Many people probably know that feeling when you wake up early on a sunny morning and a freshly prepared breakfast is waiting for you in front of your bed. A cup of hot tea will invigorate you and make your morning truly enjoyable. Typically, such breakfasts in bed are served on serving tables. We will devote today's article to an overview of the types of serving tables and how to assemble a serving table on wheels with your own hands. Let us immediately note that in order to complete the project presented below, you do not need to be a carpentry master - any man can easily cope with this.
Design options
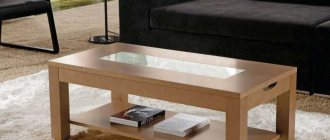
There are a huge variety of models and designs of serving tables. They can be two or three-tier, folding, with additional drawers or shelves for bottles. The stylistic decision depends on the interior design in which the table will be used.
Based on the functions assigned to serving tables on wheels, the design of such tables usually includes two shelves so that not only several dishes can fit on the table, but also drinks, serving sets and more.
Metal, glass or wood are perfect for this design. If you decide to assemble this piece of furniture yourself, it will be most convenient to use natural and environmentally friendly wood or MDF. The presence of furniture wheels will make the serving table comfortable. A handle attached to one side will help guide it while moving. And all kinds of hooks, shelves or cutting boards will add functionality.
Today you can find a huge number of different designs of serving tables, for example, with three shelves, with a stand for bottles, folding and many others.
Preparatory stage of work
The process of making a kitchen or coffee table-transformer for the living room begins with creating a frame for which soft wood is selected. This can be pine, spruce and other coniferous trees. However, if you rely on the experience of experienced home craftsmen, then linden is the best option. The main reason for this choice should be the ease of wood processing, as well as the long service life of furniture made from it.
To create a tabletop for a transforming table (a photo of it will allow you to imagine the future product), ready-made wooden furniture panels are most often used. If your skill level allows, then you can add a plastic or aluminum lid to it. Such furniture with an aluminum lid is perfect for use in the country. However, you don’t have to spend time and effort for this, because you can go to a store that sells goods for making and repairing furniture, where you will definitely find ready-made metal countertops in their assortment.
You will have to prepare not only the materials for making the frame of the transformable dining table, but also long furniture hinges. With their help you can assemble the folding lid. It is best if you choose copper or brass hinges. Of course, you will have to pay a little more for them than for similar fasteners, but you will be sure that they will last you longer.
Materials for making a transformer table
If you consider yourself one of those home craftsmen who are not accustomed to using store-bought ingredients for homemade crafts, then you will have to prepare the following materials:
- A board or ready-made furniture board 2-2.5 cm thick. If you decide not to limit yourself to using this table as a coffee table and dine at it, then you can use a sheet of thick plywood as a material for the tabletop. If you initially decided to make a dining table, then you should use more durable and reliable materials.
- Material for decorating the edges of the table top. A couple of decades ago, strips of thin plywood or thin veneer were used for these purposes. Today, every home craftsman has access to a more advanced part called a plastic edging, which you can easily install yourself.
- Beam or furniture panel for table legs. In order not to make a mistake when choosing the material for a transformable dining table for the living room, be guided by the model of furniture that you are going to make. To make the legs, you can use available materials, such as a metal pipe or corners.
- Load-bearing tires. Of course, you can make them yourself, but you will save a lot of time if you buy ready-made ones. Today, many stores offer tires made of wood and metal, which can be equipped with transformable furniture. Moreover, they often provide all the necessary fasteners, so you don’t have to spend extra money and time searching for them.
To fasten the parts, you will have to prepare nails and self-tapping screws, although you can also use a more modern option - Eurobolts. For furniture that will be used outdoors, it is recommended to use special plastic plugs in addition to fasteners.
Required Tools
To do this job quickly and efficiently, you will have to prepare a set of the following tools:
- Hacksaw;
- Plane;
- Electric drill complete with drills designed for woodworking;
- A grinding machine, instead of which you can use a special grinding attachment.
- A set of sandpaper of varying degrees of grit.
You will also need measuring tools. Therefore, prepare a centimeter ruler, a construction tape measure and a square. To meet the requirement for a horizontal countertop, you must have a building level available.
What you need to make it yourself
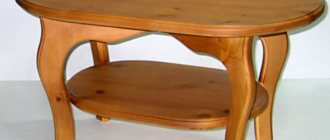
The simplest one to make would be a table made of wood. It doesn't take a lot of time or special skills to assemble it.
Almost every housewife dreams of having comfortable furniture that can be used to ensure a comfortable stay in the kitchen, living room or even bedroom.
Knowing the required list of materials and tools, having a clear drawing and a step-by-step description of the process, it is quite easy to make a table on wheels with your own hands.
The main advantages of the furniture are that it is multifunctional, ergonomic, and highly mobile.
Drawing up drawings
Initially, a detailed drawing of the future product is drawn up. At this stage, you can let your imagination run wild, or you can use ready-made schemes.
The diagram is applied to a sheet of paper indicating all the sizes of the elements, places of their attachment, and finishing materials.
Having decided on the model, it is necessary to draw a drawing on paper, indicating the dimensions, dimensions of the parts, and the places where they are fixed to each other. All these parameters must be strictly controlled in the future.
The serving table consists of an upper and lower base, connected to each other by vertical posts.
When you decide to assemble such a table for the first time, it is better to opt for a simpler model. The best option is a two-tier serving table on 4 wheels.
Dimensions:
- height 78 cm;
- length 93 cm;
- width 42 cm.
Schematic drawing of the product:
Preparing countertops
The second step in assembling a serving table with your own hands is preparing the upper and lower tabletops. In total, we will need 20 planks 10 cm wide, 18 of which should be 42 cm long and 2 planks 32 cm long. Thus, it turns out that the bases will be recessed 5 cm relative to the table tops along the long side of the table.
Assembling table tops for a table on wheels
To level the tabletop planks as evenly as possible, using clamps, temporarily secure a board of the same thickness between the table legs.
Aligning tabletop planks
Attach the first 10 pieces to the top base using finishing nails or screws.
Fastening the tabletop with finishing nails
Similarly, we fix 8 pieces in the middle of the second base and fasten two shorter boards on the sides.
Assembling the lower table top
The final step in preparing the countertops is to attach the edging along the long sides of the countertops. The length of the slats should be 93 cm.
Decorative framing of tabletops
We also do fastening with finishing nails.
Installation of flange
Materials and consumables
Billets and other lumber to be used in a project must be planed or sanded.
When the table is assembled, leveling the surface in some places will be very problematic. The next step after choosing a model and drawing up a drawing will be the preparation of the materials necessary for the work. So, you will need the following:
- boards for the frame (size 50mm x 100mm);
- boards for the table top (size 25 mm x 100 mm);
- slats for edging (size 25 mm x 50 mm);
- sandpaper;
- primer, paint;
- drills, screws, nails.
When connecting boards with screws, you should first drill holes of a slightly smaller diameter with a drill.
This will help prevent the lumber from splitting. You can get all this at a regular hardware store.
Required Tools
For convenience, while fastening the frame with screws, you can secure it with clamps.
From the tools you need to make sure you have:
- circular saw;
- drills;
- screwdriver;
- hammer, preferably pneumatic;
- grinding machine;
- office supplies.
Carpentry tools will be indispensable in your work.
On a note! When preparing for work, it is important not to forget about safety. Protective equipment such as goggles, a respirator, and gloves will be useful here.
For edging, slats are cut and fixed on the sides.
Functional aesthetics
Serving tables, due to their universal design, as well as the presence of a certain number of tabletops, are quite popular among those who want to enjoy its countless amenities. Such a table is indispensable in matters of economical use of time and space: with its help, you can simultaneously serve a significant number of dishes at a party, while, installed in the corner of the room, this compact item will not interfere with your guests.
The serving table has become an integral attribute in the catering industry, since its universal shape allows you to serve several customers at once in a matter of minutes.
This fact invariably stimulates labor productivity and evokes positive responses: both from satisfied visitors and grateful employees of the establishment.
An elegant serving table often crosses the thresholds of the private sector. This aesthetic item is needed not only in luxurious country villas, but also in cozy small apartments where guests are often received. In the latter case, an additional work area or quick setting of a mobile buffet table is often required.
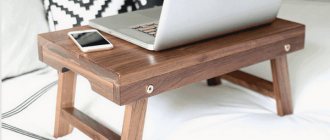
Ikea Eplaro wooden serving table (photo)
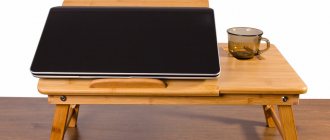
It can be used to organize a temporary workplace and a mini-playground for children. This is an absolute way out for the elderly and those people who find it difficult to move independently: it is much more convenient to bring them dishes on a served table.
This bright and “emotional” decor item, which has a simple but ergonomic design, in addition to its main purpose, can decorate any interior and serve you as an elite stand for designer small items, indoor plants, books, CDs, electronics, soft toys, etc. Further.
Step-by-step instructions for making a serving table on wheels
It is easier to divide the whole process into several stages. The first will be the manufacture of the frame:
- saw 12 blanks with a circular saw (4 32 mm long, 4 860 mm long, 4 780 mm long);
- sand the sawn boards with sandpaper or a grinder;
- assemble 2 frames from the resulting blanks, securing each with a self-tapping screw;
- connect the rectangles with 780 mm long posts, securing everything with self-tapping screws.
Use a circular saw to cut pieces for the serving table.
Important! To prevent the bars from cracking at the attachment points, it is better to first make holes for the screws.
First prepare the holes for the screws. Widen it at the base so that the screw heads do not protrude above the surface of the part.
The next stage is assembling the tabletop:
- cut boards (18 pcs. 420 mm long, 2 pcs. 320 mm long);
- cut slats (4 pieces, 930 mm long);
- fix the board (5 mm thick) on one side for leveling, because the tabletop is 10 mm larger than the base;
- connect all the workpieces one by one, recessing the heads of nails or screws;
- attach the slats to the sides - this is the edging of the table.
To ensure strong connections and the parts fit tightly together, fasten them with clamps until the glue dries.
Product painting:
- fill small cracks, uneven areas, places where screws are screwed in or nails are driven in;
- apply a layer of primer to increase the service life of the product (2 layers);
- paint the almost finished table with a brush or spray can.
Apply the substance to a dry surface.
To achieve an even and rich color, paint in two or three steps. At the last stage, the wheels (optimal diameter 80 mm) and the handle are fixed; it is better to buy them in a regular furniture or accessories store.
Today, in specialized stores you can find a huge assortment of different swivel wheels for furniture, differing in design, diameter, material, fastening design, as well as the presence of a brake.
Organizational stage of work
We will make the serving table from pine wood panels 18 and 28 mm thick. You will also need 5mm plywood for the bottoms of the drawers. We cut the lumber according to the presented drawing, observing the parameters of the workpieces indicated below.
Serving table detailing
- Bottom shelf dimensions 28x459x782 mm.
- Stationary table cover – 28x450x800 mm.
- The hinged part of the lid is 28x300x450 mm.
- Side wall – 18x430x500 mm.
- Side wall – 18x450x528 mm.
- Rotary stop – 18x120x120 mm.
- Side walls of drawers – 18x90x393 mm – 4 pcs.
- Front and back sides of drawers – 18x90x300 mm – 4 pcs.
- Rollers – 18x140x140 mm – 2 pcs.
- Racks with a diameter of 20x90 mm – 2 pcs.
- Plywood box bottoms 5x280x385 mm – 2 pcs.
Consumables
- Guides for drawers, length 400 mm – 4 pcs.
- Piano hinge dimensions 32x445 mm.
- Furniture roller 65 mm high.
- Wooden dowels with a diameter of 6x30 and 6x40 mm.
- Round wooden block ∅15x160 mm (you can use a rolling pin).
- 4 mm rail 18x40 mm.
- Duralumin tube ∅ 8, length 1770 mm.
- Rubber rings (for plastic sewer pipes, ∅ 100 mm) – 2 pcs.
- Carpenter's glue.
Serving table decor ideas
There are many options for decorating a finished serving table on wheels made by yourself. It all depends on the person’s imagination.
The choice of color for your DIY serving table is yours.
It could be:
- original painting (stripes, circles or triangles);
- the use of decoupage techniques (decorating the surface with various drawings, photographs or images prepared on special decoupage napkins);
- craquelure (creating an aging effect by applying a special varnish made from egg white or PVA glue);
- applying the ornament using self-adhesive film.
The serving table will become an indispensable assistant when relaxing in the company of friends or relatives, or watching a movie after a tiring day at work.
Which one to choose is a matter of taste and preference, as well as the interior design of the room in which the table will be located.
It should be said that tables on wheels can be both compact and large in size. It all depends only on the dimensions of the room in which it is planned to be used.
Such a convenient piece of furniture as a serving table on wheels, made with your own hands, will be useful to everyone. To do this, you will need a list of materials and tools needed for the work, a drawing, a step-by-step description of the assembly, but the main thing is desire, a little effort and effort, as well as soul.
Serving tables become necessary for carrying dishes and food when there is a need to serve customers away from the kitchen, such as in a restaurant or at an event.
Mini bar
A very useful model is a minibar on wheels. There are models on sale in different sizes and functions. A bar can usually hold up to 18-25 glasses, as well as a number of bottles. The design allows the stand to be used as a serving table.
Such a serving table - a bar on wheels made of glass, wood or metal will be a wonderful addition to the holiday table.
A mobile alcohol bar is a real pride of every home owner who wants to receive guests. This furniture is designed for storing and presenting drinks. Larger homes often have full, built-in bars that hide a large collection of alcoholic beverages.
Most often it consists of two levels. The upper level serves as a place where mostly open bottles and glasses are kept. In turn, the lower level is nothing more than a small “reserve”, used in case the party lasted a little longer than planned.