Priming the ceiling is an important and necessary process before puttying or other types of finishing work; it increases the service life of the ceiling covering. The drying time of the primer plays an important role in the finishing process. The primed surface will provide excellent adhesion to its final coating because... When dry, a dense film is created on which paint or putty adheres very well. In addition, the applied primer paint provides antiseptic, anti-corrosion and anti-fungal properties. Among other things, when some components are added to the paint, the primer can also be fire-resistant.
In order to find out how long it takes for a primer to dry, it is necessary to determine the factors influencing the drying process and at the same time know the compositions of the paints. You still need to know the answer to this question in order to correctly allocate the time for starting repairs and not waste it waiting empty near the ceiling.
- Firstly, it depends on the surface of the ceiling being treated: if it is rough or dry, then the primer will dry very quickly, if the primer paint is strongly absorbed into the surface of the ceiling, then it will take much longer to dry;
- Secondly, the air temperature in the room affects; if it is below +15 0C, then the drying time will increase significantly;
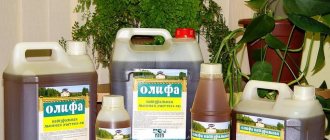
- Thirdly, before work you need to read the instructions - subject to the temperature conditions, ordinary primer paints dry completely in 4-6 hours, and those primers that contain oil paint will take about a day, alkyd paints will dry from 10 to 12 hours .
- The fourth factor in the question of how long it takes for a primer to dry is the layer of paint applied - the thicker this layer, the longer the primer will take to dry.
What is a primer
Primer is a unique composition that improves the adhesion of finishing materials to each other. In addition, the mixture has an antifungal composition that prevents mold from forming.
On a primed surface, the consumption of paint, glue or finishing plaster is significantly reduced. But in order for the primer to acquire its properties, it is necessary to wait for it to dry completely.
How long does it take to prime before painting?
They form a loose waterproofing layer on the treated surface, which effectively resists the penetration of moisture into the wall.
Deep penetration primers are used on porous and loose surfaces that need to be strengthened before subsequent decorative finishing. This primer reduces the drying time of the glue, due to the fact that when applying glue to the primer, the composition becomes more viscous. The wallpaper sticks quite firmly to the walls and ceiling. Primers with a mineral base are used as the initial material for leveling the surface. They contain cement. A special feature of this mixture is deep absorption, which allows it to tightly bind the surface. They are odorless, non-toxic, and perfectly fill the pores of loose substrates, giving them the desired density. Ideal for walls finished with chipboard or crumbling plaster. Complete drying time is about 5 hours. Primers for highly specialized applications are produced for treating metal and concrete surfaces.
What determines the drying time?
Drying time depends on several factors:
- Type of primer. The mixture differs in composition, and the drying time differs accordingly.
- Wall material. Since materials differ in their ability to absorb moisture, the time will vary from several hours to several days. Dries faster on porous, dry surfaces.
- Number of primer layers.
- Temperature and humidity in the room where the work is being done.
Varieties of mixture
Not all primers are suitable for use on drywall surfaces. Some mixtures are produced for outdoor use, and the installation of gypsum boards is typical for interior spaces. At the moment, there are such solutions and let's find out which primer for gypsum plasterboard is best suited:
- Acrylic - a universal mixture used for various substrates
- Alkyd – designed for wood structures
- Phenolic – for processing metal and wooden elements
- Perchlorovinyl - refers to universal mixtures that are intended for outdoor use
- Griftal – only external walls can be treated
- Polystyrene - there is a degree of toxicity, so it is better to use for external bases
From the above, it becomes clear that for drywall it is better to choose an acrylic primer. Before you buy a mixture, read its label and instructions - most manufacturers indicate for which surfaces their solutions are suitable. When you need a primer for drywall under wallpaper, choose colorless mixtures - they do not turn yellow, unlike white solutions. Ceresite is no exception. The same position should be followed when purchasing primers for drywall for painting. Colorless primers are called universal.
There is no need to dilute the water-based emulsion; after purchasing the material, you can apply it yourself. Penetration of the primer occurs instantly, after which no traces remain on the surface. The norm for a strengthening solution is to create a glossy film.
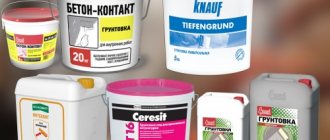
Types of primer
The primer is sold in two types:
- In the form of a dry mixture that must be diluted with water;
- In liquid form, ready for use.
The composition can penetrate surfaces up to 1 cm deep. Based on the depth of penetration, they are divided into:
- Deep penetration. Apply to wooden and porous walls. Dry within 24 hours.
- Quick drying. Suitable for metal surfaces. Dries from one to four hours depending on the number of layers applied.
- Universal adhesive compositions. Can be applied to any type of surface. Dries from 4 to 10 hours. The time also depends on the number of layers applied.
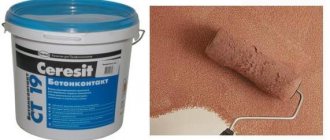
- Concrete contact. Applied to concrete walls, most often used for exterior work. Dries in 12 to 24 hours.
- Drying oil. Used for woodworking. It dries in at least a day.
General information about the process
There are certain conditions regarding preparation for priming the ceiling before painting. However, these tips, to some extent, also apply to preparing other surfaces for painting, regardless of whether the work is planned indoors or outdoors.
Surface preparation
If the surface is covered with tiles or wallpaper, then they must be removed using a spatula or drill, and the remaining adhesive must be washed off. If a simple whitewash is applied, you can wash it off with water, and then, using a spatula, remove the layer of plaster. To do this, use a damp roller or brush, and the plaster can be removed with a spatula.
Drying time on various surfaces
When working with different surfaces, it is worth considering the type of primer and its drying time. You can check whether the layer has dried with a special moisture meter.
If you don’t have such a device at hand, you should follow the instructions left by the manufacturer on the packaging.
Plaster
The plaster is based on a sand-cement mixture, therefore it is highly absorbent. The walls are covered with a thick layer of primer; there should be no dry spots left immediately after treatment. One layer dries completely in 4 hours.
If you plan to lay tiles in the future, you don’t have to wait for complete drying. In this case, the dust will settle and will not interfere with the work.
putty
Impregnation of putty walls with a primer is mandatory. Otherwise, the material will significantly increase the consumption of paint or glue during further work.
- The primer layer should be thin.
- Otherwise, cracks may form on the wall.
- The drying time for one layer in this case is 3-4 hours.
Drywall
The material absorbs moisture well, so one coat is sufficient. Dries in about 3 hours at a temperature of 20 degrees and normal humidity levels.
- If it is necessary to apply a second layer, the work should be done 4 times after applying the first.
- The lack of shine on the surface indicates that the primer has completely dried.
Tree
Wood must be primed to increase its service life. The primer has a bactericidal composition and does not allow the material to rot, and also prevents the appearance of bugs.
- Wooden walls absorb coating well.
- The composition is applied in at least two layers.
- Drying time is 12-20 hours at temperatures above 19 degrees.
Brick
For processing, universal primers or deep penetration compounds are most often used.
- Depending on the age of the brickwork, the coating occurs in several layers.
- One layer dries in 4-5 hours.
- If there is limescale on the wall, the polymerization period increases to 8-10 hours.
OSB boards
OSB boards are coated with a paraffin protective layer in production. It must be removed before applying the primer. Otherwise, the composition will not be absorbed, and the paraffin will fall off over time and the stove will become unusable.
- Most often, oil-based or synthetic-based primers are chosen for OSB processing.
- With them, the slab does not swell, and its service life increases. Drying time is 24 hours.
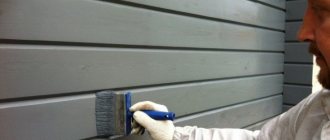
Impregnation technology
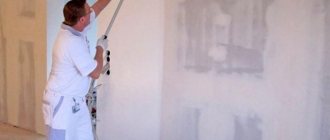
For application, use a roller with a telescopic handle or a brush. The solution is poured into a container, where a metal mesh is then placed. It traps undissolved particles that may stick to the roller. The primer is applied in vertical strokes from the ceiling to half the wall and in the opposite direction. The upper part of the surface is processed first, and then the lower part. The corners are carefully coated with a brush. The quality of the work performed is easy to track: dry places will be noticeable against the background of a wet wall. When working with a primer, you need to follow some rules: while the impregnation is drying, any temperature fluctuations are unacceptable; a draft can cause uneven fixation of the protective layer; It is unacceptable to reduce drying time by artificially heating the room. After the first layer has dried, the application process is repeated. If the surface is smooth and slightly sticky, then the walls are ready for wallpapering.
How to speed up drying
In situations where finishing work needs to be done urgently and it is not possible to wait for the primer to dry completely, you can use various tricks. But each of the tricks has its negative sides.
Heat gun
The primer dries well if the room temperature is above 21 degrees and average air humidity. But it is not always possible to create such conditions. In this case, you can use a heat gun.
The device can be easily moved from room to room. Preference should be given to a gun with a power of up to 2 kW. But it can only be used if accelerated drying is allowed according to the instructions. Otherwise, cracks may form.
When working, it is worth considering the following nuances:
- The unit cannot be directed to individually selected areas. The air should spread over the entire surface of the walls.
- The gun should only be turned on at minimum or medium power.
- The temperature should not exceed 30 degrees.
- The device should be kept away from the wall.
- Periodic ventilation is required.
Special impurities
Construction stores sell special mixtures that reduce drying time. They mix into the primer before application. See the instructions on the package for proportions.
You can also immediately purchase soil with already added impurities. In this case, the drying time will also be indicated by the manufacturer.
When working with such compounds, be sure to follow safety precautions:
- Processing should be done only with a respirator and gloves.
- Since the mixtures are toxic and can lead to poisoning.
Open windows
Depending on the time of year and weather conditions, you can open the windows to dry the primer. Excessive moisture should not get on the treated walls. And the air temperature in the room should be kept at least 20°C.
Direct sunlight hitting a primed wall can cause the composition to dry out and cracks to appear. Therefore, it is better to keep windows open in warm, but not sunny weather.
It is recommended to periodically ventilate the room. Then the coating will set faster.
Preparing the ceiling for priming
Before applying the primer layer, you need to prepare the surface:
- Remove old trim. Remaining materials must be removed from a previously painted ceiling. It is most convenient to remove wallpaper with a spatula, and paint with a wire brush.
- Clean the surface. In addition to the remnants of the previous finish, you need to remove all falling off pieces of plaster, old putty and debris. You will need a chisel and a hammer, and also a broom.
- Repair large dents. If during the previous stages significant irregularities appeared, they must be covered up. Usually they use the same mixture that was purchased for priming.
- Wait for the putty to dry completely. In the meantime, wet clean the room so that dust knocked from the ceiling does not fly into the air.
After these preparatory work, they proceed to priming.
Photo of the best primer
Useful video
And so, many novice professionals ask themselves the same question: is it necessary to prime the ceiling before painting and puttying. Is primer important or necessary? Let's find out the answer by watching the video:
So, should you prime your ceiling before painting? Need to! Even if we are talking about whether a ceiling primer is needed for painting with water-based paint, the answer will also be positive - this will help to achieve the best results. Even if you follow only the tips listed above, you will be able to cope with the repair.
However, if you doubt your abilities, then it is better to trust a professional team of repairmen who will help you renovate your apartment for a relatively small amount.
Examples of using
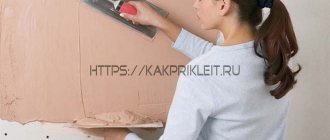
Correct application of primer
In most cases, the question of how long it takes for wallpaper primer to dry is of interest to self-taught craftsmen. Indeed, without having the proper experience, it is difficult to plan the process in advance, so it is worth leaving a small margin of time (read also the article “VD Primer AK 133-1: let’s find out more”).
Means for preparing walls for wallpapering
In many ways, the rate of polymerization depends on the application technique:
- Firstly, the material must be used according to the manufacturer's recommendations. Attempts to dilute the binder “by eye” can lead not only to slower evaporation, but also to a complete loss of adhesive properties.
- The material must be applied in a fairly thin layer, without leaving streaks or drops.
- If a penetrating mixture is used, several layers can be laid on the porous base. In this case, the second layer is applied when the first one is almost completely absorbed, but has not yet completely dried.
Application of penetrating agent
Optimal drying conditions
And yet, experienced finishers, when asked how long the primer should dry before wallpapering, give the following recommendations:
- If wallpaper glue was used as a primer, then it is quite possible to glue the trellises onto a damp surface. It is enough to let the soil soak for about 15 minutes - we will just have time to cut the roll to size and coat it with adhesive.
- If you used a contact mixture (its price is slightly higher, but it shows much better results), then it is better to wait about four hours.
- The best option for planning the work is as follows: apply the product to the walls in the afternoon, and start finishing the next morning (at least 8 hours for the solvent to evaporate). This way we guarantee high-quality polymerization and the absence of defects.
Wallpaper can be hung the next morning!
You should also follow a few simple rules:
- Temperature changes should not be allowed during drying.
- The presence of drafts in the room can cause the primer layer to polymerize unevenly.
- You should not speed up the process of solvent evaporation by heating the walls with a hairdryer or heat gun: this will only lead to a decrease in the quality of adhesion of the soil to the base.
Results
You should not skimp on primer, nor should you refuse this type of work. In terms of finances, this still won’t justify itself; there will also be costs to correct various problems with the ceiling surface.
A beautiful ceiling in a room is quite possible if the surface is primed correctly
The secret is to choose a specialized primer for your ceiling or one that has a mineral base. Universal primers are often used for ceilings. It is important to study the instructions carefully and buy the product that will match the surface. They usually decide on the spot whether to prime the ceiling plinth. It’s better to just remove it - if it comes off easily.