MesterulManole
6228 0 0
MesterulManole November 10, 2018Specialization: many years of experience in finishing work for residential and office premises, country houses, country cottages, etc. Hobby: cycling in all its forms
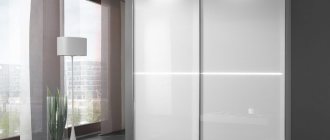
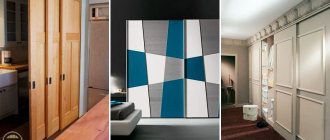
The combined facade will favorably emphasize the design of a modern interior
The popularity of wardrobes with sliding doors is growing from year to year, which is not surprising, since this furniture not only saves space, but also looks great. The attractive and modern design of sliding wardrobes is formed through the use of a variety of decorative panels. Let's look at the types of decorative panels in the design of a sliding wardrobe, their purpose and application features.
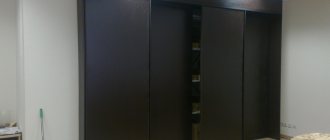
Chipboard
This is the most cost-effective type of design for a compartment door, into the frame of which a chipboard panel 8-10 mm thick is inserted. The door can be mono-filled, i.e. using one sheet of panel for the entire height and width. This version of the sliding wardrobe looks strictly, without frills. The filling of the door can be divided into fragments of different sizes, colors, shapes and even materials. For example: combine chipboard with a mirror or glass.
The average cost of a compartment door made of chipboard is 4-5 thousand rubles.
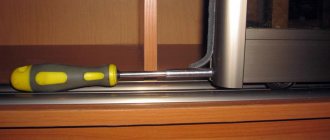
How does the stage of installing sliding doors with your own hands take place?
Progress:
- Before performing this type of work, you need to check how level the cabinet body is installed. This will require a level.
- We attach an W-shaped profile to the top cover of the frame.
- We mount the running profile horizontally on the bottom wall without securing it. Before this we install the clamps.
- We install the sliding door into the grooves of the guides, checking the angle of its inclination with a level. The adjustment is carried out using the running profile, after which it is fixed.
- Using the adjusting screw, we adjust the doors along the entire height until they are completely adjacent to the sides.
- The last stage is adjusting the clamps.
If the process of movement of the structure occurs without friction and there are no extraneous sounds, then the installation was successful.
Detailed instructions for assembling a sliding door with your own hands at home
An interesting description of a similar assembly process
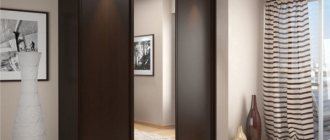
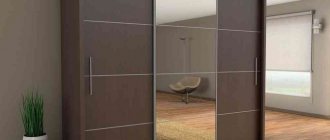
Mirror.
The mirror is quite often used in the facades of sliding wardrobes. The thickness of the mirror is 4 mm. The film on the reverse side of the mirror (amalgam) is also protective; from an accidental strong blow the mirror will not crumble, but only crack.
There are several types of mirrors used in wardrobes: regular, bronze and gray.
It is possible to apply sandblasting or stained glass patterns on mirrors.
The average cost of a mirror door is 5-6 thousand rubles.
Adjusting the lower guide roller PU04 when installing an interior sliding door
PU04 is attached to the floor using 3.5x15 self-tapping screws so that its location is clearly under the top rail. To determine whether this part is correctly placed or not, we move the partition from the open position to the closed position. When the element has taken the right place, we secure it with self-tapping screws, mounting the partition in its plane.
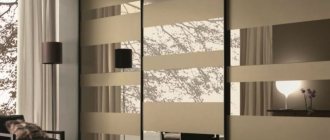
Decorative glass.
Decorative glass is a satin mirror with a matte pattern applied on a mirror background using chemical etching.
What else do you need to consider?
It's time for adjustments, now we eliminate the gap between the baffle and the bottom roller. There is play between these elements. To adjust this area, place the tip of a flat-head screwdriver into the end of the wheel plate (opposite the ellipse-shaped groove).
Using a hammer, rotate the roller body relative to the central hole. Gently tapping the tool, we remove the gap. We remove the partition again and tighten the screws until they stop to firmly fix the lower wheel. We install the structure in place.
You can view the assembly instructions in more detail in the following video.
Now you know how to assemble not only compartment doors, but also sliding interior doors with your own hands, and you can easily do it at home!
Sandblasting drawings.
Sandblasting of glass is a matte and rough-to-the-touch pattern that is applied with a jet of sand on a 4 mm thick mirror in a special chamber. There are a huge number of drawing templates.
There are several types of application of patterns: on the front side, on the reverse side, on the back side (according to the shape of the pattern, a stream of sand destroys the reflective film - amalgam), matte pattern on a mirror background, mirror pattern on a matte field (the field around the pattern is processed, the pattern itself remains untouched) , deep drawing (a relief is created on a mirror field), the use of paints when processing sand, the so-called matting.
.
The average cost of a door with a sandblasted pattern is 12-13 thousand rubles
How do you adjust the height of an interior sliding door with your own hands? Detailed instructions
To secure the door leaf of the system to the ceiling, two rollers are installed in the upper running guide. We fasten it to the ceiling with self-tapping screws, after which the system is suspended on the tetrahedral head of the roller screw.
The system is attached to the bracket with a fixation nut in exactly this position.
By rotating the bushing for adjusting the partition in height, we carry out debugging. We fasten the roller to the bracket with a fixation nut so that the partition bushing is held in height.
Materials and sizes
Doors for a cabinet built with your own hands are not as complicated as the owner might think at first glance. However, in this case, preparation is important, which includes the acquisition of all materials and accessories, as well as the selection (calculation) of the dimensions of the compartment doors.
Materials for making doors
This is the first stage that you need to go through if you plan to make furniture with your own hands. There is a choice: you can use several suitable materials to create cabinet doors.
- Chipboard is a traditional candidate. These boards are the most common and convenient material, so they are often purchased for making various furniture. If the master does not yet have experience in this type of work, then chipboard will be the best choice: working with them is relatively easy. The best option is the most secure laminated panels (LDPE).
- MDF. This material is of higher quality, but the price is also less attractive. If you just make the doors out of MDF, you can save some money on cabinet assembly, but the doors will look better.
The last contender is a massive tree. This is the beauty leader on this list, but working with such an expensive material requires a lot of experience. So for beginners, chipboard or MDF is more suitable.
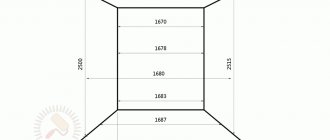
Dimensions
Width is a parameter that depends more on the size of the furniture, but there is no limit. However, there are a number of recommendations for creating a design that will be as convenient and hassle-free as possible.
- The optimal minimum width of one door is 500 mm. Yes, the master can narrow it, but in this case the sheet may become deformed and then simply “slip out” of the guides.
- The maximum recommended width is 1100 mm. But even this size is not the best option, since the owners will have to put in a lot of effort, and for small family members, “filling up” the wardrobe can become an unattainable goal.
If we talk about the recommended sizes in which you will not have any difficulties when operating the “warehouse”, they are in the range from 600 to 900 mm. The width of the furniture affects the number of doors. When the doors are open, they should not block access to the contents of the cabinet.
As for the height of the doors, in this case there are no strict restrictions. This parameter depends on the height of the ceilings or the height of the furniture being installed, so this measure is chosen by the owners themselves.
Opening requirements
They are much stiffer than traditional swinging structures and even stiffer than horizontal surfaces. The original dimensions remain the length of the opening and its height, but the top and bottom edges must be ideal along the entire length.
Small vertical deviations in the side walls will not affect the cabinet doors too much. It is not difficult to cover these imperfections with decorative trim. However, even a small horizontal difference can cause the cabinet doors to gradually come off. The worst-case scenario is that they jam. To avoid such consequences, the top and bottom profiles are often mounted on adjustment bars. The first, “cheapest candidate” is an element made of chipboard.
The width of these strips is selected depending on the system; the standard is 100 mm. If you select this option to compensate for unevenness, the height of the opening is measured after installation is complete. The second method is to subtract their total thickness from the previously measured opening height.
Filling corner wardrobes
Examples of corner compartments of different shapes
Corner storage systems benefit from the fact that thanks to them, the maximum space in the room is filled, including the corner area.
Example of a corner storage system
If you make the corner closet deep, it turns into a mini dressing room. It is convenient to place not only a clothes rail, but also open shelves, closed drawers, shoe baskets and long upper shelves for storing suitcases or hats.
Inside the corner cabinet you can store an ironing board or vacuum cleaner
It is not necessary to cover the entire floor of the compartment; you can make a corner wardrobe of this shape
The corner storage system can be made in any shape to suit the design of your home.