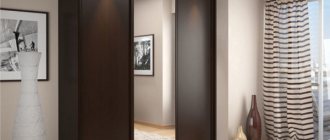
Sliding wardrobes are increasingly appearing in modern apartments to replace traditional wardrobes. However, the advantages of such cabinets in the form of a convenient storage system and compact size do not exclude the disadvantages in the form of frequently observed problems with door adjustment.
Doors in closets can bend, pop out of their tracks, squeak, and have other sliding problems. Most of these problems are quite capable of being solved by the owner of the cabinet himself, having a basic understanding of the functioning of the structure.
Today we will talk about how to deal with ordinary faults in wardrobe doors and successfully adjust them.
Adjusting wardrobe doors
Possible problems
Installing sliding doors in a wardrobe is one of the most difficult moments when assembling this piece of furniture. It is these components that tend to periodically break or become deformed as a result of improper installation or subsequent careless handling. Even those owners who used the cabinet very carefully sooner or later may encounter phenomena such as:
- lack of smoothness;
- skewed door leaf;
- lack of door locking when closing;
- peeling off the buffer tape
- the web jumping off the guide track;
- the appearance of extraneous sounds.
To adjust compartment doors, you do not need in-depth knowledge of its functioning.
Fortunately, all of the above shortcomings can be eliminated, moreover, with the proper skill, you can do without calling specialists. It is enough to have among the tools such basic items as a hex wrench and screwdrivers of different calibers.
Warp door leaf
This problem manifests itself in most coupes due to loose closure of the door and the side pillar at the top or bottom. In order to correct this situation, adjustment is applied using a screw located at the bottom of the door.
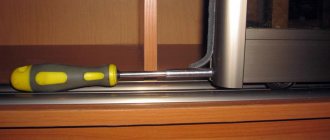
Step 1. Peel off the buffer tape, under which you will find two holes. The hole on top is intended for assembling the door, while the task of the bottom is to adjust the location of the roller (higher or lower). It is the bottom hole that we need.
Holes for assembly and adjustment
Step 2. Take a hex wrench designed for confirmations. You can take either a C-shaped or L-shaped option.
Set of keys
Step 3: Insert the key into the bottom hole and start turning it. The direction of rotation determines the change in door position. When rotated clockwise, the door will begin to rise; when rotated counterclockwise, the door will begin to lower.
The direction of rotation of the key determines the movement of the door
Step 4. Rotation must be carried out until you are sure that the door is tightly adjacent to the side post both at the top and bottom to avoid further distortions.
Closing from above
Closing from below
Step 5. Inside the rails you can find stoppers (steel springs), the purpose of which is to hold the door leaf and press it against the side post. If the stoppers have not been adjusted or for some reason are not working properly, the door will not stop in the place intended for it.
Stopper
Step 6. In order to move the stopper, take a piece of plastic or fiberboard (some craftsmen prefer to use a screwdriver or even a knitting needle). Press the plastic against one of the edges of the stopper and move it in the desired direction. At the first attempts, you may end up with an undershoot, so after each movement of the plastic it is important to check the movement of the door in practice and correct the result if necessary.
Adjusting the stoppers using a piece of plastic
This instruction solves two possible problems at once - the door is skewed and the doors do not fit tightly, which is a natural consequence of the skew. The number of stoppers directly depends on the number of door leaves, therefore, in cabinets with several doors, for proper operation of the mechanisms, it is necessary to periodically check all the corkscrews.
Peeling off the buffer tape
There are several ways to return the brush or schlegel to the correct position:
- If the length of the tape allows, it may be enough to simply tuck it into the hole. This method is not the most possible of all, since over time the brush can simply get knocked out;
Inserting the boot into the hole - applying super glue. When distributing it, it is important to ensure that the product does not fall into the hole for adjusting the height of the door, which we talked about in the previous section. Otherwise, subsequent corrections to the skew will be very problematic;
Using superglue to fix the boot - use of clothespins. You can easily purchase clothespins at any furniture store. In order to use them, you should fix the door with a wooden wedge. After fixing, take a clothespin and put it on the brush and profile with the cut facing you. Upon completion of the procedure, make sure that the door roller can fit into the rail grooves.
Fixing the door with a wooden wedge
Attaching clothespins
Installing a stopper (latch)
The stopper is needed to ensure that the door is fixed in the closed position and held tightly without forming a gap with the touching side.
How to install
Install them in the groove of the lower guide (where the wheel goes), one stopper for each door.
We insert one stopper into each groove, screw the bottom guide, install the doors and adjust the latches, ensuring a tight closure.
In order to accurately place the lock in the right place, completely close the compartment doors and mark the center of the wheel on the guide below, and install the stop there, centered on the mark. You can move the stopper in the groove with a flat screwdriver.
Video - Adjusting wardrobe doors
Extraneous sounds
Despite the fact that many owners of sliding wardrobes are not bothered by the presence of creaking and other sounds when the doors move, this condition indicates that there is a malfunction somewhere in the mechanisms. Normally, doors should move smoothly, quietly and without any vibration or bouncing. Any of the listed “symptoms” speaks in favor of weakening of the fastening elements, which may soon make itself felt in the form of more serious manifestations.
Fittings and fasteners for sliding wardrobes
In order to eliminate this unpleasant phenomenon, it is necessary to adjust the roller mechanism responsible for the smooth movement of the sashes. In order to carry out this task, you must first remove the doors and thoroughly tighten the fastening. When tightening, it is important to ensure that the overhangs of the rollers on all sides are symmetrical to each other. It is the absence of an overhang on one of the sides or the misalignment of one of the rollers that provokes “interference” when the doors move.
By the way! Sometimes the cause of squeaking is a simple lack of lubrication on the rollers.
Roller lubricant
Removing the doors
Learning how to remove and put on wardrobe doors is very important, since you may need this action more than once when repairing or adjusting some parts. When moving the door leaf, it is very easy to make a mistake, which can result in related problems such as the door skewing or even falling out. In this regard, it is important to adhere to a fixed procedure.
Step 1. Lift the door, then feel for the wheel, and then carefully remove the wheel from the guide. Repeat this procedure for all of your closet doors.
When lifting the door, avoid sudden movements
Step 2. Holding the door on both sides, lift it up, then pull it towards you.
To prevent the door from sagging, it is important to grab it at both ends
Step 3. When putting the doors back, start inserting them from the top guides.
Returning the door to its place begins with the upper guides
Step 4. Once the door fits into the tracks, place the wheels on the prepared rails.
The further movement of the doors depends on the correct location of the wheels.
Please note that different wardrobes have their own specific mechanisms, so there are no universal instructions for disassembling them. Above we indicated the most general procedure.
Time frame for eliminating the defect
Even those deviations in functioning that seem insignificant to you require attention. The fact is that the longer the defect manifests itself, the more damage it causes to the mechanisms, as if gradually wearing it out. The result of ignoring obvious interference may be the failure of the entire sliding system as a whole, which will no longer be possible to cope with without a specialist.
The further period that the cabinet can serve you depends on the timeliness of adjustment.
The web jumps off the guide track
The jumping of the canvas and the lack of smooth movement of wardrobe doors are often explained by the same reasons:
- entry of foreign objects into the lower profile (from accumulation of dust and wool to chewing gum, parts of children's construction sets, etc.). When colliding with an obstacle, the door either literally jumps out if the object completely blocks the rail, or jumps, which also indicates the presence of extra objects;
Profile blockage is one of the most common causes of door jams - sudden closing and opening of doors. If you handle the doors carelessly, a reverse inertial movement periodically occurs, throwing the door up and causing it to fall out. At the same time, it almost never falls out completely, due to fixation using the upper guides.
Wardrobe doors are not designed to withstand harsh handling.
Removing debris from the lower profile is quite easy:
- remove the door from the cabinet according to the step-by-step instructions indicated in the previous chapter;
- remove the foreign object. This action is not always the easiest, especially when it comes to sticky gum. In extreme cases, it is necessary to replace the entire lower profile;
- to improve sliding, you can lubricate the rails with paraffin or graphite lubricant;
- put the doors back in, starting from the top rails and ending with the bottom ones.
Regular paraffin is excellent for lubricating rails.
Making a stand for an aquarium with your own hands: what to especially pay attention to
But when you have a compartment with at least 3 doors or more, then every time you open and close you will have to expose these sliding panels. If there are no stoppers, they will move freely along the upper or lower rails. Add to this the cases when the frame is not aligned strictly horizontally, which is why you will definitely not be able to position the doors perfectly evenly. Therefore, the stopper is deservedly considered an indispensable component of the wardrobe. In addition, you can install fittings with a shock absorber (closer) to bring the cabinet to perfection.
Types of doors
Despite the fact that for a person who is not experienced in the design options of sliding wardrobes, all doors are almost the same, this is far from the case. At the moment, there are four main types of doors for such cabinets:
- hanging;
- with an overhead profile;
- frame;
- coplanar.
The main difference between them lies in the method of their installation and further functioning. We will reveal each of the mentioned types in the table below.
Table 1. Types of doors for sliding wardrobes
| Door type | Description |
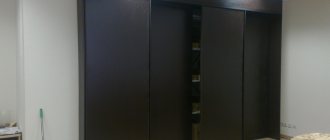
| Hanging doors have the simplest design and low cost, which explains their wide popularity on the Russian market. At the top, on the inside, hanging doors are suspended using rollers, and at the bottom they are placed in guide corners. Parts of hanging doors are mounted right under the ceiling. Due to the fact that this type of door is often made from chipboard, they are susceptible to bending and getting stuck if not placed perfectly on the floor |
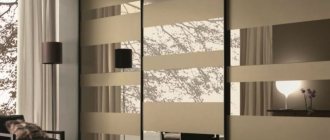
| The purpose of overlay profiles is to correct the main “sin” of sliding wardrobe doors, namely bends. Due to the fact that additional fixation in the form of profiles appeared at the edges of the doors, the system actually became more reliable, but also became significantly heavier. This type of door is placed on rollers both above and below, but it is the lower rollers that provide support, while the upper ones act as additional support. The rollers themselves are attached to the chipboard panels with screws. The disadvantage of the overlay profile is the ease of the doors jumping out of the rails at the slightest obstacle |
| Frame doors are considered the most durable, since in addition to a horizontal profile they also require a vertical one. The changes also affected the rollers - now they have special tendrils that prevent deformation, distortion and falling out of the doors. Such antennae are a kind of stopper that protects mechanisms from damage and deformation. Due to the use of aluminum in the manufacture of profiles, the structures have become lighter and easier to handle |
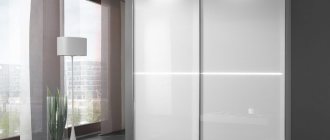
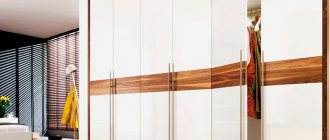
| Coplanar doors resemble monolithic panels, due to which they fit perfectly into minimalist interiors. A distinctive feature of this system is that the canvases are always on the same level, without overlapping each other. Cabinets with coplanar doors belong to the elite segment and are rarely presented in most furniture stores. The weight of such structures sometimes reaches 70 kilograms, which makes them not the most easily transportable objects. Installation of such doors occurs via a monorail system. Both rollers and ball bearings are used to slide the elements, allowing the doors to move more smoothly |
Closer for sliding system
This is a whole system that includes stoppers, limiters, latches and other elements so that the doors automatically close smoothly and are comfortable to use. Every third model requires several closers at the same time due to the need to close the doors in different directions. Adapters that regulate the operation of the system are installed in the upper part of the cabinet, and the closer is installed in the upper part of the guide yard.
It is worth noting another significant role that is controlled by the automatic system - security. This device minimizes the likelihood of injury when closing the cabinet abruptly.
In addition to providing safety to the owners, the structure itself has an increased level of protection against loosening. This opportunity arises due to the shock-absorbing effect that is introduced into the automatic door closer systems.
Wardrobe care
In order for the cabinet to serve you longer and not require any intervention from the master, it is important to maintain it in good condition. A common mistake is to believe that it is enough to put this piece of clothing and do nothing with it for it to last for decades.
Proper care of your wardrobe will allow it to maintain its original appearance for as long as possible
The sliding wardrobe does not require much attention, but it does need to follow some rules:
- cleaning the inside of the closet 2-3 times a year;
- periodic ventilation of the room and control of air humidity;
- washing surfaces in case of stains;
- uniform load distribution.
Cleaning
Cleaning primarily means cleaning the guide rails, which we have already discussed several times above. They can become clogged either as a result of large objects entering or as a result of dust accumulation. To ensure the most effective cleaning, it is most convenient to use a vacuum cleaner with removable attachments.
Over time, wardrobes tend to become clogged, especially the guides
However, if you wish, you can get by with an ordinary small broom. In addition to the guides, it is also advisable to rid the closet of excess dust, both outside and inside, so that it does not settle on clothes and other items stored in it.
Buffer tape sticker
A buffer tape is absolutely necessary; it will protect the interior of the cabinet from dust, as well as soften the impact of the door on the side when closing.
They glue it at the very end, when access to the adjusting screws is no longer needed, because it covers all the holes on the vertical end of the door.
There are two types of buffer tape, differing in pile length:
- Short (up to 6mm)
- Long (up to 12mm)
If possible, when ordering your system, purchase long-pile buffer tape. Although it is not often used, the long pile will provide you with more comfortable use of the cabinet.
The color of the buffer tape is selected depending on the color of the system.
Gluing the buffer tape will not take you much time. Remove the protective film from the back of the tape and glue the brush onto the vertical end of the door.
This is where our work ends, we remove the protective film from the profile, use a rag and glass washing liquid to bring the mirrors to a perfect shine - and our closet can be hung with things.
Brush seal
The buffer tape is an integral part not only for silently closing doors, but it is also what prevents dust from penetrating inside the cabinet. When choosing between various types of this element, it is worth choosing a solid tape with a long pile.
There are no less important stages in the overall design. Therefore, it is important not only to buy high-quality products, but also to understand the purpose of each individual element.
Now we have reached the final stage of assembling our cabinet. Today we will install one mechanism, thanks to which this product is called a sliding wardrobe - a sliding system.
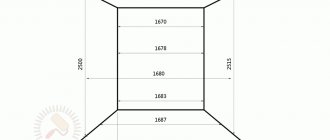
So what do we have? We have a fully assembled cabinet, but without a system. The actual size of the opening for installation was H 2318 mm (height) by L 1320 mm (top width) and L 2315 mm (bottom width). According to the drawing, this size was H 2318 mm by L 1318 mm.
As you can see, our actual width is slightly different from the planned one. By +2 mm (along the upper width), and by -3 mm (along the lower width). But there's nothing wrong with that. We order the system according to the planned opening H 2318 mm by L 1318 mm.
The need to protect furniture
A small child finds everything that happens around him interesting, so situations often arise that threaten the baby’s health. The time when children begin to crawl and walk is considered especially dangerous, since the danger will be from sharp corners and doors of furniture, sockets, and household appliances. Young children especially actively begin to explore the world from the contents of the closet and shelves. Some things can be removed or moved higher, but the sharp corners of tables, sofas, chairs, and drawers remain.
Even if you protect sharp furniture elements, the question arises regarding the contents of cabinets, cabinets, and drawers. The baby can open the door and easily get to small items, dangerous devices and valuables, and medicines. Therefore, it is important to take care to make it difficult for a child to penetrate into pieces of furniture.
To reduce the risk of injury to a child, caring parents resort to tricks - installing protection, limiters and blockers. Sometimes such devices are made independently, but a more reliable option is special products that can be purchased at hardware stores.