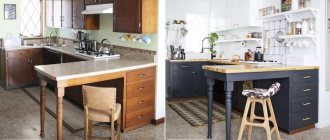
Restoring wooden doors may be required not only if you want to save money by not buying new ones. But also when they are of historical, architectural or simply family value. Also, old doors and, accordingly, openings are of non-standard sizes, so new ones need to be made to order, which seriously increases costs. It doesn’t matter what reason prompted you to think about the possibility of repairing the door, returning it to its former appearance, or vice versa – changing it beyond recognition, fitting it into the updated interior. What matters is how to do it.
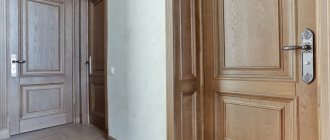
Doors before and after restoration Source fondvnimanie.ru
How to cover cracks in a wooden door?
The interior door is not the last element of the interior.
Not only the color, design, and material of the door are important, but also the quality of installation. Proper installation and installation is half the success. When installing a door, various situations arise: incorrect calculation of parameters, installation difficulties, force majeure situations. As a result, the outcome may not be as rosy as initially thought. The resulting cracks spoil the appearance of the room, and not everyone knows what to do with them. The article discusses the most common causes of cracks and ways to eliminate them.
Very often, before painting the floor, the question arises of how to repair the floor. During their service, the boards dry out and begin to creak, and this is an absolutely normal phenomenon. As technology develops, methods become even more advanced. Therefore, when the need arises to eliminate a defect, you just need to choose the method that you like best.
General scheme for eliminating cracks:
- Prepare materials.
- Clean out cracks.
- Fill them out.
- The material must dry.
- Sand, remove roughness.
- Paint it.
Types of floor reconstruction
Wooden floor repairs can be divided into:
- Dismantling and sorting out all the floorboards. Such large-scale work should begin if the crevices have reached enormous sizes. The boards must be carefully and thoroughly sorted out, unevenly dried edges must be planed, and only intact and strong floorboards must be left.
- Partial dismantling. It is carried out when wide holes and creaks appear.
- Filling a small number of small gaps. Most often used.
Methods
It should be remembered that there is always a little space left between the boards for ventilation and in case of natural expansion of the boards. If the cracks become too large, then they need to be sealed.
- Construction foam. The cracks can be sealed with construction foam. First you need to dismantle the baseboard, then clean the cracks, and then foam them. You can put some foam under the foam. After drying, you need to remove excess foam and putty on top to make it airtight.
- Glue + sawdust. Troubleshooting is carried out using adhesives. There are two types:
- Sawdust swells for two hours in boiling water, then stirs well. Pour PVA or wood glue into the swollen mass and knead until a viscous consistency appears. The mixture is applied to the cleaned surface, carefully compacted into the gap, but without effort. After complete hardening, remove any unevenness, for example, sand it with sandpaper.
- You can make a mixture of glue, cement and sawdust. Coloring agents can be added to the composition. The method can also be used to create a perfectly smooth floor.
3. Wood putty. If they are small in size and there is no desire to prepare repair mixtures yourself, then you can buy putty. It is important to take into account the nuance: over time, the putty cracks. It is optimal to use it if the floor is eventually covered with plywood.
4. Paste and paper. The easiest and most inexpensive way. The paper is filled with water. While it swells, a paste is prepared; copper sulfate is added to it (approximately 1:10). Vitriol will prevent the proliferation of insects. Then the paper pulp is wrung out, added to the paste and mixed.
5. Cord . A long-proven folk method, it is used to eliminate cracks not only on the floor, but also in wooden walls. First you need to select ropes of the required diameter and length. Coat the cord with glue. Then putty, sawdust and glue are mixed. The rope is buried in the crevice, and the remaining space is filled with the prepared mixture.
6. Wedges . A rather complicated method, which implies that the cracks will be clogged with thin slats, which are hewn to look like a wedge. It is very important to correctly and accurately adjust the wedges to the size of the gaps. Be sure to treat the wedge and the gap with glue, then glue the strip into the gap and tap it with a rubber mallet. If the wedge does not go in completely, the excess material can be removed with a plane.
Other repair methods
You can purchase other materials at hardware stores and use other methods to remove gaps.
- Tow . A widely known linen material that has not lost its demand even against the backdrop of the emergence of new modern compositions. Tow can be compacted into the cracks using any available means. For reliability, it needs to be treated with wood glue.
- Cement and epoxy glue. The two ingredients are mixed in equal proportions, perfect for masking small crevices. The mixture must be poured taking into account the fact that after drying there will be natural subsidence.
- Plywood . A last resort when there are too many of them. The plywood is attached with self-tapping screws and immediately covers all imperfections in the floor.
- Sealant with a nozzle in the form of a syringe. Acrylic and silicone based sealants are ideal. They close cracks without any effort. This is a material with a long service life, very reliable and proven.
Gaps in a wooden floor can appear at any time in any area. Before starting work, it is necessary to evaluate the materials for eliminating defects, their locations and disassemble step by step the technology for eliminating floor defects.
Decoration
To complete the door repair you need to restore the coating; this can be done in several ways:
- painting;
- stain;
- varnish;
- cladding with other material.
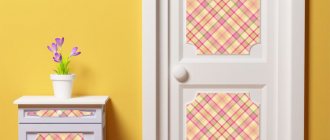
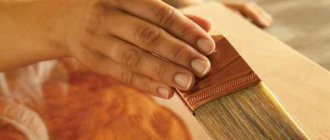
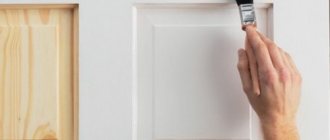
If we are talking about a wooden door, it is best to carry out repairs using already tinted putty; in this case, it will be enough to open it with varnish. You can update the surface with stain. Be sure to treat the door leaf with a water-repellent antiseptic. If we are talking about dyed canvas, there should be no problems at all, the main thing is to choose the same color of the composition. If you decide to patch the hole, you can apply a pattern over it to disguise it.
Door defects can be easily masked using a drawing or sticker
For chipboard, an excellent way out of the situation is to replace the front covering; laminate is usually used for this purpose. However, wooden doors can also be updated by covering them with veneer or film, at the same time you will be able to repair minor defects.
High-quality repairs will allow you to repair visible defects and extend the service life of the structure as a whole.
We recommend watching the video:
Standards for gaps between canvas and frame
Any door is characterized by a gap regulated by GOST, which is necessary for comfortable opening and closing of the product. Wood products are prone to swelling and drying out, which leads to the loss of their original qualities and structure. Even at the installation stage, experienced specialists recommend competently forming a doorway, the correct size of which depends on the dimensions and weight of the doorway. A slight upward deviation from GOST is allowed, provided that the humidity in the room with insufficient ventilation is high, and the door leaf or frame is made of wood materials that are hygroscopic.
Before thoroughly sealing the slopes of the opening, check whether the gaps between it and the door comply with the standards prescribed in GOST.
In order to improve ventilation, the gap between the lower edge of the canvas and the floor can be increased to 40 mm.
Chipboard repair
A common problem with chipboard doors is soaking and delamination; how can you repair such a door yourself? To do this you will need glue and a syringe. It is recommended to remove the canvas from its hinges. Using a syringe, pour glue into the structure of the exfoliated material, then press the sides and place the door under the press. Once the glue has dried, apply protective tape to the edge to prevent it from breaking again.
Delamination is the most common problem with chipboard doors.
Chipboard doors are not very reliable and are not recommended for use in rooms with high levels of humidity.
How to seal cracks in a house?
Next, let's look at the best way to seal cracks and crevices in a wooden house:
Caulk. It is a good insulator.
Moss and tow . They are considered classic materials for insulating a wooden house, as well as for sealing cracks and cracks. These materials do not interfere with the aesthetic appearance of the building.
To seal cracks and crevices
with moss , it is first dried and then soaked in water before use (30 minutes).
Then the water is drained from the container with the moss, the moss is squeezed out and rolled up with a roller. The rollers are placed in cracks and crevices, compacted with a hammer or mallet, and everything is left to dry.
After three days, the dried excess material is cut off.
Instead of moss,
tow or jute fiber .
Tow is sometimes filled with cement mortar or plaster or left as is.
Using a nail, knife or awl, they check the quality of one of the above and stick it between the beams or logs.
The tip of the product should not pass straight through.
Gaps or cracks are also removed using
sealing , that is, first the edges of the gap are covered with masking tape, then a tow of tow or jute fiber is compacted into the joints, cracks or crevices, and only then a sealant is applied with a spatula.
Seams, cracks and crevices are not completely filled with sealant to the edges, but it is applied so that it touches only two points of the tree. All is left to harden for 6 hours, and then this place is painted over with suitable paint. If during the work the sealant still gets onto the surface of the log or timber, it should be removed using fine-grained sandpaper.
Since silicone sealant cannot be used for wooden buildings,
acrylic sealant . This sealant is colorless and odorless and therefore safe.
Acrylic sealant does not react to temperature changes, dampness and holds the walls of wood very well.
Folk remedies
- Vinegar and olive oil will mask minor scratches and imperfections. Mix the components in proportions of 1 to 3 and rub the resulting composition onto scratches on the door or furniture. Then wipe the surface dry with a clean cloth;
- Walnut quickly fills scratch grooves and leaves no marks. The treatment looks natural and natural. To do this, cut the nut in half, gently rub the half with light pressure on the damaged areas and wipe with a dry cloth to remove the oily residue. You can cover this area with a thin layer of wood varnish;
- Iodine will help restore dark wood. This is walnut, oak or mahogany. Take an old toothbrush or other small brush, soak it in a weak iodine solution and treat scratches on the countertop, cabinet, door or other wooden products;
- Mayonnaise eliminates cracks. Fill the grooves with the product, remove excess and leave for two to three days. Due to the protein, the tree swells and closes the cracks on its own. After this, remove the remaining mayonnaise and polish the surface;
- Mix cigarette ash or toothpaste with water until a thick mass is obtained. Rub the resulting mixture into the damaged area and leave until dry. Remove excess and polish the surface;
- Black tea also helps remove scratches. Pour 35 ml of boiling water over one tea bag. Leave the composition to brew and gain strength. Then apply tea leaves to the affected areas using a cotton pad and wait until dry;
- Homemade mastic made with your own hands. To prepare the mixture, take 40 grams of solid wax and melt it, or use ready-made liquid wax, but it also needs to be heated. Add 30 grams of turpentine and a teaspoon of alcohol to the solution, mix. The product is applied warm to the affected area and distributed over the surface, then rubbed with a napkin until shiny;
- Sandpaper will remove all damage from wooden surfaces. To do this, use fine-grained sandpaper, which is used for finishing sanding, with a number P 600 and higher. Moisten the sheet and work the surface along the wood fibers. Finally, walk around the defect to smooth out the marks and buff the piece with a cloth.
How to do the job yourself: instructions for sealing
In addition to these methods, you can use silicone paste to seal cracks in interior doors. It is sold in tubes, but you will need a special gun to work.
- In order not to stain the canvas and trim, you need to treat them with Vaseline or stick on masking tape.
- Charge the gun, adjust the amount of incoming material.
- Apply the paste at an angle of 45 0, slowly moving it over the surface, without unnecessary haste.
- The door is kept closed until the material dries, the period is indicated on the packaging or in the instructions.
- After this time, you can open it and then remove the excess paste.
This method is simple, but provides high-quality sealing. Good for rooms with high humidity, such as a bathroom or kitchen.
After all, plastic is a cheap and simple material that is suitable for most modern interiors. Molding is applied to close the gaps. You need to determine its size, shape and color. You can secure it with nails or glue. There is no need to perform any special actions. Sometimes you can make plastic slopes:
- install guide profiles on the prepared surface;
- cut parts from purchased plastic with a jigsaw;
- work starts from the side walls from the entrance and ends with the ceiling;
- close the edges with special corner-shaped plugs;
- Apply sealant to all seams and joints.
Extras have also become popular. They can be attached either to the frame or to the doorway itself. They can be held in place by mounting glue or self-tapping screws (at the owner’s discretion); the caps can be closed with plugs or putty.
- on ordinary ones they resemble slats with veneer;
- telescopic or stacked - they widen the opening, similar to lining;
- combined - rather, they look like a decorative corner.
When attaching extensions, the vertical of the wall cannot have a deviation of more than 4 mm , so it is necessary to take accurate measurements. After all the calculations of the work, you must carefully and consistently adhere to this algorithm of actions:
- Cut the board into pieces of the desired size.
- The box is mounted and the accessories are attached to it.
- The resulting structure is installed in the opening.
- Wedges are placed in the space between the walls and the structure is adjusted until the required position is achieved.
- The entire space between the wall and the box is foamed in three stages. Each subsequent one is applied strictly on the completely dry previous one.
- The surface is plastered.
- Closed with platbands.
This method allows you to make all doors in the same style. It is important to take measurements and installation correctly. Plus - the color of the material and texture can be taken similar.
If you plan to use an extension, it is better to buy a door frame with a groove, which will make it easier to install additional parts.
There are many ways to beautifully and neatly close cracks in an interior door. From them, you can choose one that will be closer to the interior design, will be affordable, and will decorate the room. Any of the described options is widely used when repairing and installing doors.
Video description
If you are wondering whether it is possible to restore interior doors that are over a hundred years old, watch this video:
Restoring cracked panel doors
If the panels dangle in the grooves of the main planks, the canvas will have to be disassembled and reassembled and glued.
The panels are held in place by a tongue and groove joint lubricated with glue, and are sometimes tightened with dowels or self-tapping screws, the caps of which are closed with wooden plugs. To restore the integrity of the door, you need to do the following:
- The removed canvas is placed on the edge, the plugs are removed and the screws are unscrewed;
- separate the frame elements and inserts;
Eliminating cracks around the door perimeter
Even after high-quality insulation of the door leaf, cold air will continue to enter the home through large gaps between the door and the frame. The easiest way to solve this problem is to use a special seal: thanks to it, you can achieve complete tightness of the door block and significantly reduce the level of heat loss. This material is presented on the building materials market in several varieties, the installation of which is slightly different from each other.
Insulating the door around the perimeter
Self-adhesive tapes
The simplest and most inexpensive option for sealing the door leaf around the perimeter. To make such tapes, rubber or plastic can be used. To simplify its installation, an adhesive layer is applied to one side of the tape. The width and thickness of the tape may vary, which allows you to choose the most optimal option for a particular case. It should be taken into account that this seal has to be replaced periodically (this is especially true for frequently closed entrance doors, which causes compression of the gasket material).
The procedure for installing self-adhesive tape is as follows:
- Preparation of the area to be finished (end of the door leaf). It is cleaned of dirt and degreased.
- Taking dimensions and cutting off the seal. It is recommended to cut the strips with some margin (5-10 mm).
- Gluing strips. It is more convenient to start work from the upper corner of the canvas. The protective film is not removed from the entire segment: 5–10 cm is enough. After this, the tape is applied to the doors and carefully glued, gradually removing the protective paper. During the gluing process, the strip must be pressed tightly.
- The areas where the loops are located are glued along the outer plane of the stopper. Corners must be trimmed carefully.
A cheaper option for insulating tape are products without a self-adhesive base. They are mounted in a similar way; nails or special glue are used for fixation.
other methods
A more reliable option for eliminating cracks around the perimeter of entrance doors is the so-called. "floor planks". According to the type of construction, they are wedge-shaped and external; according to the material used for manufacturing - plastic, metal or foam. They can be replaced with strips of felt, wooden glazing beads, etc. The main thing is to use screws or nails rather than glue as fastening.
Installation of floor strips
Glass replacement
Old cloudy or broken glass is easy to replace yourself. Instead, you can put a new one of any type (plain, multi-colored, smooth, embossed, tinted, sandblasted, transparent or matte). It is irrational to change glass 1 cm thick, since it will be expensive and you need to have certain skills.
Glass with glazing beads
Replacing glass that is secured with glazing beads is the easiest to do. First, they are dismantled, removing the fragments by hand. After this, you need to take pliers and a metal spatula and use them to pry the glazing bead. Use pliers to carefully pull out the nails, clean the opening with a knife or chisel and measure. For a non-standard opening, a shaped pattern is cut out of cardboard, but you need to take into account the dimensions of the glass, which should be slightly smaller than the opening. After washing and drying the glass, the design is transferred from the pattern and cutting is performed. To avoid damaging your hands, you need to use gloves and work with a working glass cutter on a flat surface.
Fastening glass to glazing beads
The glass opening is sealed around the perimeter, the cut section is mounted, new fasteners are sawed with a jigsaw and secured with thin nails.
Glass with hidden fixation
If the glass on the door is installed in a hidden way, then you will need to disassemble the structure and unscrew the fasteners. After this, the old glass is removed and new glass is installed in its place. In this case, the use of silicone is not allowed, which will make further replacement impossible.
A major disadvantage of replacing such glass is the risk of reducing the tightness of the canvas after assembly. It will be necessary to straighten the door with a plane. Glass can be replaced with an unbreakable acrylic mirror, which will be quite durable, aesthetic, lightweight, and quick to cut.
Sealing cracks with cord
This method has been known for a long time and is used to seal cracks not only between floorboards, but also when repairing walls, when a piece of synthetic cord is selected in accordance with the size of the hole. The use of this option not only solves the problem of how to seal cracks in a wooden floor, but also helps to get rid of creaking floorboards.
The following materials should be prepared: cord (hemp rope), PVA glue (carpentry), sawdust, putty. The rope is completely lubricated with glue and a mixture of sawdust, adhesive and putty is made.
The cord is placed on the crack, laid inside so that it is 2-4 millimeters from the top of the floorboard. This distance is filled with the mixture with a small margin on top, since the putty composition shrinks during the drying process.
Wax correctors
Special sticks made of hard waxes are a simple and convenient solution for cosmetic repairs of small cracks, chips, dents, deep scratches and other defects. Wax correctors have gained wide popularity mainly as a means for cosmetic repairs of furniture and other wooden products used indoors and not subject to heavy wear. Wax correctors are offered in colors that imitate various types of wood. The colors are easily mixed to achieve the desired shade.
Preparing for work
Whichever method you choose, the preparatory work will consist of covering the entire structure of the box with film and masking tape to protect it from accidental damage. Finishing the doorway involves preparatory work.
- All unevenness and roughness that may interfere with further work must be removed.
- You need to clean the surface, remove dust and prime it.
- If you plan to lay a cable in the opening, then you can lay it, but not in the case of erecting a frame.
Peculiarities
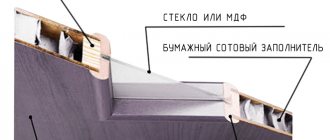
Before you start designing a door, thoroughly understand its structure. Find out what features it has. The main difference between such doors is the presence of inserts that make the product sophisticated and elegant.
Installation and its varieties:
A blank sheet made of plywood. It consists of elements made from sheets of plywood, fixed inside with self-tapping screws;
Blind installation
With glass inserts. Glass inserts are used to fill the canvas. The canvas looks decorative and is light in weight.
Insert
Made of wood. This design is considered durable and reliable. The insert in this case is made from thin wooden sheets, but it should be noted that this way the production costs a large sum of money.
Natural wood
The technological manufacturing process is that the frame and insert are connected to each other. This is done using special fastenings with glazing beads. Manufacturing also involves other types of fastenings.
The gap is wrong, what should I do?
Situations where the gap is very small or large are common. In the first case, it is necessary to reduce the door leaf, in the second - insulation (closing) of the gap.
The first step is to check whether the box is warped; to do this, use a building level. Must be observed:
- Diagonals - the distance between opposite corners is equal.
- Angles - all should be 90 degrees.
If the gap is too small, you can carry out the following manipulations:
- Remove paint, especially on painted wooden doors that are many years old. Layering paint over time greatly reduces the gap.
- If there is no paint, then use a hand plane to trim the contours until a normal gap is formed.
Possible defects
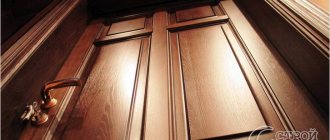
Restoration begins after determining the extent and type of damage. The defects of wooden doors of different designs may differ; to eliminate them, a suitable method is selected:
- Deformation of a multilayer door leaf. A curved product is almost impossible to close, or large gaps remain due to a loose fit to the frame. The defect is common for products made from several layers of wood. The reason is a violation of gluing technology, poor-quality material or intense exposure to moisture. Minor curvature is compensated by adjusting the frame. In case of severe bending, replace the top layer of sheathing to relieve stress.
- Peeling of covering sheets from the frame. The defect occurs as a result of the manufacturer using low-quality glue or when the recommended operating conditions are violated. It can be restored by re-gluing and then keeping the product under pressure. However, the solid frame and covering sheets react differently to moisture and temperature changes. When peeling, the decorative coating often cracks or breaks in pieces. Small cracks are hidden with putty. If the peeled sheet cannot be restored, it is replaced.
- Loosening of the glued door frame. The result of the defect is loose closure, as well as the formation of cracks. It can be assumed that the product itself is bent. To make the right decision, both structural elements are inspected. If the problem is in the box, it is strengthened by removing the trim.
- Door leaf skewed. Diagnosis begins with inspection of the loops. If the door is too loose, it may not close. If a misalignment is detected, which is often found on a frame where the elements are connected by a notch, leveling is done using wedges. Grooves are cut out in the corners of the structure and filled with glue. Wedges sharpened at an angle of 10° are driven in with a hammer until the frame is completely level.
- A slight increase in the gaps between the leaf and the door frame is likewise a defect. Heat escapes from the house through a loosely fitting sash, reducing the quality of sound insulation. The problem with small gaps is solved by gluing seals.
What can slopes be made from?
Slopes can be internal or external, depending on their location relative to the room. When finishing them, two problems are solved: aesthetic and thermal insulation. To do this, you need to choose the right material.
MDF panels
Now for this type of work, in most cases, MDF panels are chosen, which have proven themselves in bathroom renovations. This wood fiber material comes in several types.
- Veneered is a material perfectly suitable for finishing a doorway; it is particularly strong and durable compared to other types of panels.
- Laminated is a water-resistant material that is slightly less durable than veneered MDF. But it is very attractive from the outside: it has a rich palette of colors, and there are also panels that imitate the texture of natural wood. Such MDF is also perfect for finishing a doorway after installing a metal entrance door.
- Painted is a material whose surface is less durable. It is not suitable for this type of work.
We make slopes from MDF with our own hands
If you decide to finish the doorway with MDF panels on your own, then the following materials and tools will be useful to you:
- MDF panels (3 pcs.);
- platbands (3 pcs.);
- decorative bending corner (3 pcs.);
- decorative rail (3 pcs.);
- guides (slats with a width of 10 mm and a width of 30 mm, the total length of the slats is approximately 9 m);
- screws (length 35 mm), approximately 30 pcs.;
- dowels (diameter – 6 mm), approximately 30 pcs.;
- watery nails;
- cement mortar;
- polyurethane foam;
- jigsaw;
- assembly knife;
- chisel;
- brace;
- bit;
- roulette;
- pencil.
To perform high-quality work on finishing a doorway, you must follow the following rules:
- slopes should be located approximately 1.5-2 cm below the level of the box;
- the distance between the external slopes should be greater than the distance between the internal ones;
- To properly install the door and obtain even slopes, you need to accurately measure the dimensions of the doorway.
Stages of finishing a doorway
- Sealing cracks with cement
First, inspect the slopes, seal large cracks and holes with cement or putty (if small), remove any protruding old cement mortar, old whitewash or paint; Seal the gaps between the wall and the door structure with polyurethane foam, and after it has hardened, cut off the excess with a knife.
- Treat the surface of the slopes with a primer: this is necessary for better adhesion of the plaster to the wall.
- Level the slopes with plaster or cement mortar; to do this, use a system of beacons (iron profiles fixed to the wall with dowels). Plaster consists of cement, sand, and lime mortar. You can purchase a ready-made plaster solution created for facade work.
- securing the outer corners with a mounting profile.
Reinforce the outer corners of the slopes with a mounting profile. It must be carefully pressed into the fresh plaster. The base for the slopes is ready. Let it dry completely. - Carefully measure the dimensions of the slopes, pay special attention to the corners in order to avoid inconsistencies later when installing the panels. From MDF panels, cut out two side and one top parts of a suitable size.
- Cover the entire upper surface of the slope with special glue and press the MDF panel onto it. You need to hold it tightly until the glue sets one hundred percent.
- The side panels must be secured in the same way. Experts advise using spacers for reliable and high-quality fixation.
- installation of MDF panels on slopes
Close the gaps formed between the panels and the wall with a decorative plastic corner, which is glued using watery nails.Finish the outer edge of the slopes with a decorative corner or nail in cash.
How to finish the front door clearance.
Order doors
"TOREX" in Moscow and the region: Qualified hardening and installation.
How to put the entrance wall in order after installing the front door
Complex for plastering door slopes
DSP. Plastering the concrete lintel of the upper slope. Side plaster.
If you do not smooth out the slopes earlier, you can put guide strips on them, to which you can attach MDF panels with screws. The whole process is only slightly different from finishing the slopes on the windows.
Decorative rock
After installing a steel door, door openings can be trimmed with decorative stone. This finishing is done with or without jointing. In the first case, textured materials are used, in the 2nd case, slate or pebbles. The process is easy, but requires certain knowledge and abilities. To decorate with decorative stone, you will need a spatula, a rubber hammer, a bucket for cement mortar, and a grinder with a concrete attachment.
PVC panels
Often internal slopes are finished with plastic. This is a cheap material that does not require special care and is easy to install. PVC panels also have a rich palette of colors, so you can choose the finishing color you need.
A popular option is panels with an imitation of the texture of fabric or wood.
The plastic is secured to a wood sheathing or fixed to the plaster with a special glue. The disadvantages of this material include its fragility: as a result of careless use, the plastic can simply be destroyed (for example, if you bring something bulky with corners through the door and catch the plastic slopes, then a hole or hole may remain on them, which cannot be repaired with anything it will work).
Cement screed or plaster
One of the most common types of finishing of internal and external slopes is cement screed or plastering. A solution or plaster solution prepared from cement, sand and water is applied to the door opening with a trowel, smoothed out, and all roughness and smudges are removed. If you decide to plaster the slopes
or cover them with a cement substance, then you need to set up beacons: this way the material will lie more perfectly.
Flat wooden slats or special iron profiles can be used as beacons. They are fixed using alabaster correctly vertically. After the beacons have hardened, the gaps between them and the walls are filled with cement or plaster. To level it, use a spatula. This type of screed needs a number of days to dry. After this, the surface of the slopes can be painted with facade paint on an acrylic base in a suitable color. A door
with such slopes looks neat. It is completely protected from water and cold. Then such a surface can be decorated with any finishing material. But it is quite difficult to evenly cover the slopes with screed or plaster, and such work takes quite a lot of time.Plasterboard finishing
Internal slopes made of plasterboard look beautiful; if installed correctly, such structures will not cause any trouble for their owners for a long time.
To produce plasterboard slopes, you will need the following materials and tools:
- wall plasterboard;
- dowels 6*60 (“fungus” with self-tapping screw);
- plastic profile (starting, guide);
- metal screws;
- a knife for drywall (you can use an ordinary stationery knife);
- roulette;
- the construction level is small;
- screwdriver;
- perforator;
- hammer;
- putty knife;
- container for plaster solution.
glue for working with drywall;
Types of interior designs
Interior doors differ in the material they are made of:
- Solid wood. The material is traditional for elite-class structures, both double and single-panel. Especially Finnish ones, made from high quality wood.
- Laminated or veneered MDF or chipboard. These doors are distinguished by high performance properties and good appearance at a relatively low cost. Products from Finnish manufacturers are of high quality.
- Glass. The use of glass doors has no restrictions, either operational or installation location. But installation of glass structures requires extreme care and precision.
- Plastic. A good alternative where using wooden ones is not practical.
The following types of structures exist:
- According to the opening method - hinged and sliding. The latter are usually sliding, compartment and folding, which differ in “accordion” and “book”. Particularly popular are compartment doors, which save space. The most traditional installation is swing doors.
- According to the internal structure of the canvas - panel and panel. This applies more to hinged wooden ones, rather than glass and plastic ones.
- In terms of external design - solid and with inserts.
There are options for single- and double-leaf, right-handed and left-handed designs. The choice of double-leaf doors is determined by the width of the opening. Using double doors provides a certain convenience. In addition, the appearance of double structures is always more presentable.
Which material is most susceptible to damage?
Apart from wood, all materials used are lightweight, made from wood waste. They are easily damaged, especially when carrying furniture or careless handling. The thinner the material of the door leaf, the greater the likelihood of getting a dent or hole on its surface.
Much depends on what door frame the material is installed on. Some manufacturers skimp on frame parts, so the door turns out to be light, but unreliable. In places where there is no frame, MDF, fiberboard, and chipboard are most at risk of being punctured. So the reliability of the door primarily depends on the quality of workmanship.
Damage to wooden doors can be in the form of chips, cracks and dents, since a wooden door is made from solid or stacked material. The resistance of wooden doors to damage is directly related to the type of wood. Hardwood doors are more stable. Much depends on the treatment of the wooden door: sanding, impregnation or coating.
Butterfly dowels for crack stabilization
Large cracks can be not only a headache, but also a natural decoration for the project. To a greater extent, this applies to products made from slabs - massive cuts of wood from which table tops, bench seats and other elements are made. In such furniture, wide cracks preserve the philosophy of the Live ege style, which is characterized by minimal interference with the natural forms of wood.
But for a crack to cease to be a defect and turn into a decoration, it needs to be stabilized. Otherwise, it will continue to expand and eventually split the wood piece in half.
For stabilization, decorative and functional elements such as butterfly dowels are traditionally used. They are glued into pre-milled grooves. The standard thickness of the key is 10-15 mm. The size and number of embedded butterflies is an individual question; it depends on the size of the part and the nature of the cracks. For a greater decorative effect, stabilizing inserts are made from rocks of contrasting colors.
How and with what to seal cracks
When the main risks have been identified and the causes of cracks have been eliminated, you can proceed directly to eliminating the flaws.
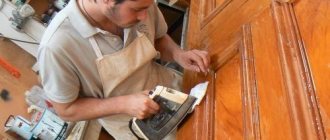
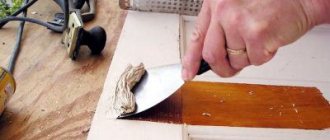
Wood putty
Repair using ready-made wood putty is the easiest sealing option.
Factory putty will free the craftsman from preparing complex compounds and will help him get the job done quickly. The putty is suitable for filling small cracks. If the area of the flaw is large, the composition can quickly crack and crumble. Ready-made putty can also be used when you plan to lay another floor covering on the wood.
Work order:
- If necessary, widen the cracks with a spatula or screwdriver to make the solution easier to apply.
- Cracks are cleaned of dust and debris.
- Use a narrow or rubber spatula to grab a certain amount of putty. Next, it is applied to the crack, trying to press it as deep as possible.
- After the putty has dried, after about 1-2 days, the surface is cleaned and sanded with sandpaper.
Attention! The disadvantage of factory-made putties is the rather limited color palette, which is why the seams become visible to the naked eye.
Sealing tow
Sealing cracks with tow is considered the “old-fashioned” method and also does not require much effort.
Tow is traditionally used in plumbing work to seal threads and pipe connections. This coarse fiber is a product of processing bast crops. It has a high degree of hygroscopicity, strength, wear resistance, and is safe for health. To seal cracks in a wooden floor, tow must be soaked in an adhesive composition. Then the fiber is carefully driven into the gap, trying to fill the entire space. After the glue has dried, the floor can be painted in the desired shade.
Tow can be replaced with synthetic rope. It is impregnated with PVA glue and used in the same way. After drying, the remaining rope can be cut off and the surface can be painted.
Construction foam for sealing cracks
A universal solution for sealing holes in wood flooring can be polyurethane foam.
It is used mainly when processing the perimeter of the room - in the area of plinths. Step by step steps:
- The skirting boards are carefully removed, being careful not to touch the boards on the floor.
- The surface is cleaned of old dirt, sand and dust.
- Pieces of foam plastic are placed into large cracks.
- The free space is filled with construction foam.
- Wait the time necessary for the mixture to harden, cut off the excess.
- The entire perimeter of the room is puttied, and after the putty dries, the plinths are installed in their original place.
Sawdust with glue
An inexpensive but effective way to get rid of a gap in a wood floor is to use a mixture of sawdust and glue. The composition can be prepared independently according to a certain algorithm:
- Prepare small sawdust and pour them into a large container.
- Pour boiling water over the sawdust until a thick, homogeneous mass is formed.
- When the sawdust absorbs water, swells and cools, add glue. You can use regular wood glue or PVA as a basis.
- Mix the mixture thoroughly until smooth.
- Using a spatula, scoop up a small amount of the compound and apply it into the space between the boards. It is necessary to completely fill the gap, but do not compact it with force.
- Level the filled mass and remove excess glue.
This homemade putty should dry in 2-3 days. After drying, the surface should be sanded or sanded.
Another option for the adhesive composition is with the addition of cement:
- glue is mixed with warm water in a ratio of 2:15;
- add 5 parts of sawdust and cement to the mixture;
- The components are mixed and infused for 5-7 minutes.
The composition is recommended to be used heated. It gives a good insulating effect, but takes quite a long time to dry - about two weeks.
Fiberboard repair
Now let's look at how you can repair a fiberboard door. This material is thinner and flimsier, so the corners of the canvas often suffer; in this case, the defect can be repaired using a small piece of plywood. Cut the damaged part so that you can easily place your workpiece in this place; you can glue it or use small nails without a head.
How can you repair a hole in a fiberboard door with your own hands? If we are talking about a broken part, you can use wire, a hook is made from it, with which you pry up the broken part of the fiberboard, then both edges are treated with wood glue or PVA and pressed against each other. After drying, clean the seam and treat the top with a fixative. You can make a patch in a similar way by cutting out a square of identical shape from fiberboard and inserting it in place of the cut damage.
If large holes need to be repaired, the door leaf will need to be repainted.
If the hole is quite large and it is not possible to seal it, use the same method as for wood. Repairs are made using polyurethane foam, volcanic rubber, putty and fine sandpaper.
Furniture wax
Another easy-to-use method is to use furniture wax. In this case, you will need a soft version. This option is suitable for masking small seams and joints between planks.
- Clean the surface of the trim.
- A soft wax pencil selected by color is applied to the joint and rubbed into the surface.
- You need to wait for about half an hour.
- After drying, the remaining wax is carefully removed.
- The surface is polished with felt and a cotton cloth.
Thus, masking gaps, joints and seams on door frames is an easy task. Using special formulations, you can cope in a short time. However, the problem is always easier to prevent: install door frames correctly and, if necessary, contact specialists.
Standard door kit
If there is a standard door set with dimensions of 200x60x90 cm, then the gap should be 3-4mm on all sides. It is allowed to form a lumen of up to 5 mm if:
- the room has high humidity and ventilation is needed;
- the doors are made of a material that absorbs moisture very well.
It is worth paying attention to the distance from the threshold to the canvas. Under normal conditions, it is 2–2.5 cm. If you need to ensure improved ventilation and unhindered opening, the distance can be increased to 4 cm.
Door seal
Putty
Using gypsum putty with the addition of acrylic paint is a method often used by specialists. This method will help if the gaps are significant and careful masking is necessary. Follow the following algorithm:
- Sift the gypsum putty to avoid the appearance of lumps.
- Add acrylic paint that matches the color to the mixture.
- Apply a small amount of the mixture to part of the platband or trim remaining after work.
- Wait until it dries completely and evaluate whether the color of the putty and the strip is different.
- If there are differences, adjust the color of the putty to the desired color.
- Once the desired shade is achieved, apply colored putty to the joints and gaps.
- After drying, putty residue can be easily removed using a soft rag.
This method is durable and makes it possible to achieve a visual monolithic effect.
When applying putty, it is advisable to use a silicone brush instead of a spatula.
Sealant
There are various color options for silicone sealants on the market. Finishing the seams of door frames with color-matched sealant, due to its simplicity, is extremely popular and not labor-intensive. The most expensive step is going to the store and choosing the color composition. After selecting the material, the sealant is placed in the gaps and joints. This method is quick and simple, a beginner can handle it.
Choose the color carefully: once dry, it cannot be changed. Polyurethane types of silicones are difficult to remove from the surface: work very carefully. Over time, sealants tend to yellow and require replacement.