Doorway, Miscellaneous
Many of us have encountered redevelopment. It happens during a major renovation, when the owners of an apartment decide that it’s time to change something in it. At such moments, the transfer of doorways from one place to another occurs. In this case, the question appears on the agenda - how to seal the doorway? In this case, several options for the development of events will certainly be considered.
How and with what can you block a doorway in a wall?
If you do not want to radically change the appearance of your apartment, then you can modify the doorway itself. For example, do it not in the usual rectangular shape. The option with an arch looks great.
If you decide to remove the doorway and seal the old passage, then you should consider sealing options. It could be brick, drywall.
To have an idea of what we are talking about, let’s look at each of the doorway sealing options in more detail.
It is worth considering that no matter which sealing option you choose, the goal will be to completely eliminate the passage. After completing the work, nothing will remind you of the old doorway.
Features of an interior without doors
A doorway without a door is a popular design technique. This is a practical and fairly inexpensive way to increase usable space and use it more intelligently. By choosing the right finish, you can turn an ordinary opening into a spectacular and unique interior detail.
In what cases would such a method be relevant?
- If necessary, separate the food preparation area from the living room area.
- When zoning large areas.
- When combining adjacent rooms.
Installation of extensions without grooves
If there are no grooves on the sides of the planks, individual parts are taken into account. The operating principle boils down to the following algorithm:
Decor of door slopes
After completion of the finishing work, all that remains is to cover the planks with paint and varnish. This is done as needed. In general, when installing extensions by a non-professional, the work takes about 3 hours. With professionalism - from 30 minutes to an hour. Finishing with decorative stone, which is applied to door jambs, is also in demand. It is not suitable for any interior.
Home » Accessories » Frame » What is an interior and entrance door jamb
Advantages and disadvantages of an opening without a door
A free doorway, not cluttered with doors, has a sophisticated and stylish look. This design is used both in small two- and three-room apartments, and in large-sized cottages and mansions. Let's figure it out - what is the advantage of such a solution?
Pros of not using interior doors:
- Visual expansion of space, which is a significant advantage in small apartments. The absence of a barrier in the form of a door between the dining and kitchen areas, entrance and living room, allows you to move and maneuver faster and more freely.
- This frees up the unused area behind the open door leaf. When the canvas is removed, you can place any piece of decor or furniture in this place. For example, a vase, column, cabinet.
- An area is formed that can be advantageously decorated using a variety of materials. There are plenty of options for decorating the opening.
- Passages decorated in the same style create the feeling of a complete interior ensemble.
- Free air circulation is ensured, which is very important in the heat.
The main disadvantage of unlimited space is the inability to be in a private atmosphere. But this problem is easily solved with the help of a variety of curtains. And if the apartment has a more secluded place - a bedroom or an office, it is better to retire and restore peace of mind in such a closed room.
The following disadvantages can also be identified:
- lack of soundproofing barrier;
- the aromas will spread throughout the house;
- unimpeded penetration of drafts.
How to seal the gap between the frame and the wall
Hello, I ordered the entrance door to my apartment from a not-so-cheap company. They delivered and installed. Everyone is happy, but I have a question. After installation, a gap naturally appeared between the walls (opening) and the iron door frame, which the installers sealed with construction foam. This foam can be seen from inside the apartment quite well because the gap is large and in some places from the outside too. The door itself is not in the plane of the wall (the house is a panel house and the builders were not skewed seven meters there) and there are gaps between the wall and the outer door frames (foamed, of course).
How to seal these cracks so that construction foam does not stick out? I believe that if you simply cover it with cement, it will fall off quite quickly over time due to the vibrations created by the operation of a heavy iron door. I thought maybe I could fill it with some kind of sealant and paint it?
Cut off the foam, plaster it with sand-cement mixture M150, under the film, so that the concrete has time to gain strength. It’s even better to scoop out the foam altogether and concrete it with a cement (concrete) mixture. It demonstrates the complete vulnerability of your door to the whole world.
Sorry, I don’t understand – cement or concrete? I believe the cement will crumble or “spill” over time. If you remove the foam, then you need to reinforce the cement placed between the door and the opening. Moreover, I have little idea where to get concrete in such small quantities - at least 1 cubic meter can be brought from the factory.
I have a similar situation in my new building, plus a wall made of foam concrete. I decided to lay the platbands in half a brick on the outside, as if duplicating the main wall from the outside. It turns out to be quite reliable and quite affordable.
It will not be possible to duplicate the wall - such is the layout (you could tear your hands off, but as it is) of the house that the opening is in the wall that forms the wall of the staircase (9-storey building), and on the other hand there is not even a door frame due to the impossibility of installing it - 5 cm to the wall in which is the neighbor's door to the apartment - that is, two doors from the staircase cage, as if in the corner, these cages were designed. Well, where can we go – a house from the late 70s.
They are plastered with sand-cement mortar, but it is better to fill it with concrete. Although sand-cement mortar will also work. No fittings are needed - the door frame is your fittings. Where to get it - go to the store and buy a bag of TsPS M-150. Well, or you go to the store, buy a bag of cement, and steal sand from the nearest playground. Then you go to the trash and find any container that you won’t mind throwing away later (starting from a 10-liter canister, the side of which needs to be cut off.) If you don’t have a mixer-drill, confiscate the child’s scoop, pour it into the TsPS container, pour water, stirring until the consistency of thick sour cream. If you want concrete, you will have to go to any neighboring construction site with a bucket and ask for small crushed stone. If you want bricks, it’s the same, but ask for a couple dozen bricks.
Appreciated the joke about concrete
(I studied this question when I was pouring a pillow under the garage) And about the fittings too.
2shs_sf I also have a panel wall, plus or minus 15 mm in evenness. The door was installed with steel trim on the outside. After cutting the foam, I rubbed the cracks with a fügenfühler at 90 degrees. They also make a decorative smooth plaster (Rotband) transition to the wall. Or a strip of 10 cm, such as a cash-out portal, also with plaster. I can post a photo tomorrow. Nothing falls off when a door slams, because... The door is placed securely on the anchors, the entire impact is absorbed by the wall panel, and foam is involved in dampening vibrations. I made slopes from the inside with Rotband, blocked the installation gap with an overlap of 30-40mm on the box. I covered the top with MDF with cash, so no cracks are visible and nothing is falling out. The door is a monolith. Don’t even think about replacing the foam with concrete - this could result in the door failing, but there will still be cracks.
Samar wrote: Don’t even think about replacing foam with concrete - this risks the door failing, and there will still be cracks.
Why do you think so? Do you have any experience?
shs_sf wrote: After installation, a gap naturally appeared between the walls (opening) and the iron door frame, which the installers sealed with construction foam. This foam is visible. outside in some places too.
Anticipating the possibility of such a situation when installing the door, the installers refused to foam it. After installation, I assessed the size of the cracks and, where the cracks turned out to be large, filled them with “sand concrete” (CPS). Small cracks were foamed. Three years - normal flight, no cracks.
In what cases can you do without doors?
Not every opening in the house can be stripped of its door leaf. It is difficult to imagine an open passage to a bedroom, office or storage room. However, in this case, you can get by with sliding partitions, screens, curtains, and with their help create an intimate atmosphere. As a result, the visual separation of rooms will be realized and privacy will not be affected.
Door panels are removed if it is necessary to combine:
- kitchen and living room;
- living room and corridor;
- kitchen or living room with loggia;
- bedroom with dressing room.
The rectangular shape of the opening can be preserved and made more interesting through effective finishing. Often apartment owners prefer arched openings of regular and irregular shapes. Asymmetrical variations, round, triangular and trapezoidal portals are in great demand.
Door panels are abandoned if they plan to decorate the passage using stained glass and mosaic modules or a bar counter. Such techniques are especially often used in studio apartments.
As a rule, the decision to abandon doors is associated with the need to redevelop the premises. To create such a design, use:
- expansion of the existing opening;
- creating something new.
An open passage in a load-bearing wall allows you to unify the space while maintaining the rigidity of the building structure.
Formation of a slope using finishing material for mortar
In this case, materials such as drywall, MDF, plastic slopes, etc., are strengthened using cement-sand mortar or adhesive. The surface has already been prepared: leveled and primed.
It is best to indicate the level of the future slope and provide normal support for the sheathing material. To do this, screw the screws into the wall so that their heads form one plane. In this case, the thickness of the sheathing material is taken into account, because it will rest on the heads of the screws. After this, you can fill the entire space of the slope around the perimeter with a solution.
For reliability and for the sake of economy, the first layer is a cement-sand mortar, which forms a layer slightly smaller than the height of the supporting screws. Next, select an adhesive composition suitable for your sheathing material. The adhesive solution is applied in an even layer over the surface of the slope and onto the strips of material on the reverse side.
Carefully placing the sheets of material on the slope, they must be pressed down until they rest on the caps of the screws. The correct installation is checked using a level; if necessary, you can correct the position while the solution has not yet set.
If there is a gap between the sheathing sheets and the wall, it must be sealed with mortar. After this, you can attach the platbands, if any.
Video: nuances of primary finishing of slopes
Doorway design ideas
The market offers a huge selection of materials for designing free door portals. If you cannot find products that will optimally fit into the interior, you can make them yourself from scrap materials. You can use any materials that are used for wall decoration. The cheapest option is plasterboard structures, the finishing of which can be paint or wallpaper. This finish is especially relevant when installing sliding systems or making an asymmetrical passage. Panels made of plastic or MDF are also inexpensive. The most expensive materials used to decorate doorways are stone, ceramic tiles, valuable wood, and gypsum stucco. As an alternative to the door leaf, you can use curtains from a variety of materials, blinds, and mosquito nets.
When selecting material for this type of work, it is necessary to take into account the general style direction of the interior. The design should fit organically into the design of the room.
Fabric curtains
Textiles are one of the most popular space dividers, which are used to decorate a doorway. They give the interior freshness, style and beauty. The main advantage of curtains is that they are an excellent decoration and a continuation of the design concept. Correctly chosen color, print and texture of the canvas are the key points that allow you to maintain the style of the room. Designers recommend using several panels to create an interesting composition. Don’t forget about accessories for curtains – tiebacks, tassels, decorative cords, lambrequins.
With the help of such a decorative technique, it is good to decorate open spaces - if it is necessary to combine the room, the curtains can be easily pulled back and secured with tiebacks.
To create curtains, you can use both natural and synthetic fabrics. The first option is especially popular. Curtains made of cotton, linen, silk, satin, satin look expensive and emphasize the status of the apartment owner.
If it is necessary to ensure a sufficient level of thermal insulation, you need to choose the most dense curtain fabrics. All light and airy materials perform only a decorative function.
To fix the curtains, use ordinary window curtain rods or metal tubes attached to the wall above the opening. In the latter case, the curtains must be equipped with:
- grommets;
- ties;
- loops.
The tubular curtain rod should be easy to remove so that the curtains can be washed regularly.
Filament curtains
If you want to create a beautiful and extraordinary design for interior portals, you can use thread curtains. They are made from a huge number of synthetic cords. The threads are united at the top, and their ends hang freely. Such curtains can be used as an independent interior object or as an element of a composition in combination with other materials.
Thread products are made from high-quality polyester, which allows them to maintain their shape, integrity and attractive appearance.
The material has:
- excellent light transmittance. Since the canvas is not continuous, it cannot effectively block the passage of sunlight. This is ideal for poorly lit rooms on the north side;
- light weight – the load on the cornice is minimal;
- transparency - visually make the room more airy;
- versatility - they look great in almost any style, both classic and modern.
Thread curtains can be decorated with lurex, beads, bugles, and large beads, which makes them even more attractive.
Curtains made of bamboo and wood
Curtains made from bamboo sticks or pieces of wood look great in an interior opening. Individual elements are painted in a specific color. It is possible to apply a large pattern to the entire canvas. The bamboo doorway curtain consists of approximately 100 bamboo beads. Sticks and pieces of wood are connected together with staples or wire. You can string them on fishing line or cords. In this case, a metal stop must be installed after each fragment to prevent it from slipping. The degree of transparency of the fabric depends on the size of the intervals for placing beads.
Such curtains are not strong enough, so they should not be used if small children and pets live in the house.
Such curtains will be more convenient if they are placed only at the edges. You can hang short threads in the center, which will not impede movement.
It is not difficult to secure such curtains. You need to nail them to the plank placed above the opening.
Blinds
Properly selected blinds are an excellent solution for decorating a passage. Models with drawings really decorate the room. The advantage of blinds is that they are easy to care for - they can be easily wiped or washed. Standard window models will not fit in size, so door products will have to be ordered. The color palette of the material is very diverse, which allows you to choose products to suit any room design. You can combine several colors and make an original composition.
For high traffic conditions, it is better to use vertical products - they are easier to move. If the room is visited infrequently, you can purchase horizontal analogues.
Roller blinds
The material of a correctly installed curtain is tightly adjacent to the door portal, so this type of curtain is very convenient. The material is very diverse in terms of stylistic orientation and proposed dimensions.
The products are equipped with a weighting agent, thanks to which they maintain a stable position when closed. The only inconvenience is that raising such a curtain takes quite a lot of time, so you won’t be able to leave the room quickly. Although, if you close the canvas only at night and keep it open during the day, this inconvenience is not felt.
Wood paneling
This type of decoration is an integral element of most historical styles. For finishing, oak, ash, pine, and hornbeam wood is used. You can purchase the parts ready-made. During installation, they are fixed using nails or self-tapping screws.
Decorative panels
An excellent decoration for classic interiors can be a decorative cornice protruding above the opening. It is called “sandric” and consists of stucco elements - moldings, bas-reliefs, and may contain fragments of statues. To make this decoration, gypsum and polyurethane varieties of material are used.
Decorative tiles
This type of cladding is significantly heavier than polyurethane and wood. At the preliminary stage, the walls must be leveled with putty. The adhesive is selected depending on the size of the tile. Lightweight modules can be attached using liquid nails. For weighty options, you will have to prepare a special adhesive mixture. They begin to veneer from the bottom, with breaks for each row to set. The seams are filled with grout in the same color as the tiles or in a contrasting color. In addition to tiles, you can use artificial stone or clinker tiles. A mirror design that will further expand the portal and fill the room with light will look great.
MDF and plastic panels
Using MDF panels you can create an excellent and affordable finish. You just need to choose trims and trims that are similar in shade. Among the disadvantages of such cladding, one can highlight the poor moisture resistance of the material. Therefore, it is better not to use MDF boards to decorate the passage to the kitchen. However, if there is good exhaust hood, dampness will not threaten the integrity of the finish. It will also protect neighboring rooms from the penetration of food odors. You can also protect the material with self-adhesive film.
Plastic panels, on the contrary, are ideal for decorating the passage to the kitchen, as well as to the hallway, where there is a high risk of mechanical damage.
The panels are attached with glue or lathing made of wooden slats. They can be easily cut with a hacksaw. The advantages of the material include a variety of colors and textures.
Anti-mosquito curtains with magnets
Mesh curtains are indispensable in the summer, when you need to protect yourself from dust and insects. They do not create barriers to air flow and open easily simply when passing through them. The curtains are connected using a magnet, which automatically closes after allowing a person to pass through. This is incredibly convenient if your hands are full.
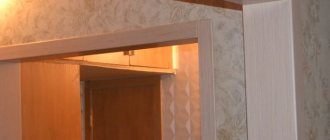
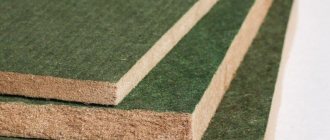
Paneling
This option is most often used for finishing slopes after installing an iron door. These can be panels made of MDF or plastic, which ensure the geometric accuracy of the opening, making it durable, neat, and beautiful.
Advantages of MDF panels:
- cannot be deformed;
- resistant to the development of microorganisms;
- do not emit toxic substances.
The only disadvantages of the coating are the relatively high cost and difficulty in choosing the appropriate shade.
Finishing is done quickly, with virtually no construction waste remaining. To carry out the work you will need:
- panels;
- slats or blocks of wood for the frame;
- fasteners (liquid nails, screws, dowels);
- decorative corners.
Ways to close a doorway instead of a door
When starting a grandiose redevelopment, do not rush to block all the doorways that seem unnecessary at first glance. We suggest considering one of the options for their use.
False door
A non-standard solution that gives the interior originality. The door turns into a “trick”. The passage is sealed only on one side. This technique will allow you to play a trick on the guests and deceive the inspection services. This door can be used for sticky notes, or as a separator for a special area - for reading or working.
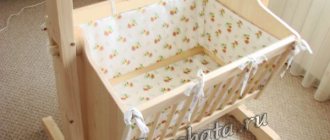
Hidden closet in the doorway
A wonderful option that does not require complex execution. The door and the jamb remain in place, and the opening itself is deepened as much as possible. The result is a small storage facility. It can be equipped with shelves and store canned food and other necessary things here - needlework kits, old toys, dishes. Among the disadvantages of this solution are the following:
- the niche cannot be made deep enough;
- if a ledge has formed into another room, you will have to beat it.
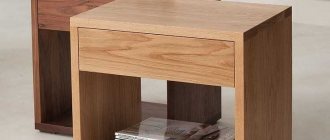
Built-in wardrobe
The space deepens due to the adjacent room. It is better to give preference to a glass door. Shelves should be mounted along their entire height. You can store sets, cosmetics, jewelry, books, and various decor here. The content depends on the location of such a cabinet.
Doorway design: niche with shelves
Usually, installing a decorative niche requires a lot of effort. You have to create a structure from plasterboard, which is mounted on a metal frame and “eats up” the space quite well. An unused doorway can successfully act as such a niche. To do this, you will need to dismantle the door - completely or partially - leaving the lower part. In the resulting space, you can organize shelves and build lighting.
Secret door
An interesting extravagant solution that will undoubtedly make your home mysterious and exotic. A secret door can be used to disguise a room where you do not want strangers to enter. Hidden behind a shallow sliding cabinet, it will remain a secret for your guests. None of them will guess what is actually hidden behind a small shelf of books or decor.
A little theory
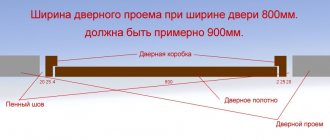
We remember what a doorframe is when we hook our little finger on it in the dark, passing from room to room. It is also called a box. To put it simply, it is a rectangular or square frame on which the door itself is mounted. The door jamb serves as a layer at the junction of the door and the partition. It is necessary for a tight fit of the door plane. In relation to the entrance door, this allows you to reduce heat loss and also provide good sound insulation.
The material used to make the front door jamb depends on what the door itself is made of. If it is a metal-plastic structure, then the box will be the same. The most common materials used are wood or metal. In the first case, it is good if it is oak, beech or hornbeam. These rocks have a dense structure and are less susceptible to destructive actions. Along with this, they also require a lot of effort to process. Metal jambs are assembled from a corner or, less commonly, from a square.
The main components of the finished door jamb are:
There are times when it is not possible to match the width of the box to the thickness of the wall. To cover the remaining space of the slope, an extension or an additional strip is used, which is fixed nearby. The casing covers the cracks and material that remain between the door jamb or door frame and the wall. Their color is matched to the color of the interior doors and their trim; only in this case is it possible to achieve the required harmony.
Note! In carpentry, a door jamb refers to a wooden frame; in everyday use, a door jamb refers to the ends or slopes of a door opening.
Choosing a material for sealing a doorway
If you don't plan to use the doorway for storage, you can seal it up. In this case, you will have to decide the question of what material to choose for this purpose.
Consider the following options:
- brick;
- drywall.
Keep in mind that permission must be obtained to completely eliminate the opening.
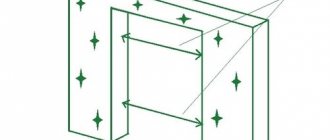
Brick
Brick has undeniable advantages as the main material for sealing passages. It can be used to brick up openings both in load-bearing external walls and in interior partitions. And there is no particular difference whether these walls are made of reinforced concrete panels or brick. However, we note that it is unlikely that openings in panel houses will be allowed to be moved. But when a room has two entrances, one of them can be abandoned. There are also buildings where there is a section in the load-bearing wall that can be knocked out and thereby form a new portal.
The disadvantage of using brick in aerated block, asbestos-cement or gypsum construction is that the thickness of half the brick does not correspond to the thickness of the wall. Therefore, differences are formed that have to be corrected with plaster. This creates certain problems. You can also try laying the brick on its edge, which is important for thin partitions up to 8 cm. The difference with this method will be only 1 cm.
This difference can be easily removed by increasing the thickness of the plaster layer. If the wall thickness is 9-19 cm, you need to take a one-and-a-half brick with a height of 80 cm and, similarly to the previous option, lay it on its edge. In this case, the thickness of the patch should be less than the thickness of the main structure. The main thing is that the masonry does not protrude beyond the plane of the surface. This will significantly reduce the consumption of plaster mixture.
Before you start laying the passage with piece masonry material, you need to start preparing the base and end surfaces. There should be no threshold or remnants of flooring below. Ideally, the base should be a concrete slab, which should be covered with one layer of roofing felt.
It is necessary to make notches on the new masonry. This will allow it to better adhere to the old one. When sealing a brick wall, you should remove some of the old mortar from the ends, or better yet, slightly knock down the corners of the bricks to form grooves. After this, the surface must be thoroughly dusted and moistened with water or primed. Only after this is it possible to begin sealing the hole.
The laying is done in a standard way with tying the seams. Sometimes long nails are driven into the gaps of the old masonry to drive their free edge into the new one. But this is optional. To fasten the elements, a cement solution is used.
Some craftsmen make recesses in the old masonry in order to insert newly laid bricks into them. Thanks to this, a stable connection is formed between the wall and the new formation. Each subsequent row of bricks must be shifted relative to the previously laid one.
In this case, the strength of the constructed structure will be ensured. The thickness of the solution is carefully adjusted - it should be within 12-14 mm.
After the second or third row, the evenness of the masonry is checked using a building level. You need to make sure there are no distortions. Having sealed the wall with brick, you can rest assured of the excellent soundproofing properties of the “patch”.
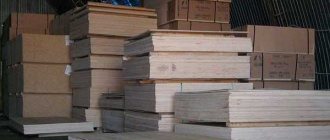
Drywall
Alternatively, you can use drywall to seal the walls. It is used when the strength and soundproofing qualities of the structure are not of great importance. With the help of this material, work on sealing the opening can be done in the shortest possible time. In this case, you do not need to have any special professional skills. An undeniable advantage is the affordable cost of the material.
When sealing the passage with plasterboard, you will need to build a frame from a metal profile. Four guides 3-4 m long will be enough. The profile is mounted around the entire perimeter inside the opening in two parallel rows. Fastening to the wall is carried out using dowel-nails 6x40 mm. The products are connected to each other using self-tapping screws equipped with a press washer.
It is necessary to remove the surfaces of the laid area. The guides must be installed at a distance of 12.5 mm from the edge. This distance should take into account the thickness of the gypsum board sheet. Then you need to install crossbars from profile scraps at a distance of 60 mm. You will get a frame to which sheets of drywall will be attached. The gaps can be filled with insulation, which will provide the required level of sound insulation.
It is more correct to use whole sheets of dry plaster, but if desired, you can get by with separate fragments. But do not forget that they need to be joined only at the locations of the crossbars.
To form high-quality joints, an edge plane is needed. With its help, the chamfer can be removed at an angle. Such joints are the easiest to seal properly.
In order to cut solid fragments from plasterboard, you will need a knife with a reinforced blade. Before cutting the material, markings must be applied to its top layer. Next, the leaf shell is cut along this line. After this, the slab is broken, after which all that remains is to cut the cardboard layer from the back side.
The next step is to apply the drywall to the frame and screw it with self-tapping screws at intervals of 20-25 cm. The screws must be screwed in without excessive force so as not to damage the shell of the material. Next, the seams between the gypsum board elements are sealed - in case the cladding was not installed from a single piece.
For finishing you will need a primer mixture, putty and fiberglass reinforcing tape. We treat the seams with a primer, fill them halfway with gypsum mortar and glue the tape, pressing it into the plaster. Next, we putty the sheet over the entire area and leave it for finishing.
Non-standard solutions
In addition to the above standard methods using popular materials, you can use more original options that will highlight the interior, decorate the front door and surprise your friends:
- Artificial stone is a non-standard finishing of slopes. The main advantage is resistance to mechanical stress (if it is not a plaster model, it is fragile). Not a cheap option, requires the participation of a specialist.
- Tile. A type such as clinker (imitation brick or stone) is suitable.
- Plastic panels are an affordable but unreliable finish.
- Decorative plaster – in terms of aesthetics and durability, it has no equal. But you will need to work hard to find a good specialist in this field, because this work requires a creative approach and professionalism.
Materials can be combined if their properties are similar (sandwich panel parts + stone, laminate + tile and others).
How to prepare for work
Tip: In order for more light to penetrate into the room, the slopes should be plastered at a slight angle, which is measured with a special square.
The instructions for preparing slopes for work suggest the following procedure:
- The surface is thoroughly cleaned of dirt and dust.
- Bitumen and grease stains, salts that protrude on the surfaces are removed.
- Particular attention should be paid to preparing the corners.
- Existing concrete deposits are removed.
- The masonry seams are cleared to a depth of one centimeter, which will ensure good adhesion of the material to the main surface, and the plastered corners of the walls will become durable.
- The walls are primed with a special primer solution (see Types of construction primers and their scope).
Tip: When plastering walls with sand-cement mortar, their surfaces must be moistened with water using household sprayers, rollers or brushes.
- Galvanized plaster profiles are attached to MP-75 or Rotband mortar.
- Profiles must be aligned in two planes:
- relative to the wall;
- without shifting the selected position relative to the slope.
- If there are several doorways on one wall, you need to simultaneously install the profiles on the outer slopes, and after the solution has hardened, install the intermediate elements, aligning them with respect to the previously installed ones. Aluminum slats are used for this. In this case, the outer profiles will protect the corners from damage and act as plaster beacons.
After preparing the surfaces, you can plaster the doorways.
To do this you will need to purchase:
- Ironing iron.
- Spatulas.
Tip: For high-quality plastering of surfaces, you need to make a template. To do this, you can use available material, for example, a piece of plastic. The main thing is to ensure that the working part of this structure is sufficiently smooth and sharp.
Conclusion
In conclusion, we would like to note that it is better for DIYers to stick to materials designed for sheathing. These are MDF, wood and PVC. If you are confident in yourself, then you can take a swing at drywall. But we recommend leaving plastering of slopes to professionals.
MDF door slopes are one of the most affordable for DIY installation.
How to work with different types of walls
In addition to the standard situation in which the concrete opening of a panel apartment building needs to be sheathed, there are other options. The wall can be:
- Concrete;
- Brick;
- Made from rounded timber;
- From laminated veneer lumber;
- From cinder blocks (and other types of blocks);
- Made from sandwich panels.
All these types of materials differ in their aggregate properties and size. For example, rounded timber is much more “movable” than laminated timber, and cinder blocks have a lower density compared to concrete. That is why you need to work with each type of wall individually.
The easiest way to install door trim is on a concrete wall. It is dense and thin, it is difficult to damage it with a handy tool.
Brickwork is wider than concrete, so the standard addition that comes with the kit will clearly be out of place here. The width of a brick wall can reach 50-60 centimeters. A concrete wall is rarely thicker than 10 centimeters. Moreover, brick crumbles under strong mechanical stress from both sharp and blunt objects. You need to work with it delicately.
Rounded timber shrinks. Therefore, during the installation of the door, a support structure is pre-fabricated from bars. In this case, the sheathing should be attached to them, if possible. This is done to avoid the opening from deforming over time. Moreover, the width of the timber also does not allow the use of a standard extension. Glued laminated timber does not shrink, but is also much wider than a standard concrete wall.
Cinder blocks, sandwich panels, foam blocks and other materials with minimal density require gentle fastening of the sheathing. In this case, it is better not to get carried away with self-tapping fasteners and choose, for example, polyurethane foam.