What to do if the door is warped
A skewed entrance or interior door does not fulfill its functional properties, closing poorly, not isolating individual rooms or the general space of the apartment. Knowing what to do if the door is warped, you can independently eliminate the design or operational problems that have arisen in a short period of time, giving the door leaf a second life, saving your finances and time. Most defects can be successfully corrected at home, without the use of expensive equipment and tools and without engaging the expensive services of professional craftsmen.
Getting rid of squeaks
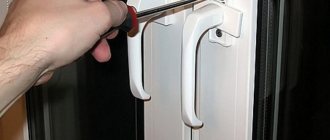
In order to eliminate unpleasant squeaks, try treating the door hinges with machine oil. This is done as follows: place a wedge at the bottom of the door, then lift it a little. Gaps will appear on the hinges, into which you need to drip a little oil. You can use a pipette for this. To prevent the problem from happening again, do not forget to repeat the procedure periodically.
Machine oil can be replaced with a piece of lead from a soft pencil, which perfectly functions as a lubricant. Under the pressure of the door leaf, the lead will soften and the door will stop creaking.
General recommendations
Door misalignment is a consequence of a number of operational or technical properties of the product. Therefore, it is necessary to immediately determine the cause of such a deficiency and first of all try to eliminate it. There are differences in the operating characteristics of doors made of wood, metal and combined materials.
Over time, even the most high-tech and reliable door samples require inspection and preventive maintenance: lubrication and adjustment of hinges, surface cleaning, coating of functional elements with special compounds.
Note!
The cause of malfunctions or damage to the door structure is not always due to improper operation or mechanical failure. Often the problem lies in the quality characteristics of the product, violation of its manufacturing technology, installation or storage conditions. Therefore, you should purchase door sets only from reliable and trusted manufacturers who guarantee a certain service life and provide certificates of compliance with Russian standards.
Types of problems and damage
All types of internal door problems are divided into two categories: damaged appearance of the product and improper functioning.
To correct defects in the decorative cladding, reconstruction of the canvas will be required. Such work is carried out in the same way as restoration of cabinet wooden furniture.
Malfunctions of the door are expressed as follows:
- The sash closes unsatisfactorily and loosely, resulting in abrasions on the floor covering. It is necessary to repair the hinges and adjust the position of the blade;
Important! When the sash often comes into contact with the frame, it is necessary to adjust the position of the leaf relative to the frame
.
- Uneven gap around the circumference of the vestibule (slits appear on one side, and on the other the panel rubs against the frame);
- Sagging of the sash. Its own weight causes such deformation. If the deformation is not corrected for a long time, this will lead to distortion of the box;
- When the blade moves, a creaking noise is heard. In this situation, you simply need to lubricate the hinges. If the creaking does not go away, then it is worth checking the frame for distortion;
- The door doesn't open. If the humidity in the room is high, this will negatively affect the door frame. Moisture causes the frame to deform and misalignment occurs. A breakdown of the locking device can also lead to such a malfunction.
Sometimes a specific type of door deformation becomes a consequence of several factors, so you need to consider all the options for problems that arise with the doorway and be able to eliminate them yourself.
Eliminating skew in a wooden door
The main reasons for the distortion of doors made of natural wood are increased room humidity, constant dampness and significant temperature changes. This is usually the most common problem for owners of summer cottages, rural houses or country cottages for seasonal use. Due to the lack of heating in the winter season, the internal elements of buildings become damp and freeze, and when the weather warms up, condensation appears in them. Summer heat causes moisture to evaporate from the wood and cause it to warp. For wooden structures, such conditions become a real test of strength.
Note!
Even in apartments and houses with permanent occupancy, wooden doors require special protection from distortion, the use of penetrating impregnations and effective coatings.
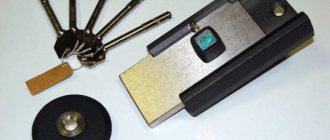
An already warped wooden door can only be corrected by first removing it from its hinges. You should prepare a plane in advance and use it to remove excess millimeters of wood, including paint or varnish, from the ends of the canvas. If the door is severely warped, you can repair it using felt or rubber spacers. The width and dimensions of the gasket are selected individually, taking into account the actual state of the structure and pre-made measurements. Fix the strips of cushioning material using small nails, special glue, or a furniture or construction stapler. The fastening technology depends on the characteristics of the door leaf and the level of its operational load.
Strengthening the frame
Due to long-term use, the fastenings of the base of the door block (frame) in the opening weaken, they say “the door has settled.” To eliminate damage, the frame is strengthened:
- We dismantle the platbands.
- We align the deformed frame vertically with levels and fix it in the corrected position. To do this, we drill several holes in the side posts (on the right and left sides), covering at least 3-4 cm of the doorway wall.
- The box is fixed in the holes made using metal pins or wooden nails (pins) made of hard wood, pre-treated with epoxy resin.
- We install the platbands, leaving an indentation of 1-1.5 centimeters along the edges of the frame.
When fixing the box to a concrete wall or brickwork, the holes in it are pre-formed with a hammer drill.
Elimination of distortion of a metal door
Any metal door designs are more resistant to negative climatic conditions and difficult operating conditions. But there are situations when even the most reliable metal structures are subject to distortion. The most common reason for a change in the properties of the canvas can be the use of too heavy multilayer steel in production or a technological violation of the thickness of the product. First of all, the door hinges may fail. They change their technical properties, sag or break. It is almost impossible to eliminate such a drawback as an incorrect and incorrectly calculated door design on your own.
Over time, the hinges can simply weaken and wear out. It is enough to change them and the door will serve its owners for many years to come. The main thing is to choose the correct size of hinges in a hardware store and make sure of their quality.
The most difficult and serious situation is the misalignment of the door as a result of significant shrinkage of the house and its individual structures. As a rule, this problem is associated with non-compliance with construction technology or premature commissioning of the house. In such a situation, you should replace the metal door with a wooden door, which is easier to adjust and correct when changing openings.
Low tide installation
The final stage of work is finishing. One of its important elements is the ebb above the windows in a wooden house: it is designed to remove rain moisture from the walls and thereby increase their durability. In addition, it covers the lower part of the casing and improves the decorative qualities of the walls.
A wooden house or bathhouse changes in size all the time - it either “sits down” a little, then rises again. Therefore, simply taking and rigidly fastening windows and doors into the openings will not work: either the frames will bend or the walls will “hang” and will not be able to sit down when they dry out. To prevent this from happening, a wooden casing (casing or casing) is installed in the opening, which is held in place only by friction. It is already possible to attach a window or door frame to the elements of this box.
First, let's look at the casing profiles. Fixation due to friction is ensured by a simple tongue-and-groove lock. In one case, a tenon is made on the logs/beam of the opening, in the other, a groove is cut out.
If your bathhouse is wooden - a frame made of logs or timber, then the technology for installing windows and doors will be exactly the same as in the house. No difference. So everything described applies to the bathhouse.
Monolithic casing boxes
The counter part is often made from a solid wooden beam. They are also called monolithic or finishing. Depending on whether the groove is cut or a tenon, the mating part is made U- or T-shaped
Please note that when installing windows or doors, the fasteners should not go into the beam/log of the wall. To ensure proper reliability, the frames are mounted in the “thickest” parts of the casing
The casing is made of timber, in which a groove is selected or a tenon is cut. Accordingly, casing/edge profiles are U- or T-shaped
The material for the casing is monolithic or laminated veneer lumber. The use of laminated veneer lumber in bathhouses is not recommended: when using non-moisture resistant glue (and this usually happens), constant changes in humidity cause the glue to break down and the timber to crumble. Therefore, it is better to use monolithic timber of the required size
Just note that the timber must be dry - no more than 12% humidity. If it's wet, it will crack or warp. Order chamber-drying timber of the required size from the sawmill, or dry it yourself in the shade in a draft for 4-6 months
Order chamber-drying timber of the required size from the sawmill, or dry it yourself in the shade in a draft for 4-6 months.
This type of casing is called monolithic or capital. You can already attach a window or door frame to it. If the windows/doors are plastic, the “face” of the casing can be left flat. If you plan to install wooden products, choose a quarter for them.
Which of these two casings/pipelines is considered the best? When done correctly, both perform their tasks normally. Everyone chooses what is easier for them to do.
How to make a tenon on an opening
There are two options - first cut a tenon in the doorway, then make a casing block under it. The second option is to mark the tenon along the finished groove. In any case, markings are applied first.
The width and depth of the tenon should be 4-5 mm less than the dimensions of the groove. The casing is “planted” on the insulation, so space is required for it. The width is marked at the end of the logs/beams, the depth - on the side surface of the walls
When marking, it is important to maintain the verticality of the lines. Next, take a circular saw or chain saw and make cuts according to the marks.
Next, take a circular saw or chain saw and make cuts according to the marks.
In this case, it is important to maintain the required cutting depth on the side surfaces and not cut off the tenon completely. If you are not very good with a chain saw, it is better to use a circular saw - you won’t be able to cut very deep there
For an example of the formation of a spike, see the video.
There may be several reasons for the imbalance:
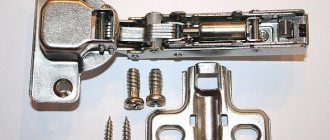
- Deformation or sagging of hinges (canopies). With prolonged use, the hinges wear out, the canvas gradually sags, causing misalignment. This problem is relevant for both the entrance and interior doors. The reason may be that the canvas is too heavy and the canopies are weak. The awnings either need to be adjusted or replaced.
- Deformation of the door frame (masters often call it lutka or ludka). There can be several reasons for the violation of the box geometry: shrinkage of the foundation of a new house, deformation of the walls, manufacturer defects, incorrect installation, long-term operation, heavy weight of the canvas, exposure to humidity (for wooden boxes).
- Deformation of the canvas. When doors do not close well, check the geometry of the door leaf. Geometry problems are common with wooden doors. The canvas may become deformed due to temperature changes and high humidity. To eliminate this cause, you need to check the gaps. Their size should be 2-4 mm. If on one side the gap differs by more than 2 mm, the matter is a violation of the geometry.
Frequently encountered problems
- The main malfunctions in the operation of the door unit are associated with the deformation of the wood during operation: the leaf may shrink if the material was not completely dried during installation, or increase in size due to humidity and changes in temperature.
- The problem may also be the wear of the connecting fasteners - hinges. The phrase most accurately characterizes the breakdown is: “the door sank.” When closing, the sash scratches the floor or threshold due to sagging hinge structure.
- Over time (under the influence of mechanical, thermal and other factors), the outer decorative surface of the door block is damaged.
The door lock breaks very often
How to adjust a metal door
In some cases, you can eliminate the cause of the distortion yourself.
Wear or broken hinges
One of the most common reasons for sagging metal entrance doors. According to their design, canopies can be divided into several types:
- Classic;
- Hinges with support bearings;
- Ball loops;
- Hidden canopies.
Classic loops. Metal doors are rarely equipped with them - they wear out quickly. The washer is the first to become unusable. To replace it, you need to remove the fabric from the hinges, remove the old washer, and replace it with a new one.
Sometimes the reason that the door has moved can be the loosening of the screws. The fix is simple: tighten the screws, or better yet, replace them with screws of larger diameter. You can do this door adjustment yourself.
If possible, it is better to replace classic hinges with more durable ones. For example, for reinforced Italian hinges from the Kontur company, which are designed for 300-500 thousand openings.
Canopies with support bearings. These hinges are adjusted using a screw located at the top. When the screw is tightened, its lower part rests against the pin of the counter loop, and the blade rises.
Ball loops. You can also adjust such a loop using a washer. If the door has sagged too much, it is better to replace the awnings with more powerful ones. If the deformation occurs due to the fabric being too heavy, add one or more loops.
Hidden loops. It is very difficult to replace hidden hinges yourself without the skills. It is better to contact a service center. You should also contact a specialist if the iron door awnings are not screwed on, but welded. In this case, in order to repair the door, the hinges will most likely have to be cut off and new ones welded.
If the hinge is broken it needs to be replaced. That said, adding a few extra awnings wouldn't hurt. You can do this yourself. To do this, fix the blade in the half-open position and replace all the hinges one by one. In some cases, deformation of the metal in the racks or in the frame of the canvas is possible. To fix this problem, welding work will be required. If you have never welded before, contact a service center.
Violation of box geometry
The most difficult thing to eliminate is a door that is skewed in a private house, where the problem arose due to deformation of the foundation. A complete reinstallation of the door frame will be required. Afterwards, the issue with the foundation must be resolved, otherwise the geometry may be violated again in the future. If the walls become deformed, reinstallation will also be required.
It is almost impossible to correct the violation of the geometry of the hole yourself, without the skills and tools.
Violation of the geometry of the canvas
The cause of deformation most often does not lie in operation. As a rule, it warps welding seams. They give tension to the metal and with temperature changes these tensions increase.
You can check the curvature using a laser level or a regular ruler. If you see that the iron door is warped precisely because of the welds, this is a reason to contact the manufacturer. You won't be able to fix this defect on your own.
Arbitrary opening (closing)
If you notice that your door begins to open or close at the slightest draft, this indicates that the hinges are not secured correctly. They must be secured strictly in a vertical line. And if the doors open randomly, you need to move the hinge on top closer to the inside of the jamb, and when closing it, you need to do the same with the bottom hinge, or put something under it.
Also, skewed hinges can cause the door to become skewed or jammed. To solve the problem, you will have to remove the old screws from the hinges and replace them with longer ones. If you decide to leave the old screws, you will need additional reinforcement of the sockets. This is quite simple to do: you need to fill the loops with pieces of wire wool, or drive in a wooden plug pre-lubricated with glue. Also, the door will stop jamming if the hinges are recessed into their sockets.
To prevent the door leaf from skewing, it is necessary to recess the hinge located opposite the skewing. If the above measures do not bring the desired results, you will need to remove a small layer of wood from above. You should do the same with a door swollen from moisture.
In some cases, the problem can be solved by walking along the end of the door with coarse sandpaper. You don't even have to remove the fabric from the loops to do this. However, if it is necessary to remove a large layer, the door will still have to be removed.
The door is removed from its hinges in the following order: place a hard object under it, lift it, holding it by the middle. Rock the canvas a little on its hinges, lift it with the lever and remove it.
It may well be that the door periodically shrinks and swells depending on the time of year. Then you need to remove the excess layer of wood when it swells, and during drying, nail a spacer, the thickness of which you can adjust. The gasket is made in the following way: take a rectangular piece of sheet copper or brass. Its length should be equal to double the thickness of the door leaf, and its width should be approximately 4-5 cm.
This rectangle is fixed with screws or nails to the vertical end in the center of the door, and its other half is bent outward and its end is rolled up into a roll. Cardboard or several layers of paper are placed in the space between the plates. With these simple steps you will ensure trouble-free closing of the doors. Based on its condition, you can increase or decrease the lining.
What to do if a wooden door sag
If the reason for the sagging of a wooden door is weakened hinges, they can be adjusted in the same way as metal hinges.
The reason for a wooden door to warp can be a change in temperature and humidity. If the integrity of the canvas is not compromised and the distortion is small, it is often enough to bring the humidity levels back to normal. To reduce the humidity in the room, you can use air conditioning, heating devices, or simply ventilate the room. Ventilation repairs may be needed.
Hinge repair
If a wooden door has leaked (one side is raised up, and the bottom end touches the threshold), then repair work must be carried out in the place where the door leaf is attached to the base - the hinges.
- The problem can be solved very simply: loosen screws are tightened with a screwdriver. You can also lift the door using a metal washer or a wire ring of the appropriate diameter, placed on the axis between the lower and upper half of the hinge.
The ring (or washers) and hinges are treated with oil before installation.
- Fixing hinged structures can also fail: the screws turn in enlarged holes. In this case, the screws are replaced with longer fasteners or the holes for them are sealed.
The size of the hole is reduced with matches. Repair of a wooden door is carried out with the panel removed. All fasteners are lubricated with glue and tightened before fixing. The door is installed after the glue has completely dried.
- The last method is to form new seats for hinged hinge elements: they are made with a hammer and chisel above or below the previous fastening.
The wooden door sank. Can it be prevented?
Wood is a living material that requires regular care and protection. A variety of coatings are used for this purpose.
Coverage types:
- Oil paints. They are practical and easy to clean; just wipe them with a damp cloth. Oil paints reliably protect the material from moisture.
- Acrylic paints. Odorless, non-flammable. The material adheres well to wood. The coating reliably protects the wood.
- Stains. Impregnation is more of a decorative nature. It penetrates the fibers, highlighting the texture of the wood. After stain treatment, the wood must be varnished.
- Lucky. They can be oil, acrylic, colored, colorless. The varnish reliably protects natural material from the effects of adverse environmental conditions.
It’s difficult to say for sure which coating is better. There is a different option for each case. One thing is for sure: covering the canvas and the box with protective varnish or paint is easier than doing repairs later.
To avoid problems with skew, choose models from trusted manufacturers. The Kontur company offers reliable models where the load of the hinges is carefully calculated, and welding is performed strictly according to technology.
Exposure to moisture
The reason for the deformation of the box can be not only dampness or flood, but also the finishing of the wall near the doorway after installation of the structure. Putty and plaster are water-based, and water evaporates into the wood and causes it to swell. Moreover, gypsum mixtures can expand after drying, which also causes the wood to swell.
If, after installing the door, you decided to putty the walls near the frame and it became deformed, then:
- — Set the location of the deformation,
- - Remove the casing,
- — Unstitch the seam between the frame and the wall.
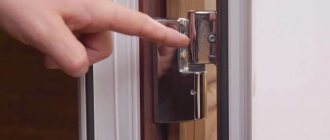
To determine the location of the deformation, take a strip of paper and run it along the gap between the closed door and the frame (photo 1). This is necessary so as not to unstitch the door over its entire height.
Now mark the place of deformation with a pencil, remove the casing and use a spatula or a sharp knife to remove the putty/plaster from the side of the wall (photo 2). Just close the door overnight with a paper gasket in the gap between the door and the frame and in 90% of cases the problem will be resolved.
If the door creaks
As a rule, the door creaks simply because the hinges are not lubricated. Most often, you can pour a sufficient amount of oil into the hinges without removing the door, but if the hinges are covered with a crust of dirt and paint, then it is better to remove the door, clean and lubricate the hinges, and then hang it in place.
The door can also squeak because the hinges jam, since the recesses in the doors and frame were cut too deep to install them. Here the solution is very simple: unscrew both parts of the hinges, seal the seats with cardboard gaskets and install the hinges again, securing them with screws. Using the trial method, determine the correct position of the door when suspended on its hinges: you may need several cardboard (or plywood) spacers.
The door may also stick because the screws have become loose and are sticking above the surface of the hinges. Usually the screws can simply be tightened all the way; If they do not stay in place, replace them with longer screws of the same or smaller diameter if the heads of the previous screws were too large to go deep into the countersunk holes on the hinges.
To prevent the door from sticking, install cardboard spacers under the hinges. If the old screws do not hold, screw in longer ones instead.
Now in more detail
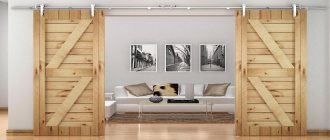
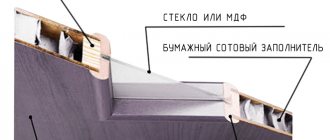
Frameless sliding doors are when the entire door consists of one whole piece, for example it can be a wooden panel, or most often laminated chipboard and MDF, this canvas serves as a door and does not have a metal frame. The top and bottom casters are attached directly to the panel and then installed on the cabinet. Experienced craftsmen insert metal straighteners on the reverse side in advance, so that in the future they can correct possible deformation of the door. Watch the video below, in which a specialist shows what rectifiers are and how to install them.
Knock when closing doors
The easiest way to get rid of a loud knock when closing doors is to install a seal on them. As for interior and internal doors, here you have the opportunity to try to move the stop strip located on the door frame; Any type of door allows you to adjust the striker plate with a groove for the latching lock tongue, although this is not an easy task: you will have to drill new holes and seal the old ones by driving repair plugs into them, previously coated with glue.
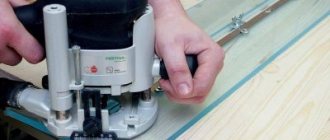
If the door gets stuck in the sash, remove it from its hinges and plan the edge. After installing new carpet on the floor, the bottom edge of the door can be trimmed using a special door miter saw.
When the door jams
In cold and wet weather, exterior doors often have difficulty opening and closing, but when it becomes warm and dry outside, they work normally again. This is a sign that during painting the lower part of the door was not covered with a sealing film, due to the absence of which moisture penetrates inside and the wood swells.
Door sticking can also be caused by a layer of paint in the rebate (on the edge of the door opposite the hinges and the selected quarter in the frame where the door fits). In this case, it is necessary to remove the door and plan the edge with a plane; Paint over the freshly planed edge after you have fitted the door and installed it in place. To prevent moisture from penetrating the wood of the door, apply at least another coat of paint to the bottom of the door.
If the bottom edge of the door sticks, rub it with sandpaper.
If the door sticks at the bottom, then the hinges may be loose and sagging. Try to eliminate the play with screws, screwing in longer or larger diameter screws if necessary. If this does not help and the working gaps in the narthex are not created, you will have to remove the door and plan the rubbing edge with a plane. Use an end plane and remove shavings towards the center of the door.
As for the interior door, you can remove a significant layer from its lower edge by placing a sheet of sandpaper on the floor under the door (abrasive side up), and, while opening and closing the door, process the surface of the lower edge in this way.
The door may begin to jam after you install new carpet or other covering on the floor. In this case, remove the door and cut a strip from its bottom end using a circular saw with a rip guide installed on it. If you have several doors to shorten, rent a special door miter saw that can be used to trim the doors without removing them from their hinges.
Reinforcing fastening of canopies with self-tapping screws
Sometimes it is enough to simply tighten the hinge screws and the door will fall into place.
In more serious cases this will not be enough. There are two proven ways to strengthen awnings.
To strengthen the fixation, you need to replace the old canopy screws with longer ones.
- We dismantle the door. To do this, you need to unscrew the screws from the canopies, or if collapsible type hinges are installed, then you need to lift the panel up and remove the door.
- We remove the hinges from the door frame.
- We seal the holes that were loosened by the previous self-tapping screws - we drive wooden pegs into the formed grooves.
You can use regular matches and glue. Apply glue to the matches and drive a homemade plug into the hole. We wait a day until the glue is completely dry and only then move on to the next stage.
- We install the hinges in place. Reinforced grooves and new screws will not allow the canopies to become loose for a long time.
If this method does not work and the door still sags, then you need to move the hinges to a new place. The right solution in this case would be to contact a specialist.
Door corners that have lost their rigidity
The corners of most doors are connected by means of a connection by inserting a through tenon into the eyes, in which each vertical timber of the door leaf is joined at the top and bottom with the horizontal beams. Over time, these connections can become weak.
There is no need to disassemble the leaf of such a door into parts for repairs; just remove it from the hinges, knock out the old wooden wedges from the end joints, make new ones, coat them with glue and hammer them in place of the old ones. To give the connection additional rigidity, and also in the event that wooden wedges were not installed, drill through holes with a diameter of 10 mm through the fork ends of each vertical beam and hammer wooden pins with a diameter of 10 mm into them, having previously coated them with glue. After the glue has set, level the protruding ends of the pins with a plane flush with the surface of the timber. When repairing a door in this way, use frame clamps: one to give the door joints a right angle, the other so that the geometry of the door is not disturbed while the glue dries.
The connection by inserting a through tenon can be strengthened by driving sharp wedges into it. Straightening a deformed door using beams, clamps and spacer blocks.
Replacing cracked glass
Cracked or simply outdated cloudy glass is not difficult to replace with your own hands. In its place, you can install a new one, for example, matte or transparent, tinted or with a sandblasted pattern, embossed or smooth, colored or plain.
Note! If the glass has a thickness of 10 mm (triplex), then replacing it is impractical. Firstly, it is very expensive, and secondly, it is almost impossible for an inexperienced person to cope with such a task on their own.
Case 1. Glass fixed with glazing beads
The easiest way is to replace glass secured with glazing beads. It is enough to dismantle them and then remove the glass by hand. We arm ourselves with pliers and a metal spatula. We pry up the glazing bead with a spatula, and use pliers to carefully pull out the nails.
Use a chisel or knife to clean the glass bed. We take measurements. If the opening is non-standard, we make a figured pattern from cardboard. At the same time, we take into account that the size of the glass should be slightly smaller than the opening. We wipe the glass with a soapy sponge, dry it with a clean rag, transfer the design from the pattern and cut it.
Attention! Wear gloves to avoid cutting your hands. Carry out work on a flat surface with a working glass cutter.
We treat the perimeter of the glass opening with sealant, after which we insert the cut piece, saw new glazing beads with a jigsaw and fasten them with thin nails.
Case 2. The glass has a hidden fixation
If the glass has a hidden fixation, you will have to disassemble the door, unscrewing the bolts, removing the old glass and inserting the new one. Silicone cannot be used in this case, since it will be impossible to replace it later. A significant disadvantage of replacing glass in such doors is that after assembly, the panel may lose its geometry and will require editing with a plane.
By the way, instead of glass, you can use an acrylic unbreakable mirror. It is quite light, durable, highly decorative and easy to cut.
Find out about the 10 best options for how to do it in our new article.
Installing the door drain strip
A drain strip is a piece of board with a shaped profile that is attached near the bottom edge of the door to drain rainwater. For a more effective result, drill holes for the screws with a guaranteed gap in depth, then drill out these holes according to the diameter of the screw heads so that each of them can be recessed into the countersunk area. Thus, the heads of the screws will be below the outer surface of the rail and can be hidden from above with wooden plugs glued into these holes.
Commercial house
As I wrote earlier, my brother and I decided to start building (so far 1 house) for subsequent sale. I wrote about this project earlier
The house will be one-story
80 m2, aerated concrete walls, lined with brick. The foundation is a reinforced concrete slab.
We collected some credits and drove off.
The snow melted and our site appeared.
Of course, I knew that it was quite swampy there. But in our city there are basically no others, just some are a little higher, others a little lower. One continuous swamp.
But last year’s information turned out to be irrelevant this year! Since a neighbor (500m) built a garage, filled up the drainage ditch and the whole area floated. Here is a photo from May last year
This year things are a little worse. Well, okay, we’ll solve this issue (we’re already solving it by involving the administration)
Individual housing construction plot with an area of 590 m2. Gas, water, fiber optic internet near the site.
We begin to transport the earth.