The kitchen is the room that falls into disrepair faster than others. Here, furniture and decoration are constantly exposed to temperature changes, high humidity, soot and grease. The facades of the furniture in the work area especially quickly lose their attractive appearance.
Buying a furniture ensemble for the kitchen is not a cheap pleasure. If it is worn out only externally, then you can bring it back to life yourself. What methods of restoring kitchen facades exist and how to work with them - read on.
Coating restoration
Restoration of kitchen facades depends on both the base material and the finishing layer. In most cases, if the main material is damaged, the entire façade will have to be replaced. The exception is small scratches and chips, which can be repaired with a special wood putty or wax pencil.
When the finish is damaged, everything is not so clear.
- PVC film. The material does not adhere very well to chipboard or MDF due to its different nature. Over time, as well as under the influence of moisture and temperature changes, the film peels off. The advantage of the material is that restoration of such a coating is quite possible.
For small defects, the PVC film is simply glued: draw PVA glue, “Moment”, into a syringe from a needle and fill the area under the film. Then smooth out the coating and secure with tape for 4 hours. If the damage is extensive, you can remove the entire old film from the facade by heating it with a hairdryer, and stick a new one in the same way. In this case, it is better to use liquid nails.
- Melamine and acrylic films have much better adhesion to wood material, so they rarely peel off. Small areas are glued in the same way, but if the damage is extensive, the façade cannot be repaired at home: the coating will have to be changed in a workshop.
- Acrylic panel. This type of kitchen renovation is impossible. In case of severe chips or scratches, the sash must be replaced with a new one.
- The veneer is glued as easily as PVC film. Replacing it is also not difficult: the material is produced with glue already applied to the back side.
- Enamel. Repairing kitchen facades with your own hands is quite possible, although the work requires extreme care. Firstly, you need to clean out scratches or peelings, secondly, choose exactly the same shade, thirdly, apply it very carefully. If there is a large area of damage, it is better to entrust the work to a professional.
Preparatory stage
Before you begin restoring furniture at home, it is important to correctly assess the scale of the work ahead.
First you need to determine which defects you will have to deal with. There are several types of furniture damage that you can restore yourself:
- Scratches and abrasions;
- Deep mechanical damage - chips, cracks;
- spots;
- Damage caused by insects;
- Missing or worn-out fittings;
- Broken parts.
Once the extent of the damage has been determined, the restoration process can begin. First, you should clean the surface of dirt, if necessary, rinse it with warm water and detergents, and dry it.
Upgrade with PVC film
Restoration does not always mean only returning facades to their original appearance and replacing fittings. Modern methods of decoration make it possible to change the appearance of a kitchen beyond recognition, using quite affordable means.
One of these options is vinyl film, or rather, a sticker with an image on PVC film. Moreover, the image can be anything - from a wood pattern to an ornament of any complexity or a landscape.
Quite often, this technique is used to change the style of the kitchen or simply diversify the design. To do this, decorate an area or two doors with a sticker. If they want to update their entire set, all facades are covered with vinyl film. The choice is entirely determined by the style of the room.
Paneled facades are very suitable for such kitchen renovations. The frames are painted or also covered with a film of a different color, and the inner surface is decorated with self-adhesive film.
The photo shows a successful solution in the Art Nouveau style.
How to fix the problem?
If the film on the facade of the MDF kitchen has peeled off , you need to carefully spread it with glue from the edge and press it down. There is a chance that the film will take the desired shape. Another way to restore the coating is to use an adhesive membrane. To do this, you will need to lay the boards on a dry and flat surface, for example, on a table, cover them with a membrane, and use a vacuum. The membrane should tightly cover the facades. If you want greater reliability, you need to use high-quality glue and heat the material so that it can be activated. Warming up should be done evenly. This method is suitable only for unmilled facades: if the surface is uneven, the membrane will not stick and will quickly peel off. Therefore, it is so important to carry it out correctly, observing certain conditions.
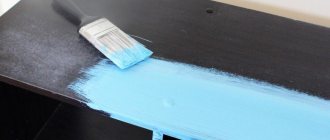
Coloring
Restoring kitchen facades using painting is the second most popular method. It is worth noting that it is far from being as simple as it seems at first glance. All facades are painted with the exception of MDF doors with acrylic panels.
Polyurethane enamels are preferable among kitchen materials. They are resistant to moisture and temperature changes, are not afraid of light, dry quickly and are safe. In addition, the palette of paints includes all kinds of shades and textures - from matte to high-gloss, literally with a mirror shine.
How to restore a kitchen set by painting?
- Remove all the fittings from the sashes, then remove the facades themselves.
- The finishing layer is completely removed and the surface is cleaned with sandpaper.
- The material is primed - it is recommended to use a water-based polyurethane primer. The procedure should be repeated and wait for the primer to dry completely.
- Apply paint using a roller and brushes of different sizes. The paint must be applied in several layers, first allowing each layer to dry completely. The carved parts of the product are especially carefully painted. Using a stencil, you can create a pattern, ornament or image on the sash.
- When restoring the facade, do not forget about the final stage - varnishing. No matter how good the enamel is, varnish will prevent its mechanical damage.
Coloring techniques are different. Depending on your own skill, you can simply paint the facade with one color, you can paint it, you can paint the kitchen set with “metallic” paint - it contains aluminum powder.
The fashionable aging effect is obtained in this way: the facade is covered in two layers with paint of different shades, and after drying, a solvent is applied to the surface. In this case, the top layer becomes covered with cracks. With the right skill, you can also achieve a “chameleon” effect: this will also require painting in two colors, but after drying, the facades are coated with glossy varnish.
Removing scuffs and scratches
There are many ways to remove scratches on furniture, both professional and popular.
Furniture stores that sell fittings and parts sell a special touch.
It is accessible and easy to use: just shake it well, then apply it with a brush to the damaged area. If necessary, make several layers.
Leave to dry for 15 minutes, then wipe with a flannel or viscose cloth, leveling the surface.
Another remedy is furniture wax. It comes in two types, soft and hard. The soft ones are enough to rub the desired area, the hard ones are first melted, applied, allowed to harden and sanded.
Craftsmen offer equally simple ways to disguise small scratches and abrasions.
Using walnuts, iodine, machine oil, mayonnaise, olive oil and vinegar, children's wax pencils.
The method of application for all options is approximately the same: carefully treat the damaged area, leave to dry and absorb for a few minutes, wipe with a soft cloth.
You can also make your own mastic. For this you will need:
- Turpentine (30g);
- Petrol;
- Alcohol (20g);
- Wax (40g);
- Wool fabric.
Melt the wax in a metal bowl, add turpentine, stir and add alcohol. Dip a cloth soaked in gasoline into the mixture and gently rub the mastic until shiny.
These were methods of removing and masking surface damage on polished wood surfaces.
Now let's look at the possibilities of restoring more serious damage.
Decoupage
To restore the facades of kitchen furniture, sometimes they resort to not entirely traditional methods. Decoupage has become a trendy touch for retro kitchens. But in practice it is used quite rarely, as it requires taste and accuracy in execution.
The material for decoupage is special napkins with bright original images. In fact, in this capacity you can use newspaper clippings, pieces of fabric, fragments of lace, your own old photos, a finished image from albums or books. In the kitchen, decoupage using small objects will be very useful: coffee beans, herb stems and spikelets, dried flowers and the like.
The decoupage technique is quite simple: you sand the kitchen set with your own hands using coarse and then fine sandpaper. They are painted with a background color - acrylic paint is used, and then the image or objects are fixed to the surface using office glue. Be sure to cover the craft with several layers of transparent furniture varnish after the glue has dried.
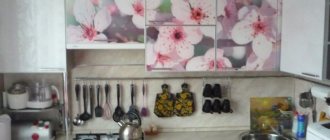
The photo shows “plant-based” kitchen decoupage.
Moldings, overlays and decoupage
These restoration methods will give the kitchen set unique features: there is no limit to the scope for imagination.
Before applying jewelry, the surface for it is prepared: the application area is sanded, cleaned and degreased.
A 3D decoupage pattern is formed using a stencil: a material is applied through it to form a bas-relief. A popular option is to use wood putty. After drying, the pattern is sanded with sandpaper and covered with a protective layer of transparent or colored varnish.
Volumetric decoupage
Applying putty through a stencil
Decoupage with putty
For decoupage using napkins or decoupage cards, PVA glue is applied to the selected material. Then the drawing is applied to the cabinet door and smoothed out. After drying, apply 4 layers of matte or glossy varnish.
USEFUL INFORMATION: Which wallpaper to choose for the kitchen?
Moldings are overhead wooden or plastic elements. They, like decorative overlays, are attached with glue to a previously prepared surface. For wooden moldings it is possible to attach them to small nails without heads.
Moldings and overlays
Updating your kitchen with moldings
Moldings for furniture
Furniture decor
Varnishing
Repairing a kitchen set made of wood comes down to restoration, especially if the material is quite expensive wood. And old wooden furniture, both today and centuries ago, is perceived as a symbol of solidity. Moreover, wooden kitchen units are not that difficult to update.
The most popular techniques are varnishing and tinting; they are often combined. The varnish can be used as matte transparent, glossy or even colored. It doesn’t radically change the color palette of the furniture, but it does add some shade. Stain is used in cases where they really want to change the color of the facade by a couple of tones.
The technology of both processes is similar.
- The facades are removed from their hinges and the fittings are removed.
- The surface is cleaned of old varnish or other finishing, treated with sandpaper, coarse and fine, and then thoroughly sanded.
- The cleaned surface is primed.
- After the primer has completely dried, a layer of varnish is applied to the facade with a brush. After the varnish has dried, the procedure is repeated at least twice.
The stain is applied in the same way, after the soil has dried. Depending on how much they want to change the color of the furniture, tinting is carried out from 1 to 4 times. Then the product is opened with varnish at least twice.
Molding – furniture plinth of different shapes – will help diversify the look of updated furniture. It is very diverse in size and configuration. The molding is glued to the surface of the facade and can be painted and varnished along with the sash.
Removing chips and cracks
Getting rid of chips and cracks in wood is much more difficult than getting rid of surface scratches.
Therefore, if you are not sure that you will be able to carry out repairs at home, it is better to contact a specialist.
If you decide to do it yourself, you need to stock up on the necessary minimum tools:
- White spirit (nail polish remover);
- Stain of the desired shade;
- Wood primer;
- Fine sandpaper (100, 180, 300, 800, 1200 and 3000);
- Wood putty;
- Masking tape;
- Roller or brush.
If the restoration does not require complete disassembly into parts, then the remaining surfaces should be protected with masking tape.
Clean the damaged area from the varnish coating using white spirit, treat the wood with a primer, then putty.
After drying, level the putty with the surface using sandpaper. Remove dust with a damp cloth and apply stain to obtain the desired shade.
It is important to apply the stain exclusively to the putty area, without getting it on the wood. Otherwise, the wood will change color, and then major repairs will be impossible.
Tip: You need to make the color a shade lighter, as the stain will darken when varnished.
After complete drying, you can varnish. The varnish should be applied with a brush or roller, depending on the area of the area.
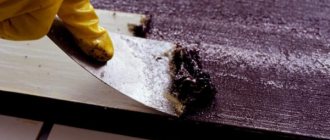
Each new layer can be applied only after the previous one has completely dried and preliminary sanding with sandpaper with a fraction of 600 or 800 units.
The last layer is smoothed over the old polish using the finest grit sandpaper.
First at 1200, and then at 2500 or 3000. When finished, wipe with polish or furniture wax until a glossy surface is obtained.
Unusual solutions
The imagination of home craftsmen literally has no limits, so completely unexpected things can serve as materials for kitchen renovation.
- Photo wallpaper is a material that is in no way inferior to PVC film in terms of density and strength. It is fixed to the surface of chipboard, MDF and even plastic with liquid nails. Photo wallpapers are cut to the size of the facades and pasted in the most usual way. After the glue has dried, the products must be opened with varnish. If desired, you can order photo wallpapers with images from your personal archive.
- Tile finishing. As a rule, walls are decorated with ceramics. However, nothing prevents you from using this beautiful material as decoration for a flat or paneled facade. The tiles are cut and fixed using the same liquid nails.
- An even more interesting, but also labor-intensive option is porcelain mosaic. There are not enough broken dishes from one apartment for this, so you will have to get the fragments somewhere: if you negotiate with the nearest cafes and restaurants, you will get the material quite quickly. The fragments are sorted by color, used to form a pattern or simply a color gradient and glued to the surface of the facade. The gaps between the fragments are sealed with grout.
Restoring countertops and kitchen tables: interesting ideas
To refresh a countertop or table surface made of chipboard, staining, decoupage and varnishing are used. But there are other ways, such as tiling, as in the photo below.
A countertop surface improved with ceramic tiles receives many advantages:
- Not afraid of water.
- Becomes more resistant to mechanical damage.
- Easy to clean and remove dirt.
The disadvantage of this modernization is a significant increase in the weight of the countertop. But since kitchen furniture is used permanently, there is no big problem here.
The tiles are laid using regular tile adhesive. But the work has its own characteristics:
- First, we attach metal corners to liquid nails along the perimeter of the tabletop. They serve as edging for the tiles and cover the end of the covering.
- We lay the tiles: tightly and with minimal gaps. The glue dries quickly, so you shouldn’t cover the entire tabletop with it at once. It is recommended to apply it in small portions under one or two tiles.
- We wait at least 6 hours until the glue dries completely, rub the seams and cover with a protective layer of varnish.
Another original way to transform a tabletop is to create a mosaic or ornament under tempered glass. Several slats or corners are screwed to the surface, which will divide the tabletop into zones. Decorative filler is poured into these sectors: small pebbles, coins, shells, beads or sand. From above, all this splendor is covered with impact-resistant glass, which is glued on.
Repairing kitchen facades with your own hands: everything will work out!
Repair is usually a costly and troublesome task, except when it is done on your own. If you approach the matter wisely, you can get a wonderful result while spending a small amount of effort and money.
When initially choosing facades for the kitchen, you need to pay attention not to the appearance, but to how wear-resistant the material used is (reaction to elevated temperatures and humidity, the action of acids and alkalis, fragility of structures, susceptibility to chips and scratches), as well as to repairability later.
Almost all external parts of the kitchen are made of MDF, chipboard or solid wood and form its base, which is covered with a decorative coating on top.
Such a coating can be various films, plastic, veneer or acrylic. It is their properties that will determine how long the kitchen can serve without requiring repairs.
Restoration of the ends of chipboard facades
The front surface of a chipboard set is often subject to various damages. This may be abrasion of paint, chips and scratches, defects in parts in places of fittings and fastenings. Such damage can be easily eliminated without disassembling the hanging cabinet using wax crayons, retouching agents, and fixing varnishes.
Most often the problem occurs with chips at the ends. Melamine edging is used to restore these areas. Repair work takes place in several stages:
- Selecting a new edge of the appropriate size and color. It is necessary to measure the length and width of the end of the door, add a few centimeters for reserve;
- Removing old edge. Heat the iron and apply it to the element;
- Cleaning up irregularities. To do this, you can use a chisel, fine sandpaper;
- Installation of new covering. Apply a self-adhesive edge and iron it with an iron. When the glue hardens, trim off the excess with a knife and sand the joints.
Types of kitchen facades
Laminated facades
They usually consist of MDF or chipboard, which is first covered with a melamine film on top, and then varnish is applied over it. This is one of the most wear-resistant finishing options and is quite difficult to repair. This material has the main advantage - an affordable price.
Frame facades based on MDF
They are frames made of MDF panels covered with either veneer or PVC film. Glass, rattan, chipboard or plastic can be inserted into frames. They are characterized by low wear resistance, but repairing such facades is quite simple.
Facades covered with PVC film or plastic
They are also based on MDF, which is covered on top with either film or laminate. The advantages of such facades are increased wear resistance, an attractive price, excellent decorative properties and good maintainability.
Common reasons for this type of repair include peeling of PVC film from MDF when exposed to temperatures above 75 degrees, and heavy cleaning of frosted plastic.
Wooden kitchen fronts
The most expensive, but spectacular type of kitchen facades. It has good wear resistance, provided that certain rules for caring for the product are followed, but can fade when exposed to direct sunlight.
Depending on the type of kitchen facades, if they are worn out and the nature of the damage, you can use certain types of repair work yourself. The repair can be gentle in case of minor changes in appearance or major, when more serious efforts are required to bring the headset into proper shape.
Wooden kitchen fronts
In order to repair wooden kitchen facades with your own hands, you must initially determine the type and nature of the damage, decide how radically the appearance of the kitchen should change after restoration, choose the appropriate repair method and carry it out using the presented technology.
How to decorate a kitchen set
Those who have a question about how to transform the facade of a kitchen unit with their own hands should know that there are many ideas and techniques in this regard. The main thing is to choose the right decorations that will look harmonious with the overall design of the room. For decoration, all kinds of stickers, paint, varnish and even additional elements can be used.
Hand-made things are in particular demand because they reflect the inner world of the owner, her talent and skills.
If you want to give a monotonous kitchen new colors, brightness and life, it will be enough to update the color of the kitchen set. With the modern choice of building materials, this will not be difficult to do. Remodeling with rattan inserts will give the façade new life. The main thing is to make the correct measurements first.
Rattan is often found in the interior of our apartments.
If the outer sides of the cabinets do not have obvious and visible damage, then painting can be used; the use of antique techniques is popular. To do this, you just need to go over the painted canvas with a special sanding material; it slightly scratches the paint layer, giving the surface an aged appearance.
The aging effect manifests itself when dark areas peek through light paint, and vice versa.
Another interesting option is ceramic tiles. You can also use mosaic elements.
When choosing tiles for the kitchen, take a closer look at its texture.
Ceramic tiles
Another option for decorating an old kitchen surface is ceramic tiles. You should choose the material carefully; it is better to give preference to small-sized parts. Advice from a professional in the store will help you purchase the most suitable ceramic tiles for a particular type of finish.
Uneven contours, imitation of aged clay tiles or stone are suitable for a set in country and Provence style.
Fastening tiles is an important process; if you do not have experience in such construction work, then it is better to contact a specialist who will do the work and provide certain guarantees.
Large and medium-sized elements are not suitable for a miniature kitchen. Such decoration will only increase the feeling of crampedness in the room.
Rattan inserts
Recently, rattan inserts have become very popular. With the help of this technique, the covering of the facades will acquire newness, the transformation will benefit the kitchen furniture. Before you start cladding, you need to take the most accurate measurements from the surface on which the canvas will be applied, and then cut out the parts. The rattan fabric is attached using a construction stapler.
The range of wicker rattan furniture is varied.
Rattan is a material that you can play with and come up with different options for filling the surface with it. You can decorate the entire door, or part of it. If the fastening was not done carefully enough and the staples are visible, then decorative strips can be used, they will help hide the defects. Before attaching the canvas, it must be soaked in water.
Rattan decorative elements are ideal for any interior style.
Do-it-yourself kitchen renovation in various ways
Surface decoration
It is used in case of minor scratches and minor chips, and also as a gentle method of changing the appearance of kitchen furniture.
In order to hide minor scratches and chips, you can use a wax pencil matched to the color of the headset. It is melted over the damage and then sanded to smooth the surface. This procedure is also repeated when decorating the surface with vinyl stickers to achieve a perfectly flat surface. The pencil is not selected by color.
Decorating kitchen furniture using stickers
It is worth noting that scratches on glass cannot be removed this way.
Decorating the surface with vinyl stickers is suitable when you want to update the kitchen facades and hide small surface defects at the same time. The repair process does not take a huge amount of time; it is carried out without removing the facades from their hinges.
To do this, you need to clean the restored surface from dust and debris, degrease it and, using a plastic spatula, slowly apply the sticker to the material, carefully separating it from the base.
Pasting kitchen facades with vinyl self-adhesive film
This type of repair is suitable when the area of problem areas is large or you want to completely change the appearance of the facades. To get a good result, it is better to use expensive material for pasting, a thick and textured film, for example, German. It adheres better and hides even minor scratches without their restoration.
Here's what you need for pasting
It should be borne in mind that this method of kitchen renovation can only be used on smooth and uniform surfaces. Covering, for example, moldings or strips with film will be very problematic.
In order to properly cover facades with your own hands, you need:
- using a screwdriver, remove and conveniently place parts of the furniture on the table;
- thoroughly remove dust from them, degrease them using special solutions, for example, white spirit;
- take the dimensions and draw them on the film using the dimensional grid on the reverse side, a ruler and marker, and a canvas of the required size and shape. It’s better to add 2 cm along the edges just in case. Cut out the film;
- Carefully separating the film from the base, paste the facade using a plastic spatula. To achieve a high-quality result, you can use a hairdryer, which will allow the film to lie perfectly on the surface without bubbles. If they appear, you can use a needle or a stationery knife to puncture.
Coloring
One of the most effective types of facade restoration. This method is used provided that the surfaces being repaired are free of damage and chips. If they exist, then it is better to restore them using a wax pencil or other suitable material. To paint facades, use enamel, acrylic paint for MDF or car spray.
To properly paint kitchen facades with your own hands, you need to:
- remove the doors from their hinges and lay them on a relatively flat surface, having previously dismantled the fittings on them (handles, hinges);
- rinse the surfaces well and then degrease them using a special material;
- clean the facades with fine sandpaper, then remove dust from the surface;
- using a spray gun, apply the primer in several layers so that each layer has time to dry;
- starting with hard-to-reach places, apply paint evenly using a roller or brush in one or several layers. Let it dry. You can liven up a painted element by adding a cute design using a stencil;
- After painting, the facades can be varnished to obtain shine and additional protection from aggressive environments.
Varnishing
This method is used to restore existing varnished facades or apply it as a protective layer to a painted surface.
To varnish surfaces with your own hands you need:
- first dismantle the facades, then clean them of fittings;
- thoroughly clean the surface with fine sandpaper, and then remove all resulting dust and debris with a damp sponge;
- the next stage of preparation is priming the facade in several stages until the primer is completely dry;
- After the primer mixture has dried, you can apply acrylic furniture varnish with high wear resistance on top. The varnish can be transparent or pigmented. In order to get an impressive result, colored varnish is applied, adding transparency to it with each layer.
Summarizing the above, we can say exactly what material is better to choose for facades so that they serve their owners longer, and their repairs can be done with your own hands without extra effort. These include MDF facades coated with PVC film or high-quality plastic, as well as their wooden counterparts. It all depends on the class of the kitchen, taste and financial security of its owner.
Restoration of kitchen facades made of natural wood
Solid wood furniture looks great, but requires compliance with several operating conditions:
- The surfaces of wooden furniture should be cleaned with soft cloths soaked in a soapy solution. Do not use solvents or abrasive cleaners.
- Do not place hot dishes on the countertop.
- The humidity in the room should not rise above 70%.
- Minor damage and scratches must be repaired as soon as possible.
Scratches and cracks on the facades of solid wood furniture are repaired with melted wax. Chips are smoothed out with wood putty. After leveling the surface, the restored area is covered with a layer of furniture varnish.
If you need not just minor repairs, but a complete update of the appearance of the facade, replace the entire varnish coating. This is done this way:
- We dismantle the facades and remove the fittings.
- The surface is carefully treated with fine sandpaper. It is necessary to completely remove the old varnish coating. This is not always easy, especially if there are raised patterns or indentations.
- We remove varnish shavings and sawdust with a damp sponge or napkin.
- After drying, prime the surface twice, allowing each layer to dry before applying the next.
- Apply varnish with a brush or roller. We form the protective film in several layers, with each subsequent layer being thinner than the previous one. The varnish dries for at least a day in a well-ventilated area.
A different shade of wooden furniture will be given by stain or varnish with pigments.
You can change the set beyond recognition and give it a more modern look, as in the photo, by painting it.
How to update a kitchen set with your own hands: interesting ideas and useful tips
The front part of a kitchen unit is called a facade, in particular, the front side of its doors and drawer lids. For its manufacture it is used:
- natural wood;
- chipboard (chipboard);
- medium density fiberboard (MDF);
- plastic.
Special dyes, glass, metal, and self-adhesive films are used to finish the front surface. Sometimes these materials are combined with each other, for example, when creating stained glass windows.
In most cases, restoration of kitchen furniture facades becomes necessary after long-term use. Drops of fat, particles of food residues, and vegetable dyes leave traces that cannot be removed with household products.
In order not to buy other furniture, since the existing one remains in technically sound condition, many owners prefer to update the facade. This repair work can be done even by an amateur because it does not require special skills or special qualifications.
If the elements of the front part are intact, have no damage or large holes, and adhere well to the fasteners, you can perform simple operations:
- cover the surface with self-adhesive films;
- paint it a different color;
- seal the facade using decoupage technique.
These options can be applied to furniture made from any material. Everything you need is sold in construction stores.
Pasting
The easiest way to update the front side of a kitchen unit is to cover the facades with self-adhesive film. It is better to choose a material with a glossy surface. It is easier to wash; grease and dust will not stick to the surface.
Using film we restore it like this:
- the removed parts of the facade are washed with a product and dried;
- the film is cut into pieces 1-2 cm larger than the plane of each part.
- Having glued its edge, we fix it, gradually unwinding it along its length.
To make it easier to disperse bubbles, the surface of the facade is lightly sprayed with cold water. Excess film is cut off with a stationery knife.
Coloring
Another option for restoring facades is painting. Anyone can do this work with their own hands in the following sequence:
- remove handles, hinges and fittings;
- Wash, dry and degrease the removed parts;
- Prime the surface of the facade depending on the type of paint, pre-cleaning particularly damaged areas with fine sandpaper;
- dry and apply paint with a roller on a flat surface, or with a brush on a textured surface.
The paint is allowed to dry, after which the furniture is assembled.
Decoupage
Restoring the kitchen façade using the decoupage technique has become popular. To do this, use wrapping paper, napkins with a pattern, and waterproof glue. Doors and drawers are removed, cleaned, and dried. A layer of glue is applied to the old coating, paper cut into pieces, cut out patterns, flowers, drawings or parts thereof are placed on top.
Old postcards and wall calendars can be used for covering. To give the façade surface an aged look, the application is dried with a hairdryer. This creates fine wrinkles. To protect against moisture, decoupage is coated with several layers of transparent varnish.
Restoration of chipboard, MDF
As a rule, complex repairs and restoration of chipboard furniture involve replacing parts. Modern laminated or veneered surfaces are rarely repaired. They change more often. In our workshop you can replace a tabletop, a veneered door, or part of a façade that has become unusable. We replace it with a similar one that matches the color, pattern, and texture of the veneer. The restorer will select the necessary veneer for veneering or purchase already veneered or laminated material. Next is a matter of technology. As a rule, when repairing chipboard furniture, it is updated and takes on a fresh look. And when replacing facades or cabinet doors, it becomes completely new. During restoration, the carved decor of the frame is carefully removed, the part (tabletop, part of a door or cabinet front) is changed, varnished, and polished. Then the decor returns to its place. There are no traces of repairs left.
We are focused on providing quality service. Making copies of furniture, veneering with valuable wood, marquetry, decoration. It is necessary to resort to restoration of furniture only if it is so expensive that it is not possible to replace it with a new one. This primarily applies to expensive luxury furniture. Italian designer furniture is so good in design, construction, execution and finishing that parting with it due to minor damage or disruption of the surface finish is wasteful.
Furniture made from chipboard began to appear in houses, apartments, and offices starting in the mid-20th century. Chipboard is a chipboard. First, the shavings obtained during the woodworking process were mixed with glue. Now technology has become more complex. The shavings are bonded into slabs with resin. Sheets are formed from the resulting mass. Chipboard width 1220-2500 mm. Length 1830-5680 mm. Thickness from 10 to 28 mm. Dimensions determine properties. Thin sheets of 8-10 mm break easily and are suitable for decorative partitions. 16-18 mm – used for furniture production. 22-25 mm have proven themselves well for the production of countertops.
Advantages of chipboard furniture.
1. Cheaper than furniture made from natural wood. Although this cannot be said about luxury expensive Italian or designer furniture.
2. Don't warp.
3. Does not crack due to changes in temperature and humidity.
1. Phenolic resins are used in the production of chipboards. Therefore, it is necessary to ensure that all planes and edges of the furniture are carefully veneered.
2. Under the influence of moisture, the tree swells and increases in size. The resin or glue cannot hold its shape. The slab swells and breaks up into chips.
3. If broken, it cannot be glued. Repairing chipboard furniture consists of duplicating or reinforcing the broken part with wood.
Repair and restoration of chipboard will not be required if you treat things with care.
Workshop gallery
Estimated cost of restoration (price as of January 9, 2019)
| Price, rubles | |
| Chair | 5000 – 20000 |
| Armchair | 10000 – 30000 |
| Sofa | 30000 – 60000 |
| Cost, rubles | |
| Table | 10000 – 40000 |
| Buffet | 30000 – 80000 |
| Closet | 30000 – 80000 |
Restoration of paintwork
| Finishing | RUB/sq. meter |
| Waxing | 500 |
| Polishing | 1500 |
| Shellac | 2000 |
| Gilding | 3000 |
| Decoration | RUB/sq. dm |
| Patination | 50 |
| painting | 200 |
| Marquetry | 500 |
| Mosaic | 1000 |
By sending us a completed form with photographs, as well as asking a question, you will receive complete information about the item (what it is, material, age) and the cost of restoration work. Next, the restorer will come to the site, inspect it, and determine the final price of the restoration.
The final price will not change. Departure is free.
DIY MDF door repair
If the surface of the film on facades made from MDF requires replacement, this task can be dealt with without resorting to the services of hired specialists.
Problems may include:
- the coating begins to peel off from the edge;
- swelling of the film appeared;
- the surface is damaged.
If the film comes off, what do they do: remove the door and unscrew the handles, hinges and locking fittings, and place the facade on a flat surface. If a corner or a small strip has come off, it is recommended to heat the coating and apply the film with strong smoothing movements. To fix it, a flat plate and a weight are placed on top.
For heating, use a household hairdryer or iron (when using it, cover it with fabric or Teflon film). If the furniture is not old, you can level it with your hands, heating the adhesive during friction.
If the factory sizing does not hold the surface, use quick-drying “Super-Moment” or universal polymer glue for fixation. The work is guided by the instructions for use of the product.
To repair a film façade whose coating has bulged, you will have to cut the bubble into 4 pieces crosswise with a utility knife. Sometimes the cause is dust or debris trapped under the film during furniture manufacturing. You need to thoroughly clean everything inside of foreign objects, apply glue and press. Depending on the type of glue, MDF doors are kept under load from several hours to several days.
If damage occurs (holes, cracks, fire marks), you need to completely renew the coating. Handles, hinges and other fittings are removed from the part, cleaned and dried, and then a film is glued on. A furniture company or specialized store will help you choose the right color and texture; the main thing is to show a sample.
Good to know! Most often, the film peels off near heat sources (stove, oven, radiators) and water (sink).
How to glue a broken part or peeling veneer
Some broken parts do not need to be replaced; they can be glued together at home.
To do this you need wood glue or PVA. The area to be glued must be cleaned, sanded with coarse sandpaper, treated with an adhesive compound, left for 5 minutes, and then joined by squeezing strongly.
Clamps are useful for this.
It should take at least a day for it to dry completely. After the parts have been glued, the remaining glue should be removed.
It's time to move on to cosmetic restoration - tinting with stain and varnishing.
The peeled veneer is also glued with PVA. If it is not possible to leave it under pressure, an iron will help. You need to apply glue to the joints and let it dry a little, then, pressing firmly, smooth the veneer with a heated iron.
Tip: To protect the veneer from overheating, place a sheet of paper between it and the iron.
With the help of veneer, you can radically change the appearance of furniture.
An old and fairly worn tabletop will be transformed and become a work of art if it is decorated with veneer mosaics.
Veneer is also used to cover the facades of cabinets and any other surfaces. Even products made from inexpensive types of wood will look like high-quality, expensive furniture if they are covered with veneer made from oak, walnut, cherry or birch.
Repair of wooden surfaces
Monolithic elements of furniture sets made from solid natural wood are restored by re-painting the facades.
For the kitchen it is better to choose enamel rather than paint. The first has a higher degree of abrasion resistance and fades less.
Acrylic enamels are water-based. Having chosen to paint kitchen wooden facades with this material, it is recommended to apply a protective layer of transparent varnish on top. Alkyd enamels do not need such protection.
Painting kitchen facades is a popular method because it does not require much expense and takes little time. Most often, a different color is simply applied on top of the old, washed and degreased layer.
In case of major damage (deep scratches, holes, traces of fire), it is necessary to prepare the natural wood surface. Old paint is removed using chemicals (removers) or heating with a hairdryer. After this, the wood is cleaned with fine emery cloth. Deep damage must be filled with a special putty for wood. To ensure that the composition holds better, cracks and crevices are cleaned of dust and debris.
Removing stains
Often on a polished surface there are stains from spilled coffee, iodine, oil, wine or other unknown coloring liquid. You can deal with them by wiping the stains with gasoline.
If necessary, repeat the procedure several times until it disappears completely. Finally, wipe with a mixture of denatured alcohol and linseed oil, this will restore the polish.
Stains from hot mugs, irons, and kettles are removed using ammonia or regular vodka.
Restoration of glossy coatings
Another way to restore the kitchen facade with your own hands is varnishing. This method allows you to show the beauty of the texture of different species, gives the furniture an expensive and representative look.
In order for the surface to sparkle with gloss, it is pre-prepared. All fittings are removed, after which the paint from the facade or old varnish is removed. The wood is cleaned with emery, first coarse-grained, then fine.
Existing cracks in kitchen facades are sealed with putty, which is matched to the color of the wood. To make it look more similar, sometimes colored pigments are added to it. The putty must be dried before you begin varnishing the facade.
If necessary, use a special transparent primer. She:
- levels the surface;
- creates a protective layer;
- enhances the texture of the source material.
The peculiarity of working with varnishes is that it is applied in several layers. The first layer is made as a base layer, allowed to dry, after which the next one is applied. The last layer is made the thinnest and most transparent. It gives the facade a glossy shine and enhances the depth of the pattern.
The varnish should be allowed to dry before hanging the doors in place. Drying it with a hairdryer is not recommended. Characteristic ripples may appear. It will ruin the appearance.
Quick restoration of furniture at home with your own hands
Owners of antique furniture evoke sincere envy among lovers of rarities.
Unfortunately, not all lucky people are able to realize the value of old furniture, cabinets, sofas, chests of drawers, dressing tables and other items that seem to have outlived their usefulness.
The advantage is that in the old days there were no such technologies and materials that today make it possible to quickly and cheaply build any element or an entire set.
The furniture was made from valuable wood, covered with varnishes and drying oils from natural ingredients, and forged elements were used for fittings. Modern materials - plastic, MDF, fiberboard and chipboard - do not require special skill.
They are easy and accessible to process, and restoring furniture at home with your own hands should not be a problem.
However, products made from them do not have the same energy, do not give a feeling of warmth and comfort, like those made many years ago by a master by hand, using basic tools or machines.
What to do with curved surfaces?
Restoring the coating of corner elements that have a curved shape may at first glance seem more difficult than working with flat surfaces. But semicircular facades are no more difficult to process than all others.
Radial facade can be:
When working with self-adhesive coatings, experts advise applying the film in the direction of the bend, and not across it. This will make the process easier and faster. Working with paint or varnish in this case does not differ from the standard one.
Difficulties may arise with curved glass on the facade. To replace a broken or cracked piece, you will have to order it separately. It is better to entrust measurements to a specialist.
Restoring the façade of a kitchen unit does not cause any problems. In most cases, a home handyman can easily handle it on his own. But in a situation where the damage is extensive, it is better to seek help from specialists. Or consult with an experienced carpenter first.
Source: vseme.ru
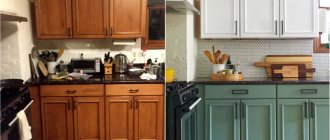
Method 1: Painting the kitchen with chalk paint
Do you want to update your kitchen set beyond recognition with your own hands? The best way to do this is to repaint the facades with chalk (mineral) paint. Why chalk?
- The fact is that this type of paint has a thicker consistency and increased adhesive properties, due to which it fits perfectly on any surface - even on laminated chipboard/MDF. Moreover, chalk paints eliminate the need for tedious sanding and sometimes even without primer.
Chalk paints are also good because they give the painted surface a texture similar to that obtained when painting a wooden surface. Therefore, even the most ordinary kitchen with film facades will look much more noble after such an “update”.
- In Russia and the CIS countries, you can buy chalk paints from designer Daria Geiler, foreign manufacturer Annie Sloan, Kazakh Vernenskaya Manufactory, etc. You can also make chalk paints yourself using recipes that are easy to find on the Internet.
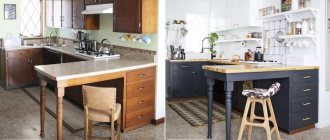
Here are some photo examples of kitchens before and after restoration.
Photo of a kitchen with film facades before and after painting with Daria Geiler paint. Here the author of the alteration restored the peeling film on the facade near the stove, and then painted the furniture without removing or sanding the film
Old kitchen with veneer cabinets before and after painting with Annie Sloan paint. By the way, in this kitchen even the tiled floor was painted with chalk paint, and the patterns on it were painted using a homemade stencil
Inspired? Then it's time for a master class.
To paint the kitchen you will need:
- Primer (special for chalk paints or alkyd if the furniture was painted with oil stain);
- Chalk paints (preferably with a 10% margin);
- Matte moisture-resistant varnish (acrylic or polyurethane).
- Material consumption is calculated following the manufacturers' recommendations. It is especially important to correctly calculate paint consumption. If there is not enough of it, you will have to repaint the remaining areas with paint from another batch, which, due to the nature of production, will be slightly different in tone.
- Which varnish is better - polyurethane or acrylic? To ensure that the kitchen coating can withstand extreme loads, it is safer to use polyurethane varnish. However, if you rarely cook and do not have pets, acrylic varnish is perfect, especially since it dries faster, does not have a strong odor and is cheaper.
- Brushes: two synthetic brushes for primer and varnish, as well as one natural or synthetic brush about 4 cm wide (a natural brush gives a more pronounced texture);
- Degreaser, such as white spirit;
- Sandpaper with a grain of 100–180 microns;
- Ladder;
- Film and masking tape (to protect non-paintable parts);
- Screwdriver;
- Gloves.
How to paint a kitchen set:
Step 1. Preparation
First you need to remove the handles from the facades. The floor, walls, splashback, countertop, glass inserts, fittings and other surfaces that you do not want to paint should be covered with film and masking tape. Next, clean all parts from grease (preferably with a degreaser), stains and dust.
- Do the facades need to be removed? It is not necessary to do this, but it is more convenient to paint this way.
Step 2: Primer and/or sanding
It is not necessary to sand the old paintwork, film or lamination, but it is necessary to treat it with a primer in 2 layers. In this case, each layer of primer must be allowed to dry, and then the primed surfaces must be sanded to even out the coating and enhance paint adhesion.
- However, if the lamination has a strong gloss, then it is advisable to remove its top shiny layer with fine-grained sandpaper - this will make the coating even stronger.
- If you are not too picky about the result (for example, if the kitchen is temporary, very old or got for free), then you can do without a primer. All you need to do is: wash the facades from grease, then paint them in 2-3 layers and finally cover them with 1 layer of varnish.
- Do you want to achieve the most even and durable coating? Then it’s worth sanding the surfaces after each layer of primer, paint and varnish (except for the finishing layers).
- Before starting work, test the paint on any object.
- If you want to save money, paint only the fronts and visible parts of the frame, and the interior walls and shelves of the cabinets can be painted cheaper or left unchanged.
Step 3. Coloring
Once the primer is dry, begin applying 2-3 coats of paint, allowing each layer to dry completely (one coat of chalk paint only takes about 30 minutes to dry).
- It may take 5-6 coats to cover a dark finish with white paint.
Restoration of a burnt tabletop
Burnt countertops can be restored to their original appearance in the following way:
- Using a router, carefully select the damaged area. It is necessary to go deeper into the surface with ledges, reducing the area and slightly capturing intact material around the perimeter. The result is a recess that looks like a miniature quarry.
- Fill the hole with softened wood putty. It dries quickly, so we compact it into the recess in small portions.
- We cut off the protruding excess with a sharp knife, carefully sand the patch, and then polish it.
- We paint the restored area. In this case, you need to try to reproduce the color and texture of the main part of the countertop.
By combining these methods, you can restore kitchen furniture without large financial investments. This will not only restore the appearance of the old kitchen set, but also make it unique.
And finally, the promised selection of photos of kitchens before and after restoration.