Weaving from newspaper tubes is a very popular activity, and this is not surprising: something had to replace traditional weaving from wicker. Paper crafts turn out just as good, and most importantly, tube weaving is accessible to both adults and children - you just need to prepare more material. This is what we will do today: we present a master class for beginners on making newspaper tubes.
Choosing paper for straws
If you want to make beautiful flowerpots and baskets from newspaper sheets, it is recommended to initially select the material for creating paper tubes.
To make newspaper tubes, I most often use newspaper or glossy magazines.
The most suitable types of paper for blanks are identified:
| Paper | Peculiarities |
| Paper with a density of 45-48 g/m2 | This type of paper is called consumer, newspaper or offset. It can be purchased at any office supply store. To make straws you will need about 2 packs. In this case, the sheets should be white and fairly dense. Fax paper is also suitable. Its density makes it possible to twist workpieces without difficulty. |
| Newspaper | It is the most budget-friendly raw material, which is quite docile and soft. The sheets can easily be rolled into a beautiful tube. This type of paper is suitable for beginners. |
| Glossy magazines | Magazine pages are suitable for rolling blanks. However, the tubes will be quite rough and more difficult to paint, unlike paper sheets. In this regard, such products are suitable for the manufacture of frames and frames to give them additional strength and rigidity. |
| Office paper | Not very suitable for weaving because it has a high density. Office paper sheets of A3 and A4 format have a density of 80 g/m2. As a result, the workpieces will be less pliable and very dense. It will take a lot of time to curl the sheets, unlike other types of raw materials. In this case, the finished tube will be quite rigid, which will cause difficulties in creating weaving. The finished craft will contain creases and twists. |
For rolling the tubes, it is recommended to use consumer paper and newspaper because they are ideal for creating paper vines.
What paint to paint
It is not so important how exactly to paint newspaper tubes for weaving, but what kind of paints to use for this. A novice craftswoman must learn all the subtleties and features of each composition that can be used to color newspaper blanks. Possible types of coloring substances include:
- gouache - mainly used after weaving;
- watercolor - used only for coloring white paper, otherwise the faded layer will “expose” the black and white typographic line;
- acrylic paints - they are used to make an aqueous solution;
- stain - used to create a characteristic color for a wooden vine;
- spray paint for car painting - used after weaving;
- a solution of iodine, brilliant green or potassium permanganate - an aqueous solution that allows you to create a natural shade for a wooden vine;
- dyes for clothes - diluted in accordance with the instructions;
- food coloring - diluted in water according to instructions;
- ink or ink - allows you to get a black, slate or uniform gray shade;
- hair dye.
If black and white newspapers are used, it is recommended to use dyes, which will additionally make the tubes more rigid and able to hold their shape. Therefore, mix the primer with a few drops of a certain color. The primer can be added to other formulations.
Note. If the desired color is not obtained from the first staining, it is recommended to carry out the procedure a second time. It is important to remember that to obtain the final result, you need to wait until the tubular blanks are completely dry.
Tools for work
You can make newspaper tubes for weaving using the following tools:
- A solution of primer and color is well suited for painting. Before use, the primer must be diluted with water according to the information described on the packaging or bottle.
- Brushes. Necessary for applying paint and varnish to the surface of both individual tubes and the finished product.
- Glue. The work can be based on the use of any suitable paper glue. This can be PVA glue or a glue stick. It must have the main property of fixing multiple surfaces.
An important parameter is the thickness of the component used, since if you use too thin glue when building up products, they will quickly become soggy.
- Varnish. To ensure that the final result is not damaged by moisture and dampness, the product must be impregnated with varnish. Regular wood varnish will do, but since the product will be in a closed room, you should use an acrylic mixture. It is odorless and can dry in a short time, creating a film and transparency to the product.
- Wood stain made with water. Helps color the material in shades of maple, oak, pine, and ebony. Available in up to 20 shades, both in liquid and powder form.
- Scissors or knife. These devices will be required for cutting newspapers into strips, and the manufactured tubes can easily be cut with cutters.
- Clothespins. You should use the device if you need to fix workpieces when weaving or gluing parts.
- Spray. The device is necessary for moistening finished and dry tubes. To do this, the workpieces should be sprayed and then placed in a bag. The tool can be used to apply paint to the surface of the finished product.
- Knitting needles with skewers. It will be much easier to twist strips of paper if you use knitting needles ranging in size from 1.5 to 4.5 mm or wooden skewers for making kebab.
The tubes, which are created using a thin knitting needle, end up looking like a vine. Using knitting needles of larger diameter, you can make blanks that can easily be flattened and weaved into any products, like straw.
- Awl. It is quite easy for them to make holes and move apart the rows of weaving to pull blanks between them.
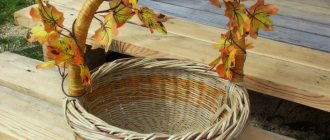
A complex basket made of newspapers. Step-by-step instruction
A low, practical basket is made as follows:
- For the bottom you will need 13 newspaper tubes. 5 of them need to be placed side by side, and the remaining 8 should be laid out crosswise on top.
- Next, we braid the top in the form of a braid with one piece of paper.
- When the paper rope runs out, it should be extended.
- Weave the bottom in this way to the required size.
- Having completed forming the base, you should bend the tubes upward and braid them again.
- Having created 4 rows of walls of the future product, fix the main strips on the sides with clothespins and then form the basket. The entire craft is braided in two pieces.
- At the end, the edge is made with a figured volumetric weave.
- Hide and glue the excess ends.
- Pull out the clothespins, paint and varnish the basket.
Preparing paper strips
Before you start rolling, you need to prepare the paper strips so that the final result is long and neat.
To do this you need to do the following:
- Place a sheet of newspaper in front of you. Fold the paper in half vertically.
- Cut the newspaper along the fold using a knife.
- Fold 1/2 of the paper in half vertically, cutting it along the fold.
Blanks that were twisted from strips with a clean newspaper edge will turn out without letters and light-colored. The rest will contain a drawing or typographic font.
In order for the wicker product to be of medium size, it is necessary to take a knitting needle with a thickness of no more than 1 mm, while the width of the strip should be within 10 cm. If the paper density is low, the workpiece for twisting should be wide.
It is undesirable to twist elongated pieces to a full turn of the paper, because the product will not be even. In this case, difficulties may arise with extending the tube, which will negatively affect the appearance of the wicker product.
Beginning craftsmen are not recommended to use long tubes longer than 40 cm; for them, weaving blanks 30 cm long is suitable. Thanks to this, you will not have to build up the product, and the appearance will not deteriorate.
To weave newspaper tubes, it is recommended to cut the sheet along the fibers. When cutting the first strips, initially everything goes correctly in one direction, but in the other direction the process becomes more difficult and the cut comes out crooked.
This is due to the direction of the cellulose fibers in the paper sheet. Therefore, it is recommended to establish their placement before slicing.
Determining the direction of cellulose fibers in a paper sheet
This can be done in 2 ways:
- First option. The sheet should be torn horizontally and vertically. If the tear occurs along the grain, it will be straight and even, and the edges will not be too shaggy. If the tear occurs across the grain, it will be uneven.
- Second option. You should fold the paper sheet in 2 directions perpendicularly, ironing the resulting folds. The bend that follows the fibers will be even and smooth. If it runs across the grain, it will be broken and rough.
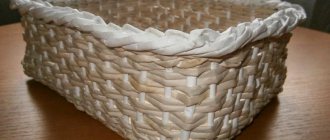
Product bottom
The weaving process should begin with the formation of the bottom of the product.
Note!
Master class on decoupage: step-by-step do-it-yourself decoupage schemes. Master classes on creating products for beginners (130 photos)Bouquet of candies: TOP-170 instructions for creating a bouquet of candies + DIY design ideas
Bouquet of Raffaello: the best instructions for creating a bouquet of Raffaello with your own hands + simple diagrams with photo reviews
The easiest way to make a beautiful bottom is with a cardboard base. You need to cut out two blanks of the desired shape and size from cardboard. The edges of the tubes are placed on one piece, lubricated with glue, and covered with a second piece on top. It is important to make the corners correctly, placing the tubes as close as possible so that the weaving is uniform.
A more complex way to make the bottom of the product is to weave the bottom. To work, you will need long tubes, so you need to immediately glue three tubes in a row. The techniques and patterns of work are no different from wicker weaving. It is essentially a paper wicker weave.
The tubes are connected, the center is determined and they braid the rest with one “vine”, forming the bottom. The bottom may have a round or other shape depending on the design. To weave a round bottom, the tubes are folded into “rays”, then braided.
How to twist paper straws
Paper tubes can be wound using a knitting needle on a table or on a weight. Everyone chooses the twisting option that will make it possible to produce a sufficiently large volume of workpieces.
On a knitting needle
Winding paper on a knitting needle is the most popular way to create tubes for weaving. The knitting needle must be selected in relation to the size of the strip and the final result. To make the workpiece thin, you need to take a tool No. 1.5, the paper piece should be within 5 cm. For paper strips 7 cm wide, a knitting needle No. 2.5 is required.
You can make newspaper tubes for weaving in the following way:
- Bend the paper sheet lengthwise into 3 parts and cut along the fold. The result should be 3 strips.
- Place the knitting needle diagonally on the edge of the strip, wrapping the sheet tightly enough. To make it easier to extend the workpiece, the end of the tube should be wider or narrower than originally.
- Coat the edge of the strip with dry glue to keep it clean and dry. When using PVA glue, you need to use only a drop of the product, because the gluing areas will not be painted well in the future. As a result, the newspaper craft will have uneven coloring.
- Transfer the finished newspaper blanks to a jar or box so that they do not crumble.
On the table
For ease of rolling paper strips, it is recommended to perform the work on a flat surface. For example, you can use a table that must first be covered with a silicone mat so that the workpieces do not slide on the table surface.
How to make newspaper tubes for weaving on a table
You can make newspaper tubes for weaving on the table by following these steps:
- Place the paper strip straight. Place the knitting needle at an angle of 30° on the corner of the sheet on the bottom right and begin to twist the workpiece.
- In order for the newspaper strip to tuck under the tool, press the knitting needle firmly against the sheet with your fingers, rocking it back and forth for better adhesion of the tool to the workpiece. You can moisten your fingers with water.
- A large angle should not be created between the tool and the workpiece. By placing the knitting needle at an acute angle, lengthen the product as much as possible. The tube should not move during the twisting stage; the turns must run parallel to each other so that the product has the same thickness.
- Having twisted the end of the strip, place your hands like on a rolling pin and twist the rest of the newspaper.
- Coat the remaining small edge of the strip with glue and twist the workpiece to the end. The spoke can be removed.
The end result should be 2 products: light, made from a blank sheet, and with letters. It is recommended to twist the workpieces quite tightly and tightly. If the paper coils are tightly spaced, they can create a solid web. Due to this, the crafts will be of higher quality, and the weaving will be pleasant and simple.
Aweigh
You can make newspaper tubes for weaving by weight, but only experienced craftsmen use this method. This is explained by the fact that such weaving requires great skill and experience.
Master class on curling newspaper strips:
- For a paper strip 8 cm wide, prepare a 1 mm knitting needle. Place the tool against the edge of the workpiece so that the angle between the knitting needle and the edge of the newspaper is minimal.
- Tuck the end of the sheet to make it easier to wind it onto the tool, and continue the weaving process. Do not squeeze the paper too much, because it will wrinkle.
- When half of the workpiece is twisted, move your left hand closer to the edge of the product, continuing the twisting with your right hand, and supporting the tool with your left.
- The angle between the edge of the strip and the twisted tube should be no more than 45°. Soak the tip of the paper with a thin layer of glue and finish weaving.
- Upon completion of twisting, remove the knitting needle.
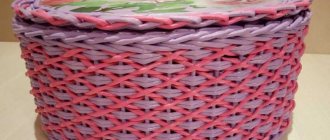
Weaving a storage box
Cut out two rectangles of the required size from cardboard. We cover them with wallpaper or other beautiful paper.
After this we mark one rectangle. On each side we make marks every 2 centimeters. Glue the racks. Just glue them a little to the right of the marks. And we also glue a tube for the corner post to the corner.
Then glue the second rectangle on top. Place under a press for better adhesion and for the glue to dry. This also prevents the cardboard from warping.
When the bottom of the box is dry, put the mold on it and begin weaving the walls.
We bend each post into two and lift them along the side wall. These will be our racks. And due to the fact that we glued them a little to the right, our racks will fit exactly according to the marks.
Add three working tubes. We glue them under three posts to the bottom.
We weave one row into three tubes. The result is a pattern like a pigtail. And the cardboard that we have at the bottom is not visible at all.
To strengthen the corners, we glue two posts on them.
We weave the walls of the box with a chintz pattern using two tubes. During weaving, the tubes seem to catch up with each other. We glue two working tubes and weave first one, then the second.
To strengthen the corners, you can additionally wrap the corner posts with a working tube, but not every time, but every other time. If the tube runs out, extend it by gluing the next one to it. To do this, cut off the end of the tube a little, drip glue there and insert the beginning of the next tube into the hole. And you can continue to work.
We weave the walls of the box to the place where you want to make holes for the handles. We strengthen the seven racks by gluing additional tubes, and two to the outermost ones.
We continue weaving in the opposite direction until the second handle. We do the same thing here. And we weave to the same height on both sides.
Then we begin to weave in a circle again. And we weave to the desired height.
We hide the ends of the working tubes, pushing them towards the racks. And we move on to bending.
We add two short tubes to one rack and one more to the two adjacent ones. We will do the bending with a “rod” pattern. To do this, take one of the added tubes and place it behind the second stand from it. Then we also bend the first rack and lay it behind the same rack. We do this twice. Now we have two tubes coming from behind the counter. And 4 tubes remain free. We're not touching them yet.
And we begin to remove the extra tubes. To do this, we bend two working tubes behind the next stand, cut one (short) and glue it to the place where the stand comes out of the weave. We place the second one on it and put the first rack on top.
Do this until the end of the row. At the end of the row, we hide the remaining ends in the weave, pushing them inside the weave near the posts.
Prime the finished product with PVA glue and water. After the glue has dried, coat it with acrylic varnish.
You can add decorative trim to suit your taste. The storage box is ready.
It turns out strong, light and beautiful. And it will add order to your shelves.
Building up and softening
If the tube is twisted correctly, its width on one side will be greater than on the other. To extend it, you need to insert one tube into the other by 2 cm. If there are identical ends when extending, one edge will need to be folded into a corner or cut at an acute angle. Office glue will help ensure the strength and reliability of the connection.
You can get a neat-looking product by using dry preparations. This will allow for high-quality gluing and make it invisible after weaving is completed. Tubes intended for making stands must be well dried. The remaining components should be moistened before weaving to improve their flexibility and pliability.
To do this, you can use the following options:
- Pour silicone glue in the amount of 1/3 of a tube into a 1 liter liquid and stir well. The tubes should be moistened in the resulting liquid and wrapped in cling film, leaving only the ends dry. This procedure must be performed in the evening so that in the morning they are soft and not deformed during weaving.
- You can glue blanks and twists by pre-treating them with glaze impregnation. It is recommended to use a German-made composition called Dufa. The procedure will ensure a glued twist, giving it softness and smoothness.
The impregnation should be diluted in an amount of 80 ml in 500 ml of liquid. The resulting solution must be applied to the surface with a brush, then dry a little and place the material in a bag, leaving only the ends outside. Afterwards you can start weaving.
- The tubes can be treated with a mixture based on water and varnish, used in proportions 1:3. The processed workpieces must be dried immediately with non-hot air from a hair dryer, then re-packed into a bag, leaving the ends outside.
- To moisten the material, you can use water and a small amount of fabric softener or table vinegar. Additives can make the workpieces pliable and obedient.
Pour liquid into a spray bottle and spray the workpieces with it, leaving the ends dry. When finished, the product should be wrapped in film, leaving the edges outside overnight. Moistened tubes, left in this form for more than 3 days, may become moldy.
Processing of tubes
When the tubes are made, they will need to be treated with any of the following means: decorative impregnation, primer or stain.
When processing the surface, it is recommended to use gloves and cover the table surface with a protective film.
Decorative impregnation
Decorative impregnation is based on the following steps:
- Impregnation in the amount of 1 tbsp. l. place in container.
- Add 38 ml of water and stir well.
- Place a batch of tubes on a film laid on the table.
- Using a brush, apply the prepared solution to their surface.
The work should be done quite quickly, since the material should not stick together, so the product is left on the table in a bag for 25 minutes, then ventilated and put in the freezer overnight. This treatment allows you to hide all the twists on the folds on the finished product and make the tubes more flexible, which cannot be achieved when using varnish.
stain
The tubes need to be divided according to color and material of manufacture; water-based stain can be made from the following colors:
- tree;
- oak;
- plum;
- chocolate mocha.
The stain of the desired shade should be poured into a container and applied to the surface of the tubes with a brush. At the end, the products must be dried at room temperature, having first laid them out on the surface of a table covered with film.
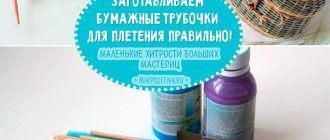
Painting with colors
Painting the tubes with colors is based on a mixture made from 3 tbsp. l. enamel, sauna varnish in the amount of 2 tbsp. l., 300 ml of liquid and 1 tsp. color scheme
The components are thoroughly mixed and applied to the surface of the tubes. After the workpiece is shaken to remove excess moisture and dried in a convenient way.
Primer and varnish
To make a primer, you must perform the following steps:
- Add 1 part PVA glue to 1 part white acrylic paint.
- Dilute the resulting mixture to a paste using water.
- Treat the workpieces with this solution, then dry and apply stain or acrylic varnish to the surface.
Weaving from newspaper tubes is considered a fascinating activity for both adults and children. You can make various crafts from them that will be beautiful and durable. To do this, it is enough to prepare a large amount of consumables.
Coloring
It is convenient to paint newspaper tubes in a tray with a small amount of liquid or dip several pieces at a time into a wide-necked bottle. You can paint with a wide brush on a surface previously covered with oilcloth, slightly twisting the tubes. It is best to dry them on a wire rack or stacked in a woodpile.
If you want to paint the finished craft, do it first with a wide brush and then with a thin one, carefully covering the cracks. You can also give the work the desired color using a spray bottle or by immersing it in a container with a coloring agent and slowly turning it.
Next time we will weave the first figures from newspaper tubes.