Furniture is gradually losing its original appearance, and to fix this, many resort to painting. This method allows you to quickly and inexpensively transform any piece of furniture beyond recognition. You can age a worn lacquered chest of drawers or give a bookcase a classic look. In this article we will try to figure out how to paint lacquered furniture. This process does not require special skills or expensive equipment; the main thing is to choose the right paint composition and follow the technology.
Paint selection criteria
The first thing you need to start with is determining the appropriate coloring composition. Not only the quality of the finishing work performed, but also the durability of the coating and its technological properties depend on the correct choice of paint. Experts find it difficult to choose the best paint and varnish material for processing lacquered or polished furniture. During the purchasing process, you need to take into account your personal preferences, the condition of the piece of furniture and the desired end result.
The main thing to consider when choosing paint is the type of furniture coating. If you are going to repaint a wooden chest of drawers, then you need a wood coloring compound, but if you have a metal lampshade, you can’t do without metal paint. This rule also applies to painting lacquered furniture.
In this case, very strict requirements are imposed on the coloring mixture:
- water resistance;
- abrasion resistance;
- resistance to mechanical stress;
- frost resistance and strength.
The choice of paint for lacquered furniture largely depends on the desired end result. Experts distinguish three main types of coating:
- glossy;
- matte;
- semi-matte;
- transparent (the surface is varnished).
Depending on the condition of the furniture, you should give preference to a denser paint composition or apply the mixture with a roller rather than a brush.
Important! If you are going to repaint the furniture yourself white or another shade, give preference to translucent coatings (a glossy or matte layer of paint will look sloppy on a varnished surface).
Depending on the type of coating on wooden furniture, paint with a suitable composition is selected:
- Water-based acrylic. This is an almost universal option, but it is better to use this paint if it is necessary to paint veneered furniture.
- Enamel or clear varnish. Such materials will be optimal for painting polished furniture if the old coating needs to be updated.
- Metallic paint. This option is suitable if you want to give the fittings and some furniture elements a silver color.
Note! Experts advise choosing a coloring agent that can retain its original external characteristics for a long time (for example, acrylic paint of a predominantly white color).
On video: how to make an old wardrobe fashionable.
Main difficulties and mistakes
Common mistakes made by craftsmen during the restoration of lacquered furniture:
- Incomplete removal of the old coating is the most common mistake. It is necessary to get rid of the old varnish completely, sparing no effort or expense. Even a small part of the previous coating will appear after restoration and spoil the appearance of the product;
- Excessive haste - you must carefully study the instructions for dyes and various products that remove old varnish. Failure to comply with the timing can ruin the result;
- Inattention also often prevents craftsmen from painting furniture efficiently. Flaws and cracks noticed in time can be puttied;
- Uneven or excessive application of paint - many craftsmen try to apply paint in a thick layer, which later leads to the appearance of bumps and drips;
- Skipping an important step - grinding. Many people mistakenly believe that removing the old coating is enough; the surface of the products is already quite flat and smooth. This opinion is wrong. Sanding is an important part of the furniture restoration process. The surface becomes smooth, the paint adheres more evenly and better, and lasts longer.
Important nuances
Before you start painting any furniture at home, you need to carefully study the entire process of applying paint and varnish. We also recommend watching several videos that describe painting polished furniture, since this operation requires special skills and taking into account some of the nuances of the material.
The question of whether it is possible to paint polished furniture cannot be answered unequivocally. Painting this type of interior items requires careful preparation and experience in the restoration field. If you need to paint a large area of a polished surface, we recommend that you contact a professional, otherwise you may get a poor-quality result and spend a lot of time and effort.
It is worth taking care to protect the surface to be painted (usually fittings) if it will often come into contact with hot objects. For this, special fire-retardant solutions are used, for example, Polystyl or Neomid.
How and with what to paint wooden furniture
If furniture made from fresh wood is being treated or the topcoat is removed before the wood , fluff will be raised after the first coat of paint dries. The rough surface must be sanded before subsequent application.
The choice of material depends on the circumstances of use of the furniture:
Kitchen cabinets, tables, chairs work in humid conditions, they are affected by steam and soot. For such furniture, moisture-resistant compounds are used that are inert to household chemicals and airborne aggressive components. These include silicone, glyphthalic, acrylic paints.
for garden benches, swings, and sofas in gazebos. They resist atmospheric acids and alkalis and are not destroyed by solar insolation. These are pentaphthalic paints, silicone, oil, nitro enamels .
What will you need for work?
Has the glossy surface lost its distinctive shine, dulled and lost its original appearance? Then you need to take care of painting the aged piece of furniture. To do this, you just need to apply a new coating. Let's start with what materials and tools you will need:
- acrylic based paint;
- glossy or matte varnish;
- roller and brush for applying paint;
- scraper and metal brush to remove the old layer of varnish;
- sandpaper (or sanding machine);
- primer solution (for repainting wood surfaces);
- solvent and detergent;
- protective composition for wood (antiseptic).
Painting secrets
- In addition to the painting material, you will need a small fluffy roller (a smooth one will not work in this case) and a soft brush for painting hard-to-reach places.
- Paint and enamel must be applied quickly, as it dries very quickly.
- You should not take a lot of paint, as it may roll off the already painted surface.
- You don't need to press the roller too hard. Since you are applying the paint to the varnish, there is simply nowhere for it to soak in. And the effort will be unnecessary.
- Wait until the first coat is completely dry before applying the second coat. On average it takes about an hour.
- Usually two coats of paint are enough, but in rare cases three may be needed.
- Don't listen when they say that dark furniture can only be repainted dark. These types of paints are very dense, so they may well cover the base, even when transitioning from black to white.
- If something goes wrong during painting, the paint can be washed off with plain water within the first half hour.
- After completing all the work, let the furniture dry thoroughly. It's better not to touch her for at least the whole night.
Good luck!
How to prepare the surface?
First, the surface is prepared for applying paint. The instructions involve the following steps:
- We remove all the contents of old furniture, eliminate doors and drawers, as well as all fittings.
- We clean the fastening parts with a soap solution, after which we should degrease the entire surface of the structure and wait until it dries completely.
- We remove the old polish and varnish layer using a wire brush, scraper or solvent (it is recommended to carry out this procedure at least three times to achieve the best effect).
- In industrial conditions, at this stage the surface of the painted piece of furniture is sanded and minor defects are removed. At home, you can use sandpaper and apply an antiseptic.
- Next, we proceed to the primer; when it is completely dry, the surface should be sanded again until rough.
This is the main thing you need to know about the preparatory stage of painting lacquered furniture. Next we will talk about the process of painting this kind of surfaces.
Coloring stages
All work is carried out in several stages. It is not recommended to cover furniture with new paint without removing the varnish - this will greatly deteriorate the quality of the finished surface. It is better to carry out the restoration in accordance with the advice of professionals, which will make the result beautiful and durable.
Surface preparation
Removing the old coating is the main stage of preparing furniture for repair. You can remove varnish in different ways - mechanical, thermal and chemical. Experts prefer to use a hair dryer for thermal removal of varnish. The procedure is as follows:
- put on a protective suit and gloves, not forgetting about glasses;
- run a hairdryer over a small area of the surface, warming it up well (instead of a hairdryer, some use a blowtorch, but this method requires extreme caution so as not to damage the wood);
- take a spatula or knife and scrape off the varnish coating.
The mechanical method is more labor-intensive. You should proceed like this:
- remove drawers from furniture, remove all fittings;
- Wash fasteners, handles and other accessories well with soapy water, use soda if necessary;
- wipe the furniture with soap and powder to degrease it and remove dirt;
- rub off the varnish using a scraper, coarse sandpaper, or a metal brush;
- sand the surface with fine-grain sandpaper or a sander.
You can also get rid of the coating using a chemical method; for this purpose you will need a solvent that does not harm the wood. The remover is applied to the surface of the object with a brush and left under the film for 3 hours. Afterwards, using a spatula, carefully remove the old varnish.
Putty damage
To accurately assess the condition of the furniture, it is recommended to disassemble it into as many elements as possible. This way it will be possible to treat even the most inaccessible places and replace all the old, broken, ugly fittings. After sanding is completed, get rid of dust (wipe the furniture with a dry cloth or vacuum it). Next, an antiseptic is applied so that the product is not damaged by fungus in the future.
All large and medium-sized defects must be thoroughly puttied. It is better to buy transparent putties - they are suitable for any type of wood and do not change its structure. The putty should be applied in a thin layer and leveled well so that the surface remains smooth. After allowing the layer to dry completely, apply it again if necessary. At the end of the work, the treated area is sanded again.
Degreasing
Carrying out this procedure increases the service life of repaired furniture. Also, degreasing significantly improves the adhesion of paint to the surface and makes the coating layer uniform. To do this, use any detergents. They are diluted in water, wiped over the surface of the product, and washed off.
Wipe dry and dry until moisture completely disappears. If puttying has been done beforehand, it is better to use alcohol or vodka rather than an aqueous solution for degreasing. Stubborn stains of grease and dirt can be removed with table vinegar.
Painting process
Immediately before painting, priming should be carried out, for which only transparent primers are used. The product must be applied not only to the putty areas, but to the entire surface - the primer reduces paint absorption and improves adhesion.
Painting is done as follows:
- All elements that will not be painted must be removed or sealed with paper tape. This way you won’t have to wash them after the restoration is complete.
- Apply paint to each element separately. It is better to use a roller, so the paintwork will lie flat. Particular care must be taken to paint drawers and shelves, dry them separately, and only then fasten them in place. You need to make sure there are no paint drips.
- After drying, apply another layer of material to the furniture. This way the result will be fixed.
- Assemble furniture. You can install it in place.
Proper drying
Acrylic, latex and other water-based paints take a long time to dry. To prevent furniture from getting in the way, it is better to prepare a place for working and drying in advance. Each layer takes 12-24 hours to dry, and many enamels are harmful due to their fumes. You cannot live in the room where the furniture is, and children and animals cannot be present even temporarily. The best temperature for drying is 20-23 degrees, so the coating will dry within the time specified in the instructions. If the temperature is lower, drying will take longer.
The process of painting lacquered furniture
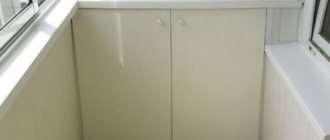
Painting a varnished surface is easy. This process does not require any special material costs and will take you very little time. However, you should strictly adhere to the instructions and tips for finishing work outlined below. Let's look at how to paint polished furniture (let's take a cabinet as an example):
- A polished cabinet requires careful preparation (elimination of all drawers, components, various stands and doors). Next, the interior shelves, various recesses, as well as joints and corners are painted.
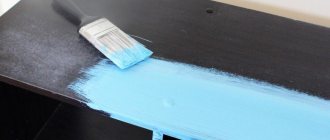
- Shelves, drawers and doors are painted separately from the main surface of the furniture (which must first be covered with a special film). If you are going to paint furniture yourself for the first time, then paint with a roller rather than a brush, so you can cover the desired area more evenly.
- After painting all the internal elements, we move on to painting the main surface. Apply the paint with slow, careful movements, avoiding smudges and omissions. After the first layer has dried, apply the coloring composition again - this will create the most uniform and durable coating.
- After the paint has completely dried, we begin assembling the structure. At this stage, you can decorate or sand the surface to give it a custom design.
To paint polished furniture, a spray bottle will come to your aid. Compared to a standard brush and roller, it distributes the paint more evenly without any overlap or streaking.
Repainting an old chest of drawers (2 videos)
Furniture before and after painting (24 photos)
Tips and tricks
Some craftsmen try to paint furniture without removing the old varnish. This can be done if there is not the slightest chip or network of cracks on the coating. It is worth first applying paintwork to an inconspicuous area, and evaluate the result after drying. If the paint lays down evenly, there are no drips or build-ups, you can paint the rest of the surface. Unfortunately, this rarely happens, and in most cases, old furniture does not look its best. If you want to get a really high-quality item, you should remove the varnish and carry out all the work according to the described technology.
Step by step process
To begin with, it must be said that this process is quite complex and tedious . At the same time, it requires the availability of certain materials, the price of which is sometimes very high. That is why, before embarking on it, you need to carefully weigh everything in order to make the right decision.
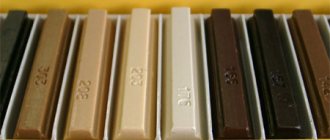
Sample of material to determine its qualities and get an idea of the appearance of the final product
Paint selection
- First of all, it must be said that fire-retardant paints for metal Polistil are used in such situations only in cases where it is necessary to restore fittings that come into contact with hot objects. It is usually found in furniture that is used to decorate the kitchen. For other metal parts, it is better to use a cheaper dye.
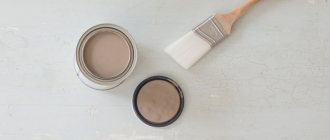
For varnished surfaces, special compositions are used, which are closer in composition to varnishes or enamels
- If the question is asked whether it is possible to paint veneered furniture, then in this case professional painters and carpenters answer in the affirmative, however, they believe that it is better and much easier to replace the coating itself, since it will look more beautiful and more practical. Otherwise, you should use water-based acrylic dyes. They will give the surface a good color and will not hide the veneer structure.
- When the question comes about whether it is possible to paint polished furniture, some experts answer in the negative. However, if you use special transparent enamels or varnishes, you can not only apply the necessary layer over the old surface, but also carry out a kind of restoration by rubbing out scratches and then polishing.
Using ordinary oil materials to create artistic painting on an already treated surface
- Quite often there is a need to paint furniture white. Therefore, first, putty is usually used, which is applied to the prepared surface, and then acrylic dye is applied. The result is an almost perfectly smooth coating that will look great in any type of interior.
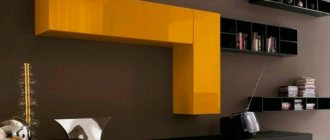
There is simply a huge selection of different materials that allow you to imitate other types of surfaces
- Sometimes there is a desire to give some furniture elements a silvery metallic color, but sputtering or chrome plating cannot be done. Therefore, electrically conductive paint Zinga or similar is often used for such situations. It allows you to achieve the desired result at low cost.
Advice! It is believed that you can paint wooden furniture with almost any paint. However, she will not always get a good appearance, and not every material will serve her well. Therefore, professional craftsmen recommend using special compounds that were developed for these purposes.
Before starting work, it is worth protecting those areas of the furniture that you do not plan to apply dye to.
Step by step process
- When choosing what to paint polished furniture with, you must take into account that almost any coating requires a prepared surface. That is why they immediately purchase primer and putty.
- It is best to clean any surface. Fine abrasive sandpaper is perfect for this. At the same time, professional craftsmen strongly recommend removing the old coating, since it can cause the paint to lag behind the surface.
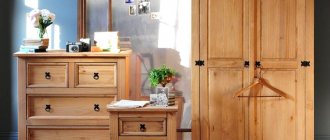
It is much easier to first disassemble the furniture and process each part separately to achieve maximum results
- The next step is priming. If it is necessary to preserve the fibrous structure of the wood, the restoration instructions recommend using a minimal amount of primer or using transparent types. Some experts believe that it is enough to simply treat areas of chips, cracks or other damage, but this opinion is wrong, since the primer increases adhesion and reduces the degree of absorption of the surface.
Painting furniture at home
Initially, it may seem that this is a difficult task and only a professional can cope with it, but in fact this is far from the case. During use, chips and scratches appear on the furniture, as a result of which the varnish coating suffers. Over time, a piece of furniture becomes unsightly and you want to throw it away. However, a more economical option is to repaint the polished surface, thanks to which it is possible to completely change the appearance of the furniture.
The first and one of the main stages is the choice of paint for restoration work. The final result directly depends on the chosen composition and color. There is no optimal solution, so everyone chooses the paint they like best. First of all, you need to realize that there is paint for coating metal objects and wood. It is important to determine whether the paint should have frost resistance and water-repellent properties. The coating itself can be transparent, matte or glossy.
Finally! Ingredients on how to paint old furniture without sanding!
Paint furniture without removing the old coating
Paint furniture without removing the old coating
There it is! - that’s what I was looking for. Frankly, it's been a while. I like remodeling furniture. But I don’t like removing the old coating from it at all: like desperately sanding, scrubbing and scrubbing. I am sure that for many it is this preparatory process that allows them to retreat from the planned alterations. Rejoice, girls. There is a way! It was invented and tested by the resourceful Beverly.
And she painted this chair - an object familiar to many of us
And the chair turned into such a beauty:
My delight knows no bounds! They also gave me a similar chair, which spent several years at the dacha, all peeling and peeling
This is what a chair, wounded by time, looks like - that is, it’s creepy - it seems like it would be easier to throw it away
After a little research and lots of testing, Beverly figured out how to make the paint so she could paint everything with it without the tedious preparation. She recommends using a 3:1 ratio (paint:additive) with calcium carbonate or gypsum. The author used calcium carbonate from the grocery store. In other words - baking soda.
Here's what she did and how:
Boil a small amount of water (a third of a cup) and slowly add about three-quarters of a cup of calcium carbonate to the water. Stirring well and thoroughly so that there are no lumps. Attempts to add calcium to the paint without boiling water were unsuccessful: there were a lot of lumps left. The measurements are not exact, everything was done by eye, intuitively.
Pour about one and a half cups of latex paint into the container, add a mixture of water and calcium carbonate, in small portions, mix, add more. Add and stir until the mixture becomes an even, slightly watery color. But you can’t add a lot of calcium either; the paint thickens greatly over time.
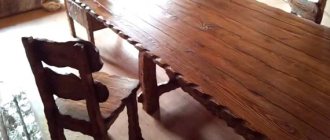
And we begin to paint the unsanded, unshaded wood. It turns out beautifully, as in the photo below
This is such a beautiful chair.
And further finishing is a local matter for every craftswoman: if we want, we leave it as it is. We want to decoupage