Peculiarities
The bathhouse has a steam room area and a relaxation area.
Each zone has its own characteristics that must be taken into account when choosing furniture. In the steam room, simple objects in the form of benches and benches are often used. The main asset is the shelves. Non-standard solutions when designing and arranging furniture are welcome, however, when implementing bold ideas, it is necessary to be guided by safety, convenience, and functionality.
The recreation area is given special attention. The room is intended for longer periods of time, so the furniture should be aesthetic, comfortable, and cozy. Much attention should be paid to the arrangement of objects. The use of large parts should be avoided, especially in the center of the room.
When choosing furniture for a sauna or bathhouse, you should take into account the characteristics of the microclimate. Not every material can withstand constant temperature changes, high thermometer numbers or high humidity. If materials containing chemical impurities were used in the production of furniture, then as the temperature in the room increases, they will evaporate.
Therefore, when choosing a material, you should give preference to natural components that are resistant to “extreme” environmental conditions. Wood is considered the most environmentally friendly and durable option. Beautiful wooden furniture gives a special touch to the room.
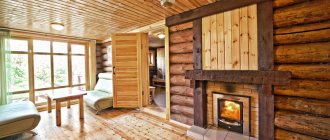
Creating a cozy atmosphere is the basis of the design of any bath room. People come here to relax and unwind, so it is very important to carefully think through the design of the furniture and its placement. There are various styles and trends, following which you can create a special atmosphere. Depending on preferences, the color scheme of the furniture is selected. Thematic accessories, handmade items, and textiles complete the look.
In addition to a beautiful interior, if the size of the room allows, you can place a TV, stereo system, kitchen items, refrigerator, fireplace. Small sleeping ottomans and couches can be used as places to sleep. Lighting can be bright or dim. Light bulbs, flashlights, and small chandeliers are used for this.
The presence of plants allows you to revitalize the atmosphere and improve the microclimate.
The main difference between bath furniture and what we use in apartments is its moisture resistance. In conditions of high humidity and temperature, it should last a long time. Another important nuance is that the furniture is in direct contact with human skin. Environmental friendliness is the main criterion for selecting items for a bathhouse.
For relaxation in the bathhouse, an original Russian way of restoring strength, various types of furniture were invented; they will be discussed in the next section. It is worth highlighting the main requirements for the material:
- High density;
- Easy processing - sawing, grinding, trimming;
- Safety for humans;
- Low thermal conductivity – furniture should not heat up;
- Small amount of resins in the composition.
All of the listed characteristics indicate that the best furniture material for a bathhouse is wood of various species. It is worth noting that varnishes, paints and adhesives are not used in production. This is due to constant humidity conditions in the room, which causes the coating to swell and gradually peel off.
Traditionally, a relaxation room is designed in bath complexes - this is a place where people can relax in a calm environment, without hot steam. Some rooms require furniture on which a person can sit and have a snack. The requirements for the coating in this case are different: they must also be moisture resistant, although they can have a varnish coating, since there is no constant exposure to steam.
Bath furniture can be made in various stylistic directions, let’s consider the most popular of them:
- Classic style - characterized by straight lines, rigor and practicality. There is no room for luxury here - all items are made discreetly and at the same time cozy. Steam rooms in spas are often equipped in this style;
- Antique sauna furniture is a common option for a free-standing sauna. Entering the room, you get the feeling of a fairy tale. All items are made in an antique style - they have rounded backs, fancy cutouts, and an aging effect.
To arrange a home bath or sauna, you can limit yourself to the classic style - it is inexpensive, and the items can be made with your own hands. If you plan to design a bathhouse for commercial purposes, choose an old style for bathhouses; visitors will appreciate it.
Classic
Antique
The path to the heights of art
Also, for applied purposes, crafts are often created from wooden sticks. These things are usually made for convenience. For example, a bookmark.
A face made of colored paper is glued onto a wooden ice cream stick. And the bookmark is ready.
Wooden sticks are also used in flower pots as tags with numbers or inscriptions. But there is another use. Sometimes a whole house is built from sticks.
If you have a lot of ice cream sticks in stock, building a house out of them is a useful fun for kids. Working with ice cream sticks and matches helps children develop their fingers.
Building a house from these materials is not an easy task. This requires precision movements. Of course, in both cases the house is built using glue. It is built in layers, gradually.
One row of the walls of the house has dried up, another is being completed. And so on to the top of the walls. And then the roof needs to be laid there. It takes a long time to build a house. There are beautiful works of art here. There are people who can make masterpieces out of ordinary things.
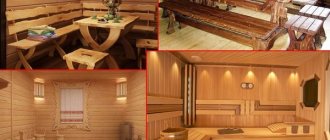
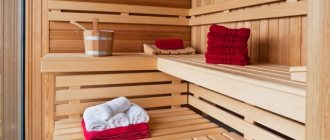
shelves
Bath shelf - diagram
Shelves for a small steam room Before making shelves for a bath, you need to take some measurements. The shelves should not cause inconvenience. Its device can be either single-tiered or three-tiered. It is believed that the heat is higher at the very top. The design resembles the shape of steps.
Once the required dimensions of the boards have been determined, you can begin to work:
- It is necessary to mount a frame of wooden posts. For this, a timber is taken.
- The racks are fastened together. You can even use metal screws here, because the body will not come into contact with this part of the shelf. The distance between the two posts should be about 50 cm.
- The frame must be attached to the walls of the bathhouse.
- Then the boards are attached to the frame. When installing them, you can no longer use metal. The distance between two adjacent boards should be about 1 cm. This is necessary so that the water can drain freely. In addition, this device allows the structure to dry faster.
Making a shoe rack does not require a lot of time and labor, so you can cope with such a task in a couple of hours.
The shoe rack in the bathhouse is assembled and installed as follows:
- 2 side parts of the structure are being prepared, 35 cm wide and up to 90 cm high, as well as upper and lower parts 60 cm long.
- The workpieces are thoroughly cleaned with fine-grain sandpaper or a grinder.
- 2 cuts are cut from the slats for the vertical shelf, the length of which is equal to the width of the side parts (35 cm). The parts are fixed to each other with self-tapping screws; the sides of the structure are reinforced with metal corners or wooden blocks.
- Markings for the shelf are made on the side elements and holes of the required diameter are made.
- The finished product is a box with sides, top and bottom slats, and a vertical shelf (or several shelves) for shoes.
Useful work
In schools, on the topic: how to make wooden crafts - they give an assignment. Make a birdhouse out of wood. If you do it carefully, it can turn out like this. First, a platform is built in the form of a square.
It is cut out of plywood. On top of the plywood square, 4 slats are sewn along the edges with screws. Then the frame of the birdhouse is built. From slats. Plywood is sewn onto the constructed frame on all sides.
An opening is cut out from the front for the birds to enter. When all 4 sides of the walls are strengthened, the roof is built. Also made of plywood. Triangle. So that there is a canopy near the roof. Now you can hang the birdhouse on a suitable tree.
Pour some crumbs in there. A birdhouse built from wood is better than others. It is more beautiful and looks aesthetically pleasing. And there are more benefits from such crafts for children. The work requires a lot of concentration and effort.
Varieties
To decorate your steam room and dressing room colorfully and elegantly, you should pay attention to the types of furniture that are most often used for furnishing. The photo below shows the most popular models and accessories for bathing.
First you need to figure out what items must be present in the steam room. The first thing you need to buy is shelves. This is a special design designed for sitting. This is where people steam in a sauna under the influence of hot air. Requirements for shelves:
- Long length;
- Stable seat;
- The presence of several tiers.
Tiered furniture in a bathhouse is necessary so that the shelves can accommodate several people at once. At the same time, people should not interfere with each other. It is advisable to purchase shelves in 2 - 3 tiers. The width of the products is 60 cm, and the length is at least 180 cm.
Experienced sauna owners recommend also having footrests and headrests. The first ones are necessary to sit comfortably without disturbing other steamers. Headrests are needed to relieve stress on the neck. Benches are the second thing that is important to have in any sauna. They are also placed in the steam room, against the walls.
- Tables – there are a lot of options for choosing tables: figured, carved or classic square and round. The scope for imagination is limitless, everything depends on financial capabilities;
- Chairs or stools - upholstered furniture for a bathhouse is also important. For example, chairs may have a soft seat. The upholstery material should not deteriorate when exposed to moisture. Chairs can be decorated with antique carved backs, and stools can have figured legs;
- Wooden fonts are the place where a person plunges after a steam room. This easily replaces a swimming pool, because it is not always possible to equip one at a summer cottage. The average size for a font is 1.5 m in diameter. Several people can be here at once;
- Basins or tubs - it’s hard to imagine the procedure of being in a bathhouse without these items. Photos of basins and tubs are presented below - you can also make them yourself.
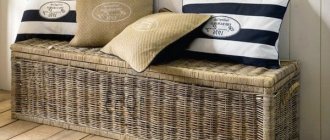
In addition to tables and chairs, furniture for the relaxation room in the bathhouse is selected at your discretion. These can be small storage areas for accessories and towels, cupboards for dishes, sofas and shelving.
Stools
Fonts
Sizes that are comfortable for a person
There is no way to get around this point: there is a certain relationship between the size of the table and how many people can comfortably (or not) fit behind it.
Therefore, each bathhouse owner should estimate in advance how many people will most likely gather at the table in the recreation room or on the veranda at the same time. The second important factor in choosing the size (and, possibly, shape) will be the area of the room. After all, you need not just to place a table, but to make sure that a person can sit down and get up from the table freely, that there is room for passage, etc. To do this, you need to add a few more parameters to the table dimensions - the width and depth of the seat, the width of the seat for one person at the table, and also the minimum width of the passage.
For our part, we will present the standards of ergonomics, which is the science of how to adapt things to human anatomy.
REMEMBER! To sit comfortably at the table, a person needs 70 cm of space. This is called the seat depth (see picture). Add these 70 cm to the dimensions of the table on all sides - you will get a spot that you allocate for this area. The minimum passage behind the seated person, if necessary, must be at least half a meter.
Now the dimensions of the countertops themselves (according to the estimated capacity):
A person is comfortable at a table if he is provided with at least 60 cm of table space in width. It's minimum.
A two-seater table of square or round shape should be 60 cm on the side or in diameter. However, the “spot” of the zone together with the chairs is calculated as 120 by 210 for a square and 120 by 200 for a circle.
A three-seater table is only possible for a round shape, but the dimensions increase: the table diameter is 80 cm, the spots are 220 cm.
The four-seater can be either cross-shaped or parallel. The side of the square is 85 cm, the side of the spot is 225 cm. The diameter of the circle is 90, the spot is 230 cm. The rectangle is 85 by 125 cm, the spot is 185x225 cm.
Five-seater – circle 100 cm, spot 240; rectangle, size 135 by 85 cm, spot – 235 by 225 cm.
Six-seater – three types. Circle: diameter 120, spot 260, rectangle parallel seating – 85x175, spot – 235x225 cm, perimeter – 85x145 cm, spot – 285x225 cm.
We'll probably stick with eight-seaters. The circle is 140 cm in diameter, the spot is 2.8 meters. Rectangle: parallel seating – 80 by 250 cm, spot 220x285 cm around the perimeter – 85 by 195 cm, spot 225x285 cm.
Also worth mentioning is a design called a “corner”. It looks cozy and fills the space well. The module of the proposed scheme is a seat measuring 55x55 cm. A corner measuring 220 by 165 cm is folded out of them. The table is also square in shape with a square side of 85 cm. Single seats in front of the table are the same dimensions as the module.
Stalls
Designer furniture for baths
Bench The bench in the bathhouse is made almost according to the same principle as the shelves. It is advisable that there is a decent gap between the boards of the bench. The use of metal elements is almost impossible here. In some cases, benches are attached to a shelf.
For the shop you need to choose:
- seat strips (preferably thin);
- wooden blocks for the frame;
- fastener
The first tool you will need is a grinding machine or sandpaper. It is necessary to work not only with the bench, but also with the shelf. All boards must be perfectly sanded and their edges rounded. Otherwise, you could get hurt by the furniture.
You also need to prepare a hacksaw, plane and hammer.
- The bars are measured. After marking, they are cut.
- A frame is knocked together from the bars.
- Planks are placed on the frame. The distance between them should be at least 1 cm.
It is better to choose wooden nails as fasteners. After the bench is ready, you need to sand all the corners and surface.
To make an average bench you will need 6 pieces of timber 45 cm long, as well as 14 - 15 boards 90 cm long.
Lampshade for steam room
After purchasing a lamp for a bath, you should take care of a reliable lampshade for it.
To make all the parts you will need a jigsaw and a hand router. Otherwise you will have to use hand tools. Of course, this will negatively affect the quality of the work and will also take much longer.
You need to choose the right wood. It should not release resin so as not to cause burns. For example, it is advisable to take birch, linden, aspen or maple. They can be purchased at any store. You will need a planed board, slats, wooden dowels and thin nails.
The length of the central groove for the grille is equal to the sum of the width of the rectangles that are inserted into it. The two versions of the scattering grating are assembled using thin nails. They are driven into the outer and also central jumpers. This will be enough to provide the required rigidity.
Lighting is a very important thing in a steam room. Soft light will provide a comfortable environment, but the lamp must be waterproof.
Which materials are better
The requirements for materials for furniture have already been indicated in the first section of the article. Therefore, it is worth highlighting those raw materials that are considered unacceptable for arranging a sauna:
- Plastic – when heated, it releases harmful substances into the atmosphere;
- Metal – under constant exposure to moisture, corrosion occurs and rust appears;
- Leatherette – not suitable due to constant exposure to wet human skin.
The best material option is natural wood. For the dressing room, you can use chipboard or MDF, from which countertops and cabinet door fronts are made.
If the choice fell on coniferous species, it is worth taking a closer look at Canadian cedar - it emits less resin than its coniferous counterparts, and at the same time has a beautiful texture. Let's consider the main tree species, their colors and features in order to choose the material for furniture in the bathhouse.
| Breed | Colors | pros | Minuses |
| Pine | Light shades: cream, yellow, sand | Pine contains a large amount of resin, which makes it moisture resistant. When resins are released, the surface of the tree is covered with a protective coating. When cutting this coniferous log house, you can see beautiful curved patterns that will be appropriate on any bathhouse furniture. | Do not use pine for a steam room: when exposed to high temperatures, the tree releases a lot of resin, which causes skin burns. |
| Spruce | White Red | Quick and easy processing is the main advantage of this breed. On a cut of spruce you can find a large number of fancy rings and patterns. Spruce has an affordable price. | The presence of knots and a tendency to rot will not allow items to be installed in a washroom or steam room. The material is great for a rest room. |
| Larch | Yellow | Larch is protected from the negative effects of ambient temperature. It has a beautiful pattern and high density. | The wood of this species is heavy and difficult to process, so larch furniture will be expensive. |
| Oak | Rich palette from light gray to brown shades | The tree is resistant to aggressive environments, it has an unusual texture and color variations. Oak has high strength, so furniture made from it is strong. | The complexity of processing increases the cost of products; in addition, oak is too massive. It is optimally used for dressing room furniture. |
| Ash | White or olive | It has high wear resistance, does not crack, and is flexible. Its structure allows you to create furniture from log houses with a pattern. | Not resistant to temperature changes and high humidity |
| Poplar | Sand | It is light in weight and easy to handle. | It rots quickly. |
| Aspen | Yellow | The breed is moisture-resistant, but large furniture cannot be made from it - it will quickly become unusable. Aspen is ideal for tubs and basins. | Over time, furniture greatly changes color to dark shades. |
| Linden | Beige | Bath furniture made from linden has a pleasant smell. Linden is resistant to moisture and can be processed well. | It is considered the most suitable breed for bath furniture. |
Having studied the information, it is worth concluding that furniture made from linden wood is the most suitable for a sauna. It is distinguished by a healing linden scent, which, combined with high temperatures, has a beneficial effect on the human body, giving freshness and youth to the skin. Photos of linden furniture are presented below.
Poplar
Larch
Wooden splendor
The wooden bath table continues to be an unfading classic of the genre of domestic bath interior. Wooden objects have many advantages:
- High ecological purity of the product, its naturalness and naturalness in the interior decoration;
- Low thermal conductivity and heat capacity, which is a very valuable quality in relation to the realities of a Russian bath;
- A wooden table for a bathhouse has the necessary margin of strength and natural durability with relatively simple and unpretentious maintenance;
- Wood is easy to process and to work with it you need a fairly small list of available tools.
To be fair, it is worth mentioning the use of other materials from which it is theoretically possible to make a bath table:
- Plywood and MDF are unique substitutes for solid natural wood, in the production of which various chemicals are used, including alkyd resins;
- Plastic - some of its types, manufactured to food grade tolerances, are suitable for the production of furniture and tables in particular. Products based on plastic masses are durable, lightweight and sufficiently strong. Caring for them is easy. However, the presence of plastic in the bathhouse interior negates the charm of the bathhouse itself;
- Metal - due to the characteristics of steel, cast iron and tables made of non-ferrous metals and their alloys, their presence in the bathhouse is appropriate in the form of individual elements, but not the structure as a whole.
Types of wood for making bath tables
A wooden table for a bath is made from certain types of industrial wood that have the necessary consumer qualities. These include the following:
Linden. A pleasant, easy-to-work wood with well-structured wood of uniform color and a pleasant aroma. Retains its original qualities for a long time; Alder. Wood of this species should also be classified as a priority. Easily and predictably processed, satisfactorily resistant to warping under conditions of frequent temperature changes
The texture of the wood has an attractive appearance with minimal decoration and processing. When choosing commercial raw materials, special attention should be paid to the degree and quality of its drying; for alder raw materials this is fundamental and important; Aspen. It is distinguished by good quality solid wood, in which knots and other serious defects are rarely found. Materials of this type are affordable and well processed
Among the disadvantages, it should be noted the tendency to warping and drying out. It is worth remembering that aspen tabletops do not withstand significant mechanical loads very well; Poplar. In terms of their characteristics, materials made from this type of wood are close to aspen. However, despite being cheap and accessible, poplar products are not particularly durable; Oak. It’s especially nice to make a table for a bathhouse with your own hands from this wood. Its noble color, deep original texture, and spicy oak aroma distinguish it from a host of other species. Excellent strength and record durability put oak furniture beyond competition. The disadvantages include the high cost of conditioned wood and the tendency to split when fastened with self-tapping screws.
It is worth mentioning separately about the use of coniferous wood in our carpentry practice. Spruce and pine are among the most affordable lumber on the domestic market. However, making a table for a bathhouse with your own hands from such raw materials is not always rational. Firstly, all conifers are quite resinous, secondly, it is unlikely to obtain a beautiful and bright texture without subsequent processing and, finally, using them in conditions of high humidity means dooming them to a short life. From coniferous wood, it is worth using cedar and larch, and the latter is more preferable in terms of the cost of raw materials.
To summarize this section, we present a table reflecting the hardness of various types of wood, which directly determines the durability of the countertop and the resistance of its surface to mechanical stress:
| Wood type | Compliance with its hardness class, according to current industry standards |
| Boxwood, dogwood, white acacia | I class, very hard |
| Hornbeam, pear, ash | II class, hard |
| Beech, English oak, European maple | III class, moderately hard |
| Birch, elm, larch | IV class, moderately soft |
| Pine, spruce, alder, chestnut | V class, soft |
| Linden, aspen, poplar | VI class, very soft |
Other furniture
Wooden font
With your own hands you can build not only shelves and benches, but also a lot of other furniture and items for the bath. After all, a font is simply needed here, as well as hangers, shelves for shoes and much more. You can’t do without lamps in a bathhouse. It should be remembered that all the items here have one feature: they are simple and functional. This gives them a special charm.
Hanger in the dressing room
Shoe rack Bathhouse hangers can be made from knots. To do this, you need to prepare branches with forks and a board.
- Branches with Y-shaped forks are processed. The side that will be adjacent to the board must be level. The ends of the knots are sawed off and sanded.
- The board needs to be marked.
- Holes for fastenings are made in the knots and boards. It is better to make wooden fastenings.
- Having joined the branches to the board, you need to connect them through the holes with dowels.
- Then you need to treat the finished hanger with stain.
The simplest design of a shoe rack is made from a pallet. The shelves and legs are made of boards.
Rustic Door Hardware
The Russian bathhouse is given its originality by such things as carved wooden handles on the interior doors. This door element looks very unusual, made using a beautiful tree knot or part of its roots. To implement such a project you will need:
- branch or part of a root;
- saw;
- jigsaw;
- wooden cut;
- cutter with attachments;
- sandpaper;
- dowels;
- clamp;
- epoxy adhesive;
- drill;
- varnish
Go along the contour of this shape with a jigsaw, and use a cutter to process the edges of the cut to give the workpiece texture. Clean the side ends with sandpaper. Remove the bark from the knot or root chosen for the handle and try the element on the base. Use a saw to trim the edges so that the ends fit snugly against the surface of the base. Apply epoxy glue to them and press them to the main element, for greater strength, clamping both objects with a clamp.
Drill two holes at both ends of the handle at an angle, and then drive dowels coated with glue into them. Cut off the excess pegs protruding above the surface of the handle. These dowels will help make the structure stronger.
If you don’t want to spend a lot of time making a door handle, you can simply attach an unusual knot to the door. It just needs to be sanded and varnished first. And craftsmen who know how to work with cutters can make beautiful decorative elements with their own hands by applying patterns to the workpiece.
Criterias of choice
You need to select wooden products based on your own preferences. To begin with, you should purchase all the necessary items, without which no sauna is complete. After this, you can begin to select other accessories that, in the opinion of the owners, will harmoniously complement the decor.
It is recommended to pay attention to the following criteria:
- Safety - since the furniture for relaxing in the bathhouse will come into contact with the human body, the entire surface of the furniture must be perfectly smooth. There should be no roughness or protruding elements on it. If the furniture will be made independently, it must be thoroughly sanded with the finest sandpaper;
- Environmentally friendly - the tree species should not emit resins harmful to the body. It is worth asking the manufacturer about the composition of the wood and asking for quality certificates. Chipboard furniture should be installed only in the recreation room;
- Style - depending on the direction in which the sauna will be equipped, you should give preference to products that are in harmony with the overall design. If the bathhouse is made in an old style, choose products with patterns and rounded shapes. In the photo, such furniture will look original and rich. When arranging a classic sauna, choose discreet, straight furniture models.
After purchasing a table for the rest room, do not forget to select matching chairs. To ensure a comfortable pastime, it is better to give preference to soft chairs. By arranging a bathhouse for yourself, you can always spend time there with friends and family. The healing properties of steam and hot water have a beneficial effect on the body, and furniture made of natural wood will harmoniously complement the picture. High-quality furniture will have a long service life and delight guests.
How to make a bucket for a bathhouse with your own hands
Among the accessories for a bath, a pouring bucket occupies an important place.
It is best to use oak. If you can’t buy boards from this tree, you can replace them with mulberry (mulberry) or ash.
In order for your DIY wooden dousing buckets to last as long as possible, you need to follow important recommendations. For example, buckets can shrink and crack over time. This unpleasant incident can only be avoided if you steam them with hot water. After this, the buckets need to be dried well with a cloth. It is advisable to place products as far as possible from open fire or dampness.
Before use, it is recommended to pour hot water into the bucket and leave it for several hours. Thus, the boards swell, the distance between them and cracks disappear. After the procedures, the bucket should be treated with boiling water.
Staves are boards that are used to make buckets. You need to mark evenly on both sides the places for attaching the handles. It is important to make the ears as long as possible so that it is convenient to lift the bucket. A special handle made of wood or rubber must be placed on top of the bow.
The bow should be made of steel wire. The thickness should be 7 mm. A simpler option would be a bow that was removed from an old bucket.
Manufacturing technology of a doused wooden bucket:
- Buy boards. It is best to make a bucket that holds 10 liters of water. You need to decide how many rivets you will need. They should be processed and given the required shape.
- For easier assembly, it is advisable to make it wider at the edges than in the middle.
- Additionally, special hoops are needed to make a bucket. It is recommended that there be two. One is attached closer to the top, and the other is attached to the bottom. The hoops need to be made of metal.
- It's time to start assembling. Attach 3 strong ones to the top hoop at equal distances using clamps. Then fill the free space with boards. Perhaps the last board will not fit well, then it needs to be planed.
- On the side where the bottom is installed, you need to soak the boards. Place the circle in hot water for 30 minutes.
- Then you should turn the bucket over and throw a rope over the free edge. Hang the bucket and use metal to tighten it. Secure the remaining hoops.
- Secure the bottom using steel clamps.
Choosing furniture for baths and saunas
The standard set of furniture for baths and saunas consists of the following items:
- shelves and sunbeds;
- benches and benches;
- wardrobe and hangers;
- hanging shelves;
- chairs, stools, armchairs and tables.
To create a special atmosphere of comfort and relaxation, it is not recommended to use old and unnecessary furniture for the bath. The exception is brushed furniture, stylized as antique.
The main selection criteria are functionality, safety and durability. Functional areas in the bathhouse should not be cluttered with unnecessary interior items, so the optimal set of furniture for each room must be thought out in advance.
Steam room furniture
The key element of the steam room is the canopy. Standard size: width – 65 cm, length – 185 cm. For tall visitors, it is better to arrange products up to 220 cm in length. Its height is determined as follows: in a standing position, the arm is lowered, the knuckles of the hands should reach the shelf. The optimal height is up to 80 cm.
When choosing, the design features and dimensions of the room are taken into account - products can be single- or multi-tiered, L- or U-shaped, folding and stationary.
For convenient placement on the upper tier of the shelf, special benches of varying heights are used, taking into account the height of visitors. The width of the benches is up to 45 cm. Structurally, they are represented by wide longitudinal strips up to 3 cm thick, installed on thick supports.
No less important attributes of the interior are headrests and footrests. Headrests allow you to sit comfortably on a shelf in a lying position and reduce pressure on the spine, and footrests are used for high-quality warming up of limbs that are in a suspended state.
Furniture for washing
A bench of various configurations and dimensions is often installed in the washing department. Other functional pieces of furniture are compact stools and shelves - on them you can store a basin, bucket, tub and other bath utensils necessary for water procedures.
A compact hanger for clothes and bath accessories – towels, hats and washcloths – can also be installed here. To install it, you should choose a secluded place, protected from splashes.
Furniture in the rest room should be comfortable and practical. It is selected taking into account the total number of visitors who will simultaneously use the steam room. The recreation area allows you to implement any design project - from strict classics to bold art deco.
The standard set of furniture for a rest room is represented by a table, benches, wooden trestle beds, shelves, chairs or stools.
Mosaic crafts for the soul
Surely there is a place in your dacha or garden plot, in the house or on the street, or in a gazebo, that you want to somehow decorate, but at the same time do it in an unusual way. We offer to decorate any surface with crafts in eco-style. The essence of the method is to lay absolutely any pattern or image from wood cuts of different sizes. We will need:
- Plywood sheet;
- Liquid Nails;
- Varnish;
- Jigsaw or hacksaw;
- Many thin cuts of different sizes.
First, come up with a drawing that will delight you and lift your spirits with its appearance. Now you need to transfer the sketch from paper to a sheet of plywood, following the scale. When the drawing is ready, attach it to the attachment point and estimate the size. Perhaps the craft will turn out to be too bulky or, conversely, so small that it will get lost against the background of a long wall. This can be fixed at this stage. After adjustments, you can begin cutting out the plywood base. Now all that remains is to glue the wooden circles with glue and enjoy your creation.
protect the craft with clear varnish
If you have an old mirror at your dacha, you can use the same principle to frame it in a beautiful frame. The mirror must be glued in the center to a sheet of plywood, leaving the edges free for attaching saw cuts. Usually, if the mirror has a round shape, then the frame follows its contour. And you try to use the opposite method - enclose a round mirror in a square frame and see how unusual it becomes after its transformation.
Choosing wood for making bath furniture
The operational parameters of finished pieces of furniture depend on the materials used for their manufacture. The best furniture for a bath is made of wood. This choice is quite logical due to a number of advantages that the material has, such as:
- high density;
- low thermal conductivity;
- aesthetics;
- pleasant aroma;
- practicality and durability;
- safety and environmental friendliness;
- ease of machining.
The following wood species meet the stated requirements:
- coniferous – cedar, pine and spruce;
- deciduous - linden, aspen, alder and oak;
- exotic – abashi.
Coniferous wood
Coniferous trees are used to make functional furniture that can be used in the dressing room and rest room. In some cases, such wood must be de-resined, which increases the final cost of the material.
Products made from cedar are especially popular due to the low resin content in wood fibers, aesthetics and resistance to high moisture. Cedar furniture can be used in a steam room; when heated, it has a powerful therapeutic effect on the body.
Most often, linden, aspen and oak are used to make steam room furniture. Wood has an attractive appearance, inertness to high humidity and overheating.
Aspen is resistant to fungi and mold, easy to machine, and allows you to imitate the original pattern of expensive tree species. The main requirement for aspen is high-quality drying and the absence of knots. The only drawback of aspen is the low wear resistance of wood fibers, which leads to the appearance of dents and abrasions on the surface of finished products.
Linden has a pleasant aroma that has a healing effect on the respiratory system. It is resistant to rotting, deformation and temperature changes. The main disadvantage of wood is its susceptibility to mold, so it requires preliminary antiseptic treatment.
Oak is the most practical and sought-after material used for the manufacture of a wide range of bath furniture and accessories. It is distinguished by its visual appeal, durability, resistance to mechanical damage and deformation.
Another type of wood for making bath furniture is African abashi oak. It is attractive because it is resistant to overheating and temperature changes, and has an excellent appearance and smell. The high cost of abashi makes it an exclusive material that not every bathhouse owner can afford.
Preparation of material and working tools
Once the assembly drawing for a specific piece of furniture has been developed and the appropriate material has been selected, you can proceed to the next stage - preparing the lumber for the manufacture of the structure.
In order for wooden bath furniture to be functional and safe, it is necessary to thoroughly clean and process all the constituent elements of the structure. The dimensions of each part are maintained strictly in accordance with the drawing, and the connecting elements are identical to each other.
Taking into account the special operating conditions in the bathhouse, lumber is treated with protective antiseptic and polymer compounds that prevent rotting and destruction of the wood.
The work will require hand and power tools, which will allow you to quickly prepare the main structural elements and perform high-quality assembly. These include:
- grinding machine;
- screwdriver;
- jointer for leveling surfaces;
- plane;
- electric jigsaw;
- screwdrivers;
- ruler, square, construction pencil.
Clothes hanger in the bathhouse (step by step instructions)
The design of the hanger will consist of prefabricated elements connected to each other on two strips with wooden hooks.
You need to prepare:
- Top bar 25 x 50 x 708 mm;
- Bottom bar 25 x 50 x 567 mm;
- Rectangular elements 25 x 100 x 200 mm – 4 pieces;
- Square elements 25 x 90 x 90 mm – 7 pieces;
- Curly elements for hooks 25 x 100 mm - 10 pieces.
Round the edges of the wooden elements with a milling cutter to give them soft outlines.
- Arrange the squares and rectangles in a symmetrical order with a gap of 10 mm.
- Use fastening strips to fix their position, connect them along the pre-drilled holes with fasteners.
- In the front surfaces of square and rectangular elements, use a drill to make holes for fastening the hooks. Insert the lower parts of the hooks into the installation locations using glue.
After drying, sand and apply a coating.
Here are just a few options for making furniture yourself. As you can see, its design is simple, and the assembly process is not the most labor-intensive. The main thing is to do the work with soul, then the furniture will last for many years and will delight visitors.
Table manufacturing and assembly technology
Making a rectangular table for a bathhouse with your own hands is quite simple. To work you will need:
- wooden boards 10 cm wide, 2 cm thick, 200 cm long – 5 pcs.;
- wooden blocks for fixing the tabletop - 4 pcs.;
- beams with a cross-section of 10 × 10 cm, length 75 cm – 4 pcs. (for legs).
The table is assembled as follows:
- One of the boards for the tabletop is cut to a length of 150 cm to fix the legs.
- The boards are laid on a flat surface to assemble the tabletop. An indent of 35 cm is made from the short edge and the beam is fixed with 4 self-tapping screws. Next, another indentation is made from the same edge by 40 cm and the second beam is filled. The ends of the beam are ground at 45 degrees.
- The opposite side of the tabletop is fixed in the same way.
- Additional trapezoidal supports are made for the legs.
- The legs are being assembled. Two 75 cm pieces of timber are installed in the blanks, and the structure is fixed.
- The legs are inserted between the bars, previously fixed to the tabletop. All elements are connected with self-tapping screws.
- A short board is installed between the legs and secured with self-tapping screws.
- All parts are rounded with a jigsaw.
- The finished product is treated with a protective compound.
Wood techniques [20]↑
- 2016-02-10 Pyrography (part 2): 45 photographs of artists and amateurs that I liked
- 2016-01-26 Pyrography: 50 photographs of masters and amateurs that I liked
- 2014-05-08 Wood marquetry technique. Video master class from Tatyana Gorina
- 2014-04-06 Weaving from meadow grass (hay). Video master class
- 2014-02-21 Sculptural wood carving. Making a talisman staff. Sketches
- 2014-02-21 Weaving a cattail mat with your own hands
- 2012-09-05 Intarsia on wood. Video of intarsia technique
- 2012-08-29 Handmade wood carving lesson for beginners. Cutting out triangles
- 2012-08-23 Sketches and patterns for geometric wood carving
- 2012-02-10 Relief wood carving using a drill. Master class, video
- 2012-02-09 Pictures and sketches for wood burning. Flowers, fruits, berries, cereals
- 2012-02-07 Painting on wood with acrylic paints. Master Class
- 2011-11-07 Patterns for wood burning, suggested by nature
- 2011-10-26 Do-it-yourself artificial aging of wood
- 2011-08-14 Drawings and sketches for wood burning. Animals
- 2011-08-14 Volumetric wood carving for beginners. Carving technique and video
- 2011-07-22 Burl products, processing
- 2011-04-11 Wood burning. Master class
- 2011-04-11 Crafts from wood cuts
- 2011-03-27 Geometric wood carving for beginners. Master Class