/Accessories and decor/Decoration/
Pasta is not only a delicious side dish, but also an excellent material for creating all kinds of crafts with your own hands. After all, they are so easy to process, available in large quantities and in a variety of types. For preschool and school-age children, “pasta crafts” will help develop fine motor skills and hand-eye coordination, and for adults it will become an exciting hobby. In this material you will find 15 ideas for DIY pasta crafts, 100 inspiring photo examples, several simple instructions and a step-by-step master class on coloring pasta with food coloring.
Idea 2. Hair accessories
Pasta can be so beautiful that you can even decorate your hair with it. So, for example, an ordinary hairband will become more elegant if you stick on it spikelets painted with gold spray paint.
You can also make a tiara for a little princess from a headband and wheels and flowers glued together.
You can make hair decorations from butterflies. To do this, they need to be decorated and then glued to bobby pins, clips or hairpins.
homemade noodles
If you make a sufficiently salty dough in the form of noodles and cut it into appropriate dimensional strips, you can use ribbons to lay out a certain pattern or a complex image and securely fix it to the base.
Allow to dry completely until hardened and coat the outside with clear varnish. This way the work is maintained for a long time without changing the external parameters and shape, as well as other basic characteristics.
Idea 4. Panels and paintings made from pasta
From pasta of different sizes, shapes and colors you can create wall panels or “paint” real paintings - portraits, landscapes, still lifes and abstract scenes. There are at least two techniques for making pasta paintings.
Method 1: Find a suitable embroidery pattern on the Internet and select identical small-sized pasta. For example, these could be very small tubes or stars. Paint the pasta in the desired colors (see the master class at the end of the article), and then glue them to the canvas on a stretcher according to the chosen embroidery pattern. You can glue the parts using PVA glue or thermal glue (in this case, it is better to apply the glue to the pasta and not to the canvas).
Method 2: By hand or using a ready-made/homemade stencil, draw a schematic sketch on the canvas. Think about what kind of pasta will suit your design. So, for example, spirals are suitable for depicting hair, tubes can depict the bricks of a house, shells can be themselves, and all the small horns, stars, etc. can be used to “fill” or “draw” contours. You also need to plan what colors will be used for the painting. Keep in mind that you can create a composition not only from pasta, but also from cereals and beans. Having decided on the palette, paint the pasta (see the master class at the end of the article), and then glue them in the desired order.
The following selection of photos provides examples of panels and paintings from pasta that children can make, for example, to decorate their room, for a school assignment, or to give as a gift to a loved one.
Panel of shells, feathers and butterflies
Panel of pasta bows
Here are ideas for crafts made from cereals and pasta for creative adults.
Portrait of Ernest Hemingway made from pasta and cereal
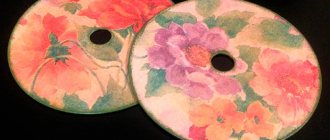
Abstract composition of spaghetti and pasta on a base of CDs
How do you glue pasta together?
The best and most lasting results are produced by a special gun, which is sold in handicraft stores. The glue there is silicone and is served hot, and when it hardens it forms a very dense plastic drop that is not afraid of any shaking.
Some advise using PVA glue, but this will be a short-lived result, until the first slightest blow. Therefore, we do not recommend that you opt for something that does not guarantee good clutch quality.
After all, you want the product to please the eye not for a couple of days, but for much longer? In addition, do not forget that children will constantly touch them and show them to their friends!
In the case of a glue gun, skill is required. The drop hardens quite quickly, so you need to have time to glue as many parts as possible in one application of glue.
Therefore, we recommend that you first practice a little folding the figures without applying glue, and when you see that things are moving quickly, then warm up the gun.
No need to drip glue from a gun directly onto the pasta! The drop comes out big enough for such small parts. Just take a little glue mass with a toothpick and quickly apply it to the pasta.
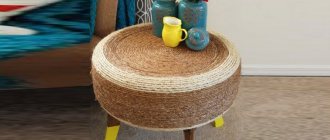
Idea 6. Stationery organizer
Any glass and even a tin can can be turned into a cute organizer for stationery items. All you need is pasta, glue and acrylic paints.
For experienced
For craftsmen and creatives, you can immediately begin to compose more complex objects. The following directions for molding jewelry are suitable.
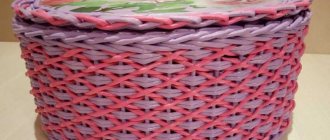
Idea 8. Pasta box
A box made of wheels or flowers may seem like the result of the finest work of a master, but, in fact, anyone can make such a craft with their own hands. To do this, you need to select a small box, line up the bottom of the box according to its dimensions, then assemble the walls of the box directly around the walls of the box using glue, and finally, make a lid of the appropriate size. If desired, you can glue handles assembled from several parts to the sides of the box, and glue the legs to the bottom. Next, the lid and the box should be connected to each other using pieces of flexible plastic or leather. When the product is ready, all that remains is to cover it with spray paint.
There is an easier way to make a box of pasta with your own hands, when a ready-made box or box is taken as a basis, and the pasta is used only for decoration.
The main thing here is to create beautiful and neat patterns and carefully paint both the box itself and the pasta decorations. To paint this pasta craft, it is best to use aerosol cans.
Simple decorations
Pasta beads are made very quickly:
- The most important thing is to decide what the design will be and in what color it should be done.
- How to alternate - different ones or take the same ones.
- How many threads will be included in the necklace?
- Measure its length.
- Consider the dimensions.
- Then paint, preferably with a brush.
- Dry until the surface is no longer sticky.
- String it on a beautiful cord or ribbon.
- At the ends you can fix special fastening elements or tie a beautiful bow.
Idea 10. Postcards with pasta decor
The same bows or, say, pasta hearts can be used to make cards with your own hands. The principle of operation remains the same as for making bookmarks (see Idea No. 9). And here is a selection of photo examples of “pasta” postcards.
Photo frame decorated with macaroni
Here, no comments at all. Take any frame, cover it with pasta and voila! An ordinary frame has turned into a kitchen one. And most importantly, no fraud, only sleight of hand and a little imagination.
In the first version, the pasta is clearly visible, but in this example you’d never guess what the elements are made of:
And here is a version of a children's frame, made from multi-colored pasta tubes:
But you can make not just one frame, but a whole collage on the wall, using several frames, not only for children, but for the whole family.. This is what such a composition will look like:
As you can see, in addition to pasta, other kitchen provisions are used here: beans, sweet straws, spaghetti. Coffee beans, peas and other bulk products are also perfect.
Idea 14. Mini Christmas tree
If you liked the idea of making pasta angels, garlands or Christmas tree decorations, then we suggest adding a Christmas tree made from pasta to your collection of New Year’s decor. This craft would look great on a holiday table, console table, or mantelpiece.
Instructions:
Prepare thick paper or cardboard, a glass bottle or a large glass, hot glue, spray paint (for example, gold), a pack of butterfly pasta and any additional decor such as beads. Cut a semicircle out of cardboard, roll it into a cone and secure with glue. Keep in mind that the higher the cardboard, the taller the tree will be. Having placed the cone on the bottle, start gluing butterflies in one row on its lower edge. Then proceed to the second row, but now place the pasta so that it overlaps the gaps in the first row.
Continue gluing butterflies using the same principle until the very top, so that the cone is completely hidden under the Christmas tree “branches”. Once the glue is dry, spray paint on the tree and then glue on beads for decoration.
In the following selection of photos you can find other ideas for creating Christmas trees from pasta.
Scallop Christmas tree
Christmas tree made from different pasta and Christmas tree made from shells
Christmas trees made of feathers and spirals
Methods of preliminary preparation
Before proceeding directly to production, it is worth carrying out preparatory activities, which include the following:
- Purchase flour products of the desired shape. It’s better to have several varieties, so the compositions turn out to be complex and original.
- Lay out a handful and try to combine them using combinatorics. In this case, it is important to observe how they make better contact, where fewer voids are formed and a high-quality fit is formed.
- The number of points of contact ensures the rigidity and reliability of fastening the entire structure.
- Don't overlook curves for 3D objects. They should be smooth if necessary. Sometimes an orthogonal joint is required - linear parts may work best in this case.
- Select the image to be created. Calculate the number of pieces that will be required.
- To carry out sorting, for this you need to lay out the entire volume and then select those that differ in their dimensions.
Curly hedgehog
Because it’s easy to make a variety of animals from pasta. Pay attention, for example, to a hedgehog. It will decorate the interior and cause not only surprise among guests, but even envy. Preschool children can also cope with the craft. In any case, you can give it to a kindergarten or an exhibition. The process will take a couple of hours, but the result will clearly please you.
First of all you need dough. The recipe is also easy: flour, salt, water. Having molded the base, use your vision to divide the forest dweller into the places where the needles begin and the muzzle is visible. Turn the spiral pasta into a silver color. Let's leave the stars on the muzzle, let them cover it tightly. Insert spiral figures onto the rest of the body; these are needles. Finally, find a place for the eyes and nose. Any other decorations will only brighten up the fake.
Christmas wreath
A traditional Christmas attribute that will decorate your home.
You will need:
- Donut base (made of polystyrene foam, cardboard or plywood).
- Pasta of different shapes.
- Thermal gun.
- Ribbons for decoration.
- Spray can with gold or silver paint.
Manufacturing process:
- Foam wreath base can be found at craft stores. You can cut it yourself from beer cardboard or plywood.
- Fill the bagel with pasta, leaving no space. Keep it in order or arrange it chaotically, as you like. Use pine cones, acorns or nuts if desired.
- Glue each piece to the base. Let the glue harden. Paint the resulting wreath the color of your choice.
- Once the paint has dried, tie a red or green ribbon around the wreath. Tie a bow on top and don't forget to tie a loop to hang the wreath on your door, wall or window.
Volumetric crafts for May 9
Crafts for May 9 are made in all educational institutions. And this is correct, because history needs to be passed on from generation to generation.
You can depict cars, an eternal flame or an airplane of that time.
I was also captivated by carnations. Just a huge thank you to the master who came up with such a craft. They look like real ones.
With the right amount of imagination, you can make a weapon into a weapon.
And by April 12, make a whole rocket.
It doesn’t quite relate to Victory Day, but I couldn’t pass it by.
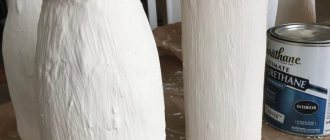
Paints
Acrylic or in spray cans, they will help you get a bright color for your products. The pasta is soaked in acrylic paints, and aerosol paints are sprayed either on the finished product or on each element separately.
Note!
DIY airplane craft: the best options for creating an airplane from paper, cardboard and plastic. 120 photo ideas
- DIY crafts for March 8 step by step - a review of the most beautiful crafts for International Women's Day (120 photo ideas)
Diaper cake for a girl - 180 photos of ideas for original diaper cakes + DIY instructions with examples of finished products
Coloring options with acrylic paints, food and natural dyes are perfect for children. It is worth remembering that gouache and watercolor paints are not suitable for the process: gouache stains your hands even after drying, and watercolor paints require dilution with water, which negatively affects the appearance of the craft.
How to properly fasten our creations
Parents are wondering how to glue pasta together to make something original. Let's discuss proven options.
- PVA glue. Safe, keeps the parts on the very basis of the work, usually on cardboard.
- Paste. Harmless, helps with voluminous figures. The problem is hardening; the process is quite slow, which is why it is not used often.
- Plasticine. The best option for holding feathers is spaghetti.
- Double sided tape. When attached to a hard surface, it holds parts well. Needed when there is a lack of other methods.
- Hot glue. A reliable method, four-year-old children can use it only under the supervision of elders.
- Super glue. It is hardly worth using, it is undesirable. Suitable for tight bends where a glue gun can't do anything.
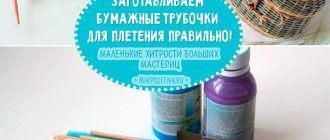
We sorted out this problem. But how to color pasta.
There are two options. The first is to paint by hand. The second is to make numerous blanks with one color.
You need to take food coloring (liquid) and a cellophane bag. Lay out the pasta, fill it with the chosen color, tie the neck, roll it with your hands, and leave it to dry.
Let's look at applications that you can come up with and make in a quiet environment.
Everything is grown up!
Don’t think that pasta creativity is an activity only for children. The older generation also has room to expand here.
Many products—you can no longer call them crafts—require well-developed spatial thinking, creativity, perseverance and painstaking work. Not to mention the amount of glue and pasta.
It’s great if children take part in this work as much as they can. After all, the best example of patience and hard work is personal.
But the manufacture of some elements can be so difficult that something more powerful than PVA is required. Here it is better to remove children from the workplace so that they do not breathe toxic fumes. Yes, everything is adult here!
For Easter
For the bright holiday of Easter, the idea of a large egg-shaped basket will come in handy. You can put painted eggs or any other holiday paraphernalia inside.
And so you can understand how to make such beauty, I’ve put together a video. It shows everything in detail.
You may need a whole kilo of pasta. Therefore, immediately think about the size of the egg.
Snowflakes made from pasta for the New Year
I didn’t even imagine that it was possible to create such openwork beauty. You look at these snowflakes and you understand that there is no need for purchased Christmas tree decorations.
Most often, pasta collected into one product is spray-painted in order to reach the most difficult and narrow places.
White, gold and silver paints are more popular.
Tea-set
For those who are confident in their abilities, I propose the idea of a tea set. It can be supplemented with a homemade samovar and cups.
This is a real decor for the kitchen or cottage. You can even decorate a table in the garden.
These crafts attract with their openwork and lightness. they seem weightless.
To collect the entire service into one whole, use a tray.
If you treat the painted surface with varnish, then even moisture will not be able to spoil the craft for a long time.
Where was the Christmas tree born?
To make it, you will need a base. For example, a plastic bottle, which must first be degreased and primed or covered with napkins so that the pasta sticks to it more easily.
A simpler option would be a cardboard cone that does not require additional processing. Excellent spruce paws would be feathers or bows, which need to be glued in even rows, alternating and overlapping.
For the smallest children, such work is difficult and tiring, but for preschoolers and schoolchildren it is quite up to the task!
Pasta can be colored in advance (or use colored ones) or after finishing
In this case, you must act carefully so as not to damage the “Christmas tree”. The completed work can be mounted on a stand - a coffee jar, a plastic cup, etc.
Animal figurines
You can make wonderful animals out of pasta. Feathers make excellent birds, shells make dogs and horses, and curls make lambs. The shape of the material is not important.
When approaching the process with imagination, any development of events is possible. It is not necessary to stop at representatives of the fauna. You can aim at making human figures.
Tree and foliage in pasta applique
The smallest craftsmen can form a pasta tree from plasticine.
- To begin with, the trunk and crown are laid out.
- And then the pasta leaves are pressed in.
Children studying in the older group can make a more complex application on the theme of autumn. To create it you will need:
- bow pasta;
- "PVA";
- dye;
- plasticine;
- brush;
- paper sheet
Training session:
- Paint the leaves in advance.
- Glue the painted blanks.
- If you wish, you can make not the entire tree, but only individual parts.