Chest functions
Chests have been known for a very long time. They were taken with them on trips, given as a sign of special favor, merchants carried their goods in them, and girls put their dowries in them. The form could be different:
- In most countries, they preferred a rectangular box with a securely closing lid - a lot of things could be placed there, and if necessary, you could lie down or sit down.
- Other nations had chests in the form of a barrel. No less things could fit there, but it was impossible to lie on such an object. But it could be rolled.
In a modern apartment, a rectangular box is certainly preferable. It will fit things that are not needed every day, and if necessary, you can very quickly organize an additional sleeping or sitting place.
Loading…
A do-it-yourself bench-chest is made almost in the same way as a chest-bed, the only difference is in the dimensions.
Choosing a bench design
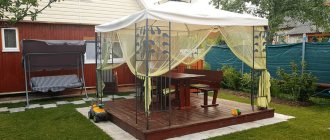
A bench for a balcony can come in different variations, but it should be light and elegant enough so as not to visually burden the small space of the balcony. The bench can be made comfortable by upholstering it with soft fabric, or you can simply place pillows on the seat.
There are two types of benches according to their functionality:
- Ordinary, intended only for recreation. To make such a bench with your own hands you will need a minimum amount of materials. This type is easy to assemble.
- Multifunctional benches are designed not only for sitting. A bench for a balcony with a box for storing any items requires more time to manufacture.
The bench should not take up much space on the balcony, so its width and length are selected individually for each room. The bench can be of a very simple design, or you can equip it with armrests and a backrest.
A bench with a drawer on the balcony is not only useful, but also a beautiful piece of furniture
The advantages of folding and folding benches are obvious; they unfold only when necessary, and when assembled they take up very little space. The disadvantage of these structures is less strength.
Tip: When building a bench for a loggia, take care of its versatility. It should be a simple, but reliable and strong element of the interior.
What to make it from?
In the old days, chests were made from natural wood. Now you can safely continue this tradition, fortunately, in construction stores you will always find boards from a wide variety of species and all possible sizes. But other materials are also suitable:
- plywood;
- laminate;
- Chipboard.
Depending on what materials you have, you need to choose one or another design of the chest-bed:
- frame;
- frameless.
The frame option is used for thin materials - plywood and laminate, since otherwise they will sag. For the frame you will need more slats or timber. For boards and chipboards, the frameless method is quite suitable. In both cases, a floor board is very suitable and fits perfectly together.
Important! The thickness of plywood or chipboard must be at least 16 mm.
History[edit | edit code]
| Indev version of Java Edition | ||
| 0.31 | January 24, 2010 | The chest has been added to the game. |
| January 29, 2010 | Chests can now be crafted. | |
| Alpha Java Edition | ||
| 1.0.14 | Chests are now used to create a minecart with a chest. | |
| Java Edition Beta | ||
| 1.5 | Chests can no longer be tripled. | |
| 1.8 | An animation for opening and closing the chest has been added, and the texture of the double chest has been changed. Additionally, the chest is now a transparent block, allowing chests to be placed directly on top of each other. | |
| Official release of Java Edition | ||
| 1.0.0 | Beta 1.9 Prerelease | The sounds of opening and closing a chest have been removed. Previously, the sounds were like at the door. |
| RC1 | The sounds of chests have been returned, but different, more realistic. | |
| 1.2.4 | Cats now sit on chests, preventing them from being used. | |
| 1.3 | 12w16a | Added world generation option - bonus chest. |
| The chest icon (and other block icons) has been rotated the other way, and now the front side of the icon is on the right, not the left. | ||
| 12w21a | Chest destruction particles are now from the boards. This was due to the old chest textures being removed from terrain.png (causing a locked chest to have no texture). | |
| Chests can be found in desert temples. | ||
| 12w22a | Chests can be found in jungle temples. | |
| 1.4.4 | The physical model of the chest no longer occupies a full block, but corresponds to its model and is 0.875x0.875 blocks. | |
| 1.5 | 13w01a | The chest is now used in crafting the funnel and trap chest. |
| 1.6 | The chest can now be mounted on a donkey or mule. | |
| 1.8 | 14w02a | Added NBT tag, which allows you to make the chest locked. It can only be opened by a player with a certain item if this value is set. |
| 14w29a | Chests now have a destruction animation. | |
| 1.9 | 15w31a | Chests are now generated in the world of End. |
| 15w43a | Chests now spawn in the igloo basement. | |
| 15w44a | Changed the contents of the bonus chest. | |
| 1.9.1 | 1.9.1-pre1 | Funnels can now fill or empty chests that are blocked with blocks. |
| 1.11 | 16w39a | Chests are now generated in forest mansions. |
| Chests are now used to craft shulker boxes. | ||
| 1.13 | 17w47a | It is now possible to place chests close to each other, which allows you to create compact storage without the use of trap chests. |
| By crouching and placing a chest or trap chest next to the previous one, you can create two chests that are not connected to each other. | ||
| The numeric block ID became 54. | ||
| 18w09a | Chests are generated in underwater ruins. | |
| 18w10a | Chests are generated in structures in the form of treasure. | |
| 18w10c | Water can now be placed in chests. | |
| 18w11a | Chests can be found in sunken ships. | |
| 0.4.0 | A chest has been added. It is impossible to make a double chest. | |
| 0.6.0 | The chest displays the durability of items as in the inventory. | |
| 0.7.3 | Double chests have been added. The texture has been updated. | |
| 0.9.0 | build 1 | Chests can now be found in abandoned mines, treasuries and villages. |
| Added smoothed lighting to chests. | ||
| 0.12.1 | build 1 | Ocelots can now sit on chests, making them impossible to open. |
| Chests are now generated in hellish fortresses. | ||
| 0.13.0 | build 1 | Added desert temples where chests can be found. |
| 0.14.0 | build 1 | Chests can now be mounted on donkeys or mules. |
| 0.15.0 | build 1 | Jungle temples have been added where chests can be found. |
| 0.16.0 | build 1 | The custom chest name is no longer displayed in the chest interface. |
| 1.0 | build 1 | Chests are now generated in the End world and in igloos. |
| 1.1 | build 1 | Chests are generated in forest mansions. |
| Official release of Bedrock Edition | ||
| 1.2 | beta 1.2.0.2 | Bonus chest added to the game. |
| 1.4 | beta 1.2.14.2 | Chests are generated in sunken ships. |
| Chests are generated in structures in the form of treasure. | ||
| beta 1.2.20.1 | Chests are generated in underwater ruins. | |
| 1.10 | beta 1.10.0.3 | Chests can be found in robber outposts. |
| Legacy Console Edition | ||
| Added chests. | ||
| Added animation for opening/closing the chest, updated texture. | ||
| Cats can now sit on chests, making them impossible to open. | ||
| A "bonus chest" option has been added to the settings menu. | ||
| Chest particles are no longer based on terrain.png | ||
| Chests can be found in desert temples. | ||
| Chests can be found in jungle temples. | ||
| New Nintendo 3DS Edition | ||
| 0.1.0 | Added chest. |
Making calculations
It will be much easier to make a rectangular box with a lid if you properly calculate the dimensions and make a scan:
- Determine the place where the chest-bed will stand - it is best to mark its future position on the wall and floor with chalk.
- Draw two more horizontal lines on the wall, thus marking the height of the legs and the bottom of the lid.
- Measure the length and width of the floor.
- Along the wall, measure the height of the box (from the legs to the bottom of the lid) and the lid.
- Subtract twice the thickness of the timber from the height.
Let's do a sweep
First you need to make a drawing to scale. It is best to take graph paper for this purpose. A convenient scale is 1:10, when one centimeter on a sheet corresponds to 10 cm of a board. Then everything is simple:
- Draw a rectangle, the length and width of which correspond to the length and width of the future chest on the selected scale - this will be the bottom.
- Draw the front and back parts - their lower sides are in contact with the long lines of the existing rectangle, and the short ones are equal to the height of the body.
- Draw the sides accordingly - the lower sides of these two parts coincide with the short sides of the bottom, and the sides are equal to the height.
- Outline the contours with a thick pencil and the fold lines with a dotted line.
- Construct the development of the lid in the same way: first, a large rectangle, which will be exactly the same as the bottom, and then attach the remaining sides to it.
- On all sides, write down the dimensions, but not to scale, but as they will be in reality.
Important! If you have good spatial imagination, you don’t need to do a scan.
It’s easy to clean up the nursery, hallway or balcony
Catherine Hug23/September/2017
Houzz-Contributor. Creative Einrichtungsberaterin. Bloggerin, Baumarkt-Stammkundin und DIY-Expertin. Mutter zweier Töchter und stolze Besitzerin eines sehr alten Wohnwagens mit Vorliebe für Schlichtes, Schönes und Skandinavien.
More
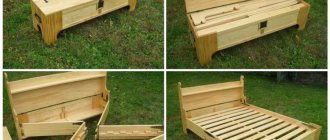
To combat clutter in a child's room, you will need very little: three wooden boxes (we bought a Knagglig from IKEA), a piece of furniture, boards and a couple of screws. And in just a couple of hours you have a comfortable bench made of drawers and practical storage. No special skills or tools are required (well, just a good screwdriver). If there is no nursery in the house, then such a chest will be useful for storing shoes and things in the hallway, on the terrace or balcony.
The basis of our craft is three wooden boxes. Each module, about the size of a regular wine box, will have storage space under the lid seat. And the lid on the piano hinge can be easily folded back to get things out.
We took laminated plywood - with it, the chest-bench can be placed on both the balcony and the terrace. If you don't need "moisture protection", use regular plywood.
You will need:
- three wooden Knagglig boxes, IKEA (we took boxes measuring 46x31x25 cm for 699 rubles, but you can use smaller boxes);
- seating surface: plywood sheet 95×48 cm;
- base: two boards measuring 91x10 cm, three boards measuring 43x10 cm; edged board 95 cm;
- screws;
- piano loop 90 cm (or 60 cm).
Tip:
Wooden parts can be cut at the counter at a building materials store.
Step 1. Making the base
We chose a base height of 10 cm. This is a comfortable height for the bench and ensures stability of the structure. Another plus is that if you place such a bench on a country terrace, the base will protect the untreated pine of the boxes from contact with the ground or the wet floor of the terrace.
We drill holes on long boards and connect the parts together with screws, as shown in the previous photo.
Advice:
Fix the parts with at least two screws on each side.
Step 2. Attach the boxes to the base
When the base is ready, place three drawers on it and screw it in with screws.
Step 3. Attach the lid
We fix the lid using a piano hinge. You can use special loops for chests. They are more reliable, but unlike the piano hinge, they are visible on the top side of the lid. Piano hinges come in different lengths and widths. The best option is equal to the length of the chest.
First, screw the hinge onto a piece of wood. Mark the appropriate places along the edge of the plywood sheet, drill holes and attach the hinge to the lid.
Place a plywood cover on the structure and screw a piece of wood onto the drawers on the inside of the bench. When finished, run sandpaper along the edge of the seating surface.
The bench-chest is ready - all that remains is to fill it with toys, shoes or garden tools. YOUR TURN... What can be made from wooden boxes or pallets? Share your experience in the comments section.
Preparing the tools
Before you start work, take care of the tools that should always be at hand. You also need to allocate at least a small space for a workshop in order to assemble a chest bed with your own hands.
Important! It is advisable that where you will work there is not too much humidity. When working with wood, sudden temperature changes should also be avoided. The chest, of course, is not a musical instrument, for which high humidity can be simply catastrophic. But suitable conditions can avoid many problems.
The tools you will need are the following:
- jigsaw or wood saw;
- drill;
- Sander;
- screwdriver (you can use a drill at low speeds);
- hammer;
- pencil;
- long ruler;
- square
In addition, you need fasteners, as well as wood glue. The following are used as fastening elements:
- self-tapping screws;
- metal corners;
- wooden scarves.
Peculiarities
A bench-chest is an excellent solution for arranging a balcony, hallway or other room. This product performs several functions at once, namely:
- the box is used to store various things;
- the chest can be used as a bench or table;
- If you decorate such a bench, it will become a decorative element of the room decor.
It is worth noting the fact that quite often this interior element is used as a bedside table or coffee table . If this furniture is in a children's room, hallway or on a balcony, then it is more often used as a bench.
Marking the frame
For the frame structure of the chest-bed, we take a 5x5 beam. You need to choose it carefully - knots do not particularly harm the work, but there should be no noticeable chips or glues.
Frame
For the body you need 12 parts:
- 4 pieces equal to the length of the chest;
- 4 pieces equal to its width;
- 4 – equal to the height minus double the thickness of the timber.
Important! For a large chest, you will also need side spacers - one on each short side and 2 on each long side. Their length is equal to the height of the box minus twice the thickness of the beam, since they are placed between the upper and lower bases.
Lid
For the lid frame you will also need 12 parts. But there is also a half-frame option, if the height of this part is equal to single or double the thickness of the beam. In both situations, you can do without the side ribs. In the first case, only the frame is made, in the second, the frame is doubled, that is, 4 or 8 parts are needed, respectively.
Important! The double frame option may be too heavy.
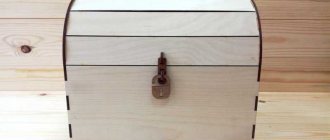
Money chest
Today, a money chest can be used at any type of celebration. Many are sure that the best gift is, of course, money, and for such a gift you just need to come up with the most reliable storage place. The ideal option would be a chest made with your own hands and decorated in the style of the main festive theme.
For work we will need the following materials:
A cardboard box of the required size;
Stationery tape;
Stationery or pocket knife;
For decoration - various materials and accessories.
When starting to create a product, you need to make a pattern for the chest and stock up on one more additional box.
The existing box must be unfolded in such a way that the bottom is rectangular in shape, and the front and back walls are high.
The next step will be longitudinal grooves, which are made carefully, so as not to pierce the cardboard, using a knitting needle on the front and back walls. This is necessary so that we can ultimately make a rounded lid for our money chest.
From the second cardboard box it is necessary to cut out the side walls, sized to match the width of the bottom of the chest. You need to make 2 of these blanks. Round off the tops of the side walls.
Now you can start assembling. All joints are connected using tape, the lid is bent into the desired shape and also secured using the same tape. The side walls must be attached to the chest and carefully fixed.
In order for a hand-made money chest to become a beautiful piggy bank, you need to use a penknife or stationery knife on its lid to make a hole for money measuring approximately 1*10 cm. When the assembly of the money chest is completed, you can begin decorating. Its surface can be covered with wallpaper, paper or beautiful fabric. If desired, you can glue a variety of original accessories onto the surface of the chest.
Assembling the box frame
To connect the parts you need self-tapping screws. Before you start assembling the chest bed with your own hands, sand the elements. This can be done with coarse and fine sandpaper, but a grinding machine is much more convenient:
- Start assembly from the base - connect the bottom parts, maintaining right angles.
- Assemble the upper part in the same way.
- Compare the fragments - the contours must match exactly.
- Place the corner ribs, attach them to the bottom, then secure the top frame frame.
- Place intermediate supports.
- Strengthen the support beams from the inside of the frame, except for the corner ones, with triangular or T-shaped plywood gussets on screws - this will reduce the tendency of the structure to loosen.
Original double-walled box
Making such a box is much more difficult, but we will help you figure it out.
Step 1. On the pre-processed workpiece, you need to draw cut lines with a pencil. And here one important point should be taken into account: when transferring the sketch, it is imperative that the longitudinal orientation of the fibers be observed!
Step 2. An even longitudinal part is cut from the workpiece (its thickness should be 1.5-2 cm). This part will serve as the cover of the product in the future.
Step 3. Next, change the inclination of the saw table. It is necessary to change the angle literally by a few degrees.
Step 4. After this, the part is cut into 2 parts and the internal waste part is cut out. Thus, a conical cavity of the product is formed.
Step 5. The halves are glued back together. Thanks to this, by the way, internal stress is also relieved and cracking and deformation of the product are prevented. The glue should be applied in a thin layer, and all excess inside should be carefully removed.
Step 6. The glued parts are placed under the clamps. In this case, you need to carefully ensure that there are no distortions or displacements.
Step 7. The table returns to the horizontal position, a couple of slices are cut from the waste part. This will be the bottom and cover of the future product.
Step 8. The interior of the box is painted. It is more convenient to carry out painting at this stage, while there is free access from both sides.
Step 9. The table returns to the inclined position, after which cuts are made along the outer contour.
Step 10. A thin layer of glue is applied to the ends of the bottom, then it is inserted into the lower part of the product (you need to press it with your fingers until it stops).
Step 11. The lid elements are glued to the workpiece, cut off at the initial stages of work.
Step 12. When the glue has dried, the main outline of the lid is outlined, after which this part is cut out.
Note! The technique described above is universal, because it makes it possible to experiment with shapes and designs, making original and beautiful boxes with your own hands.
Legs
They can be of any shape - carved, barrel-shaped, rectangular or square. The simplest option is the last one. You can also use legs from an old sofa if they are strong enough and match the color and style:
- Place rubber or felt pads on the underside to prevent your chest from damaging the floor.
- Screw the legs, and to be sure, coat the joints with wood glue.
- Check how horizontal the bottom is - if it is tilted, stick another gasket under the questionable leg.
Important! The chest can have no legs at all; such a design will be even simpler.
Flowers
Flowers are perfect for any style and design. They will perfectly refresh your balcony and will delight not only your eyes, but also passers-by on the street. They can be planted in long pots and attached to the balcony railing or hung on the wall. If you have little free time and are worried that the flowers may dry out, plant succulents. They are very unpretentious in care and watering.
How to make a lid for a chest from plywood?
The lid is made in almost the same way as the box. Start with a frame, that is, a rectangle. In addition, for a large chest you will need 2-3 transverse spacers, which are placed between the long sides.
You need to cut:
- 1 rectangle for the top - it is equal in size to the bottom;
- 2 sidewalls;
- front and back.
Connect the side beams, front and rear frame parts into a rectangular frame. As in making a box, it is convenient to use self-tapping screws. Insert the spacers, and then sheathe the lid.
Simple seat on the balcony
At this site we made a cabinet from lining. The customer asked if we could make him a built-in nightstand. You can put things inside and sit on it. We offered him this option.
The frame was assembled from slats with a cross section of 20*45 mm. The front wall was made of clapboard. The top cover was also mounted from clapboard. The ends were covered with a decorative corner.
The seat cover was secured with 2 hinges. The hinges are screwed to the front, so the structure opens to a person. This is the simplest option, it is done faster than others. To make the lid rigid, we reinforced it with 3 slats.
The customer liked sitting on our furniture. He said - I’ll throw pillows here and read books, otherwise there’s nowhere to hide from the TV in the apartment.
The lid must open
You can, of course, simply install it, but it is difficult and inconvenient. It is much more interesting to make a real chest with a hinged lid. You will need:
- 3-4 window hinges;
- mortise lock, latch or latch.
We attach window hinges to the back side. It is better to recess them by cutting out recesses of the appropriate size in the casing - only the axles should protrude. It's all screwed on with the same self-tapping screws.
Place a device in front that will close the chest. Pirate films usually show chests with mortise locks, but they are not as convenient as, say, a latch or latch. You can attach one latch in the center, or you can attach two in the corners, as you like.
Achievements[edit | edit code]
Main article: Achievement system
| Icon | Achievement | Description | Task | Availability | Xbox Points | Trophy type (PS) | ||
| Xbox | PS | Bedrock | Nintendo | |||||
| Chestful of Cobblestone | Mine 1728 cobblestone blocks and place them in the chest. | The player must mine 1728 cobblestone blocks and place 1728 blocks (or 27 stacks) of cobblestone in the chest. The blocks placed in the chest do not have to be the same ones that were mined. | Yes | Yes | Yes | Wii U, Switch | 20G | Bronze |
| Freight Station | Use the hopper to move items from chest to chest. | No | No | Yes | New 3DS | 15G | — | |
| For remelting! (Smelt Everything!) | Attach 3 chests to one furnace using 3 hoppers. | No | No | Yes | New 3DS | 15G | — | |
| Open mining! (Mine!) | Open every chest in the Battle mini-game arena in one round. | Yes | Yes | No | Wii U, Switch | 20G | Bronze |
Final finishing
Your DIY chest bed is almost ready, but you don't really like the way it looks? No problem, you can decorate it. Wooden parts will look much more interesting if they are covered with stain, fortunately, in construction stores you will probably be offered stain in a variety of colors, including walnut or ebony. In addition, the walls can be painted, covered with fabric, burned or cut into patterns.
Important! The joints can be sealed with decorative glazing bead. But nothing prevents you from making forged overlays or their plywood imitation.
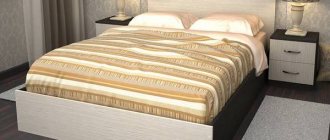
Model overview
Today there is a wide selection of models on sale , among which you can find the best option for various needs. A chest bench can be located both in an apartment or house, and on the street. Many people buy such products for their garden. Typically, garden models are made of metal. But for home use, a wooden model is ideal.
A bench with storage box combines the functions of a bench and a chest of drawers. You can store things in it, thereby saving space in the apartment. Therefore, this solution is characterized by practicality.
If you need to purchase a model for a balcony , then you should definitely take into account the dimensions of the balcony, because this thing should not interfere and take up a lot of space. It should become a stylish addition, an unusual decoration. A bench-chest can be intended for a hallway . In this room it will primarily perform a practical function, but do not forget about the decorative one.
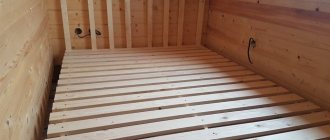
Sequence of work execution
- The first priority is to prepare the elements for the base of the structure.
- To do this, you should cut four beams, which will subsequently be located from the inside at the corners of the frame. Prepare material for all types of walls in the same way. The main condition for this work is the accuracy of measurements and careful cutting.
- Assembling the side walls. To do this, you need to attach boards with self-tapping screws to two horizontally located bars placed at the appropriate interval. The result is two folded side walls. The point is to make them even; for this we must not forget about the level of each board.
- It is better to fasten the sides with outside help. The fastening must be done based on what the seat box will be used for in the future. The boards can be attached either end to end or at a distance. It is important that the gaps between the boards are the same. This will give the box a neat appearance.
- A simple option for fastening the bottom would be to fasten two bars from the inside of the lower part of the structure, then cross boards are nailed to them.
- The lid should be assembled separately by attaching two boards from the inside. For complete reliability, it is advisable to install a diagonal spacer between the crossbars, this will avoid distortions of the shield. This simplest version of a lid for a box can be thoroughly used as a seat on the balcony.
- To complete the work of fastening the cover, a piano hinge is attached to the transverse side of the shield and connected to the main structure. For better functioning of the lid and precise fixation of the hinge, washers can be installed on the sides. For convenience, it is advisable to stick seals on the upper edges of the structure; they will soften the sound when closing the lid.
- For long-term operation of the product, it is advisable to use metal corners at the junctions of elements.
- It is advisable to install a footrest from the front side to the bottom of the box to prevent dust from getting under it, as well as to absorb additional load.
- After the seat for the balcony is built, you can move on to decorating.
Decoration
You can use any method to decorate the seat.
A less labor-intensive and affordable method is painting and varnishing. Thematic drawings or ornaments applied to the box will add individuality.
To decorate a seat on a balcony, it is better to use the soft upholstery method. To do this, you will need to cut leatherette and polyurethane foam fabric to the size of the lid of the supply box, and use a furniture stapler to secure it to the inside of the tire.
To decorate a seat on a balcony, you can also use a regular cladding board. It can be sheathed on all sides of the product, and the ends can be decorated using self-adhesive film to match the skin.
To simplify the work, the box can be decorated with pillows sewn for this purpose. It will be comfortable but practical.
Building a box seat with your own hands is not difficult, but the result of your labor will bring a lot of pleasure. Such an impromptu bench on the balcony will be able to constructively solve several issues, such as storing things and household items that cluttered the balcony structure, preserving preserved food and vegetables, and will also provide a cozy and comfortable place for rest and privacy.
Related article: Refrigerator on the balcony in winter to what temperature
Useful tips
When choosing a chest model that you plan to make with your own hands, you need to pay attention to the option that will fit perfectly with the interior of the house.
- For a retro style, a restored element that has no cracks or abrasions is perfect.
- Vintage style, on the contrary, requires a worn product with chips and scratches.
- To prevent the design from being too conspicuous, the room needs to be supplemented with objects that will match the style of the chest (lamp, paintings).
- If the room is designed strictly in white colors, and the structure is of some other shade, then it can be repainted in the color you need.
When creating a wooden craft, its final processing is very important. This includes sanding, tinting and varnishing. If there are still cracks on the surface of the product, they must be hidden using putty intended for wood.
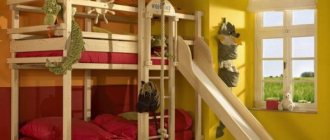
Homemade decorative chests are usually placed in the bedroom, living room and children's room.
In the bedroom, the product can be installed near the bed, placing linen, towels, a blanket with pillows or jewelry there.
In the recreation area, the structure can be used as a coffee table, on which you can place a vase of flowers, a book or a newspaper.
In addition, such a decorative element can be placed in the bathroom, and jars of cream, shampoos, cosmetics and much more can be stored in it.