The low cost of chipboard, high performance characteristics, and versatility of use have made them a very popular material. The most common areas of application are furniture production and construction.
The main enemy of these slabs is water - the chips increase in volume, the slab swells, warps and crumbles.
Even at the very beginning of production, sawdust and shavings, after drying, are impregnated with formaldehyde resins. After pressing, the surface of the boards is laminated, sometimes even varnished.
But protecting the surface does not prevent the penetration of moisture from the ends through which it enters. Accumulating inside, water gradually begins to penetrate the wood fibers, which leads to the destruction of the slab.
Consequently, the ends must first be saved from liquid penetration during operation. If they are tightly sealed, the service life of the slabs will be much longer.
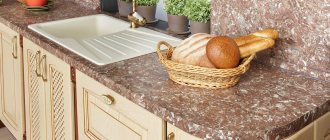
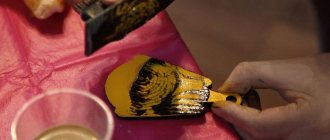
The photo shows the effects of water on a chipboard countertop.
Why are the ends the starting point for destruction? Yes, because the production of slabs of the required standard sizes, as well as the preparation of pieces of material of different sizes, requires cutting. In this case, the integrity of the wood fibers is compromised.
Thus, chipboard protection from moisture is carried out in three directions:
- impregnation of wood fibers with resins;
- special surface treatment;
- end sealing.
Content
Even at the very beginning of production, sawdust and shavings, after drying, are impregnated with formaldehyde resins. After pressing, the surface of the boards is laminated, sometimes even varnished.
But protecting the surface does not prevent the penetration of moisture from the ends through which it enters. Accumulating inside, water gradually begins to penetrate the wood fibers, which leads to the destruction of the slab. Consequently, the ends must first be saved from liquid penetration during operation.
If they are tightly sealed, the service life of the slabs will be much longer.
The photo shows the effects of water on a chipboard countertop.
Why are the ends the starting point for destruction? Yes, because the production of slabs of the required standard sizes, as well as the preparation of pieces of material of different sizes, requires cutting. In this case, the integrity of the wood fibers is compromised.
Thus, chipboard protection from moisture is carried out in three directions:
- impregnation of wood fibers with resins;
- special surface treatment;
- end sealing.
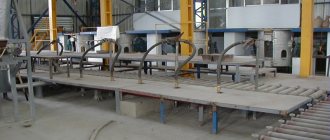
We form a tabletop from chipboard or MDF sheets
To process a product made from chipboard or MDF, you should use laminated paper, polycarbonate or polystyrene plastic.
The order of manipulations looks like this:
- Products of the required shape are cut out of chipboard and fastened with a stapler.
- Make sure that the joints between the sheets are uniform (use a sanding sheet to correct).
- Make end trim.
- The facing piece is cut out using a grinder.
- The facing material is glued and fixed using a rubber hammer.
- The end plate is mounted level with the bottom of the structure.
- The surface and apron are treated with adhesive.
- Using separators, the laminate is installed, and then the separators are removed.
- Use a paint roller to level the base.
- Use a router to make a hole under the sink.
- After shaping the product, we grind the edges.
Surface treatment of plates
The front and back surfaces of the slab, as the largest contact areas, without any protection, can pass through and absorb, accordingly, the largest amount of liquid. It would be a good idea to cover these surfaces with something moisture-proof. Some of the methods of such coating are possible only in factory conditions, some are also possible at home.
One of the main methods of protection is lamination. In this case, a melamine film is laid on sanded chipboard at high pressure and high temperature. The essence of this process is not pressing, but the fact that under these conditions the film polymerizes the surface of the slab, becoming one with it.
There is another method that is performed in the factory - laminating. Pressure and heat are also used here, but more gentle. The already hardened film is pressed against the glue-coated slab. If lamination is a chemical process, then laminating is a mechanical process.
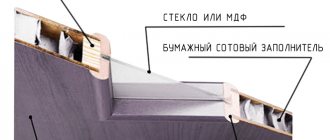
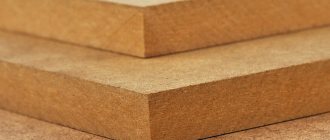
Components of laminated chipboard
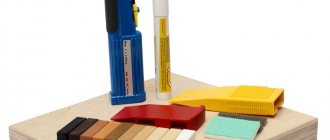
At home, non-laminated chipboard is often coated with several layers of paint for protection. Before painting, pre-treat the surface:
- dust is carefully swept away and washed off the surface;
- for the first time, the plate is coated with hot drying oil;
- then this is done with cold drying oil until an outer crust forms;
- the top is painted. With any painting method, you must remember that each subsequent layer of paint is applied to the already dried previous one.
There are several other ways to protect yourself from getting wet. For example, a surface that will not be subject to mechanical stress can be protected as follows: rub it with stearin, then heat it with a hairdryer. Let cool and repeat this a couple more times. Or: one part of bitumen varnish is mixed with five parts of drying oil. Coating is carried out twice.
Edge processing of furniture parts. Chipboard edging. Edging with PVC edges.
Furniture edging is an essential finishing element of any furniture piece. Edging chipboard is the most important step in the manufacture of furniture, because... The edge performs not only an aesthetic function, but also a protective one: the presence of a furniture edge prevents unwanted moisture absorption, drying out and mechanical damage to the furniture. Its purpose is also to protect the environment from formaldehyde, which has a negative effect on the human body.
Edging laminated chipboard furniture
Despite the imperfect environmental friendliness, furniture made from laminated chipboard has gained wide popularity in the production of office, kitchen and cabinet furniture due to its low cost and attractive appearance. But such furniture becomes usable only after finishing the edges.
- Formaldehyde resins are used to glue individual elements of furniture made from chipboard, so the processing of furniture edges on parts made from chipboard is a mandatory process in the production of such furniture.
- Like any furniture made from laminated chipboard, it can also get damaged during use. In order for the furniture to have a finished look and meet all requirements, furniture edges of different types are used.
Chipboard edge processing. PVC edging.
Chipboards are used quite often in furniture production. Despite the fact that chipboard is easy to process, the edges of the furniture parts must be additionally finished.
- The edges of edged chipboard look ugly and, without finishing, significantly spoil the overall appearance of the entire product.
- Moisture enters through the untreated edge, the negative impact of which leads to swelling of the slab and loss of its presentation.
Processing of chipboard edges is most often carried out with edging tape or PVC edge. If the furniture tape used is of high quality and matched to the tone of the furniture, then the processing of PVC edges is practically invisible.
How to process the edges of furniture parts
PVC adhesive edge is one of the most affordable ways to finish furniture elements. A variety of textures and colors of furniture tape can not only camouflage the edges of furniture, but also advantageously emphasize its contours, shading the curves with a contrasting shade. In addition, there are differences in surface type; designers use this feature in their projects.
Furniture tape can be:
- smooth,
- rough,
- embossed like wood,
- color.
Smooth options are most often used in furniture production, because... they do not limit the functionality of the furniture and are ideally combined with the main body of the product. The thickness of the PVC edge can vary between 0.4-3.0 mm.
The main advantage of using edge tape is its elasticity; it does not break and sticks firmly to the surface being treated. However, in order to produce high-quality edge gluing, it is necessary to use specialized equipment.
We provide edge processing services for furniture made of laminated chipboard and chipboard at affordable prices. Our company has the necessary German and Italian-made equipment for high-quality application of PVC edges. Experienced specialists will complete your order quickly and accurately.
How to treat plywood, chipboard and wood to protect against moisture?
The most susceptible to moisture are the sink, cabinet with dryer, countertop, and furniture near and above the stove.
The taps all start to leak at some point. So, the most potentially dangerous place in the sink is where the faucet crashes into the countertop. This is the point of contact between metal and wood. It is possible not only for the faucet to leak, but also for water to condense at the contact point. Therefore, this place is cleaned and dried with a hairdryer. Next, a layer of PVA glue is applied, after which it dries - silicone. You can use construction sealant, this is also a silicone mass; it even seals window frames against leaks.
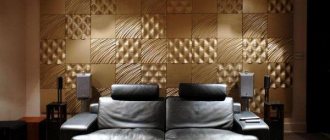
The edge not only protects the chipboard from moisture, but also reduces emissions of harmful substances
In the dish cabinet, you should check the presence or absence of a tray: if it is not there, the liquid, flowing to the bottom of the cabinet, will ruin it. For all kitchen furniture where it is possible to get wet, you need to make it a rule: degrease this area and then do not skimp on the sealant.
To seal the seams, it is better to use sanitary silicone of a suitable shade: dark mold spots will not appear on the surface.
Non-laminated edges of the tabletop are covered with connecting or end strips. They come in metal or plastic. The protection is not so great, so the end of the tabletop should first be treated with silicone. Another method of protection is to apply furniture varnish or PVA glue to the cut area. Self-adhesive films or tape offered by the construction market cannot be called reliable protection.
How to prepare the chipboard surface for laying linoleum
Before assembling the subfloor, it is necessary to bring the slabs into the room and leave them for at least 24 hours so that the material begins to gain the required moisture content of the chips. If you lay chipboard under rolled linoleum only from under a shed or garage, then as the flooring material dries, cracks will certainly form between the sheet joints.
How to process chipboard before laying roll material
Regardless of which floor surface you plan to lay slabs on, plank or concrete, pressed chip sheets must be additionally treated with a protective coating. When fixing to concrete, the back side is treated with drying oil or bitumen paint and varnish material. A certain type of treatment must be selected depending on the method of fastening on a cement-sand screed. The most reliable option would be treatment with hot drying oil. The heated mass will easily penetrate into the thickness of the pressed material and dries quickly in 1-2 days. The coating must dry before the sheets of shavings are laid on the floor surface. The front part of the chipboard should be easy to process, and therefore it can be coated with acrylic or polyester paint and varnish material.
Helpful advice! When installing linoleum, you need to choose a smoother chipboard surface, and after treating it with paint and varnish, the surface should dry in a horizontal position to avoid the formation of waves and smudges.
Leveling the surface of a chipboard floor under linoleum
Now we know what is the best way to treat chipboard before laying linoleum. But it’s easiest to level the slabs when laying them on wooden floor surfaces. In order for the linoleum covering to be perfectly smooth and exclusively horizontal, it is necessary to nail the chipboard onto the floor with nails, namely, at least 15 nails for each sheet. It is necessary to lay the particle board on the floor surface in advance and use wooden pads to level the position of the floor covering. You cannot drive nails into the body of the chipboard; it is very important to pre-drill a hole so that the point does not knock out a piece of chips from the back. The pads must be screwed into the floorboards using self-tapping screws. All that remains is to apply polyurethane foam to the floor, lay chipboards and nail them to the floorboards. When installing chipboard on a concrete floor, to level the sheet, use self-tapping screws that are screwed into the body of the boards.
After the wood-chip substrates are leveled, they are glued onto mounting foam or mastic.
Preparatory stage of the surface for gluing linoleum
After the particle boards have been laid, it is necessary to clean and seal the seams. The preparatory stage for the floor for laying rolled linoleum is carried out in the following order:
- Apply paint and varnish material to the rough surface of the particle board and joints, dry until maximum hardening. The surface should be very hard so that it can be prepared before laying the linoleum.
- The assembled subfloors must be sanded with sandpaper so that the surface is pit-free, smooth and free of depressions, chips and protruding chips.
Moreover, the joints along the general perimeter must be caulked with sealant or wax mastic. This is required in order to compensate for the expansion of the material (thermal).
Thickness of chipboard slabs for flooring under rolled material
For a wood base, you can use sheets of shavings, which have a thickness of 1 to 1.5 cm, and on concrete floors you can lay other, thicker panels with a thickness of up to 2 cm. If you see that the floor is very difficult, and there is also a possibility It is not possible to level the surface under PVC linoleum in one pass, then it is better to choose a material with a margin of thickness. After fixing the sheets on a self-leveling floor or wooden floorboards, protruding edges usually remain at the joints; height differences can reach several millimeters.
In this case, it is possible to sand the joints using an electric belt machine, and the emerging dust must be sealed with glue in the cracks, and only after that the surface must be primed.
How to glue linoleum to chipboards
Gluing particle boards is much worse than OSB or fiberboard. The structure of the material is such that a lot of adhesive-type mastic is simply absorbed. For this reason, there is simply no point in applying an adhesive composition for rolled flooring to chipboard without a primer. By the way, the glue must be liquid. It is immediately necessary to indicate adhesive compositions that are unsuitable for laying linoleum on a particle base:
PVA-M, all kinds of water-based adhesives and Bustilat.- Bitumen and resin mastics.
- Nitro-paint and oil-based paint and varnish material, an old Soviet recipe for installing a floor made of chipboard boards.
In order to glue linoleum, you can only use butyl-polyurethane, isoprene and polyurethane compositions. German and Italian brands are considered ideal. Such an adhesive composition not only holds the coating on the wood chip base, the polyurethane seam also contributes to high-quality fixation and preservation of the mass of chips.
All about edging laminated chipboards
- What is it anyway and why is it necessary?
- Necessary tools and materials
- How to glue the edge?
- Melamine
- PVC
- Adviсe
Laminated chipboard composite material is made by pressing small particles of wood mixed with a special non-mineral glue. The material is cheap and excellent for assembling furniture. The main disadvantage of laminated chipboard is that its end parts are not processed, so in cross-section they sharply contrast with the smooth surface decorated with a textured pattern. Edging the slab allows you to give it a representative appearance and hide rough edges.
We use solutions
Chipboard is trimmed very often, since in production it is made in sheets of a certain length. Many types of different products are subsequently made from them, ranging from ordinary partitions to complex furniture. This material is often coated (laminated) with special paint.
The end can be treated with several substances:
- 1. Waterproof glue. This is done primarily to protect it from moisture.
- 2. Special sealants. These substances have the same purpose as the previous type.
- 3. Paint. If you need to give the product a beautiful look, then the end can be coated with any paint, matching it to the color of the item.
How to lay linoleum on chipboard
You know how to treat chipboard on the floor, but how to lay the topcoat? First of all, you need to cut out the panels - for this, the linoleum needs to be cut into segments based on allowances for the walls of at least 3 cm. If you plan to lay imported material on the slab, then you can glue it even without curing. Domestic roll coverings are traditionally laid out on the floor for 2-3 days so that there are no bubbles in the future. The panel needs to be rolled up and laid along the wall, opposite the entrance to the room. After this, apply the adhesive and rub it thoroughly onto the slab base, while immediately laying the linoleum. After all the pieces of covering have been laid, it is necessary to roll the canvas onto the floor using a plastic wallpaper spatula or a heavy roller. After the adhesive has set, trim the joint line and the edge of the covering along the general perimeter of the room.