So we come to the topic of the doll's bath and doll's restroom .
In any dollhouse, you want everything to be like in real, real life, then playing with dolls is much more interesting and exciting. In this article, the News Portal “Vtemu.by” has collected an interesting series of crafts that will be very appropriate in doll rooms such as a bath and toilet.
As always, to make crafts we will need available materials: boxes of different sizes, cream packaging, plastic eggs from Kinder Surprise and much more.
How to make a bath for dolls?
Share on social media networks:
A doll is one of the most ancient toys on earth. The first dolls for their children were made by hand from scrap materials. They were made from clay, fabrics and rags, straw and sticks. A doll is a miniature model of a person; while playing with dolls, children endow them with the features of the people they see and who surround them. Therefore, such a toy is necessary and important for a girl. When playing, a child uses his imagination and creativity. Dolls imitate the adult world, preparing the child for adult relationships, perform different roles and are the baby’s assistant and close friend. And of course, the child wants his doll to have a house with furniture and everything that he himself has. But nowadays, buying a house, furniture and all the accessories is not a cheap pleasure. Therefore, it will be useful for your budget and for the development of your child if you and your baby do something for his little friend. Let's look at a few simple ways to arrange a toy bathroom. How to make a bath for dolls?
Tips for planning and filling a house
Most dollhouses have the following rooms:
- living room;
- bathroom;
- kitchen;
- bedroom;
- children's room.
In order for the rooms not to look empty, they need to be filled with basic interior items. If necessary, rooms are complemented with small decorative elements - mirrors, curtains, pillows, flower pots. A sofa, one or more bedside tables, armchairs, a miniature coffee table and a TV must be installed in the living room; lamps are also often installed.
The kitchen must have a set, stove, refrigerator, dining table and several chairs. The bedroom is equipped with a bed, a wardrobe, bedside tables, and a large mirror for dolls. The bathroom requires a toilet, sink, mirror, and shower. The filling of a children's room depends on the age of the baby doll. Typically, such a room contains a cradle or a miniature bed, toys, chairs and a desk.
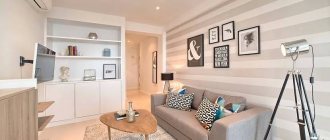
Living room
Bathroom
Kitchen
Bedroom
Children's room
Wardrobe for dolls made from scrap materials
The toy cabinet can be made of plywood, painted or covered with wrapping paper or self-adhesive film. There probably won’t be any questions here - everything is clear, and if you have questions, you can see their solution in the “natural” closet. But it can be made from very inexpensive materials. The good thing about making do-it-yourself furniture for dolls is that its cost is very low.
From a cardboard box
One of the options for homemade furniture for dolls is a wardrobe
What do you need for work?
How to make a doll wardrobe from a cardboard box
If the box you find is too large, you can make it smaller by cutting off the excess. To ensure that the folds are even, take a ruler. We apply it to the place of the future fold, we pass along the ruler several times with a blunt hard object (the stem of a spoon or fork). After this, the cardboard will be easy to bend.
Filling for a toy cabinet
We cut out shelves from scraps or another box. They should be slightly - 5-8 mm - longer and wider than the internal space of the cabinet. We bend the excess so that sides are formed on all sides. Folds form in the corners; carefully cut them off. We bend one of the parts 180° and glue it to the shelf itself. This side of the shelf will “look into the world.” We bend the other three parts at an angle of 90°, coat them with glue and glue the shelves into the cabinet. The photo on the right shows how the shelves are glued. But so that the gluing points are not conspicuous, it is better to turn the sides down.
Making furniture for dolls with your own hands is no less fun than playing with it later.
In addition to shelves, you can also make a crossbar for hangers. It can be made from bamboo skewers, for example, you can try using a juice straw, wire, etc. Hangers can also be twisted from colored wire or cut from juice bags, plastic bottles, etc.
Finishing is a creative process
Next comes the finishing touches. You can paint the cardboard with watercolor or acrylic (preferably) paints, glue it with wrapping paper, fabric, felt. You can imitate a mirror surface by covering it with foil (food foil, for example). If you want to make a “plastic” surface, look for water bottles of the desired color, cut off the neck and bottom, and use the “body” as a finishing material.
Finishing is a creative process, but first, use simpler, softer, thinner materials; they are easier to work with
Handles can be made from wire, beads, or long beads. For larger toy cabinets, you can find buttons or buttons. We glue all this “beauty” after we have “lined” the cabinet.
Doll wardrobe made from newspapers
Assembling planes from newspaper tubes
The finished cabinet walls must be fastened together. To firmly fix an angle of 90°, it is better to use a thin wire. First coat the joints with glue, then use wire to pull the walls together. If the wires are in the way, they can be removed after the glue has dried.
anchor bolt installation in a concrete wall
We glue holders under the shelves
Using the same technology, the bottom, top, and shelves are glued. The doors will need to be made a little differently. To make them open, two strips about 1.5 cm wide are cut out of tape. Tape is glued along the edge of the door so that a little more than half hangs in the air. We glue the door to the wall with this loose tape, but so that there is a gap of 2-3 mm between the wall and the door (it’s just tape there). This will make it possible to close the doors. We fix the glued door on the other side with a second strip of tape.
Fastening the door with wire
The second way to secure the doors is with wire. Only this time it should be tough and thick enough. Cut a piece that is 2 cm longer than the height of the cabinet. Immediately make a loop on the wire on one side using 1 cm. We bend the loop at an angle of 90° to the wire. We make holes in the bottom and roof, pass a wire through the bottom, the loop remains at the bottom. We put the door on the wire, using the outer tube instead of hinges. Slightly bending the wire, we thread it through the hole in the cabinet roof, bend the excess, fixing the door. We repeat the same operation with the other door. Please note that you need to attach the door with tape before finishing the cabinet, but you can attach it with wire after.
Ready-made wardrobe for dolls made from newspapers
There are still some little things that need to be said a few words. Cabinet legs and handles can also be made from paper tubes. You just need to roll them from the paper you use to decorate the toy. Roll it into a tight roll, glue the edge with glue, then cut it into pieces of the required length and glue it in the right places. Instead of tubes there can be wooden sticks, beads, etc.
Tools and consumables
To make furniture for a dollhouse with your own hands, you will need to prepare special tools and consumables. For most toy interior items you will need the following equipment:
- scissors for cutting not very durable materials;
- saw when working with wood or chipboard;
- glue;
- paper;
- scraps of fabric;
- beads, buttons;
- paints (gouache, acrylic), you can also use nail polish;
- threads with needles for sewing fabric elements or creating patterns and designs on them;
- plasticine or polymer clay - for creating small elements on furniture;
- regular or double-sided tape;
- sheets of paper, cardboard, wallpaper;
- wire.
The list may vary, it all depends on the type of construction and design.
Requirements for children's upholstered furniture, its typical sizes
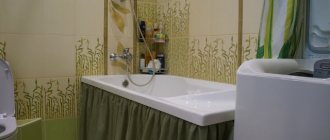
DIY bathroom for dolls
Any bathroom requires a bathtub, a sink, and sometimes a toilet. How to make a bathroom for dolls with your own hands?
Making a bath
First, let's look at a simple way to make a bath for dolls with your own hands. To make such a font, you will need the following materials:
Let's start with the fact that the cocoa lid needs to be refined, since this will be the basis of our bath:
Important! Instead of puff pastry, you can use plasticine or modeling clay. You can also make a small soap and other accessories.
We do the washing
But the bathroom won't be complete if you don't put a sink there. The easiest way to make it from a Kinder Surprise box:
Making a toilet
The toilet can also be made very simply:
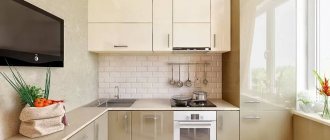
Kitchen
Room No. 4 is the kitchen , it is small but roomy. The kitchen set is a large cabinet in the shape of the letter L (photo 18).
The sink is a small plastic jam container, the faucet is made from modeling clay, and there is a small hanging cabinet:
The stove is electric with 4 burners (photo 20), its door opens.
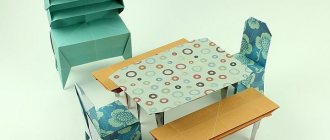
In the kitchen we have 2 chairs (photo 21) and a table (photo 22).
Dishes were also made from small items (photo 23).
Photo 24 shows our kitchen after applying paint and varnish.
On the top floor we have a children's room and a toilet room.
Do-it-yourself toilet for a Barbie doll – Do-it-yourself doll house – File catalog
I thought for a long time about how to make a toilet for a doll myself. I looked at how others equipped a doll's toilet. Some people cut out a toilet bowl from polystyrene foam, others sculpt it from salt dough.
I decided to do something simpler - make a toy toilet from a small plastic drinking yogurt bottle.
So, I am happy to share with you the “technological process”, I am posting a master class on making a toilet for a Barbie doll.
We take a bottle of drinking yogurt and remove the plastic picture. The bottle should be white.
We cut off the top part where the narrowing begins.
We cut off the bottom and put it into the main part of the toilet.
We take a piece of cardboard and draw blanks for the lid. The seat will be round, and the lid will be cut off a little on the sides, giving it an oval shape.
We cover the cardboard blanks with a soft textile napkin. I used PVA glue. You can also cover the seat with plain glossy paper.
In order to connect the seat to the lid, I used a piece of double-sided tape.
We glue five pieces of double-sided tape to the back of the seat, remove the film and place the seat on the toilet.
Take a cardboard box of cream or toothpaste and cut it in half. We make two boxes of the same size.
We cover each box with white paper and let it dry (in my photo the glue has not dried, so the paper is bunched up). One box will become the toilet cistern, and the second will become a stand under it. Using double-sided tape, attach a bead to the tank that matches the color of the seat.
We assemble the toilet. This way.
This is how the toy toilet turned out. And the seat cover opens.
So the hostess came to accept the new plumbing
The hostess looked and checked if everything was okay. “Where is the toilet paper?” - asks Barbie.
Indeed, we need to make a toilet paper holder. A paper clip is perfect for this purpose. It needs to be bent and attached to the tank in this way.
daily rent of apartments in Yaroslavl without intermediaries
Author - Metelkina Natalia
Copying any site materials is possible PARTIALLY (1-2 paragraphs) only if you install a back active link to https://www.barbetta.ru. Respect copyright.
Bedroom
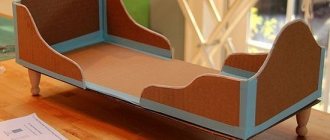
So, room number 1 is the bedroom . There is a lot of furniture in it, and the first thing we'll start with is the bed. It is quite easy to glue it together, just look at photo 4.
I covered the cardboard blank with acrylic paint, after the paint had dried, I varnished it, glued on a soft mattress, added several soft pillows and a blanket.
The next pieces of furniture are a chest of drawers and a bedside table (photos 5 and 6).
The principle of their manufacture is the same - a small cardboard box to which false drawers are glued. There was also a place in the bedroom for a comfortable rocking chair (photo 7).
A large and spacious closet also found its place (photo 8).
In photo 9 the whole room is in color.
You can also watch how to make a bed for dolls (and other furniture) on the “Homemade” channel:
How to make a bath for dolls?
Share on social media networks:
A doll is one of the most ancient toys on earth. The first dolls for their children were made by hand from scrap materials. They were made from clay, fabrics and rags, straw and sticks. A doll is a miniature model of a person; while playing with dolls, children endow them with the features of the people they see and who surround them. Therefore, such a toy is necessary and important for a girl. When playing, a child uses his imagination and creativity. Dolls imitate the adult world, preparing the child for adult relationships, perform different roles and are the baby’s assistant and close friend. And of course, the child wants his doll to have a house with furniture and everything that he himself has. But nowadays, buying a house, furniture and all the accessories is not a cheap pleasure. Therefore, it will be useful for your budget and for the development of your child if you and your baby do something for his little friend. Let's look at a few simple ways to arrange a toy bathroom. How to make a bath for dolls?
Sink for doll
We fold the side part of the strip. Cut out the bottom and top.
By the way, it’s better to cover the top of the sink with paper too.
We cut through the drain, but not all the way through.
The cabinet under the sink will be hinged in the same way as the toilet. It’s better to decorate it, for example, like a tree, using decorative film.
To make a faucet we need a rod from a handle. Under the influence of temperature, the plastic will easily take the desired shape.
Next we will need circles for the taps, as well as bases for the taps. Here I used sushi chopsticks and ear sticks. But you can use any other means at hand. We cover the taps with silver paint.
When everything is dry, mark the hot and cold water taps.
Then all we have to do is glue it and paint the drain hole.
Using the same technology of “neat corners” we make a shelf.
Bathroom for Barbie | Country of Masters
2. This is a shower cabin, I made it myself.
The pallet is a package of cottage cheese (2 pieces, for reliability). The rest is cardboard and construction film. And glass is just ordinary plastic from doll packaging. 3. The faucet is a torn faucet from a factory toy.
4. 5. 6. 7. 8. 9.
The toilet is also a factory toilet for dolls, just painted blue. Well, the bead is glued to the barrel.
10. 11. 12. 13. 14. 15.
This is also all of my making. The sink was also from a doll toy. I painted it white (it was pink) and covered it with cardboard and film.
16.
The drawers all open and function.
17.
I also made all the jars, bottles, creams and toothpastes myself from beads, plastic, foam rubber, and tubes.
18. 19. 20. 21.
The washing machine is pulled out. The lid opens and you can put doll clothes in it for washing.
22. 23.
A soap dish is a shell
24. 25. 26.
This is an ironing board, it folds up and is put away. Nearby is a container for dirty clothes.
27. 28. 29.
House cleaning products.
30. 31. 32. 33. 34. 35. 36. 37.
Living room
in the music room (photo 12).
It, unlike all our furniture, is covered with cracks. At the beginning it was covered with white acrylic paint. After it dries, a layer of craquelure medium is applied. After this layer has dried, a layer of black acrylic paint is applied. After drying, the entire product is coated with matte acrylic varnish.
Since our living room is a music room, a piano was glued together from 6 matchboxes (photo 13). It was immediately covered with colored paper, but the paper turned out to be of poor quality, and later it was painted, like all the furniture in the house. In addition, I glued 2 square beads to it - these are pedals.
The piano stool (photo 14) is glued together from cardboard, painted and decorated with a velvet cushion.
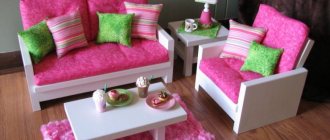
Sofa (photo 15) and armchair (photo 16). I glued them together from cardboard and decided not to cover them with fabric, but simply paint them with paint; my daughters were happy to help me with this. After applying varnish, they are very similar to leather.
The entire music room after painting the furniture (photo 17).