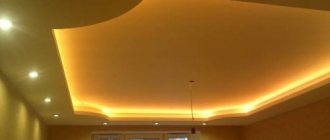
Drywall hangers are an important element of many drywall structures. These products are used for reliable fixation of profiles on a load-bearing surface when leveling walls with gypsum plasterboard and gypsum plasterboard sheets, for laying insulating materials, and creating simple and multi-level suspended ceilings. Several types of suspensions are available, differing from each other and used in different situations.
Direct suspension
Direct drywall hanger, which looks like a metal plate made of galvanized steel with perforations and cutouts, is the most common type of product. Despite its small thickness (0.6–0.8 mm), it is quite durable. Reinforced brackets with a thickness of 1 mm and a length of 0.2 m to 0.5 m are also used. They are used for leveling collapsed walls with a large level difference, when laying communications behind false walls or with a large thickness of insulation.
Separately, we can mention vibration suspensions, supplemented with an elastic rubber element, which eliminates contact between the base and the profile, thereby significantly reducing the transmission of structural noise to the frame. They are used when high-quality sound insulation of the structure is required.
Installers often splice short hangers together and attach them more frequently to increase the load-bearing capacity. But the cost reduction is not achieved.
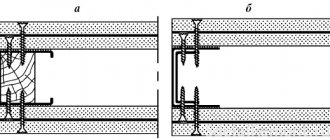
- Hangers for gypsum boards are attached to the wall or ceiling with dowels or self-tapping screws in 2 or 3 places, after which they are bent and take a U-shape. The type of fastener depends on the material of the supporting surface.
- The profile is mounted on the hangers using small metal screws with a flat, wide head (“bugs”). As a result, a small space is formed under the frame where communications, heat or noise insulation, wiring are laid, sockets, switches and lamps are mounted.
Suspensions allow you to create a gap of up to 12 cm, and shortened products - no more than 7.5 cm.
For walls, the size of the gap depends on the thickness of the insulation or sound insulation panels, which is about 5 cm. They can also be used on the ceiling, but the dimensions of the built-in lamps must also be taken into account. For them, a margin of up to 10–12.5 cm is left, which is associated not only with their dimensions, but also with the need to remove generated heat, for example from halogen lamps.
USEFUL INFORMATION: Features of installing plasterboard boxes in the bathroom
Recommendations from experts
Despite the fact that installation is not considered an extremely difficult task, not every user can perform installation work efficiently. During the installation process, great attention must be paid to such criteria as the mass and thickness of the material. According to available information, make a choice of products for fastening. Experts strongly advise paying attention to the following points:
- Before installing the fasteners, it is necessary to mark the fastening points on the surface. At the same time, they should be as close as possible to the profile joints; ideally, the distance between wall hangers made of plasterboard sheets should be 0.7 meters. When fastening plasterboard sheets, it is required that there be small gaps between the plasterboard sheets of the building material.
To ensure maximum density of the leads and guides, a special spacer tape can be glued between them.
- The supporting profiles should not be too close to the surface, and the self-tapping caps should not be left lower than the level of the drywall.
- The simplest method of checking a structure for the strength of fasteners is to pull it with little force. If all the components remain in place, this will mean that the fixation is as strong as possible and the fastening is done correctly.
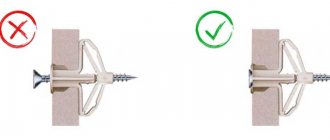
- To secure the structure, galvanized fasteners must be used. They help prevent the formation of corrosion, but also increase the fire resistance of the structure. Nylon-coated dowels are best used for attaching guides to wall surfaces.
It is also important to determine in advance the places where lamps, decorative elements and wall cabinets will be. This makes it possible to avoid further partial destruction of the plasterboard coating.
Fastening
Holes for fastening should be drilled in the wall or ceiling.
Important! Only metal dowels or anchors are suitable for the ceiling, since plastic ones are stretched under constant load.
- The brackets are attached to the wall or ceiling, after which the sides are bent at right angles.
- Then the profiles are installed in the same plane and level.
- The protruding “ears” bend to the sides.
For low ceilings, it is advisable to glue the sheets to the ceiling using a special putty or a mixture of gypsum and 2% bone glue diluted with water.
Installation features
Direct hangers for the gypsum plasterboard frame are universally suitable; when fixing them to the ceiling, only iron anchor fasteners are used; for the walls, nylon dowels are sufficient. They are positioned along pre-marked axes and then used to hold the 60× ceiling type. Ordinary piercing screws are required to connect the iron parts.
If transverse inserts are needed, it is recommended to purchase “crab” products; if they are not available, the profile is cut and bent in suitable places, but this takes time.
Suspensions with traction and vernier systems, similar to straight ones, are fixed to the ceiling using iron anchors. To hold the frame, both special and universal options can be selected; an example of the extreme is the Knauf combined suspension. Its load-bearing capabilities depend on the type of upper fastener; in vernier systems it can withstand at least 40 kg; in wall-mounted ones - the usual dimensions are 60 mm in width, - in length and 40 - in height; the presence of a perforated section allows you to control the level of the gypsum plasterboard ceiling
Regardless of the type of fastening used, final fixation is carried out after checking the level of the profile and its alignment.
In some cases, it is necessary to lengthen the direct suspension without introducing anchor and vernier systems. There are two possible solutions - installing products with unusual dimensions (for example, a vibration control panel) or fastening two ordinary parts with metal screws and bolts. Both methods have their drawbacks, but in the conditions of limited space and insignificant level configuration, they are the most economically advantageous (the price of PP is several times less than other varieties).
Suspension with traction
Sometimes it is necessary to lower the ceiling by up to 0.5 m. There may be several reasons:
- laying communications;
- installation of a ventilation duct;
- installation of a multi-level ceiling.
In these cases, wire hangers are used. It is difficult to do without them when creating structures with several levels. The device is a butterfly-shaped spring into which 2 4 mm thick steel rods are inserted.
To install in the ceiling, drill 1 hole and fix the wire in it to an anchor or metal dowel. To do this, a loop is made at one end of the wire. A profile is suspended from below to the rod by a hook, which should be tightened with pliers.
The spacing of the hangers depends on the load: each weighs no more than 25 kg. It is easy to calculate the weight of the structure: a standard sheet of plasterboard 9.5 kg thick with dimensions 1200 x 2500 mm weighs 22 kg. One standard anchor can withstand the same amount.
The profile height can be adjusted. To do this you need to click on the butterfly. When released, it firmly holds the rods.
Experts consider this design not reliable enough. Holding the structure with two curved shelves does not create a rigid fastening: the springs slip under the load. It is impossible to re-adjust the plasterboard structure due to lack of access to the fasteners. A more advanced option is an anchor suspension with a clamp and rod.
USEFUL INFORMATION: How to seal a hole in drywall with your own hands (video)
Some aspects when working
- The first and extremely important thing is compliance with safety techniques.
The edges of the product are sharp, making it extremely easy to cut yourself. When installing on a brick wall, in order to save time, you don’t have to mark the drilling spots. I use this option for attaching the 60x suspension. With one hand we press it against the wall, with the other we drill a hole through the petals with a hammer drill or drill. Specifically in such cases, a drill (or drill, in the case of a hammer drill) can wrap it around itself and cause deep cuts on your hands (I warn about this for your safety, since I myself have been finishing gypsum board premises for a long time).
The straight Knauf drywall hanger comes in different thicknesses and lengths, so before you take it, measure how far from the load-bearing wall you need to extend the sheathing.
The surface that you plan to cover may turn out to be extremely uneven, or, on the contrary, you will need to make, for example, a niche in the wall or a multi-level ceiling.
Sometimes you have to increase its length with a piece of profile. This is done like this: cut the ceiling profile to the required length, screw it onto the suspension on both sides. We attach one to the main wall, bend the second one forward for future sheathing. But if the distance from the sheathing to the wall is small (no more than 10 cm), then the thinnest and cheapest ones are completely suitable.
Homemade pendants
You can make a homemade suspension from a ceiling guide profile. To do this, take a piece and trim the side edges. Then it is folded at an angle of 900, after which the overlap is cut through and a rigid corner is obtained, which is called a boot. One part of it is attached to the ceiling or wall, and the other to the profile.
Another option is to cut and bend it into a U-shape, and then attach the sole to the ceiling and the ears to the profile. The design allows the frame to be located at a great distance from the ceiling.
Another design is obtained by cutting out part of the back of the ceiling profile along the edges, and then bending the sides and fixing them to the ceiling. The lower part is attached to the profile.
Tile cutting device
It's been a while since I added anything here.
Preface: why exactly this way, and not using a machine.
Firstly, I’m not entirely sure that the so-called wet tile cutter will cope with this task, and I’m sure that a cheap one definitely won’t cope, and an expensive one, let’s say from 50 thousand rubles. Maybe he can handle it, maybe he won’t.
Therefore, with such a daisy, I refused to buy an expensive machine because the work will not pay for such costs, and cheap rubbish is not needed.
This means we work the old way, proven and cheap.
In general, I have a tile cutter, it’s not the worst, it successfully coped with various tasks, but there was a problem with this porcelain tile. It (porcelain stoneware) breaks off along the cut line completely uncontrollably, it can clearly break, or the arrow can go to the side. The second problem is that the surface is very fragile, just like a glass surface; even behind the roller, chips can occur. A diamond cup can also chip even with a light touch. There is no need to talk about a diamond disc at all, the surface after it is jagged and chipped, which means that not every water-powered tile cutter can cope with such a task.
How to make it yourself
You can also use homemade vibration suspensions. To create such elements yourself, you will need perforated plates and pieces of porous rubber. The number of hangers is calculated individually and depends on the area of the wall or ceiling.
The technology for making the suspension is very simple. Rectangular rubber elements must be secured to the middle part of the perforated plate, after which the edges of the plates should be bent.
After the vibration suspensions are manufactured, it will be necessary to check their quality. To do this, you should secure the products on a wooden block, after which you will need to hit it on the floor. Immediately after an impact, it is worth observing the vibrations of the plates and determining their ability to dampen vibration. The faster the vibrations die out, the higher the vibration isolation properties of the suspensions.
For more information on how to make a vibration suspension with your own hands, see the following video.
Drywall dowel Fischer, Driva, Molly
To install plasterboard sheets, special fasteners are used that provide the required rigidity of the installation and frame. In particular, it is a metal or plastic dowel for drywall, which comes in various shapes and types.
A dowel is a fastener that is used to install a frame for the purpose of installing drywall or directly covering a ready-made load-bearing structure with sheets. There are many types of dowels, which are classified by shape and type of installation. According to the type of fastening they are:
The classic dowel GOST 28457 - 90 is a base into which a self-tapping screw is installed. It is used to attach a profile (metal or wood) to the wall. Features include strength and high wear resistance. In addition, this part provides a “dead” grip. Due to the fact that there are notches of different sizes on the fastener leg, it cannot be pulled out after installation. The disadvantages include the need to pre-drill a hole in the wall. For this you will need a hammer drill. Another disadvantage is that this installation cannot be used on all surfaces. Wood and foam concrete may begin to crumble under mechanical stress.
Photo - umbrella
A dowel-nail is a fastening for mounting sheets of drywall directly onto a frame. They can be used for both wooden and metal profiles. They come with or without threads. Such a fastening element can withstand up to several hundred kilograms of load, depending on the size of the leg.
Photo - nails
The butterfly dowel for drywall (manufactured by Fischer PD or others) is a combined one. It consists of a plastic base (butterfly) into which a screw is screwed. During installation, the butterfly is pressed against the joint, creating the tightest possible adhesion to the screw. This guarantees protection against element falling out.
Photo - spacers for drywall
According to the shape of the head and thread of the dowel, there are driva, molly and umbrella (they can be used not only for drywall, but also for installing suspended ceilings, shelves, cornices).
Driva are plastic or metal installation elements that are distinguished by wide and sparse threads. This cutting is excellent for fragile plaster, which crumbles under the influence of fine carving. They are very easy to use due to the hidden cross head. They enter the material softly and do not require pre-treatment of the hole with a drill.
The umbrella dowel (Molly) is necessary not only for installing drywall on walls or frames, it is often used for suspended ceilings due to its unusual shape. Now there are many different designs (open, closed umbrellas, round, etc.). The main advantage is that this is an expansion dowel, i.e., during installation, it opens on the surface and evenly distributes the load, which increases mechanical resistance. It should be noted that such a dowel can be used for a double ceiling, installation of a chandelier, sconce, etc.
Photo - molly with a ring
For budget-conscious owners, budget U dowels were invented - their peculiarity is in the material; they are made only from plastic. They also do not require additional drilling of holes in the wall. They come with or without a side. The edge is necessary to control the depth of insertion of the fasteners. The shape of the head is predominantly hidden.
Photo - plastic Driva
Classification is also made by material. To install drywall, use:
Metal ones are the most practical, but also expensive. They can withstand heavy loads (on average, such dowels are designed for the weight of drywall up to several hundred kilograms). Many manufacturers additionally treat the metal with special anti-corrosion compounds.
Plastic and nylon are more modern options that are made from plastic compounds. They are more affordable, lighter and do not rust. But at the same time they have less mechanical resistance than metal ones. In addition, they have a lower load threshold.
Conclusion
Choosing the optimal type of suspension will allow you to build a ceiling structure of any complexity. The video in this article will help you understand some of the nuances described above; if you still have questions, write them in the comments below.
Did you like the article? Subscribe to our Yandex.Zen channel
October 10, 2016
Fasteners, hardware, meshes and membranes, Ceiling installation, Operations with ceilings, Ceilings, Ceiling structures
If you want to express gratitude, add a clarification or objection, or ask the author something, add a comment or say thank you!
Dowels
Dowel butterfly. Simple and convenient fasteners for small interior items hung on a plasterboard wall. It got its name because of its shape. Originally sold flat. During installation, the self-tapping screw is screwed in and folds the dowel, increasing the support area and forming a butterfly shape.
Drywall fasteners butterfly dowel
It is mounted in a sheet of plasterboard in a vertical position. To prevent turning, it has special ribs. Requires sufficient space inside the wall.
Dowel Molly. Structurally similar to the butterfly dowel, but made of metal. The dowel itself is always the same, but the pin can have different options - a ring, a hook, an angle and a screw.
Types of Molly dowels
When the threaded element is tightened, the body of the dowel turns into a kind of umbrella, resting against the sheet of drywall on the back side.
An example of fastening with a Molly dowel
This increases the support area of the fastener and its reliability. To prevent rotation, the dowel is equipped with spikes.
Dowel Driva. It has both an external conical thread and an internal self-tapping thread. It comes in both metal and plastic.
Types of Driva dowels
Using a sharp drill, it bites into a sheet of drywall and is fixed in it using an external thread. The dowel is screwed in using a screwdriver.
An example of fastening with a Driva dowel
After this, you can screw in the self-tapping screw and hang light objects.
Doubel Hartmut. Knauf fasteners. The threaded element is only a screw.
Doubel Hartmut
The metal support is folded along the plastic guides, inserted into the hole in the drywall, aligned parallel to the wall and secured with a plastic clamp. The extra mustache just breaks off.
Ceiling frame and Armstrong ceiling
Suspended plasterboard structures have a certain weight, which means that the requirements for the strength of such a frame will be higher. The determining factors for the distance between hangers on a plasterboard ceiling will be the following:
Distance between ceiling hangers
Drawing and dimensions of the spaces between the ceiling hangers
- The thickness of the drywall and the presence of additional tiers.
- The thickness of the metal profiles used to assemble the frame.
- Hanging on the ceiling elements that increase its weight - lamps and chandeliers.
What distance should be maintained between straight hangers taking these factors into account? Craftsmen recommend installing these parts on the ceiling in increments of 600 millimeters. If a cheaper (thin) profile is used, then the step is increased, placing the hangers at a distance of 400–500 mm. The same is done with the planned multi-tiered suspended ceiling. The video shows the process of attaching the ceiling frame to hangers.
How to pin a profile
in such cases it is better to use a rack-mount (partition) profile. And without suspensions and any unnecessary nonsense! And to make the wall stand more rigid, install double partitions! it is beaten along the contour with 5*40 guides and the profiles are placed after 40 cm, but what this craftsman has come up with is nonsense! after 60 cm the cage is assembled only on the ceiling!)
Respect to you! Many people simply cannot understand that the material costs money and they still have to earn something themselves. There are many mounting options, you still need to take time into account. The wall itself is not going anywhere!
I forgot to add: If you already want to level the CD wall (60*27) with profiles, then they should also be attached at a distance of 40 cm from each other in height! A CD, when mounted to the wall as in the video, simply from the slightest blow, or when hanging furniture on the wall, will bend along with the drywall, sagging in the place where there is no suspension (from the bottom or from the top). Well, this is a controversial issue, 1. partition profiles are more expensive + double 2. the height is not always suitable, there are walls of 5-6 meters, and at such a length it will bend like paper 3. Personally, it is more convenient for me to cut not PN (like the author) and the same PP 27x60 with 2 ears at once. Such a suspension is much easier to install (1 hole, and drilling according to marks, every 60 or 40 cm) and less material is used; it’s faster and more reliable, I don’t agree =) 4 holes!! 4 screws. this is not faster, in terms of reliability, as I understand it, they are at an angle of 90 to each other to maintain vertical movement, but a self-tapping screw connecting the PP and PN drilled to the floor copes with this perfectly, the angle between the aligned PP and the suspension is not right, this is always worse than the suspension under right angle to the PP =) Yesterday I promised a photo, because I come across this very often. And don’t pay attention to the ragamuffin in the photo))