Crackle These are cracks on the surface of antique furniture. Imitation crackle not only gives modern furniture an antique look, but can also transform your old furniture.
It is better to decorate individual elements of furniture or part of the surface with craquelures. Do not completely cover a table or cabinet with craquelure, otherwise they will look “sick”.
Not only experienced craftsmen can make craquelure professionally with their own hands. Both amateurs and novice decorators can do this.
Types of varnishes and paints craquelure
To produce cracks, so-called two-step and one-step craquelure types of varnishes and paints are used. Two-step craquelure varnish from different manufacturers is produced in a set of two jars, and one-step varnish is produced in one.
When you choose craquelure paint in a store, look at the drying time recommended by the manufacturer. If your bedside table needs to be irresistible by tomorrow morning, then a varnish with the shortest drying time is suitable for you.
One-step craquelure varnish is an interesting decorative finish that imitates cracked paint on the surface of an object.
Two-step craquelure varnish is mainly used to cover the surface of furniture decorated with painting. It will perfectly age the surface and design.
One- and two-component craquelure compositions in aerosol cans are a modern finishing material that is quickly applied, is wear-resistant and does not require maintenance or finishing varnishing.
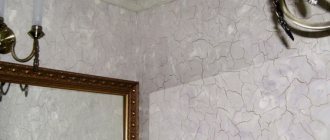
Photos in the interior
craquelure plaster with cracksTyutyunnikov Dmitry
Article verified by a decorative finishing specialist
How to use craquelure varnish: rules
The undoubted advantage of two-component craquelure varnish is the offer of ready-made decorative color solutions for the base and finishing layers and a beautiful crack pattern.
The first can contains paint (base layer), the second contains a craquelure composition. To achieve a sophisticated result on furniture of neutral tones, colors of similar, component shades will suit you.
Since using craquelure varnish is not so easy, you can familiarize yourself with the following rules:
- First, prime the surface thoroughly.
- Then spray paint from the first can from a distance of at least 10 cm.
- After the coating has dried (the drying time of the paint is recommended by the manufacturer), apply the composition from the second can. As the top coat of paint dries, cracks will begin to appear.
The peculiarity of working with a one-step craquelure coating in an aerosol can is that the composition is sprayed onto a surface painted with acrylic paint when the paint has not yet dried.
Preparing walls for finishing
Applying craquelure is the final stage of interior design, because such a surface is very easy to damage and difficult to restore. Therefore, before finishing, you need to complete all repair work, lay out wiring and other communications, and clear the room of construction debris and dust.
In the process of preparing the walls you will need:
- wide and narrow spatulas;
- primer mixture;
- starting putty;
- sandpaper;
- brush;
- clean rag.
Decorative plaster is always applied to a flat and durable surface, so preparation begins by removing the old coating.
Wallpaper must be removed, because moisture from the plaster will soak the glue, and the wallpaper will begin to peel away from the wall. The paint is removed if there are peeling areas, swelling or cracks. If the wall under the paint is smooth and the coating adheres very firmly, there is no need to remove it.
Preparing walls for finishing
Walls that are too uneven and cracked are freed from the old finish, the whitewash and plaster are washed off to the base and all cracks are sealed with putty, and defects are smoothed out. The dried areas are sanded with sandpaper to remove the slightest irregularities. Then the entire wall is covered with a layer of primer, paying special attention to joints and corners, and completely puttied.
The putty layer should be about 2 mm; too thick a coating will not adhere well and may come off when exposed to craquelure varnish.
When the putty has dried, the wall should be sanded again and wiped off dust with a clean cloth. If the ceiling is being finished at the same time, you need to complete it, install ceiling moldings or make other designs for the joints between the ceiling and walls. And only after that you can start decorating using the craquelure technique.
One-stage craquelure: step-by-step instructions
One-step, one-step craquelure varnish imitates a painted surface where the paint layer has cracked over time. The resulting effect will allow you to turn a modern piece of furniture into a valuable antique item.
A layer of this varnish is applied between two layers of acrylic paint, causing the top layer of paint to crack.
The proposed master class on craquelure will help beginning craftsmen master the basic techniques of this decoration.
You will need:
- acrylic paint of two colors;
- flute brush for painting and applying varnish;
- one-step craquelure varnish;
- acrylic primer.
One-step craquelure for beginners is one of the simplest types of decor. Follow the step-by-step instructions and you will succeed:
- Using a soft synthetic flute brush, apply the craquelure varnish in an even layer of medium density. Wait for it to dry. The drying time for the varnish is specified by the manufacturer, follow the recommendations.
- Then, using a clean brush, apply a top coat of medium-weight acrylic paint in a contrasting or component color.
- As the top coat of paint dries, cracks will begin to appear.
- Protect the surface with a crackle effect with water-based varnish, but not earlier than 4 hours after the top coat of paint has dried.
Reviews
I decided to find out how girls feel about cracked manicure technology. I suggest you read the opinions of consumers. They are taken from popular Internet resources.
- Anya, 22 years old - “I love experiments in manicure, so I was happy to purchase an inexpensive craquelure varnish from the Russian brand El Corazon. I liked the effect with cracks, I chose universal colors. The appearance of the marigolds changed immediately. Many didn’t even believe that it was such a varnish - they thought that I had painted the nail plate like that.”
- Zhenya, 31 years old - “For 15 years now, I can’t imagine my nails without coating. I bought a new product from OPI - craquelure varnish. But at first I didn’t know how to use it. It turns out there is nothing complicated about this. The craquelure fits well on the nail, the cracking effect appears after 2-3 minutes. It’s a pity that this design didn’t last long – only 5 days.”
- Marina, 28 years old - “Once I tried to give myself a cracked manicure using varnish from Dance Legend. To be honest, I didn’t understand this design at all. Yes, it looks unusual, but after applying the black craquelure it felt like I was digging in the garden and forgot to wash my hands. The effect is for an amateur."
Two-stage craquelure: step-by-step instructions
Two-step craquelure finishing is a two-step varnishing process, resulting in small cracks that need to be emphasized with a contrasting color. The crackling kit consists of a slow-drying varnish (first step) and a fast-drying varnish (second step).
Before finishing crackle, wooden furniture is carefully primed and painted, otherwise the first layer of varnish will “go” into the pores of the wood and cracks will not form.
In order to master this decorative technique, we suggest that you read the step-by-step instructions and take a master class with two-step craquelure:
You will need:
- fluted synthetic brush for coloring;
- two flute synthetic brushes for varnishing;
- acrylic paint;
- two-step craquelure varnish;
- colorful pigment umber;
- cotton cosmetic pad or napkin;
- cotton fabric.
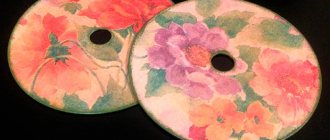
Craquelure in decoupage is one of the most popular decoration methods, which is used in every second decoupage project.
The surface of the tray, pre-painted in two layers with acrylic paint and decorated with a napkin using the decoupage technique, will be coated with a two-step craquelure varnish.
- Using a varnishing flute, apply the first layer (first step) of craquelure varnish. Spread the varnish in an even layer of medium thickness. Wait for it to dry. You can dry it with a hairdryer.
- Using a clean flute brush, apply a layer of another varnish (step two). It should be smooth and of medium thickness. Apply it quickly, in parallel movements, without removing the previous layer. Need to dry it with a hairdryer.
- After the second layer of another varnish dries, cracks will appear. To clearly identify cracks, rub a contrasting color pigment into them.
- Rub the pigment into the surface using a paper towel in a circular motion.
- Remaining pigment must be removed with a cotton cloth.
- If the surface of an object made using the crackle technique is prone to abrasion, then after the second step varnish has completely dried, coat it on top with a water-based finishing varnish or a composition recommended by the varnish manufacturer. This should be done no earlier than 4 hours later.
If this varnish is water-based, rinse the brush with water. Drying time for varnish varies, so follow the manufacturers' recommendations. The varnished surface can be dried with a hairdryer, but not with hot air.
"Cracked" technology
Do you agree that a regular manicure has long ceased to be the harsh reality of a well-groomed woman? Now it can rightfully be considered a part of fine art. There are so many techniques that can be used to make real masterpieces out of tiny ladies’ nails!
So the nail industry, several years ago, borrowed the technique of artistic aging in painting - craquelure (in other words - crackle, crack). Translated from French, “craquelure” means “crack.” Which led to the creation of vintage nails in manicure.
Crackle technique: recommendations for beginners
For those who first decided to use the craquelure technique in their decor, we suggest that you familiarize yourself with the recommendations for beginning craftsmen:
- If you need to get a dark aged surface, it is better to use bitumen varnish.
- When you need to get well-defined cracks, use oil paint. If the paint is difficult to remove from the surface, you can soak a cloth in white spirit or linseed oil and wipe the surface.
- Craquelure cracks on furniture will be clearly visible when using paint in contrasting colors.
- Metallics can only be used as a first coat. If you apply this paint on top, there will be no cracks.
- If the directions of application of varnish and paint coincide, then the cracks will be parallel. If the varnish and the top layer of paint were applied perpendicular to each other, then the pattern of cracks will appear in the form of a grid.
The size and size of the cracks will depend on:
- on the thickness of the top layer of paint, that is, the more paint, the larger the cracks
- from the direction of application of the top coat of paint
To consolidate the material covered, we suggest watching a detailed video of a master class on craquelure:
Imitation of reptile skin on nails for extravagant girls
The craquelure effect on nails simulating python, crocodile, and turtle skin is simply and realistically done using crack varnish. This look may seem daring to many, but it looks amazing, especially if the manicure complements the wallet or snakeskin handbag.
This design is chosen by bold, original individuals who strive to surprise others.
Craquelure, reminiscent of reptile skin, is suitable for themed parties. The main thing is to skillfully combine the selected shades of varnish, as well as select the appropriate outfit and makeup.
Remember! In everyday life, such a bold design will look defiant and even vulgar.
Rules of care
In order for the decorative coating to serve for a long time, you need to take into account a few simple tips: the surface should not be wetted with plenty of water, and it is forbidden to use abrasives or chemical compounds for cleaning. Do wet cleaning no more than twice a week with a soft cloth and soapy water.
Stylish decor for a cafe
Important! Craquelure is a fragile coating that can be damaged by impact or when moving furniture. The base may crack in the wrong place, which will lead to the detachment of a large fragment. Only a specialist can restore it to its original appearance.
The surface of the walls
Craquelure looks impressive and gives the room a special atmosphere. If you apply the varnish correctly and take care of it, this coating will last a long time.
DIY surface decoration
If you follow the recommendations of specialists, you can carry out the necessary repair work on your own, saving a decent amount of the family budget. To do this, you need to prepare tools and consumables:
- Protective varnish.
- Textured plaster.
- Sponge.
- Sash tool.
- Craquelure varnish.
- Putty knife.
- Multifunctional grout or acrylic enamel.
The grout and the paint itself must be chosen in contrasting shades so that the pattern stands out and is bright. Cracks can have different shapes. If the varnish is applied with a brush, the pattern will be parallel and deep. To work you need a flat brush with synthetic bristles. If you cannot do without a sponge, then it must be of the right size so that it is convenient to use. To make the pattern varied, strokes can be applied in different directions.
Stylish option
Varnish is available in two types:
- One-component. It is easy to apply to the base and dries quickly.
- Two-component. The application principle has its own peculiarities; drying takes longer. To speed up the process, use a hair dryer.
From the video you can learn how decorative painting with neat cracks is done: