Photo: womanadvice.ru The emphasis on walls and ceilings during renovation is so familiar and so banal. Modern design projects gravitate towards more non-trivial solutions, and new materials allow you to realize any fantasies. Such interesting options include self-leveling 3D floors, which instantly attract attention with their realism. It seems that a little more - and they will come to life!
What are self-leveling floors?!
Self-leveling floors are a polymer floor covering applied to the surface using the self-leveling method and without joints or seams.
There are several compositions:
- methyl methacrylate – characterized by rapid adhesion to the surface and short drying time;
- polyurethane - applicable in places with high mechanical load and negative temperatures;
- epoxy – very durable due to epoxy resins, so it is necessary to use a respirator due to toxicity at the time of application;
- cement-acrylic – resistant to high humidity;
- combined.
Regardless of the applied composition, the surface will be perfectly smooth, even mirror-like. This effect can be achieved by the physical ability of each composition to self-level.
Pouring process
It is recommended to line up the bags with the dry mixture in one line at the mixing point. Then open, if not all, then more than half of them.
It will be more convenient to work this way and you won’t have to rush around the kitchen. The weight of such a bag is up to 40 kg, and approximately 6 liters of water are needed to stir the solution. However, by definition there should be water in the kitchen if it is not supplied on schedule.
It is advisable to make the solution not too thick. Then it’s easier to fill, you don’t have to level it, and you don’t have to worry that not all the cracks and pores will be filled.
Types of self-leveling floors
Based on the requirements, self-leveling floors can have not only different compositions, but also alternative appearances.
Often the design of a self-leveling floor is crucial, so that the result obtained corresponds to the desired one, it is necessary to understand the difference between the coatings.
Surface quality:
- matte;
- semi-matte;
- glossy;
- semi-gloss.
Design:
- monotonous;
- two-color;
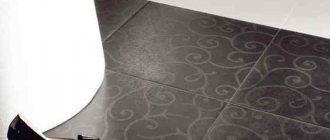
- with a pattern, ornament or streaks;
- 3D.
Installation process
Installation begins with stirring the solution. If this action is performed using a household hammer drill or a household drill, you should be careful. These tools are not designed for constant heavy loads; every 10-15 minutes of operation they must be left alone for half an hour.
First you need to prepare the concrete base, which you have already managed to reach, for priming. The more thoroughly dust and dirt are removed, the better the self-leveling floor will hold up.
It is better to plug holes in the concrete base with a rag. It is possible that they lead into voids in the concrete slab. Not only will most of the solution go into the slab, but it can also block the ventilation of the neighbors below.
Application area
The absence of joints and gaps explains the wide range of applications. For example, in medical institutions, where a lot of attention is paid to the cleanliness and treatment of surfaces, this is one of the most popular types of flooring.
Along with the design of premises, there is already considerable experience in using it outdoors, for covering steps and sidewalks. The self-leveling flooring system is so durable and wear-resistant that it can be used in a garage or warehouse where there is a high risk of damage.
Fire resistance and resistance to permanent damage justify its presence in shopping centers and other public places.
Light inside the plane
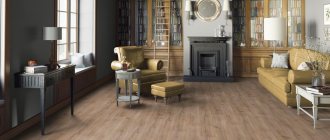
If you need to create the feeling of a podium, lighting or a flying surface, consider the option of a self-leveling glossy floor in light shades. Milk, brie, champagne - these and other neutral tones create perspective.
It’s as if light is hidden inside such a covering. This is an optical effect that is convenient to use and play with in different ways. You can reinforce it with furnishings in light, soft natural tones and velvety textures. For example, textiles: carpets, rugs. As well as natural materials and unusual finishes: wooden doors, light-colored plaster moldings, light Wainscot.
If the room has panoramic glazing or streams of light enter the room through the roof or veranda, the idea can be implemented in a minimalist manner. For example, leave the brickwork, make a light-colored self-leveling floor, and include only the necessary interior items in the design. In the evening, you can maintain the effect with spot lighting. For example, garlands or track lights.
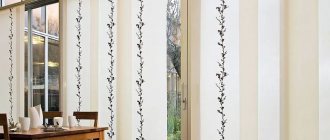
Turquoise and stucco together with self-leveling floor and brick wall
What to look for when choosing a mixture for self-leveling the floor?!
- For street coverings, there are special compositions that are not susceptible to changes in temperature and excessive moisture.
- One of the key values is the ability to quickly harden (set after application).
- Waterproofing properties are desirable.
- The composition should not be too glossy, as the floors will be slippery.
- The packaging indicates the approximate service life; it is better to choose the maximum permissible.
- To avoid damage during operation and careful processing, including with chemical compounds, the composition must provide high strength of the coating.
- Good technical characteristics must be accompanied by an attractive appearance.
Preference should be given to mixtures that do not require special conditions for drying, especially when it comes to outdoor use.
Technology for creating decorative floors
Step 1. All work begins with the preparation of a rough foundation, which is usually a cement screed. The old floor covering, if any, is completely removed, and the base is assessed for integrity and strength. All cracks on it, even small ones, must be repaired using epoxy putty, and the base is also sanded to remove various bumps and irregularities.
Preparing the subfloor
Attention! In particularly difficult cases, it is necessary to fill the base with a layer of self-leveling mixture to get rid of defects.
Calculator for calculating dry mortar for self-leveling floors
Go to calculations
Step 2. The moisture level of the base is measured - it should be no more than 4-5%. Otherwise, it should dry well before continuing work.
Humidity level measurement
Step 3. The surface is dusted using a construction vacuum cleaner. It is important to remove as much dust as possible, carefully going through all the cracks.
Dust removal of the subfloor
Step 4. The primer mixture is applied. The floors are thoroughly coated with it and then dried.
Applying primer
Step 5. The walls along the perimeter of the floor are covered with damper tape. It is necessary to compensate for thermal expansion.
Damper tape is glued
Step 6. The walls are covered with a protective film so that they are not stained with the self-leveling floor mixture during the work.
Protective film is applied to the walls
Step 7. The base layer mixture is mixed - the first layer of self-leveling floor will be formed.
Preparing the base layer mixture
Step 8. The mixture is applied to the prepared rough base and leveled. After this, it is rolled with a needle roller to remove air from the mixture.
Pouring the mixture
Leveling the poured mixture
Step 9. The film pattern is glued to the selected place on the floor or the banner is laid.
Pasting a picture
Step 10. Mix the transparent mixture to apply the finishing layer.
Preparing the mixture for the finishing layer
Step 11. The mixture is also poured over the base layer and leveled.
The mixture is poured
The mixture is leveled
Important! All work begins from the corner farthest from the exit from the room.
Step 12. The freshly poured layer is rolled with a needle roller. The surface dries well. Then the finishing varnish is applied, also dried, and you can move on the floor.
The floor is rolled with a needle roller
Advantages and disadvantages of self-leveling floors
Like any other type of building material, they have certain characteristics that should be studied to determine whether they are suitable for use in each particular application.
Traditional minimalism
For a minimalist interior, the best solution would be a calm, monochromatic color. White or gray will fit organically into any environment. Available in matte or moderately glossy light color.
The design must not have an elaborate pattern; uniform, discreet inclusions are acceptable. The fewer elements that catch the eye, the better.
Note!
Linoleum for the kitchen - master classes on installing linoleum in the kitchen interior. The best design ideas and color schemes (120 photos)- Illumination of the work area in the kitchen: TOP-130 design options. Rules for selecting and installing lighting in photo reviews
Stretch ceiling in the kitchen - TOP-130 design options for stretch ceiling in the kitchen + photo examples
Advantages
- High wear resistance and durability of the coating;
- Insensitive to ultraviolet radiation;
- Safety;
- Lack of odors and other decomposition products when exposed to physical phenomena;
- Fire-resistant composition, does not emit toxic compounds when burning;
- Simple and quick installation;
- Aesthetic and attractive appearance;
- The variety of creative possibilities and design solutions in the photo of self-leveling floors is proof of this.
A few words about 3D floors
A well-made 3D floor is a magnificent sight, although an expensive pleasure. The three-dimensional picture is attractive; specialists will create any composition you like.
But we should not forget that the kitchen is a place that you will have to visit constantly. Therefore, one should take into account the difference in the perception of gender between the owner of the premises and the visitor.
The enthusiasm will pass quickly, but the strain on your eyes will remain. In addition, there is furniture in the kitchen, in quite large quantities. It will hide any gender. Although, of course, you can choose a composition that will look appropriate.
Technologically, a 3D floor differs from a conventional self-leveling floor in two additional stages. On the first of them, the selected image is located on the filled surface, on the second - the finishing layer.
The cost of one square meter of arrangement of such a floor starts from 6 thousand rubles.
Instructions on how to fill a self-leveling floor
Leveling the floor. A level concrete screed will be required, because otherwise, much more mortar will be required, which is not profitable for financial reasons.
Base primer. It is better to use a deep penetration primer, carefully filling all holes and microcracks. To do this you will need a cloth roller. After 4 hours, repeat application and let it dry completely, this will take no more than a day.
Curtains for the kitchen - 120 real photos of new designs. Options for the ideal combination of modern curtains in the kitchen interiorHow to diversify your home interior: DIY decor and beautiful design ideas
- How to hang curtains - step-by-step instructions with photo examples and recommendations. Exclusive curtain design solutions from experienced craftswomen
We dilute the composition. In a deep container, first mix the dye and the main composition, then add the hardener and stir for a few more minutes. To avoid unwanted foam and bubbles, the drill should be at low speed.
Pour the mixture onto the floor and smooth it with a wide spatula. It is advisable to have an assistant. The composition has a maximum fluidity of only 40 minutes, so the process of diluting and pouring must be relatively quick and continuous.
Complete drying of the self-leveling floor takes at least a week, so do not rush and resort to various methods to speed up the process, as this can have a detrimental effect on the final result.
Self-leveling flooring in the interior becomes an invaluable find for the designer and the scrupulous consumer. It is ready to serve for decades and is a true decoration of both residential and commercial spaces.
Priming process
Primer is the application of primer with a brush or roller to a concrete base. It usually takes a minimum of time.
Drying depends on the weather, but even if the air is humid, you can continue working after an hour and a half.
Curtains for the kitchen with a balcony door: how to choose the ideal optionTable setting and holiday recipes for February 23: the best original and traditional dishes
Candle atmosphere: main types of candles for the home
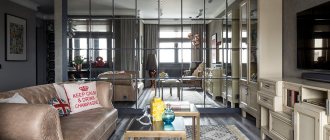
Unusual loft
The self-leveling floor for the loft is distinguished by its elementary simplicity of design. It is enough to perform the top colorless fill, which will expose the cement insides. You can additionally create the impression of sloppy work. Classic gray can be replaced with black, white or a combination of both.
Occasionally brighter colors are added. Suitable: muted orange, brick red, yellow ocher. It is acceptable to imitate rough wood, brick or stone.
Design of poured floors
As a rule, poured floors are a monotonous surface of a certain color. Special decorative elements completely change the appearance of poured floors. A beautiful and original poured floor can be created using flocks, chips, sparkles, and glitters. When creating poured floors, preference is given to epoxy and polyurethane materials.
Decorative elements can be placed evenly on the surface of the poured floor, in the form of geometric shapes or original patterns. If you use decorative elements of different colors, saturation, shapes, you can create a poured floor that looks like a highly artistic work.
Design options for poured floors:
- Plain colors are the simplest option.
- Filled floors with stains.
- Using several different paints when decorating the floor.
- Artistic poured floors based on drawings and photographs.
- Decorative design with sparkles.
- Decoration with colored acrylic “chips”, stones, shells.
- 3D poured floors with highly artistic three-dimensional images.
Filled floors are becoming increasingly popular due to their strength, excellent decorative properties, durability and reasonable price. They are successfully used in the design of living rooms and industrial premises.
In apartments, mansions, and country houses, poured floors complement and decorate the interior of the living room, children's rooms, and bathrooms.
In warehouses and industrial premises, such floors can withstand any load. Filled floors are heat-resistant, durable, and reliable in use. Thanks to their excellent decorative properties and durability, poured floors are excellent for areas with large crowds of people.
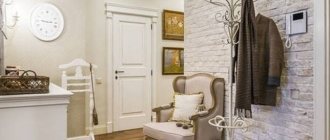
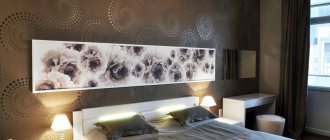
Romantic Provence
Calm pictures are suitable for a Provencal interior. You can create a green meadow, a flowering meadow, a seashore, a sandy beach.
The best choice would be no pattern. It is more important to create an antique design. Imitate natural stone and worn tiles.
A self-leveling floor made in the kitchen will be a good choice for surface decoration. The option is practical, durable, and interesting in terms of design possibilities. The optimal solution is easy to find to suit every taste and fit different styles.
Flocked floors
One of the unusual decorative elements for floor decoration is flock mixtures. Flocks of various shapes and sizes are used. Designers are offered a wide range of flock colors to work with. You can create original, beautiful poured floors using flocks in the form of multi-colored straws or flakes. Bright and festive floors are obtained by adding special sparkles to the pouring mixture. Flocks in pastel colors are ideal for a calm, warm home interior. Such poured floors create an atmosphere of comfort and coziness in the house.
Filled floors for a store or office
By creating poured floors, you can realize the most original design fantasies. An unusual and beautiful poured floor will attract customers to a boutique, store, or exhibition center. Creative and stylish design of the premises will raise the status of the SPA salon, entertainment center, and design studios.
If you notice an error, a non-working video or link, please select a piece of text and press Ctrl+Enter .
0