During cooking, food residues and drops of fat fall on the walls. To protect walls, you need a material that is easy to clean and will last a long time. One of them is kitchen backsplash tiles. In the article we will talk about the types, their quality and methods of use.
Using tiles for a kitchen backsplash - pros and cons
Kitchen backsplash tiles have been used for a long time and have become traditional. It is very affordable, easy to install and beautiful. Kitchen walls experience enormous stress every day, so they must be reliably protected. Positive sides:
- Good water resistance. It allows the tiles to neither swell nor change color, deform or warp from water, steam and grease.
- Due to the smooth surface of the tiles, the kitchen apron is simply washed off from various contaminants.
- High reliability and long service life up to several decades.
- The surface is not favorable for the growth of bacteria.
- Ceramics are resistant to fire, so they do not deteriorate from high temperatures and can be installed above the stove.
- The material is resistant to chemicals, so it can be cleaned by any means.
- Many colors, decor and the ability to combine with any other interior decoration.
Negative sides:
- Stone varieties need to be treated with special impregnation and careful care.
- The tiles cannot be dismantled and placed in other places, so they are installed for a long time.
- Careful care of seams is necessary because bacteria can grow in them. When installing, you can make them minimal, then there will be no difficulties with cleaning.
- Not all types of masonry can be done independently without experience, for example, herringbone.
Features of modern bathroom design
Different types of tiles on the floor and walls are characteristic of a modern interior design. Therefore, check out what criteria such a design must meet:
- A complete rejection of classical editing. Nowadays, structural materials with a matte and heterogeneous texture are in fashion.
- Laying standard single-color tiles in different patterns with a combination of facing materials of the opposite tone.
- The use of decorative items: friezes, borders, tiled plinths. A selection of drawings to match the color of the interior.
- Use for finishing finished collections in the bathroom: with ornament, decoration, unusual arrangement, intersecting seam.
- Using the horizontal masonry method to visually expand walls with diagonal floor placement.
- The use of vertical wide friezes is justified. This approach will help “raise” the ceiling and make the room lighter and more spacious.
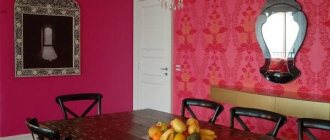
Do not forget that for modern interior solutions it is important to highlight the internal corners of the room. Therefore, use tiles of a contrasting tone in relation to the base for their cladding. For example, for a room in a pastel color palette, a material is chosen to highlight the corners of red, green, and black. In these places, laying elongated decor is also encouraged. It will make the perimeter of the room perfectly smooth and hide design flaws.
Ornament in the bathroom with brown and patterned tiles Source design-vannoy.com
Important! The use of black tiles should be thoughtful and organic. It is best to combine it with a red ornament, a panel or a collection of drawings in the area of functional areas.
Vertical stripes in the bathroom of contrasting colors Source 3dlancer.net
Types of tiles
Ceramic
Reliable kitchen tiles are made from clay and sand using pressing. Standard thickness from 3mm. up to 4mm. She is a classic.
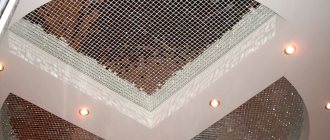
Mosaic
Mosaic for a kitchen apron looks impressive. It uses glass, ceramic and other elements. It takes a long time to install, but the result is impressive. You can cover the surface with one tone, different shades of the same range in a chaotic manner, or lay out a beautiful pattern. It’s not always possible to lay out a beautiful composition yourself – you need experience and dexterity, so designers are invited.
- The best cutlery manufacturers
Which kitchen sink to choose? Pros and cons of different materials
Table setting and holiday recipes for February 23: the best original and traditional dishes
From glass
Glass slabs are very reliable because they are tempered using a special technology. The image is applied inside, and the surface is covered with smooth, frosted or embossed glass. Depending on the style, tiles are single-colored or with a pattern. Photo printing looks beautiful. However, the material is severely scratched and deteriorated by detergents with abrasives.
Fake diamond
Often they make a noble kitchen apron from tiles based on artificial stone. It is suitable for Provence, loft. It can be made from a concrete solution with the addition of natural stone chips or from composite materials (dyes to look like natural stone). Such materials imitate granite, marble, sand coatings. However, it is not UV resistant and deteriorates due to sudden changes in temperature. You can protect the coating with special colorless varnish and impregnations.
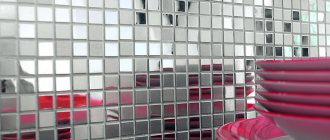
Mirror
An interesting type of glass tile is mirror. It is shock resistant but requires careful maintenance. Painted in a silver color that reflects objects or lighting. Suitable for styles: high-tech, modern, loft.
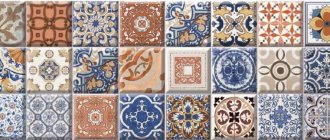
Imitation of other materials
Imitating tiles for the kitchen work area allow designers to realize any idea, ensuring the durability of the canvas and protection of the walls. The most interesting imitations are: leather, wood, stone. The design is obtained from photo printing; texture can also be added to the slabs so that only a professional can distinguish the materials.
Interesting! More often they imitate other materials only with a pattern, so as not to complicate surface care.
Table setting for February 14th - the best ideas and ways to decorate to create a romantic atmosphere- DIY Easter flower arrangements: master class (photo), original ideas
- How to decorate the Easter table - ideas, tips for decorating the Easter table, photos
Laying process
Correctly laying hog tiles on a kitchen backsplash is a difficult but doable task. The main thing here is to carry out calculations correctly and comply with a number of requirements, which we will talk about later.
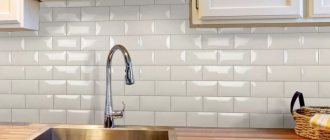
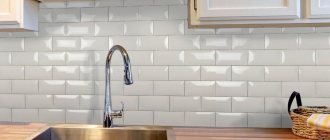
Interesting! Another name for boar tiles is “subway”. This name comes from the UK, where this method is quite often found in wall cladding at metro stations.
Surface preparation
Maximum leveling of the base will facilitate subsequent installation. Not only is it easier to glue tiles on a flat surface, but it also requires less glue and less time spent on it.
Boar tiles laid in the classic way Source elmantrade.ru
To prepare the surface for laying hog tiles on the kitchen apron, tile adhesive can be used (for differences in plane of no more than 5 mm) or a cement-sand mixture (for large unevenness values). Before you begin leveling, you should carefully inspect the area. If necessary, do the following:
- Old decorative coverings (tiles, wallpaper, other facing materials) are removed.
- If flaking elements are detected, the latter are removed until a durable surface appears. This can be done with a trowel, trowel, spatula, hammer drill or other tool.
- Before leveling, the wall is treated with a deep penetration primer. This will ensure better grip (adhesion) of the composition with the surface, strengthen the outer particles of the wall, and reduce moisture absorption from the dry mixture used.
- Work with the dry mixture begins only after the primer has completely dried. The time it will take for this depends on the temperature of the room, the amount of soil applied, and the performance characteristics of the composition used.
Other preparatory work
Surface marking is a mandatory stage of the work. The procedure will create a more accurate and aesthetically attractive surface. To do this, you can measure the distance from the floor, adjacent walls to the outermost row. Taking into account the obtained result, marks are made along which a horizontal profile is installed, which serves as the basis and support for the first row.
Healthy! A galvanized profile fixed with self-tapping screws or dowel-nails will ensure the rigidity of the structure and will not allow it to “sag” under the weight of subsequent rows. It is dismantled only after the glue has completely hardened, no earlier than a day later.
In addition to marking, when laying hog tiles on a kitchen apron, it is recommended to perform a few more actions:
- Make a preliminary layout of tiles on the floor. At this stage, try to select individual elements according to color and texture. Inspect for chips, cracks, and other mechanical damage.
- Prepare the adhesive composition according to the manufacturer's instructions. You can find it on the packaging. There is no need to dilute large volumes; it is enough to mix the amount that will be produced in 40-60 minutes. work. Over time, the composition begins to harden, dry and lose its original adhesive properties.
Boar tiles laid in a herringbone pattern Source keram-max.ru
Important! When purchasing boar tiles, buy them with a reserve of 10% of the required quantity. This will create a certain reserve in case of chips that may appear as a result of transportation, trimming, or repositioning.
Apron installation
Laying boar tiles on a kitchen apron is done as follows:
- Spread the adhesive in an even layer on the back of the tile. For this, a special notched trowel is used, after passing through which, smooth, neat grooves of the mixture with gaps 3-3.5 mm wide are left on the surface of the tile.
- Spread the glue on the wall surface. Boar tiles are much thicker and heavier than standard tiles, so the adhesive composition is applied both to the surface being processed and to the lamellas themselves. At one time, lay out the amount of mixture sufficient to glue no more than 3-4 pieces.
- Press the “brick” firmly to the base. Lightly tap it with a mallet, fixing it in one plane. The lower part at this moment should fall on the horizontal, safety profile.
- The installation of boar tiles on the kitchen apron is carried out according to the previously selected layout method. To maintain even gaps between elements, special plastic crosses are used.
- Every 5-10 min. it is necessary to check compliance with the vertical plane. This can be done with a plumb line, level or level.
- Laying the last and outer row may require trimming individual elements, the features of which will be discussed below.
- 1-1.5 hours after laying the hog tiles on the kitchen apron, remove the plastic crosses and clean the gaps between the “bricks”.
- Grouting of tile joints is carried out no earlier than one day after installation.
Important! There are layout options without gaps. In them, the tiles are closely adjacent to the neighboring ones. Crosses and grouting of tile joints are not needed here.
Masonry options
There are many ways to lay tiles, we will list the popular ones.
Standard
According to the standard, tiles in the kitchen are laid seam to seam. This arrangement allows you to save materials, because there is a complete coincidence of the rows. It is better to calculate the amount of material before purchasing so that trimming will be required.
Herringbone
The herringbone arrangement of the apron is beautiful and suitable for country, Provence, and loft styles. But it’s difficult to do it yourself without experience.
Diagonally
Diagonal laying is used to create patterns. The result is a beautiful look, but a lot of pruning will be required, so the consumption will increase.
Combination of several techniques
If you want to make your bathroom original, you can use several masonry techniques at the same time. For example, the base is an imitation of brickwork, and the interior panel in the shower is in the form of a parquet board. You can use elite tiles with a beautiful figured shape. It is used to line the following areas: near the sink, faucets, and shower head riser.
Beautiful bathroom design with tiles Source dizajninterer.ru
Popular colors
Pastel shades
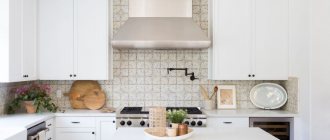
The traditional apron in the kitchen, suitable for all types of interiors, is white. It visually distances objects, so it can be used even in small rooms. He is always stylish and will not get boring.
Beige tones are best used for classic or Provence. But it can also be introduced into modern interiors if the undertones are taken into account correctly. Beige is very soft and can be easily combined with other colors.
The lavender tone is beautiful and suitable for Provence. And for minimalism and hi-tech, gray tiles will be expressive. They can be laid in random order of different undertones to get an unusual design.
Deep shades
Deep purple color is suitable for modern style. For example, bright pop art. However, it can only be used in spacious rooms so as not to reduce the ambience.
A rich green tone will add freshness and tranquility to the room. A boar tile can create a beautiful decor.
Bright colors
A striking combination would be a black and white combination. It is not necessary to dilute it with other shades, because two basic tones create an original setting. A black mosaic with white seams will look beautiful on an apron.
An unusual apron for the kitchen can be made in red. It draws attention to itself, so the rest of the environment should be neutral. You can combine it with a snow-white set. This combination would be perfect for a loft style if the hog tiles imitate brickwork. For modern stylists, a red mosaic will look interesting. You can complement the interior with scarlet textiles.
By adding a bright green tone, you get an environment filled with life and energy. You can combine it with natural shades: brown, beige, white.
Decorative inserts
There are interesting finishing options that will allow you to diversify the background shades:
1 Use of decorative panels. This technique is often used in country, Provence and classical styles. One large 60cm tile can be inserted in the center of the composition. at 60cm, 50cm. by 30cm, 80cm. at 60cm., 60cm. by 40cm. It is not uncommon that instead of one large one, 4 pieces are used. or 6 pcs. average.
To make the panel look appropriate, you will need symmetry and enough space. Most often it is placed above the stove, but if you have a long set, you can place several panels at the same distance. From the drawings you can choose any one that suits your style. For example, images of flowers are suitable for Provence, and carved patterns are suitable for classical days. You can create an interesting composition with images of cities, villages, and beautiful nature.
2 “Pencil” decor. It is a strip that runs through the middle of a surface of any width. This trick not only decorates the decor, but also simplifies installation. Often the size of the middle strip is selected to prevent cutting of the slabs.
3 “Border”, frieze. This decor is similar to pencil decor, but a strip of varying sizes is mounted above the lower cabinets or under the upper ones. It also allows you to avoid cutting the tiles if you calculate everything correctly.
4 Tiles with a pattern or relief. They do not differ in size from the background ones, but have an interesting flat or convex pattern. They are distributed over all surfaces at the same or different distances. Sometimes they are used to create a decorative panel.
Don't forget about curtains
When you are not bothered by the overall achromatic nature of the interior, the color of the curtains is quite limited and depends on the predominant shade. If black dominates, it is better to choose light curtains for the kitchen and vice versa.
The black and white color scheme of the kitchen does not oblige you to use strict colors for the curtains
If you want to use curtains as a bright accent, then listen to the following tips.
Many black and white kitchens, photos of which are located above, will only benefit from the presence of an additional shade in them:
- Use silver curtains if the kitchen has a lot of cool shades of white;
The neutral shade of the curtains will not distract attention and will be a good addition to the decor
- You can complement the set the color of baked milk or cream with golden curtains;
Such “solar” curtains will add coziness to the room
- When the black trim has brown tones, the curtains can be sand, beige, cream or caramel shades;
- If the kitchen is decorated with black and white furniture against a background of gray and blue walls, then curtains with a pink-lilac or purple tint will best fit into the interior.
Selecting tiles to match the style of the kitchen
Choosing a design for a tile backsplash is not difficult if you know the style of the room. For a classic interior, tiles made of natural or artificial stone are suitable. You can add a decorative panel.
The loft style will be complemented by tile trim on the apron along the brickwork. To do this, choose red shades. Recently, tiles have often begun to be decorated to look like aged brick.
For minimalism and hi-tech, monochromatic models made of mosaics and hogs are suitable. The main thing is to maintain a black-white-gray color scheme.
Afterword
Even with a limited number of colors you can create a stunning interior
The black and white palette in kitchen design is a very versatile and more than effective option for arranging a kitchen, regardless of its size. I hope my recommendations and collected photos will help you decide on your future interior, but if not, I recommend watching the most useful video in this article. I'm sure you can find many interesting ideas for decorating your own dining area there.
Be sure to express your opinion about this interior in the comments. I will be only glad if you share your experience of arranging a kitchen.
Gallery
Did you like the article? Subscribe to our Yandex.Zen channel
Great article 0
Tips for choosing tiles
When selecting tiles, it is necessary to take into account factors that will allow the surface to serve for a long time:
- Choose a material without relief. Embossed products are more beautiful, but they are much more difficult to clean compared to smooth ones.
- To visually enlarge the room, take a glossy finish. It is also easy to clean, but water streaks and stains are visible in the sun. Therefore, you will need to wipe the surface dry immediately after washing.
- Buy products from the same batch so as not to miss the mark with color and texture. If you have to purchase from different batches, make sure they are completely identical.
- Check for the presence of a protective layer. It prevents chemicals from penetrating deep into the material and destroying it. The best indicators of the degree of protection are “A” and “AA”.
- The quality of the coating is also important - there should be no cracks, abrasions or chips.
- Before purchasing, it is worth looking at the error of actual values. If the indicator is “0”, then there is no size error. If "1", then this is acceptable. Higher values will not allow you to lay the tiles evenly, because everything will be crooked due to different sizes.
Interesting! To prevent the material from cracking after installation, it must be stored correctly. Before installation, the slabs should be kept in a room with low humidity.
To ensure that you don’t get tired of tiled kitchen backsplashes for a long time, you also need to take into account the designers’ recommendations.
| 1 | To focus attention on the protective surface, use bright colors, mosaics, panels, photo printing, etc. |
| 2 | If the accents in the room are made by other things, then choose a neutral color and texture |
| 3 | Bright tiles attract a lot of attention, so it is recommended to install them in large rooms, and use muted colors in small ones. |
| 4 | To make the room harmonious, you need to support the colors of the apron with other elements. For example, a tabletop |
| 5 | The size of the tiles affects the perception of space - small ones increase the size of the room, and large ones reduce it |
Main nuances
The technology for laying boar tiles on a kitchen backsplash is significantly different from working with ceramic or porcelain tiles. The work is complicated due to the texture and the presence of beveled, rounded corners (not on all models).
How to trim hog tiles
As already mentioned, trimming is necessary when laying outer rows and framing protruding objects (for example, gas pipes). Trimming can be done with a tile cutter or a grinder with a diamond blade. The latter should operate at the lowest possible speed, which will reduce the number of chips.
Kitchen apron made of red hog tiles Source keram-max.ru
Processing internal and external corners requires cutting the back side of the tile at 45°. Having marked the element and sawed it off, the edges are sanded with sandpaper. In addition, pay attention to a number of features:
- After cutting the corner tiles without a chamfer, align them with each other and make sure that the resulting corner edges are even.
- Installation of beveled tiles is carried out with an additional trapezoidal cutout that follows the profile of the lamella.
Healthy! The easiest way to frame corners with boar tiles is to purchase and install a ready-made (assembled) ceramic corner.
Photo
For inspiration, look at photo examples of popular masonry in real interiors:
How do you like the article?
Simulation programs
Virtual visualization of the bathroom interior can be done through online editors and specially developed modeling programs.
We invite you to familiarize yourself with the list of the most popular of them:
- 3D Superb
- TilePlanner
- Domus 3D.
Material Selection Basics
The best solution for the kitchen is decorative ceramic tiles. However, before updating the existing finish, it is worth choosing the right tiles so that:
- Floor and wall surfaces withstood mechanical abrasion and loads, because the kitchen is considered one of the most visited and cleaned places in the house;
- The tiles were not destroyed by impacts or accidental falling of dishes;
- The coating could withstand exposure to household chemicals, elevated temperatures and increased humidity;
- The floor tiles were not slippery;
- The decoration created a pleasant atmosphere.