The French phrase “chaise longue” has firmly entered our everyday life under the term “chaise lounge”. In essence, a chaise lounge is a light, long, extendable chair, the back of which can be moved to suit a comfortable body position.
These chairs have become widespread and now it is difficult to imagine outdoor recreation without a comfortable chaise lounge.
Loungers can be classified according to the material from which they are made. And based on this, understand their advantages and disadvantages:
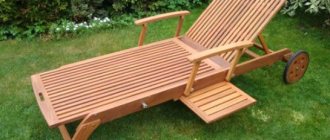
- The first lounge chairs were made of wood. The wooden deck chair is still considered the most environmentally friendly and is popular. However, it has one drawback - weight. Therefore, beds made of natural wood are most often equipped with wheels.
- The easiest to care for and budget option are plastic sun loungers. They are light, compact and mobile. Their main drawback is their short service life. Plastic deteriorates quickly in outdoor conditions, and plastic fittings break quickly.
- A very good and mobile solution is fabric sun loungers. The frame for them can be made of any materials - metal, plastic, wood. They are lightweight and great for carrying and traveling.
- Rattan lounge chairs are also an eco-friendly and sophisticated choice, as are wooden chairs. Such sunbeds fit harmoniously into the interior of garden plots and hotel areas. In addition to being decorative, they have a lot of positive qualities, but have the main disadvantage - such a chaise lounge will be very expensive.
In this article we will talk about how to make a beautiful and comfortable chaise lounge yourself from scrap materials.
General recommendations
Before starting work, you need to remember that not only the material has a price, but also the time and effort spent on manufacturing the product.
A chaise longue is a piece of furniture that will be used outdoors and, accordingly, will be exposed to all external factors. Therefore, before assembling, you should take care to protect the materials so that the lounger lasts a long time and fulfills its functions.
If you decide to create a sun lounger from natural wood, then to protect the wooden components, before assembly, they need to be treated with antiseptic liquids, primers, wood impregnations, varnish and other substances. This procedure will provide protection against rot, insects, and mold formation for many years, reduce flammability and give the structure an aesthetic appearance.
Fabric sun loungers should be treated at least once a month with special impregnations to prevent fading and to impart water-repellent properties.
Step-by-step construction of garden furniture
For work, it is better to immediately prepare a workplace where there is a wide area for working on wood or metal, high-quality ventilation for working with decorative coatings, and a residual level of lighting.
If you plan to work with welding and a grinder (for example, to make a deck chair from metal or PVC pipes), it is better to immediately remove all flammable liquids and flammable objects.
You will also need the following set of tools for work:
- Main material (wood beams or pallets, PVC pipes, reinforced iron, metal profile).
- Welding and a grinder will be useful to the craftsman who will work on a metal deck chair.
- A planer and a jigsaw are necessary for processing wooden surfaces.
- Antiseptic and moisture-resistant compounds, anti-corrosion coating.
- Decorating materials. Paint and acrylic varnish, stain perform not only an aesthetic function, but also create an additional protective layer on the surface of the material.
- To sew a cover or mattress you will need fabric, filling, needles, threads, and scissors.
A tape measure and a building level will help you control the progress of your independent work and the quality of the assembly of the structure. Beginning craftsmen should take care in advance to prepare ready-made drawings and diagrams, step-by-step instructions and video lessons.
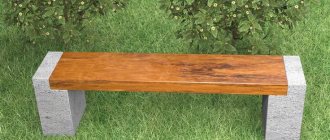
Monolithic chaise lounge made of wood
Massive wooden models of sun loungers are characterized by increased durability, environmental friendliness and comfort for relaxation. But due to their heavy weight, they will have to be equipped with wheels for ease of transportation.
When choosing the type of wood for a sun lounger, you can safely use any coniferous species. They are very practical and presented in an inexpensive price segment.
Scheme for making a monolithic wooden deck chair:
Legend:
1 - front legs; 2 — hind legs; 3 - longitudinal carrier; 4 - main (bearing) for the back; 5 — support for the back of the lounger; 6 - transverse load-bearing strips; 7 — bar for fixation; 8 — stand for supporting the back of the chair; 9 — wheels; 10 - end beam; 11 — slats for the back. 12 — slats for the seat. 13 - transverse support beam; 14 — bar for fixing.
The standard factory size of any type of chaise longue is 190 cm by 60 cm.
But since we are talking about a homemade sun lounger, its parameters remain at the discretion of the manufacturer.
Assembling a chaise lounge on wheels:
- Use a hacksaw or jigsaw to cut the beams to form the frame. We fasten the structure with corners for the bed;
- saw and sand the cross boards;
- we nail the resulting strips to the frame;
- We saw the legs from the timber (standard height is from 5 to 10 centimeters). We drill a hole in the resulting blanks (the distance from the ends of the block is 6-7 cm). Using bolts 12-16 mm in diameter, we attach the wheels to the legs;
- for lathing the structure, we cut boards (standard 8 cm by 60 cm);
- We attach the planks to the base with self-tapping screws, leaving a space of a couple of centimeters between the boards. Use a confirmation drill or a countersink drill to “sink” the heads of the screws into the boards;
- we connect the two resulting parts (for the body and the headboard) into a single structure using door hinges;
- We install a support bar under the moving part (backrest);
- decorate the chaise lounge using sandpaper, primer, paint or varnish;
- The finished lounger can be supplemented with pillows, a thin mattress, and bedding.
Cheap but cheerful
The materials that should be used when working on a chaise longue are very varied. The myth that a chaise longue is a wooden chair is unreliable.
When working on its creation, a variety of materials are used, which are at the same time quite cheap, and can be found in any hardware store. A chaise longue can be made from:
- tree. At the same time, the chaise lounge will be strong, reliable, and the environment will not be harmed. The downside is that it weighs quite a lot (to make it easier to carry, you should attach wheels);
- fabrics. The base of the chaise lounge is pleasantly comfortable and convenient. The frame is made of wood;
- rattan The chaise lounge is, to a large extent, made for home decoration. It is environmentally friendly, but there is one big drawback - the price;
- plastic. Plastic sun loungers are very light, so you can safely take them on a hike. The frame is made of wood or a special pipe. Minus – poor reliability;
- PVC material. The lounge chair has a fabric base, but the base is made of PVC pipes.
Beginning of work
After the type is chosen and the material is selected, the work starts with drawing a drawing of the chaise lounge. The drawing plays a major role, since during its creation the dimensions, shape, additional inserts and much more are determined that will be included in the final work.
Not everyone can draw such a diagram, so if necessary, you should turn to specialists.
Simple wooden chaise lounge
You can make a wooden lounger of a simpler design.
As materials, you will need:
- to create a frame frame you need two beams 2 meters 15 centimeters long;
- 2 beams for crossbars, 50 centimeters each;
- for the back of the lounger - boards measuring 5x10. Of these, 2 boards of 88 centimeters each (for the long part), 3 boards of 39 centimeters each (for the short part of the back) and 1 board of 60 centimeters;
- 6 legs, 35 centimeters high;
- 6 slats for sheathing the back (25×8×60);
- 13 strips (25x8x60) for seat trim.
Step-by-step assembly with drawings below.
We form the main frame. To do this, we fasten 2 long beams (215 cm) with screws to two 50 cm beams.
Assembling the seat. Thirteen 60 cm strips are secured to the frame using self-tapping screws. There should be a centimeter space between the slats.
We attach the legs. In order for the chaise lounge to be more stable, we install two legs each (4 in total) to the part where your legs will be, and one each (two in total) to the headboard. We cover the frame for the back with planks 88 and 39 cm long, also leaving a space of 1 cm. The back should fit freely into the main frame of the lounger.
After fixing the planks with self-tapping screws, we smooth out all the roughness and unevenness with sandpaper.
We attach the backrest to the main frame using pins. First, drill holes on the sides of the seat and back. The distance from the sides of the bars for the hole should be about 9 centimeters.
We assemble the fixation mechanism for the reclining backrest. To do this, we form two recesses for support in the main frame of the lounger. One groove is located 10 centimeters from the studs, and the second is 20 centimeters from the first groove. The depth of the recess of the first groove is 10x10 cm, and the second should not exceed dimensions of 5 cm by 5 cm.
We install a 60-centimeter block horizontally into the first groove. To adjust the position of the backrest, the block should be moved to another groove, but vertically.
The last stage is sanding, impregnation and painting.
Calculation of the required amount of material for construction: working tools
In order to make a wooden chaise longue with a fabric seat at home, we do not need complex and expensive tools, so even an inexperienced novice craftsman can make such a design for his summer cottage or country plot at the lowest cost.
To construct the backrest we will need wooden boards of the following sizes:
- Two pieces 19x38x1219 mm;
- One piece 19x38x610 mm;
- One piece 19x38x648 mm;
- One piece 19x64x610 mm.
To make the seat frame you need boards of the following sizes:
- Two pieces 19x38x1118 mm;
- Four pieces 19x38x603 mm;
- One piece 19x38x565 mm;
- One piece 19x64x565 mm.
To make a backrest support:
- Two boards 19x38x381 mm;
- One wooden round dowel with a diameter of 12 mm (length 648 mm).
To make a fabric seat we will need:
- Two pieces of awning, denim, camouflage, mattress or other durable fabric (a piece measuring 1372x578 mm);
- Two wooden dowels with a diameter of 12 mm (length 559 mm).
For fastening the structure:
- Four bolts with nuts size 6x50 mm;
- Twelve washers for nuts;
- Wood screws size 4x50 mm;
- Regular PVA glue or special glue for wood products.
The tools we will use are:
- Round file;
- Fine-grained sandpaper or sanding machine;
- Roulette;
- Electric drill;
- Grinder or saw (manual, electric or gasoline);
- Wood putty;
- Construction pencil or marker;
- Water-repellent varnish or paint;
- Hammer and screwdriver;
- Square.
Fabric chaise lounge
A simple fabric chaise lounge, like the one in the photo below, can be made yourself without much effort.
The design of the sun lounger consists of 3 frames of the following sizes:
- 1200x600 mm (in diagram “a”);
- 1100x550 mm (in diagram “b”);
- 650x620 mm (in diagram “c”).
We cut the boards to the required size and sand them down. We drill holes in the longitudinal bars for bolts 8 mm in diameter and clean the holes with a needle file. The indentations on the bars should be 70 and 40 cm.
To adjust the tilt of the back of the lounger, we make 3-4 notches in frame “b”, at a distance of 10 centimeters from each other. We sand the grooves well.
To connect the frames, we drill holes in the fastening points as indicated in the diagram. We assemble the frames together. Initially, we fasten structures “a” and “b” to each other with screws. And then, using the same screws, we connect frame “a” to frame “b”.
We cover the structure with fabric. Before nailing the fabric to the frame with nails, you should take measurements and “try on”. Check that the fabric has some slack when the lounger is folded and is slightly taut when fully horizontal. If the fabric has sat well, we wrap it around the rounded sticks from frames “a” and “b” and secure them with nails.
Tips for choosing materials for a fabric chaise longue:
- to create the frame of a sun lounger, it is better to choose hard wood species - oak, yew, beech or birch;
- textiles for a sun lounger must also be reliable. Very strong and durable fabrics are denim, canvas, canvas or camouflage.
Benefits of relaxing on a sun lounger
The convenience of a sun lounger is as follows:
- They are more stable than regular chairs and armchairs. Therefore, sitting on a lounger is much more comfortable.
- Thanks to the reclining position, the load is removed from the muscles and spine. This allows you to completely relax.
- The special design of the back of the lounger can be adjusted according to the height of the angle of inclination and you can choose a more comfortable position.
- The lounger is lightweight and does not take up much space when stored.
- The special design creates a special body position in which the tan goes on more evenly.
- In a sun lounger you can lie and take air or sun baths, watch nature, read a book and drink tea.
This piece of garden and beach furniture is very multifunctional. Plus, it adds style to the exterior of the summer cottage.
We recommend reading the article about melanin for tanning. From it you will learn about the role of melatonin in tanning, how and what cream to use, the use of melanin in tablets and possible complications after artificial production of melatonin. And here is more information about solariums and vitamin D.
DIY fabric chaise lounge. Model 2
Treat all wooden structural elements: sanding, protective impregnation, painting.
In the drawing of the chair there are additional crossbars that fix the tilt of the chair back. These elements must be prepared in advance, and slots must be made for them. The distance between the slots can be from 20 to 35 cm.
Under the back frame, we drill holes in the slats for bolts at a height of 0.41 m. We do the same for the seat frame, but take the distance at 0.43 m.
We drill holes in the center of the tops of the beams that hold the back of the lounger. All holes made should be thoroughly cleaned using a needle file.
Assembling a sun lounger
We assemble the frame for the back as indicated in the diagram. The 0.61 m rail must be fixed very firmly, since it bears the main load. Between the two upper slats at the head of the backrest we leave a small space through which the fabric can later be passed.
According to the diagram in the photo, we assemble the sun lounger seat. We put the back and seat together and connect them with bolts. You need to put a washer between the parts at the fastening points. According to the drawing, we install a structure to support and adjust the position of the backrest.
We carry out the final work: sanding uneven areas, decorating the wood with stain and varnish. We cover the chaise lounge with fabric. We pre-process (overlock) the edges of the material. We sew the bottom and top edges of the cut (forming continuous loops), so that the wooden rods can be passed through them. Place the fabric on the rods. We pass the rods with the material between the slats of the back and foot.
The advantage of this model is that the fabric on the rods is easily removable and can be washed.
Preparation of the drawing
The first and most important step for the master is to prepare a drawing of the future chaise lounge.
The following parameters must be indicated on paper:
- General dimensions of the sun lounger.
- The height of the main shield above ground level.
- Backrest angle.
- Dimensions of armrests, headrest (if provided for by this model).
For a folding chaise lounge, be sure to note the location of the fittings and its main components. Actually, the sun lounger itself has several mandatory elements: a middle and four side support posts, a support post under the back, a backrest bed, and a lower bed of the sun lounger.
In the photo of the chaise lounge, built with your own hands, you can see that there are diagonal slats between the side supports. These elements also perform a supporting function.
Chaise lounge made of polyvinyl chloride
This model of sun lounger also involves the use of fabric, but the frame of the sun lounger is assembled from PVC pipes.
To make your own fabric sun lounger from polyvinyl chloride, you will need the following materials:
- two-inch PVC pipes;
- 8 pieces of L-shaped fasteners;
- 6 pcs T-shaped fasteners;
- a piece of thick fabric.
To make this sun lounger from PVC pipes, you need to assemble two rectangular frames.
First, we cut the pipes into pieces of the required size. You can set your own chaise lounge parameters. The proposed drawing of a polyvinyl chloride lounger is based on specific dimensions.
To create the first frame, you need to take 2 pipes of 30 and 45 centimeters each and fasten them with a T-shaped adapter. The core of the adapter should be turned towards the inside of the frame. We put L-shaped adapters on the ends of the resulting longitudinal tube. Using the same method and the same dimensions, we assemble the second vertical tube.
The length of the horizontal jumpers is 66 centimeters. One jumper remains solid and is attached to the vertical pipes with L-shaped connectors. The second consists of two 30 cm sections, fastened in the center with a T-shaped adapter.
As a result of these simple manipulations, you should get a rectangular frame.
Using a similar scheme, we assemble the second frame.
We make a connection for the chair layout. We saw off 1 piece of pipe 5 cm in length and insert it into the T-shaped adapter of the vertical part.
The result should be two rectangular frames, one of which should fit freely into the other.
We fasten the frames together. We measure the horizontal between the T-shaped adapters. We cut the required length of pipe and attach it to the adapters. We attach the rear support at a convenient angle of inclination for the seated person.
We cover the finished structure with fabric.
Products made from profile pipes
How can I use leftover metal pipes?
Cold forging
- Using a corner, all square pipes are aligned.
- The required size is measured with a felt-tip pen and ruler and the excess part is sawed off.
- On a snail machine, the metal is passed through a press, and then, clinging to the equipment with one edge, the master begins to twist it into the snail. It turns out to be a curl.
- To give the product a more beautiful, unusual shape, metal templates are used. The master wraps the pipe around it, twisting it into curls.
- More massive metal parts are used to make a structure, inside of which the finished forging work is placed.
Portable lounge chair
This is a very simple and lightweight design, which consists of two parts - a wooden seat and a back covered with fabric.
The photo shows a step-by-step diagram for assembling a portable sun lounger.
Before assembly, all wooden parts must be pre-treated. Wood screws are used to connect the elements. The fabric can be nailed down with small nails or staples.
Sewing a mattress
An equally important part of the work is the choice of textiles, filling and sewing of the mattress. As a rule, for this purpose, a fabric is chosen from combined threads with the addition of acrylic. Such textiles are highly breathable, absorb moisture, and can easily withstand washing and cleaning without shrinking.
The most optimal filler is foam rubber or foam rubber (a more expensive option, but with an orthopedic effect).
Kentucky chair
You can also create a very simple and lightweight Kentucky chair with your own hands.
Assembly of the Kentucky chair (drawing and diagram).
We drill a hole in each rail with a diameter slightly wider than the fastening element (wire or pin). We lay out the slats according to the diagram and insert pins/wire into the holes.
We secure the ends with staples. Slightly lifting, straighten the slats.
Important: before you begin assembling wooden elements, they must be completely treated with sandpaper, protective and decorative agents.
See the video of the process for more details.
Adviсe
- If you decide to make a chaise lounge out of wood, we advise you to stock up on antiseptic, anti-corrosion compound and paint materials in advance. They need to process every detail before assembly in order to extend the life of the sun lounger and protect the wood from the harmful effects of the environment.
- The wooden surface must be sanded to a perfectly smooth state.
- Be sure to draw a drawing in which you describe in detail the dimensions of each part and its subsequent location. For example, where, at what distance and at what angle the back should be located, and so on.
Original chaise lounge
The outdoor furniture market is very diverse and features unusual designer models of sun loungers. Prices for some models exceed tens of thousands of dollars. However, if you show a little imagination and make an effort, you can create an original chaise lounge with your own hands for more modest money.
Here is an example of a model from the famous garden furniture brand Design Koalition with a fabric canopy.
To make such a chaise lounge of a standardized size of 1.6x1.8 m, you need the following:
- plywood sheets - 2 pieces, 1600 by 1800 mm, thickness two centimeters;
- wooden planks with a round cross-section - 6 pieces, length 920 mm, cross-section diameter 30 mm;
- plywood slats (you can use scraps from the main sheet) - 12 pieces, 94 cm long and 10 cm wide;
- fastening elements (self-tapping screws, screws, glue, nails);
- cardboard for creating a model (pattern) of a chaise lounge;
- a piece of thick fabric at least one meter wide.
A drawing of the chair with measurements is shown in the photo:
We transfer the drawing to cardboard, observing the dimensions. We cut out the resulting templates and use these stencils to transfer the design onto sheets of plywood.
We cut out the necessary elements from plywood. Where connections are provided for in the diagram, we make recesses 30 mm in diameter. We process roughness, unevenness and defects so that all parts of the structure are smooth.
We form a plywood frame. We insert the beams into pre-made recesses and secure them with self-tapping screws. To ensure reliable fastenings, the ends of the beams and all joints must be coated with glue. All gluing areas must be pressed with a press and the glue must be allowed to dry thoroughly.
We screw the strips, creating stiffening ribs for the entire structure. The distance between the slats should be 10 centimeters.
We prime, putty and paint the plywood structure.
We stretch a fabric awning over the finished sun lounger. The size of the canopy can be varied as desired. You can use Velcro, drawstring loops or a zipper to secure the awning.
Assembling a chaise lounge on wheels
We assemble the base frame from the bars. We secure the load-bearing parts with corners similar to those that secure the base of the bed.
We sheathe the resulting frame with pre-prepared and sanded boards.
We make blanks for the legs from timber. Their height usually ranges from 5-10 cm. Choose one that is comfortable for yourself and your household.
We drill holes with a drill, retreating 5-7 cm from the ends of the longitudinal sides. We secure the legs with long bolts. We control the horizontal side with a spirit level.
We screw the wheels to the center of the legs with bolts with a diameter of 30mm.
Let's start cutting the lattice elements. Use a hacksaw or jigsaw to cut 8x60cm boards.
Using self-tapping screws and a screwdriver, screw the slats to the chaise lounge frame. Since the boards are not screwed tightly, we use spacers to obtain even gaps.
We should have two parts. The smaller one is intended for the headboard. We connect both grilles with door hinges. We install a support bar under the opening part.
All that remains is to sand off the production flaws. Apply wood primer. Paint it in your favorite color and the chaise longue with your own hands is ready.
For a more comfortable stay, you can sew additional mattresses that fit the size of the bed.
Birch lounger
Another designer do-it-yourself sun lounger model is a sun lounger made from birch logs. However, in this design, birch can be replaced with any other type of wood. This lounger is not mobile, and you need to assemble it in the place where it will be installed.
To bring this model to life, you will need birch or other logs. The diameter of the logs should be from 75 to 120 mm.
Assembly of such a chaise lounge is very simple:
- logs need to be cut into pieces 65 cm in length;
- in a pre-selected place for the sun lounger, use chalk, sticks, and masking tape to mark the parameters of the sun lounger;
- We lay out the logs according to the indicated diagram. We fasten the logs together with long self-tapping screws;
- We install the finished structure in the place intended for it and, for greater reliability, we strengthen the back of the chaise lounge with brackets.
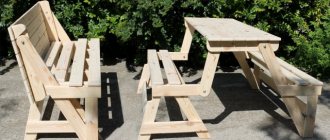
How to make a folding sun lounger
It is possible to make a folding sun lounger from wooden pallets or pallets. Before assembly, you need to prepare the following tools and materials:
- wooden pallets;
- screws with nuts and washers;
- furniture corners, hinges;
- fine-grained sandpaper;
- wire cutters, hammer.
Expert opinion
Irina Kovaleva
Cosmetology expert
In order for the lounger to last longer, it needs to be painted. Stained wood with natural relief looks beautiful. For this, stain, tint oil or varnish are used. This way, the presentable appearance of the product is preserved longer.
The work does not require high-tech equipment. The deck chair is assembled from pallets as follows:
- Two pallets are stacked on top of each other. This makes the lounger quite high. Depending on the length of the material, one row can have either one or two pallets.
- Now you can fasten the upper and lower pallets so that they do not move. Furniture corners are used for this.
- The back is being made. For this part, you need to take a pallet that will be slightly wider than those used for the lying area. The pallet is disassembled, meaning several front and bottom boards need to be removed. It is important not to forget about the nails.
- Legs for the future backrest are made from detached boards. They need to be cut to the desired height. Then, using furniture corners, attach it to the pallet from the unassembled side. It's better to do this from the inside.
- The finished backrest is screwed to the main lounger. To prevent it from being too shaky, it is advisable to screw in more screws.
- If you use furniture hinges, the backrest will be folding.
- In order not to drive a splinter, the lounger is sanded and covered with varnish, oil or paint. For softness, sun loungers can be covered with a towel or thick fabric.