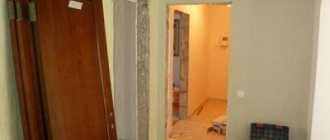
Before we look at how to attach platbands to interior doors, you should familiarize yourself with their main types. The installation method directly depends on the specific type of product.
Based on the material of manufacture, they are distinguished:
- wooden;
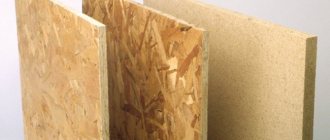
- MDF;
- PVC;
- from pressed paper;
- metal.
Types of door frames depending on the material of manufacture
For budget options, pressed products are used. In modern interiors, the most popular type is products made from MDF; moreover, unlike other types of platbands, any mounting option is available for MDF.
By appearance and configuration they are distinguished:
- straight;
- rounded;
- carved and figured;
- typesetting.
Variations of platbands according to configuration
Additionally, a capital can be installed above the upper casing. This element plays an excellent decorative role, especially when it comes to the classic style and variations close to it.
As for fastening methods, platbands can be installed in three main methods:
- on ordinary nails;
- for glue “liquid nails”;
- according to the “tongue and groove” principle.
In order for the opening to look organic, it is important to maintain optimal dimensions for all details. Cutting elements can be done in two ways: at right angles or 45 degrees. In the first case, the top strip is most often installed above the sidewalls, and its edge must be processed. When making an oblique cut, you need to create an ideal angle so that the fragments fit together without gaps. It is better to use a miter box for cutting.
How to install platbands on interior doors - mounting options
In order to understand how to nail trims onto interior doors, first of all, you need to know how to attach them. For the most part, finishing nails are used to attach platbands. The length of such nails should be no more than four centimeters. This is due to the fact that the nails must enter the door frame to a depth of at least one and a half centimeters.
An important point: it is recommended to purchase nails that have a small head or to reduce it yourself using a side cutter, after the nail has been installed half the length into the box panel . Thanks to this installation, if necessary, the installed nails can be dismantled and hammered in again at any time.
You can also use liquid nails to attach platbands. However, they are suitable only if both the door frame and the wall have no defects and have a smooth surface. It is extremely convenient to work with such fastening material even when doing it yourself. To do this, you need to apply glue to the back side of the platband and carefully press it against the wall. In this position, it must be kept pressed for two minutes. You should not apply a thick layer of glue, as when pressed it can stain the surface of the wall and at the same time it is quite difficult to clean .
Compared to regular nails, liquid nails are quite convenient to use. The installation of platbands on the door is done very quickly and no marks remain on the front side. However, it should be noted that such nails provide a less durable fastening compared to conventional ones. Another significant disadvantage of liquid nails is that they are very difficult to dismantle if necessary. It is not recommended to use such a fastening element if the platbands are made of wood.
Another element for fastening the platbands are self-tapping screws, which must be at least three centimeters in length and about six centimeters in diameter. An important point: in order to prevent cracks from appearing on the door leaf during the process of cashing out the door using self-tapping screws, you must first make holes with a drill. The diameter of the holes should be slightly smaller than the diameter of the screws. To ensure that the screw head does not remain visible, you need to drill a recess from the outside.
The platbands can also be secured using a special fastening element - a “beak”. This method involves installing platbands into specially made grooves in the box. Perhaps this installation of platbands is the most aesthetically pleasing. It is not recommended to cash the door, therefore, if the platbands are made of MDF material, as this may lead to them delaminating.
Dismantling
Removal of platbands is usually required when cash is replaced. There is no need to worry about their safety, but the work is done carefully. Taking an ax with a sharp blade and a hammer in their hands, they begin to dismantle:
- To remove the trim carefully, the interior door is placed in an open position. Positioned in the doorway, the tip of the ax is inserted in the upper corner between the bar and the frame.
- The hammer is used to hit the butt of the ax until the blade plunges under the cash.
- By pressing the handle on the ax, the bar is separated from the box. The further procedure consists of similar actions. They use an ax in a circle until the dismantling of the platbands is completed completely.
The procedure must be carried out carefully so that no dents are left on the door frame. Instead of an axe, homemade sharpened strips of durable metal or other similar devices are suitable.
How to attach platbands to interior doors or extensions?
Fastening can be done in several ways:
On microstilettos
This is the most convenient and fastest way. The main feature of the micropin is its size of 0.64 mm with a length of 20-40 mm, which allows you to significantly reduce the entrance footprint, making the place where the trim is attached to interior doors unnoticeable,
whereas the thinnest 1.2 mm nail with a 1.4 mm finishing head leaves a significant mark. As a result of the high speed of driving, the glue with which the pin is coated melts, then hardens inside the door casing attached in this way. Door trims are usually nailed onto microstuds using a compressor and a stud gun, see photo:
Since the micropin is hardly noticeable, this makes it possible to attach the platband to the door not at 4 points (as is mostly done with nails), but at 8 to 10 points, which ensures its maximum pressure to the door frame. It becomes possible to spot-coat the door casing with foam or glue and hammer in the stud without moving it. The wooden frame glued at several points gives additional strength to the structure. The ends of the platbands, sawn at an angle of 45 degrees, are additionally fastened together with a pin. There is another undeniable advantage - the ability to remove the platband, and since the traces of fastening are almost invisible, re-attach it without replacement.
Tongue-groove system (telescopic system)
The platband is inserted into the grooves on the door frame. Such a casing has a longitudinal spike up to 2 cm and is called telescopic.
If the thickness of the wall is not much wider than the door frame, then a telescopic platband is a good option in order not to use extensions, because The platband tenon can be pulled out up to 2 cm from the groove.
Such platbands make it possible to repeatedly dismantle and install them when wallpapering a wall + no traces of nails. The disadvantages are that to install such platbands at right angles, you have to make a selection, that is, small cuts and removal of pieces of tenons; the price of such platbands is almost twice as expensive, and during dismantling the tenon can sometimes come off.
Installing door frames with liquid nails or foam
The casing is glued to liquid nails. This method is used when the walls are perfectly smooth and are in the same plane with the installed door frame, providing several advantages at once - a much stronger connection and the absence of traces of finishing nails. This is true for white trims, because... on white trim the nails are very noticeable. The trims must be coated with liquid nails, temporarily secured with masking tape and waited a day for the glue to dry. If dismantled, such fastening can greatly complicate the process of repairing or re-gluing wallpaper.
Sticking platbands using adhesives
Platbands are applied shaped parts used in the design of window or door openings.
Platbands are used to cover cracks when installing door or window frames. Installing platbands helps improve the aesthetic appearance of not only the door or window, but also the room itself. Platbands can be external and internal. External trims are used to decorate door and window openings on the outside of a building.
Internal platbands are used for the aesthetic design of door and window openings indoors. Most often, internal platbands are fastened with nails. However, lightweight platband structures can be fastened with liquid nails, silicone or polyurethane foam. You just need to ensure complete adherence of the platbands to the wall and door frame.
Any adhesive materials can withstand a certain load and, with a large weight of the platbands, will not be able to properly hold the platbands on the plane. When choosing one or another adhesive composition, check the weight and properties of the platbands. You can glue the platbands on liquid nails, or you can fix them on silicone or polyurethane foam.
Miter saw for trimming trims
In order for the platbands to hold firmly, they must be properly adjusted and secured. To ensure proper fastening of the platbands, it is necessary to follow the technology and procedure for performing the work. Read here how to install extensions.
Preparing platbands for fastening
The platbands are pre-cut and marked. If necessary, one edge is trimmed at an angle of 45 degrees. Trimming trims is best done with a miter saw or miter box. The slats are tried on the box and marked.
How to glue platbands onto boxes? Platbands can be attached using adhesives only when the surface of the wall and the surface of the box lie in the same plane. If there are deviations, the platbands will not fit tightly to the surface, and gluing them is impossible. You will have to level the walls using putty.
We glue the platbands using liquid nails
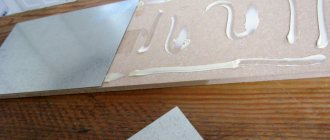
If you want to learn how to glue platbands onto liquid nails, try to purchase platbands without bends and the correct shape. Plastic trims can be glued to liquid nails, provided that the walls are perfectly smooth. Check the flatness of the box over its entire height. The areas where you plan to glue the platbands must be cleared of wallpaper, cleaned, and primed. It is recommended to use PVA glue as a primer. After the glue has dried, apply liquid nails in dots to the platbands in 20 cm increments. The lath is applied to a pre-marked area and held for several minutes. Ideally, press with a clamp overnight. Different manufacturers of liquid nails have their own technological requirements. In problem areas, it is allowed to secure the slats with nails, which can then be covered with furniture wax. The strength of the bonded joint is largely influenced by properly selected adhesive. Among the most reliable, we can recommend liquid nails under the designation TITE BOND with red letters. You can also use Titebond glue with the Heavy Duty designation, which allows you to glue heavy parts. Moment glue does not always provide the required quality of connection.
When pressing platbands with liquid nails applied to the surface, glue may bleed through. In such cases, the adhesive should be removed immediately.
How to glue platbands using polyurethane foam
How to glue trims to doors using polyurethane foam? To be honest, it is quite difficult to obtain a high-quality connection of platbands to the wall surface using polyurethane foam. As in the first case, the main requirement is that the plane of the wall and the door frame be at the same level. Otherwise, it will not be possible to ensure a good fit of the platband to the wall. The platbands are glued in the same way as for liquid nails.
It is necessary to use clamps that will secure the platbands for a sufficiently long time for drying. To securely fasten the platbands, it is recommended to use nails, driving at least two into each platband.
Here are tips on how to remove polyurethane foam if it gets on your hands or objects.
How to glue platbands onto acrylic sealants or silicone
It is also possible to glue the platbands using silicone; this is a simple and effective method of fastening. There are different types of sealants in different combinations. Lightweight trims can be perfectly glued to a perfectly flat wall using silicone and you don’t even need a clamp or nails.
Place the box flush with the wall. Clean the area where the glue is applied from dust and dirt. Apply a layer of deep penetration primer. Silicone is applied to the platbands in the middle in increments of 10 cm. The platbands are applied to a pre-marked area and left in place for several seconds.
Conclusions:
- – to secure the platbands you can use silicone, liquid nails, polyurethane foam, all methods are good;
- – for reliable fixation, it is recommended to use a combined method, glue the trim and secure it with a minimum number of nails, which are then masked with furniture wax.
Video demonstration of door trim installation
To cash the door frame, the bathhouse owner can use molded products made of wood, MDF or plastic. Carpenters advise giving preference to laminated or veneered MDF products or PVC trim, which practically do not react to the effects of steam and temperature fluctuations.
Material and specifics of fastening:
- Wooden trims can be installed on “liquid nails” or fastened with thin nails without heads. The caps can be cut off yourself or fastened using a construction gun that “shoots” studs without them. When using nails with heads, the fasteners are slightly “recessed”, and the locations are masked with wax correction pencils or acrylic sealants matched to the tone. The use of adhesives is acceptable, but will create problems if dismantling is necessary for cable installation or for further repairs. Liquid nails are applicable only in the case of perfectly aligned walls, otherwise there will be gaps between the platband and the wall being finished.
- MDF trims are practically indistinguishable from their wooden counterparts in appearance, but their fastening is carried out according to special rules. To avoid damaging the planks, guide holes for the nails are drilled in advance. The holes are not through, the preferred diameter is 1-1.5 mm. MDF, like wood, can simply be glued.
- They prefer to glue plastic trims. Their cost allows you to dismantle cash without regret or desire to reuse it. Flexible plastic moldings can be glued to walls with minor irregularities.
Choosing the cutting angle for joining
The angle is determined by the presence of a shaped relief on the front side. Home craftsmen figuring out how to install trim on doors have two options at their disposal:
- Planks with a flat surface without a shaped shape can be cut at right angles. Do the same if the door is framed with platbands with a capital. The direction of joining can be either horizontal or vertical. Before installation, the saw cuts are painted or tinted with varnish.
- Embossed moldings and platbands with a rounded surface are sawn at a standard angle of 45º. This is the most common scheme, requiring strict adherence to the rules and accuracy. The result of the slightest flaws will be unattractive cracks.
In order to perfectly cut the workpiece at an angle, you need to stock up on a miter box and a hand saw with fine teeth. A flawless edge will be achieved if the owner cuts on a cross-cutting machine equipped with a rotary platform.
Features of telescopic platbands
Buyers of doors produced by a number of domestic factories are given the opportunity not to use fasteners at all when installing trims with a patented telescopic design. The lucky owners of the “Volkhovets” or “Sofya” products will not need additional additions, since adjustments in case of vertical deviations and in case of a discrepancy between the size of the frame and the width of the opening are carried out by adjusting the telescopic door frame.
Their owners will learn in detail how to install doors with telescopic platbands from the manufacturer's instructions, since each of them has its own technological diagrams. A common feature for all is the presence of a protrusion-slot that is inserted into the groove existing on the box. It is recommended to strengthen connections with liquid nails.
Why do we need platbands - advantages of use
When the installation of the door leaf is completed, there are always gaps between the wall and the frame. And the platband on the door allows you to hide these defects. The racks are installed on the wall on all sides of the doorway. They cover up all the sloppiness, and the result is a beautiful composition. Advantages of use: 1. Allows you to smooth out the loss of verticality, if there were shortcomings during installation - it visually makes it smoother. 2. Hides communications (cables, wires) in different rooms. 3. Hides cracks and hangers that appear at the edge of the frame and wall. 4. Acts as a decorative element. For example, curly or teardrop-shaped ones emphasize different interior styles.
Important! Installation begins after the door is installed, but before the baseboards are installed.
Finishing nails
Wooden and MDF trims are easier and better to fasten with nails with flat heads. Then, if necessary, they can be easily dismantled. And so that the platbands do not dismantle by themselves and hold tightly, the nail should be driven into the door frame at least 20 - 25 mm. It is better to make the distance between the nails the same. To simplify the task, you can pre-drill through holes in the lantern. At the end, so that the nails do not disturb the appearance, they can be painted over with a wax pencil.
You can also drive nails into the door frame first. Then use pliers to remove their caps. The length of the visible part of the nail without the head should not be greater than the thickness of the strip. Next, having placed the platband against the nails, a wooden beam wrapped in fabric is applied to the plank at the location of these nails, and with a few light blows of a hammer the plank is pressed onto the nail.
Elimination of defects
An unpleasant moment is the visibility of the nail head or screw. They are slightly recessed into the body of the cash, and sealed on top with sealant of the desired color. You can use a wax corrector.
On uneven walls, due to the curvature of wooden planks, joints diverge. During installation, the joining elements are additionally connected with a finishing nail.
Wide strips from 100 to 120 mm help to hide large defects around the door frame.
Methods for trimming platbands
Correct installation of platbands begins with the preparation of parts. As already mentioned, platbands can be installed with trimming at 45⁰ and 90⁰.
Each type of cutting blanks for platbands has its own algorithm. To prepare planks for installation at an angle of 45⁰, you must:
- take the horizontal and vertical trim, put one on top of the other;
- Using a measuring square, align the platbands at right angles to each other;
- mark the boundaries of the applied platbands with a pencil;
- you will get a kind of square, the diagonal of which will be the cutting line.
- Draw a cutting line on both trims with a pencil along a ruler.
- cut along the lines.
This method makes it possible to fasten door frames of any configuration from any material.
If the moldings have a clear rectangular section or are slightly rounded at the edges, you can fasten the platbands at an angle of 90⁰ to each other. The upper casing is placed between two side posts.
Attachment by beaks
This one is different in that it does not use any of the above mountings. The casing itself is equipped with a latch, shaped very similar to a beak. Hence the name. This fastener is inserted into a recess on the door frame. Thus, the fastening is not visible from the outside. But over time, the joints may collapse, and then they will need to be treated with glue.
Fastening with self-tapping screws
Fastening platbands with finishing nails is simple and reliable.
Fastening with self-tapping screws is a standard option. It allows you to create a truly high-quality connection. You will have to work with wood, which means that self-tapping screws should be used specifically for this material. Fortunately, the modern market offers a wide variety of solutions. As for the length of the fastener, it must be at least 2 cm.
For work, it is best to use a screwdriver or drill. With their help, screwing in screws will be much easier. To ensure that the fasteners do not stick out above the casing, you must make small holes using a pre-prepared drill. It is taken with a diameter large enough so that you can easily work with the surface.
Self-tapping screws do not always look attractive, so if possible, their heads should be hidden.
Various solutions are used for this. For example, you can buy special decorative overlays without any problems. A wax pencil will do the job perfectly. It will fix the defect in a few seconds. After this, the door will look very beautiful and attractive.
Tips to make your job easier
To ensure a tight connection after installation, it is better to nail the first nail in the middle of the casing. If necessary, this will allow you to rotate the nail slightly and eliminate gaps. This problem can also be solved using polyurethane foam. When installing, it should be applied to the back of the product along the entire length and allowed to dry a little. Once this happens, the trim can be nailed to the box.
Beautiful entrance structure with decorative cladding
You can learn more about installing door cladding yourself in this video:
Do-it-yourself installation of platbands for interior doors
Table of contents
- Types of platbands
- Width and shape of platbands
- Specifics of fastening platbands depending on the material of the product
- Methods for installing platbands
- Stages of installation of platbands
- How to properly install door trims: video
At the final stage of installation of door structures, platbands are installed. This decorative element is used to mask the gap between the door frame and the wall. The overall aesthetic perception of the entire room depends on whether the work is done correctly. It is not at all necessary to use the services of specialists: everyone can install platbands for interior doors on their own if they follow the step-by-step instructions. And watching the video will help you understand exactly how to do this.
How to join the plinth with the platband?
There is no need to cut the door trim; it should reach the floor. Otherwise it won't look very nice.
The plinth itself is adjusted, the method depends on the material.
- The plastic ones have decorative plugs, with the help of which you can neatly and beautifully join the end of the plinth and the door casing.
- A cut is made on the wooden one at 45 degrees to align the adjacent side of the plinth with the thickness of the door casing.
Types of platbands
Door trims can be classified according to various criteria:
- by the material used to produce these elements;
- according to the shape and width of the parts;
- according to the method of their installation.
Platbands come in different shapes: flat, rounded, curly. If we talk about the material, then for interior doors they most often use wood products, less often - from MDF and plastic. In turn, wooden frames and MDF can be laminated or veneered.
Glass installation procedure
Door structures with glass elements are divided into two types: with standard fastening using glazing beads and hidden fixation. For any glass installation option, you will first need to remove the damaged insert.
Sequencing:
- The fabric is removed from the loops and placed on a flat horizontal surface. For ease of operation, it is better to lock the door. If it is impossible to disassemble, the open canvas is securely fixed in a vertical position.
- Thick tape is applied to the cracked glass surface on both sides, capturing the undamaged part of the insert so that the fragments do not fly away during operation.
- Determine the type of glazing: insertion through the end inward or fixation using glazing beads.
- With the second type of glass fastening, the elements are moved away in a convenient way. There is no need to disassemble the structure.
- The glass part is removed from the door. It is safer to perform the operation together. One person holds the part of the canvas where the broken glass is located, and the second takes it out.
- Sawdust, old putty and sealant are removed from the grooves.
- Check the condition of the rubber seal between the bead and the decorative insert. The deformed element is replaced with a new one.
Shards of broken glass are removed only with gloves on, paying attention to removing particles from the opening that make it difficult to install a new element.
The broken glass insert is wrapped in paper and disposed of, and the fragments are collected with a brush or vacuum cleaner.
After removing the damaged element, the glass is replaced with a new one. As an alternative to the standard insert, products made from organic, stained glass or hardened material are used.
When measuring glass parameters, it is important to take into account the gaps after fixing into the grooves, otherwise the element may be damaged due to pressure.
Sequence of work to replace the insert:
- Sealant is applied to special grooves on one side of the door.
- A rubber seal is placed on the new glass and installed in a lubricated groove.
- Sealant or glue is applied to the back of the groove.
- After 5 minutes, glazing beads are installed and secured, if necessary, with small nails.
- The door leaf is fixed in a stationary state until the sealant dries and the glass element is fixed.
The remains of the dried silicone mixture are removed after a couple of days with a sharp knife.
Replacing glass with a hidden mount occurs differently. A wire is inserted into the door cavity and the wedges holding the insert are removed. The part is pulled upward after the glass is released.
Width and shape of platbands
For interior doors, trims of various widths are available. When choosing the optimal one, you can, of course, in each specific case be guided only by your taste and personal preferences. However, it is more correct to select products for framing depending on the width of the doorway. The more spacious it is, the wider this decorative element, and vice versa.
Many people choose regular flat trims for door frames, which is mainly due to the price and their easier installation. But for the artistic decoration of the room, rounded or shaped products are still better suited, which can become an additional decoration for the door structure.
Features of installing extensions
In order to install high-quality extensions, you first need to accurately calculate the dimensions of the door structure. Measurements are taken from the box to the edge of the wall, top, bottom and middle: the width of the additional parts will correspond to the maximum value.
If the platbands are telescopic, then you will need such a number of strips that their total width is the required value. The elements must be made of the material that makes up the remaining fragments of the door system and match in color.
Installation work is carried out in the following sequence:
- the product is cut in accordance with measurements;
- the door frame is cleaned;
- the upper additional part is being installed;
- polyurethane foam is blown into the gaps;
- side additional elements are installed.
Self-tapping screws are used to secure the finish. Mounting holes with visible screw heads are decorated with plugs to match the additions.
Specifics of fastening platbands depending on the material of the product
Platbands made of any material, but of high quality and correctly selected, can look attractive and harmonious. Depending on which one was used in the manufacture of the selected products, the methods of attaching them to the base also differ.
- It is better to nail platbands made of wood with thin nails, choosing for this those without heads. You can, of course, use them with caps, but then they need to be recessed into the surface and then wax of a suitable shade or acrylic sealant to match must be applied on top to hide traces of installation. Some craftsmen simply cut off the hats. The option with liquid nails is also suitable, but it is only applicable if the walls are perfectly level. If you have a construction gun, it is convenient to fasten the platbands with the studs that are used in it. They do not have caps, and they are not visible at all on the surface of the product. It is also acceptable to use glue to attach the door frame.
- MDF trims look similar to wooden products, but they are attached differently. It is necessary to pre-drill holes for the nails - not all the way through, about 1-1.5 mm in diameter. This is done so as not to accidentally damage the trim strip. But, as in the case of wood, they can be glued to the base.
- Flexible plastic trims are mainly glued. When installing them, minor unevenness on the wall surfaces is allowed.
Fastening platbands with nails
Step-by-step technology of work - measurements and installation
It is recommended to start framing the doorway with platbands:
- after completing wallpapering work;
- when equipping doors with platbands on both sides after pasting two adjacent rooms;
- before laying the baseboard.
You need to start work on the side of the door structure into which the leaf opens. That is, from the side where the door hinges are located. The measurement reference will be the strip covering the box on the side where the hinges are located, since because of them the platband is not installed flush with the box. This indentation should be equal along all three lines. To attach the trim on the back side of the door, it is not necessary to make an indentation.
So, the order of work:
- With maximum accuracy, we measure the length of the vertical bar installed next to the hinges. The distance resulting from the indentation is added to the length. The point obtained as a result of the measurements will be the beginning of the line along which the excess is sawed off from the workpiece at an angle of 45º.
- To make the opposite casing, we take measurements in the same way, but separately. It is not a fact that the distance from the floor to the required point will be equal.
- We attach the sawn planks with two nails. We attach one of them at the base, the second about a meter later.
- We place a blank for the top strip under the unfixed upper ends of the vertical trims. We mark on it the points required for perfect sawing at a 45-degree angle, and saw off with a miter saw or a simple mechanical saw.
- We fasten all three components.
Methods for installing platbands
To install platbands, it is necessary to select the correct and most suitable cutting angle, depending on the relief and shape of the strip for the door frame. You can cut it using a fine-toothed hacksaw, miter box or jigsaw. But the most convenient way to do this is on a cross-cutting machine with a rotary platform. There are two options for installing platbands - with a cutting angle of 45 degrees and 90 degrees.
- Platbands, which have a rounded or shaped shape in the end section, must be cut at an angle of 45 degrees. This is the only way they look the most aesthetically pleasing. This work requires precision and accuracy so that when joining, no gaps are formed that will spoil the appearance of the door structure. If you make a straight cut on such a product, then the central part will rise above the edges. The end of the upper casing will become visible, which is not very beautiful.
- When installing flat trims, it is quite possible to do without cutting the 45-degree angle. Cutting at an angle of 90 degrees is great for those who do not yet have experience in installing door frames. With this cutting angle, both vertical and horizontal joining can be made. Immediately after cutting, it must be varnished.
Advice. Regardless of the installation method, it is advisable to start cutting the platbands only from the inside. This will help avoid damage to the top layer of facing material.
Mounting Instructions
After selecting the fastening material, the process of installing platbands on interior doors begins. First you need to determine how level the walls are and what shape the panel has. There should be no gaps when joining.
If the walls are perfectly level, you can attach them using adhesive mass (liquid nails). If the walls have slight irregularities, then it is better to use finishing nails or self-tapping screws.
The design of gaps at the door frame and wall begins at the opening point. There are hinges on the opening side that prevent the box from closing completely. Therefore, equal indentation is left on all three sides.
Interesting! At doors located in the corner, cashing is done in the shape of the letter L. For symmetry, some install a narrow strip of the same shade and material in the corner.
For doors located in the corner of the room, an additional narrow strip for symmetry may not be installed when finishing the slopes with decorative stone or tiles.
Do you do the cashing yourself or call a professional?
I call the master myself
At an angle of 90
There are 3 options for sawing the casing at 90 degrees: vertically, simply horizontally or horizontally with an overlap. A vertical type connection involves the placement of the top board inside the side boards. Horizontal means that the plank will not be located between the racks, but will complete the design with one line.
For vertical it is necessary: 1. Attach the stand at a distance of 3mm. up to 4mm. from the loops and from the top on the inside, mark a line for the beginning of the top element. The same is done on the opposite side. They need to be marked somehow so that you know where the right and left are (the floor may not be level and you may accidentally install a rack of the wrong length). 2. Then the length of the top post is determined from the marks on the wall. Moreover, you need to align it as much as possible with the door frame. 3. Then a cut is made along the marked lines with a hand saw with a miter box or a jigsaw.
For a simple horizontal cut, apply the top strip to the box. Focusing on the bottom edge, find the exact mounting location and draw lines to determine the exact length of the right and left trim. The size of the vertical board is also determined based on the length of the side boards.
Expert opinion
Sergey Dymchuk
Expert of our site. He has been working in the field of door production and installation for more than 10 years. Implemented hundreds of different projects. Helps make the content of our site interesting and useful.
Ask a Question
You can first secure the trims on the sides, and then measure the missing top element.
Designers use horizontal design of the door space with an overlap. To do this, the top one should protrude slightly at the edges. It is installed after installing the right and left racks.
Don't miss: How to clean polyurethane foam from a metal door
At an angle of 45
Joining a panel with a shape in the form of a semicircle or any shape is more difficult. After all, you need to know how to cut material at an angle of 45 degrees. This type of joining helps hide the gap and allows you to create a beautiful door frame. 1. Determine the length of the side panels. To do this, attach the casing at a distance of 3mm. up to 4mm. from the loops. Then mark the bottom cut point. 2. Then the planks are marked with a pencil. The lower cut point is increased by the width of the panel and a cut line is drawn. 3. Cut the cut with a hand saw. Moreover, the material is fixed in a miter box so that the mark is visible. If you cut with a jigsaw, a drawing is required. 4. Side strips are installed. 5. Similarly, we measure the top bar, make a drawing and sawdust. The top panel should coincide with the edge of the side board. 6. Mount the upper part. 7. Seal the joints with sealant containing acrylic or silicone, and after drying, paint with a corrector.
Stages of installation of platbands
All work on installing platbands for interior doors must be performed in a certain sequence. Conventionally, the whole process can be divided into several stages.
- Installation work must begin with vertical measurements of the casing from the side of the hinges on the door. Add the distance resulting from the indentation to the length. The resulting point is the beginning of the line; along it, the excess product is cut off at an angle of 45 degrees.
- Next, similarly take measurements for the platband on the opposite side, since the distances sometimes differ.
- Attach the prepared trim strips with two nails with a distance of about 1 m between them, leaving the upper part free.
- Place the top trim under the unfixed tops of the vertical planks, mark the cutting points at an angle of 45 degrees and saw off the excess along them.
- Connect all the components, then secure them with nails at a distance of 15 to 50 cm between them.
Attention! Before finally securing the trims, you need to check whether they interfere with the free opening of the doors, for which they need to be opened and closed several times. If they do not touch the planks, then they can be fixed completely.
Installing platbands for interior doors is not a very difficult task even for a beginner. The main thing is to follow the instructions, be careful and accurate in the calculations. If some point is not entirely clear, you can always watch the video to see how others do it.
Tools for work
To ensure that the installation of door trims is successful, the tools must be prepared in advance.
- To make accurate markings you will need a pencil, tape measure, plumb line, square and level .
- A miter box will help you cut the workpiece perfectly evenly at an angle of 45 degrees .
- It is better to cut the planks with a miter saw . If you don't have one, you can use a hacksaw . The fine teeth of the blade will not leave chips on the product.
- A hammer is used to drive nails or tap cash elements .
Mounting at an angle of 45
This method is suitable for curly and rounded platbands. The procedure is as follows:
Measure the height of the vertical slats from the floor. They are placed on the floor, therefore, their joints with the baseboards will be on the side. The height of the vertical elements is measured from the floor. The planks from below are placed on the floor covering, which is why the joints of the baseboards and door frames are on the side.
Then the workpiece is cut according to the markings using a miter saw, and in its absence, using a hacksaw and a miter box. The top is cut at 45 degrees on the desired side.
Now the side trims are attached no higher than halfway, so that they bend at the top.
The upper loose parts of the platbands are folded back and the upper part is placed under them. At the joints, lines are marked at an angle of 45 degrees, then the excess part is cut off. Now you can secure the platbands in all remaining places.
How to attach trim to a door frame without nails?
We install interior doors made of light natural wood.
I don’t want nails to be visible on the trim, even without a hat. What other ways are there to attach the platband without using nails? I would like to immediately note that fastening platbands with nails is already a thing of the past.
Nowadays, this method of fastening is not often found.
You will need a special glue from the “Liquid Nails” series, for example, the not bad “Moment Installation Super-Strong Plus MB-100”.
Sticks to anything and everything, including wood and MDF.
The casing must first be prepared, that is, cut off the corner at an angle of 45 degrees (we work with a miter box), and try it on.
Next, degrease the surface, including the box, and dry it.
Sometimes it makes sense to use sandpaper to roughen the surface of the box (before degreasing, of course).
We open the cartridge with glue, of course it’s not bad to have a “gun”, but if you don’t have one, you can squeeze the glue onto a couple of trims using the handle of a hammer.
The glue is very powerful; the initial adhesion is 100 kg per square (this is a lot), so there is no need to apply it completely.
We apply glue wherever it is convenient, it can only be on the platband, or on the box.
Glue was applied pointwise and pressed with force.
We keep it pressed for up to a minute and the casing is glued to the box.
But complete setting will occur within a day.
Sometimes I press it, then tear it off a little, wait 30 seconds and press it again, this option is guaranteed to glue the casing to the box.
If you suddenly find excess glue on the box or trim, it is better to remove it immediately; frozen glue is more difficult to remove.
Fresh glue can be removed with a slightly damp cloth; it is better to prepare it immediately before installing the platbands.
There are other methods of fastening platbands without nails, but in my opinion, “liquid nails” are the best option.