Added by: Evgeny Udaltsov February 2
Finished corner kitchen cabinet
When the size of the room allocated for the kitchen is not impressive, you have to think about the smallest components of comfort, using every centimeter of usable space. When we talk about kitchen units, we also mean the corner where two walls meet - a place that becomes useless if not thought through. However, it can become a very tangible help if you find the right approach. This approach usually involves creating a corner cabinet that fits perfectly into the overall scheme of the unit and makes it possible to use additional space.
- 2 Which product shape should I choose?
- 3 Getting ready for assembly
- 4 Materials and tools
- 5 DIY corner module
- 6 Assembling the cabinet
- 7 How to assemble boxes
- 8 How to install modules and embed a sink
- 9 Attaching the table top and doors (video)
Main settings
Kitchen furniture is manufactured to standards that depend on the parameters that determine the height of the cabinet you are going to assemble.
We list the main indicators that will be taken into account in the process of creating a corner cabinet:
- The width of the base - this indicator ranges from 10 to 12 cm, while its value is not affected by what type of stand will be used - solid or legs.
- The height of the cabinet is usually 70cm if you are not going to equip the cabinet with a sink. In this case, you need to make it slightly lower than the level of all other cabinets. This is done for convenience when washing dishes.
- Tabletop height varies from 2 to 4 cm. Depends on the material used, primarily on its structure.
- After all measurements, the height of the corner cabinet is usually about 84-85cm.
- The most common parameters for a cabinet are 90x90cm. Of course, the dimensions primarily depend on the parameters of other parts of the headset.
It is important to know: the distance between the tiers of the set is usually 60cm, while the standard height of a wall-mounted corner cabinet, which makes it possible for people of average height to use it comfortably, is 70cm.
Kitchen project development
Specialists begin by selecting locations for the main functional blocks:
- a sink with a platform for dishes is installed in the center;
- on the left is a refrigerator;
- on the right is a cutting table, hob and oven.
Corrections are made taking into account the configuration and size of the kitchen . They carefully study the connection with niches, columns, and protrusions. Check the compliance of the cabinets with the dimensions of the built-in equipment. Certain technical solutions are specified in the accompanying documentation by the manufacturer.
The mounting height of the hood, for example, depends on the type of hob:
- gas - from 75 to 85 cm;
- electric - from 65 to 75 cm.
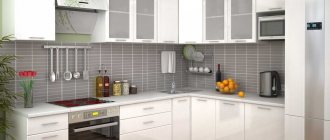
The photo shows the correct placement of the work area near the window. This solution provides natural light that is comfortable for the eyes.
Work area by the window.
Artificial sources are installed according to a separate scheme. According to current standards, the illumination of surfaces in kitchens and dining rooms of residential properties must be at least 150 lux.
When developing a kitchen project with your own hands, power lines, other utilities, and connection points are indicated on drawings and diagrams with photos.
Wiring diagram and installation of electrical wiring in the kitchen.
Separate power lines are made for connecting an oven and other equipment with high power consumption. They create the necessary technological openings (gaps) for effective ventilation and rapid removal of excess heat.
When creating a kitchen with your own hands, drawings, diagrams, and photos are considered taking into account the height and other physiological characteristics of the users.
Kitchen arrangement diagram.
Check the ease of use of the work surface and shelves. Make sure there are no protruding parts of the headset that will interfere with work operations.
Drying, for example, is often used. This component is placed at such a height that a chair is not needed to operate. It is recommended to install the oven at chest level. This solution will ensure ease of handling heavy dishes.
After clarifying the initial conditions, a set of design documentation is created. At the first stage, standard sizes of kitchen cabinets .
Dimensions of kitchen cabinets.
Next, elements that differ from standard products in shape or dimensions are noted. At the final stage, the placement of decorative lighting and other decorations is determined.
To simplify the task, you can take a ready-made kitchen drawing and add the necessary changes. Manufacturers and specialized trading enterprises offer free of charge various options for arranging furniture in the kitchens of multi-storey buildings built according to standard designs.
Kitchen set with dimensions.
Corner set of cabinets.
Drawings can be made manually or using specialized software. Better visualization of plans is ensured by the use of 3D technologies.
In software designers you can change and set the following parameters:
- dimensions of the room, household appliances, cabinets;
- wall material;
- type of handles, facade systems, roof rails;
- placement of a table and chairs, additional interior elements;
- lighting of work surfaces.
The three-dimensional layout of the kitchen can be rotated and enlarged to carefully study small details.
Despite the advantages of electronic design, it is recommended to remember the possibility of using classical design techniques.
Experienced professionals cut out templates from thick paper that simulate the arrangement of furniture in the room. This method is used to check the ease of use of equipment and the width of aisles.
Set of kitchen furniture.
Which product shape should I choose?
Trapezoidal shape corner kitchen cabinet Attached shape corner kitchen cabinet L shape corner kitchen cabinet
Once you decide on the dimensions, it’s time to think about what shape of the product you would like to fit into your kitchen space. We list the three most important varieties:
L-shaped cabinet - this form of cabinet is distinguished by the fact that the best door shape for it is folding, like the one used in trolleybuses. This way you can view the internal space to the maximum, which, by the way, can be turned from ordinary shelves into a carousel with the best angle of rotation.
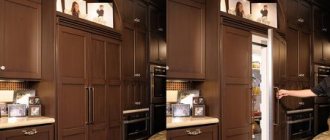
A wall cabinet of this shape will serve as an excellent space saver. The cabinet itself is also good because it can successfully accommodate a sink. Since in Soviet apartments water supply and sewerage communications are usually located in the corners, you do not have to extend the pipes.
The attached design is a less convenient option for locating the cabinet. A small cabinet with a door at an angle of 90 degrees is added to the blank cabinet located in the corner. The problem is that with this arrangement you only have access to the interior of the smaller cabinet. This design also allows you to place a sink, but the plumbing fixtures are placed in a blind module, and space for dishes and kitchen utensils is provided in an accessible one.
Remember that when placing the sink in a blind section, you significantly complicate access for a plumbing specialist in case of need for repair work, and if the sink is removed from the blind cabinet, it will remain empty and useless.
However, practice shows that it is better to place the sink in another place, and equip the empty cabinet into a place for cooking or put a microwave oven there.
The space in the accessible module can be equipped with a carousel with a slight rotation angle or pull-out baskets.
A cabinet in the shape of a trapezoid is an original and stylish option, which however has its drawbacks. This form has one door, and sections of the kitchen unit are adjacent to it on the sides. The trapezoidal cabinet looks quite solid, especially in kitchens with a large area, but it is not entirely rational.
Firstly, the straight door makes it difficult to access some areas of the cabinet, especially near the wall. And secondly, it is better to avoid installing a carousel and a sink at the same time in such a cabinet at the same time, since the first, due to the force of friction, will constantly damage the second. So it’s better to put a microwave or other equipment on the cabinet.
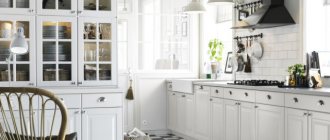
Ready-made corner kitchen cabinet
Correct measurements
The quality of the headset and its location in the kitchen depend on the accuracy of the measurements. To do the job correctly, you need to measure the perimeter of the room:
- on baseboards;
- at the level of the working part in the area of 75–95 cm from the floor;
- according to the height of the owners.
Additionally, the height of the kitchen is checked. Readings are taken in different places, since the floor or ceiling may be crooked, which will affect the headset. Any distances to communications, sockets and openings must be measured from one corner.
When creating a drawing yourself or adjusting ready-made solutions, you will need to pay attention to the gap along the wall. It is necessary to provide a space reserve of about 5 cm when installing furniture and to avoid major alterations.
If there are crooked walls, the additional gap will help to move the cabinets, aligning everything on the level, and the rest will be covered with a furniture plinth. It is recommended to install all equipment with a distance of at least 40 cm from each other.
Creating a drawing for a corner or other kitchen yourself has a lot of advantages, the main advantage is saving money on the project. By spending a little time studying the theory and effort in drawing up a plan, you can make a beautiful kitchen with the most functional arrangement of the furniture.
Modern programs help you make sketches and drawings online. Among the most popular programs for designing kitchen units are:
- PRO-100 - convenient and easy to use, the interface is intuitive;
- KitchenDraw;
- K3-Furniture;
- Basis-Constructor-Furniture Maker;
- Woody.
The described editors help reduce the time of designing and drawing typeface lines. The main advantages of sketches made in specialized programs are getting the kitchen in 3D visualization. The user can choose a color scheme and play with the arrangement of cabinets. To get the job done, you just need to know the exact dimensions and features of a particular kitchen.
Getting ready for assembly
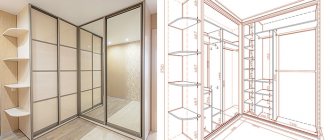
Drawing of an attached corner kitchen cabinet Drawing of a trapezoidal corner kitchen cabinet Drawing of a trapezoidal corner kitchen cabinet with sink placement
Any product must be designed before assembly. This process can be divided into several stages:
- Determine the intended purpose of the cabinet - whether it is designed for washing, preparing food, or whether you want to install kitchen appliances on it.
- You should have before your eyes the general dimensions of both the cabinet itself and its components.
- Decide on the inside of the cabinet - whether it will be regular shelves, a carousel or pull-out baskets. It is important to calculate the convenient distance between the shelves and their number.
- Think about the design and color scheme.
- Determine the material from which you will make the cabinet or cabinet.
- Create a drawing that will clearly show what is where and how it is attached.
The best materials are chipboard or laminated chipboard, which is strong enough, resists moisture and, with the necessary processing, looks very attractive, while at the same time having a low price.
Stage 1. planning - drawing up drawings, thinking through the design, measurements
So, let's assume you have already planned the design, color, additional features (like the same drawers in the plinth) and place for your future corner set. Next you need to take measurements, and then design a drawing using the data obtained.
Before taking measurements, you should determine the configuration of the corner kitchen set, which may include:
Advice! Vertical measurements must be taken at three points - in the middle, along the baseboard, under the ceiling. This will help level out the difference in measurements due to the curvature of the walls.
It is possible to design, complete the elements and assemble a kitchen, even if you only have a simple diagram drawn on graph paper or on a sheet of notebook in a square, where, for example, 1 square corresponds to 10 cm. But it is better to make a well-thought-out drawing, that is, a full-fledged three-dimensional color project using a special program such as “PRO100”.
When drawing up the drawing, you will also need to take into account the place where the gas pipe is inserted and the place where the hood is installed (passage of the air duct route). A diagram or drawing is created with maximum detail, after which a material cutting map is drawn up. And for this, in turn, a list of assembly parts for each module is required. As a rule, to assemble a cabinet you will need:
- Top;
- 2 side walls;
- Bottom;
- Shelves;
- Facades;
- The back wall is made of lightweight but durable chipboard;
- Edge (with a margin of 12%).
And, of course, the kitchen must have a countertop and an apron.
DIY corner module
Working with a jigsaw
The next stage of work will be the preparation of the main parts for the future cabinet. They will have to be cut out from solid chipboard slabs, so you will need maximum care and precision. However, this does not guarantee good quality of work. At least at home, certain factors can prevent this.
If you use a power tool for sawing, keep in mind that it chops laminate well. And in general, a high level of vibration may simply prevent you from fulfilling your plans with good accuracy.
To make your life easier, contact a company that can cut and even trim fragments of the future cabinet based on your project.
Material selection
The most accessible for home “furniture creativity” are laminated chipboards (LDSP) or fine fraction boards (MDF). These materials are affordable, have a decent appearance, and come in a variety of colors and textures. Solid wood is an expensive material; it is best to work with a professional.
The same can be said about glass - although kitchens with glass surfaces are very beautiful and popular, this material is probably not suitable for self-production.
Assembling the cabinet
Now directly about the assembly process itself:
- Make blind holes and insert dowels into them to pre-fix the components of the cabinet. This way you can level the frame and increase the strength of the future product. The chops are pre-coated with glue.
- Once you insert the dowel into one piece, insert its end into the hole of the other and press the two pieces of the cabinet tightly together.
- Before completely installing the future product, check all its parts for evenness.
- Now the confirmations will be screwed into the dowels. This is done using a hex key.
- If your design included legs, it’s time to mount them to the main structure and adjust the height.
- Make holes in the sides of the future cabinet and insert cross-shaped fastenings for the doors into them using two self-tapping screws.
- On the side walls, build fastenings for the rails along which the drawers will slide out, and fix the rails themselves.
- Once the frame is created, attach a fiberboard sheet to its back wall.
- In the case of a wall cabinet, you need to attach fittings to it, with which it will be attached to the wall. Adjustable hangers will do this role perfectly.
The process of assembling a corner kitchen cabinet with your own hands
Calculation of furniture sizes
This is the most important stage of the entire project, here you need to strain all your attention and concentrate on the details. You need to break down each drawer and cabinet and count them individually. According to the advice of experts, special attention should be paid to the cooking cabinet and oven; according to them, this is the element where beginners make the most mistakes when designing a kitchen that they make themselves. The drawing of this part must be approached with due care and concentration.
The main thing in furniture drawings is the ability to break down all the elements of furniture into parts, and then be able to correctly divide them into components. This example includes:
- Side walls.
- Back panel.
- Doors.
- Shelves.
If a drawer is being designed, then it also needs to be detailed, with special attention indicating the location of the furniture fittings. The main thing in this process is to indicate all drawings accurately, since error in this matter is unacceptable.
How to assemble boxes
- The walls for the boxes are tightened with screws. As soon as you assemble three walls, insert pieces of fiberboard into their bottom, which were created according to the parameters of these walls.
- The fronts of the drawers must be secured using eccentric ties. In this case, the screws are screwed into the facade, then the side with the head is inserted into the bushings located on the sides of the drawers. The main thing is to make nests in them first. Once the bushings are in the holes, rotate them until they engage the screw heads.
- If we are talking about a corner cabinet, you need to screw guides for rollers onto the lower corners of the drawers.
If we are talking about assembling an oven, the last stage is excluded due to the lack of drawers in this type of cabinet.
How to install modules and embed a sink
Hole cut out for sink in countertop
At this stage, the finished product is placed in a corner. If we are dealing with an attached lower module, then first we should install a cabinet with a sink with a ready-made hole for the pipes. Only then do you need to install a cabinet with a door.
You will need furniture intersection links when the time comes to connect cabinets to each other. A total of four fasteners are required.
If we are talking about a corner kitchen cabinet in which a sink will be installed, under this sink you will first need to make a hole in which the sink will be placed.
To make a cutout for the sink, attach it to the countertop and create a marking with a pencil, and then at the edge of this marking line, drill a hole of such a diameter that a jigsaw file can easily fit into it.
Once the socket is cut, the sink is inserted into it and screwed using the special fastener supplied in the kit. The cut line after this operation is treated with sealant.
Stage 3. preparation of surfaces and tools
Assembling a corner kitchen necessarily involves a preparatory stage. So, all surfaces along which the furniture will be located must be made smooth, and the walls at the junction of the furniture must meet at right angles. In order to assemble a corner set, you will need not only a well-developed detailed diagram, but also the appropriate tool:
- Hammer;
- Pliers;
- Square ruler;
- Jigsaw and circular saw;
- Roulette;
- Knife, awl;
- Level;
- Screwdriver;
- Hammer;
- Hex key for fastening;
- Drills with a diameter of 4.5 mm, 7 mm, 8 mm;
- Confirmations (50x7) or self-tapping screws 3x16, 3x30;
- Hairdryer or iron for gluing edges;
- Conductor (not necessary, but highly recommended! Assembly will be easy and of high quality).
Advice! To install confirmations, holes are first drilled in the parts to be connected, and then the fasteners are screwed in with a screwdriver.