A book table is a very popular and versatile type of furniture. When folded, it takes up little space, but if necessary, turns into a large table.
Stores sell book-tables for every taste, but they also cost a lot. But such a necessary and practical thing can be made independently.
How to make a book-table with your own hands and what is needed for this, read our article.
Types of book tables
There are many types of book tables, and each has its own pros and cons. Therefore, you need to decide which one is right for you. Let's consider several options:
- Book table with shelves You may remember such tables from the times of the USSR, but similar models are still produced today. The table consists of one narrow tabletop-frame, which is framed on both sides by large ones; they fold out. When assembled, they resemble a bedside table. Only one half can be opened.
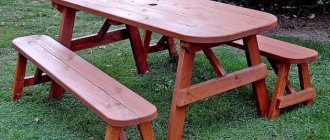
- Table-book with chairs The interior space of this model of table-book is not occupied by drawers or shelves; several folding chairs can be compactly placed there. Very convenient for a small apartment: a small cabinet can accommodate an entire dining set.
- Book-table with barAn interesting option for the kitchen or living room is a mini-bar on the table. If necessary, drinks leave the cabinet in a roll-out basket.
- Coffee table-book has standard functions of a table-book. They just make it smaller to match the characteristics of a coffee table. A very comfortable and stylish thing, perfect for any interior.
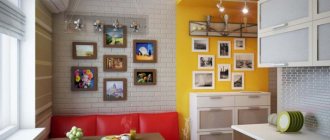
Coffee table-transformer mini-book. A compact and practical book-table will fit perfectly into the modern design of a kitchen or living room. The use of different materials and a variety of colors allow you to choose a table to suit any interior, be it a red kitchen or a kitchen in brown and beige tones.
Please note: book tables with drawers and shelves filled with things are quite heavy, and it takes two people to move them. A good solution is to put the table on wheels. It can be easily moved indoors.
What is a do-it-yourself book-table, drawings and diagrams of the classic model
There are many options for internal design.
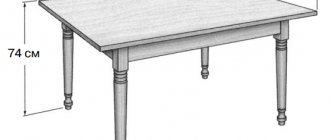
In fact, a book table is a narrow cabinet that folds out into a full-fledged table. The sides of the cabinet are hanging tabletops. When unfolded, they rest on the legs retracted from the center. But the design of the legs may differ.
In the classic version, there is one leg on each of the two sides, which extends diagonally towards the center.
There are other options when the legs are folded in half and retracted on each side (that is, there are four of them). But essentially the principle is the same.
There is a base, the cabinet itself with hanging countertops.
There are legs that are attached from the inside to the base.
All movable elements (hanging tabletops and retractable legs) are attached to the base cabinet with piano hinges.
Book table with cabinet
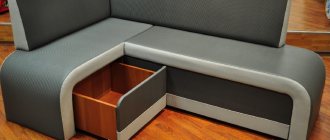
When folded, this table resembles a cabinet with drawers and shelves. It is usually chosen by housewives. It is very convenient to store various things in it.
In addition, the table is perfect for a woman who sews, as it can easily be turned into a workspace (read how to make a sewing table in this article).
The book-table supports can be wooden or chrome-plated. They do not differ in quality, both supports are stable. You can choose the option that best suits the interior.
Material selection
Natural wood (oak, walnut) is ideal for making a classic version of a dining table. Inexperienced craftsmen are advised to choose pine boards, as they are easier to process. Such furniture will add luxury and elegance to the interior. But it is worth remembering that wooden products require special care.
The most popular material for making furniture is chipboard. Its main advantage is its affordable price. But when purchasing it from an unverified manufacturer, you cannot be sure of the safety of the material.
MDF can be considered a more reliable and safe material in this category. You can also purchase special furniture panels.
Metal can be used for the kitchen table; it is better to choose stainless steel. Metal furniture is durable. But such a product will cost a lot, and you will also need to use tablecloths.
Materials and tools
To make such a model of a table-book, you need to cut the following blanks from laminated chipboard and fiberboard according to the specified dimensions: In addition, to make the table you will need:
You will also need the following tools:
- pencil, tape measure; Phillips screwdriver or screwdriver; hex wrench (4 mm); jigsaw; hammer.
Please note: Laminated particle boards are difficult to cut at home. You can draw up a cutting diagram and go to a workshop where specialists will cut out the table parts.
Types of designs
Many people associate a folding table-book exclusively with Soviet models, which in those days could be found in almost every home. Today, the range of such tables is much larger. First of all, they differ in the shape of the tabletop , which are:
- round;
- square;
- with rounded corners.
Also, folding tables differ in the type of construction. There are many different options, but only a few models are popular among them.
| Construction type | Peculiarities |
| Standard | The design consists of a central part, which is the main support of the table, a folding tabletop and legs. When the table is folded, the extra legs are hidden inside and only come out when the lid is lifted. |
| Model with folding chairs | A special feature of this design is a set of chairs hidden inside a folded table. Such furniture sets are very convenient, but their cost will be higher. |
| Table-book-transformer | Transformers doesn't stop at just turning into a dinner table. They can serve as a small chest of drawers, a cabinet, a cabinet and even a bar. |
| Book table with empty support element | This table is similar in design to the standard model, but there are no shelves for storage inside it. Thanks to this, it becomes even more compact and lightweight. |
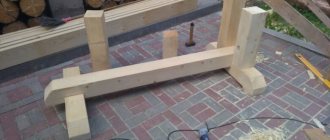
Stages of work
Step 1. Attach the ends to the sides of the table (3, 4). Do this with nails. Secure the roller guides to them with screws (3.5 x 16).
The sides of the table (3, 4) are connected by the bottom (8) and the drawer (7). Use dowels and a screw tie. Make holes in the sides and frame and insert eccentrics there.
Please note: the arrow on the eccentric must be directed towards the end of the part.
Step 2. Screw the eccentric rods into the holes on the table top (1). the card with screws (4 x 16) . Lower the tabletop onto the sides. This must be done so that the eccentric rods fit into the holes in the ends of the sidewalls and the frame. On the sidewalls and frame, turn the eccentrics 180 degrees clockwise.
Step 3. Attach the ends to the retractable sides (5) using nails. Insert eccentrics into their holes. Do the same with the mounting strips (6).
Take the double-sided eccentrics and insert them into the ends of the mounting strips. You need to insert it with the long side. Turn the eccentrics 180 degrees clockwise.
Drill holes on the mounting strips and insert dowels there. The extendable table support must be attached to the mounting strip.
Turn the eccentric 180 degrees clockwise. Using screws (4 x 16), you need to attach the card loops (5) to the mounting strips (6). Screw the hinges (3) already attached to the mounting strips to the sides of the table (4).
Step 4. Insert the shelf supports into the holes of the additional tabletops. Screw the additional table tops to the card loops that are attached to the main table top. The eccentric and screw couplers must be closed with plugs. Take screws (4 x 16) and use them to secure the mating parts of the four-hinged hinges on the side of the table (3).
Attach four-hinged hinges to the door (10). Do this with the same screws. Screw the handle with M4 x 20 screws and hang the doors.
Secure the hinges with fastening screws to the mating parts. Insert shelf holders into the holes on the sides (3, 4). Place the shelf (9) on them.
Step 5. It is necessary to assemble the boxes. Using a screw tie, connect the back wall of the box (13) with the side walls (14).
You need to screw the eccentric rods into the holes on the façade and insert the dowels. Connect the façade with the side walls. This must be done so that the eccentric rods and dowels fit into the holes on the side walls.
Insert the bottom of the drawer (14) into the groove. Secure it with nails. the mating to the sides of the drawer (6) . This needs to be done close to the facade, using screws (3.5 x 16). Attach the handles using M4 x 20 screws .
Insert the drawers into the cabinet. To do this, you need to tilt the drawer and place it so that the rollers of the drawer guides rest on the guides on the sides of the cabinet. Lower the drawer and push it into the cabinet.
Important: the box should move smoothly along the guides, without squeaking or rubbing, and slide out without effort.
How to make a table-book with your own hands, drawings and diagrams can be seen in this video:
- Author: Svetlana K. Print
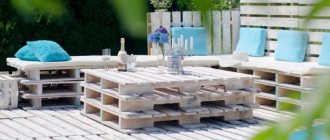
PhotoLack of space often occurs among apartment owners, especially when it comes to furniture. A DIY book table, which is not too difficult to make, can help solve this problem. This table takes up very little space when folded, so it is the best option for small apartments or where several tables are needed at once.
Thanks to its simple and compact design, the book table is perfect for small spaces, such as the kitchen, since it can be folded if necessary.
The book table itself is not inferior to a regular table if it is made with high quality, but at the same time it also saves living space. In order to make such a book table with your own hands, you will need the following materials and tools:
- jigsaw; drill; iron; office cutter; square; pencil, marker; level; tape measure; screwdriver; chipboard sheet; furniture edge; self-tapping screws, screws; furniture hinges; corners.
A standard sheet of chipboard, when cut correctly, produces 2 tables, so there is no need to worry that there may not be enough material.
Work order
Before starting work, you need to decide on the design. There are many options; the source of ideas can be diagrams, drawings, photos of finished products, of which there are many on the Internet. It is better for a beginner to choose the simplest option without internal filling, while a more experienced master can assemble a book-table with drawers and shelves (table-cabinet). The wings are usually made rectangular, but if you order sawing in a workshop, they can be rounded.
In the form of a book, you can make either a large dining table or a coffee table, the design and assembly principle are the same, only the dimensions will be different.
You should also consider what materials the table will be made from. The classic option is laminated chipboard; all parts can be made from it. Other options are possible:
- tabletops, sides, stiffeners and drawers are made of chipboard, and legs are made of timber;
- legs and stands along the edges of the sidewalls are made of profiled steel pipe, with wheels attached to the bottom (a good option for a mobile coffee table);
- The central frame, legs and drawers are metal, and the tabletop is made of impact-resistant glass with safety edge treatment.
First you need to sketch a drawing, a sketch of the future table, on its basis the drawings necessary for making a book-table with your own hands are drawn up. This can be done manually or using a computer program; you can also take ready-made drawings as a basis and, if desired, substitute your own dimensions or make changes in accordance with the features of the selected model. Based on the drawings, a detailing sheet, a cutting sheet are drawn up, and then the cutting itself is carried out.
How to make a table book: the preparatory process
Folding table diagram.
The purchased sheet of chipboard must be cut to size; you can entrust this to the craftsmen in the workshop, but if you have an electric jigsaw, cutting it yourself will not be difficult. It is preferable to take laminated and moisture-resistant chipboard for the table. When marking and sawing, it is enough to adhere to some rules, knowledge of which will greatly facilitate the work.
All lines drawn on the sheet must be cut through before final sawing. When working with a jigsaw to make a table book with your own hands, you should not guide the file clearly along the contour itself, but step back 2-3 mm from it outward. This will allow the resulting chips to appear outside the part.
Chips will inevitably appear when cutting yourself, so it is better to insure your work.
After cutting, the end must be treated with sandpaper with a fine or medium structure.
To make a book table, you will need to saw the following parts: a narrow central part of the table top, which acts as a binding, and two large covers for the table. Additionally, you will need racks for the central part or main supports and crossbars for the main part in the amount of 3 pieces.
You will need 4 pieces of stands for retractable legs. strips that will connect them to the sidewalls, also 4 pcs. To strengthen the design of the retractable legs, 2 more strips are used.
Detailing
So, let's begin. Let's start with the table.
Our tablecloth will have the following dimensions:
- 800 x 600 -2 pcs. Wide caps.
- 800 x 250 - 1 pc. Narrow cap.
OK! I'm working on the lid. Everything is simple here. Next we need to calculate the main support, not forgetting about our slider legs.
I marked the following details with blue numbers: 1. Main support frames. 2. Ribs.
Calculating racks 1
We set the total height of the table to 750 mm. Thus, having drawn such a sketch, it becomes clear to us that the top cover is 16 mm, and at the bottom of the racks we screw adjustable brackets, the height of which is 10 mm. Shelf height = 750-16-10 = 724 mm. The width of the stand should be the same size as the top cover. Take this as an axiom! Otherwise it will turn out “clumsily”. Checked! Its width will be 250 mm.
The table frames will have a size = 724 x 250 - 2 pcs.
How to make a table: assembly
Drawing of a table-book.
Before the book table is assembled, the ends of all previously cut parts are processed by applying a furniture edge. In order to achieve maximum accuracy when working, the parts are clamped in a vice, lined with felt so that they do not leave marks. The tape placed at the end must have an allowance of at least 2 cm for each treated area, this is due to its ability to shrink.
The edge tape is applied to the end of the workpiece with the adhesive part facing down. Then the tape is smoothed along its entire length with a hot iron for at least 15 minutes.
The iron should not be too hot; after processing, the edge is additionally smoothed with a dry cloth to improve adhesion. The excess is cut off with a sharp knife. Defects that appear along the edge can be eliminated using sandpaper.
To make a book table, its retractable legs are assembled using Euroscrews. For this purpose, a through hole is made on the front side of one of the parts.
The same hole is drilled on the second part, but of a smaller diameter. The parts need to be fixed using the confirmat and then the location of it must be closed with a plug. All areas where fastening is carried out using a Euroscrew should be treated in the same way.
The next step, in order to make a table, should be to attach furniture hinges to the legs, of which 2 pieces will be required for each leg. To assemble the central leg, the lower jumper is mounted in a horizontal position, the height from the floor is 10 cm, its location should form a right angle with the racks.
On both sides, 7 cm is removed from the edge of the rack to accommodate the central jumper. The next jumper is mounted vertically in relation to the bottom one, and the last rib is fixed in the center. It is located between the tabletop and the second lintel
The finished base for the table book is placed on top of the central part of the table top. From the edge of the table, the support posts should be at a distance of 3 cm on both sides.
The entire structure is connected by corners; 2 pieces are taken for each side. The central part of the table is connected to the lids using furniture butterfly hinges. Before making a table, it is turned over, in this position the lids and retractable support legs are screwed on.
Content:
- 1. An economical option for a book-table. Necessary tools. Detailing of a book-table. Required accessories. Assembling a book-table. 2. A more elegant do-it-yourself book-tableRequired tools and accessoriesDetailingAssembling a second book-table
Initially, our apartments were not conceived as housing, but rather as a refuge. Shelter from rain and cold - no more. From this point of view, everything is absolutely correct: it’s warmer in close quarters.
But you can no longer receive guests - a large table takes up the entire living space. Although the furniture stores present such simple solutions that you can’t help but think: Do-it-yourself book-table - is it really that difficult to make? Everything is quite simple, especially if your hands are tailored to the desired format and you want to save money.
Making a table-book is quite simple
Here it makes sense to consider the manufacture of two different versions of tables, united by one common goal - to open to their full width only at the right moment.
Assembly order
Central part of the table:
- At a distance of 3 cm from the edges of the central part of the tabletop, they are attached to it using the corners of the sidewall.
- The sidewalls are connected to each other by stiffening ribs using confirmations. The lower stiffening rib (bottom) is attached parallel to the tabletop at some distance from the floor, the remaining 2 are directly above the bottom and under the tabletop, perpendicular to them.
- Adjustable supports or thrust bearings are attached to the bottom of the sidewalls (if supports are not used, the height of the sidewalls must be increased).
- The box is being assembled. Its height is the sum of the height of the racks plus the double thickness of the overhead strips plus the height of the two wheels.
- Between the racks, at an equal distance from the overhead strips, a stiffener is mounted perpendicular to the ground.
- Loops are screwed to the racks that will face the central part of the table with self-tapping screws, 3 for each leg.
- Rollers are attached to the overhead strips at the top and bottom, closer to the outer edge, with self-tapping screws.
- The central part is turned over with the tabletop down, the wings are moved to the narrow part of the tabletop and fastened to it using hinges (3 for each wing).
- Loops attached to the legs are screwed to the sides.
- The legs are moved to their extreme working positions, the places where the wheels are located are marked, and in these places clamps are attached to the wings that will not allow the legs to move spontaneously.
Economical option for a book table
Such a table is cheaper to manufacture and more compact, but has a number of disadvantages. Which, however, is reconciled by the price.
Economical option for a book table
Dimensions when folded: 750x800x200 mm. When unfolded: 750x800x1600 mm.
In the picture it is shown with rounded corners, but this is additional expense for figured cutting and edging, so we will go quickly and cheaper, that is, without aesthetic delights.
DIY book-table, drawings and diagrams
The ideal option for beginners is to try making a book-table with your own hands to understand whether it’s worth getting involved in making furniture yourself. The item is very useful and necessary in the house. You can make it for yourself or as a gift to someone. On the other hand, it is very easy to assemble. To confirm this, the article contains a do-it-yourself table-book drawings and diagrams with detailed descriptions and instructions.
Detailing of the book table
You must immediately and forever remember that sheets of laminated chipboard at home cannot be cut accurately and without chipping, so you will have to order the main cutting from a furniture company or a construction supermarket.
The details are given for a chipboard thickness of 16 mm and a melamine self-adhesive edge 0.5 mm thick:
- 733x200 – 2 pcs., table sides. 700x800 – 2 pcs., table “wings”. 200x800 – table top. 727x120 – 2 pcs., table drawers. 727x70 – 4 pcs., leg stands. 500x70 – 4 pcs., leg drawers.
The parts are edged as follows:
- The edge is placed on the end of the part with the adhesive side down and ironed with a hot (3/4 power) iron. Then, while the edge is still warm, you need to rub it over the top with a dry cloth several times, achieving uniform gluing. Remove the excess edge with a knife and clean the edges with sandpaper.
It should be noted that two and a half of these tables can be made from a standard (2440x1830x16) sheet of chipboard. So it makes sense to team up with a neighbor or accept an order for a second copy from a neighbor. This is worth considering before going to a specialized store to buy components.
List of materials and parts for making a book table
In order to independently assemble such a convenient piece of furniture, you must first prepare all the parts from which it will be made.
The list of required preparations is as follows:
- Folding part of the table - 1 piece - 60*60 cm (made of plywood 2.5 cm thick).
- Fixed board – 1 piece – 60*47.5 cm (made of plywood 2.5 cm thick).
- Grooves for movement of legs in the folding part of the table - 2 pcs. - 53*3 cm (made of plywood 1.8 cm thick).
Groove element for moving the legs on the table - 2 pieces - 12*3 cm (made of plywood 1.8 cm thick).- The upper part of the end of the groove limits the movement of the legs - 1 piece - 12.2 * 3 cm (made of plywood 1.8 cm thick).
- Groove element for leg movement in the folding part - 2 pieces - 53*2 cm (made of plywood 1.8 cm thick).
- Groove element for moving the legs on the table - 2 pieces - 12*2 cm (made of plywood 1.8 cm thick).
- Bottom for the end of the groove, limiter - 1 piece - 12.2 * 2 cm (made of plywood 1.8 cm thick).
- Side walls - 2 pcs - 72*52 cm, MDF 19.
- Horizontal parts of the cabinet (shelves) - 3 pieces - 52*31.2 cm, MDF 19.
- The lower vertical part of the partition from the inside – 1 piece – 41.8*31.2 cm, MDF 19.
- Vertical table top for partition - 1 piece - 31.2*18.4 cm, MDF 19.
- The middle part of the cabinet (horizontal) - 1 piece, 31*25 cm, MDF 19.
- Cabinet door - 1 piece, 47.7*34.6 cm, MDF 19.
- Shelf - 1 piece, 21*25 cm, MDF 19.
- Drawer front panel - 1 piece - 34.6*20.9 cm, MDF 19.
- Drawer front panel (behind the facade) - 1 piece, 41.8*31.2 cm, MDF 19.
- Side panels - 2 pcs - 34.1*25 cm, MDF 19.
- Back panel - 1 piece - 27.2*12 cm, MDF 19.
- Bottom panel - 1 piece, 34.1*27.2 cm, MDF 19.
- Drawer and door handles - 2 pcs., diameter 3 cm, wood.
- The upper part of the leg - 1 piece - 8 * 8 * 1.8 cm (made of plywood 1.8 cm thick).
- Movable leg - 1 piece, top diameter 5.5 cm, bottom 3 cm, height 70 cm, wood.
- Furniture hinges - 2 pcs., diameter 5 cm, metal.
- Hinges for the door - 2 pieces, the size will depend on the shape, metal.
- Bottom panels at the end: 2 pieces, 2*30*0.5 cm, made of plywood 0.5 cm thick.
The illustration shows a diagram of the table with attached part numbers for assembly. The figure shows a drawing of a tabletop, which should be based on the manufacture and assembly of elements into a single structure. Separate components of the tabletop are a drawer and a guide channel for the movement of the legs. For manufacturing, you will need all modern tools (power only), which will help you make perfection out of ordinary blanks.
Required accessories
Confirmats 5x70 (if you don’t stop at making a table, buy a package). Self-tapping screws 4x16 (similar). Window hinges or otherwise “butterfly hinges” with a “wingspan” of 30-35 mm, 10 pcs. Plastic L-shaped linings for furniture legs or so-called “hooves”, 3 mm thick, 4 pcs.
Let's take a closer look at this point right away. On each side of the table, one of the “hooves” is attached from below to the movable stand of the leg, extending the delta to the floor, and the second is attached to the “wing” of the table from the inside, finally fixing the height and position of the leg when open. Fastening with self-tapping screws 4x16. Furniture corners 4 pcs., for attaching the tabletop to the sides.
Final work
We close the gap between the table and the wall by installing a plastic plinth. Its first part is attached to the wall with self-tapping screws, and a decorative attachment is snapped on top. Special caps are used to decorate corners. Typically, hidden wiring can be placed inside the baseboard. Next, household appliances and kitchen hoods are installed. For a gas stove, fix the hood at a height of 75-85 cm, and for an electric stove - 65-75 cm. To hide it in the cabinet, provide a hole for the air duct in the upper wall of the cabinet in advance.
We recommend watching a master class on assembling a kitchen in this video:
Assembling a book table
Assembling the base of the table.
Here and below: Drilling for confirmations in a plane - an 8 mm drill, through. At the end - a 5 mm drill, hole depth at least 60 mm.
We draw a vertical line in the center of each sidewall - this is the axis of the drawer fasteners. The drawers, oriented perpendicular to the floor, are pulled together with the sides.
The upper drawer is flush with the top, the second drawer is 50 mm away from the floor. We screw the table top onto the corners. The canopies protruding from the sides must be identical.
We screw the vent hinges to the tabletop along the axes, as shown in the figure. Side hinges – with a distance from the edge of the table top of 120 mm.
Screw the window hinges to the tabletop
The legs are a copy of the table with the difference that the upper drawer is oriented parallel to the floor. We fasten the legs with loops to the table frames (according to the picture), distributing the difference in height equally - these gaps are selected with “hooves”, as indicated above.
Attaching the legs of a book table
We turn the base over with the tabletop down and attach the “wings” of the table to the hinges simply in place.
Such a folded table can even be placed outside the door, and the cost compared to store prices is an order of magnitude lower.
What is a do-it-yourself book-table, drawings and diagrams of the classic model
There are many options for internal design.
In fact, a book table is a narrow cabinet that folds out into a full-fledged table. The sides of the cabinet are hanging tabletops. When unfolded, they rest on the legs retracted from the center. But the design of the legs may differ.
In the classic version, there is one leg on each of the two sides, which extends diagonally towards the center.
There are other options when the legs are folded in half and retracted on each side (that is, there are four of them). But essentially the principle is the same.
There is a base, the cabinet itself with hanging countertops.
There are legs that are attached from the inside to the base.
All movable elements (hanging tabletops and retractable legs) are attached to the base cabinet with piano hinges.
Detailing
Unfortunately, the edging on book tables does not look very good due to the joining in the most noticeable places. Therefore, we order sawing immediately with figure saws and factory pasting. In this case, for extra beauty, we recommend ordering 2 mm thick PVC edge gluing.
So:
- 900x400 – table top 900x700 – 2 pcs., table top wings 733x400 – 2 pcs., table sides 800x200 – 4 pcs., side drawer and box parts for storing stands.
Detailing and components
Let's look at how to make a book table with your own hands using the example of a table made of chipboard without internal filling, with 2 pairs of legs on wheels, made in the form of narrow boxes.
A 16 mm thick chipboard sheet is sawn into the following parts:
- Table top wings – 2 pcs., 800x600 mm.
- The central part of the tabletop is 1 piece, 800x250 mm.
- Sidewalls (central supports) – 2 pcs., 724x250 mm.
- Central stiffeners – 3 pcs., 708x210 mm.
- Vertical strips (racks) of leg boxes – 8 pcs., 644x60.
- Horizontal (overhead) strips for leg boxes – 8 pcs., 340x60 mm.
- Stiffening ribs for leg boxes – 4 pcs., 308x110mm.
Experts recommend using thick metal butterfly hinges instead of traditional piano hinges; they are more rigid and reliable. It is more convenient to make the legs on wheels only if you implement your project, carry out drawings and detailing yourself, do not forget to take into account the height of the wheels when calculating the height of the legs.
- butterfly loops 45 mm long – 18 pcs.;
- corners – 4 pcs.;
- linear caster wheels 29 mm high – 8 pcs.;
- clamps (holders) for the upper wheels of the legs – 4 pcs.;
- adjustable supports or thrust bearings – 4 pcs.;
- self-tapping screws 4x16 - 100 pcs., confirmations 75x5 and plugs for them in the color of the chipboard - 45 pcs.;
- edge for sealing open cuts of laminated chipboard - about 30 m.
After cutting, the parts are edged.
Instead of the usual flat edge, you can run an edge profile along the edge of the tabletop.
Assembling the second book table
If you carefully read the first part, you will not have a question about how to make a book-table with your own hands, regardless of the modification. Refer to the attached picture and the drawings of the upper section.
There is, however, one important point.
When you begin to attach the bases for the metal legs to the tabletop, make sure that when closing (folding) the table they do not rest against the sides. In addition, the instructions for such legs show that after connecting the leg to the base, it must be secured with a fastening screw. In your case, this should not be done, because the legs should be freely removed and stored in the box.
Now a little about the difference between the two table models given. Without looking at the cost - constructively.
In the first case, the base of the table is narrow, and there is only one leg on each side, mobile and located at an angle. That is, the table turns out to be quite unstable, especially during a vigorous celebration of something. Although it is quite suitable for peaceful gatherings.
But, you shouldn’t find fault with the tables if you haven’t left the apartment. Enjoy your holidays at your new table!
The book table is made by hand using chipboard. The material is cut in specialized workshops. To make such furniture yourself, you will need a drill, iron, knife, tape measure, pencil, right angle and 5 and 8 mm wood drills.
Diagram of a folding book table.
DIY book-table, drawings and diagrams
The ideal option for beginners is to try making a book-table with your own hands to understand whether it’s worth getting involved in making furniture yourself. The item is very useful and necessary in the house. You can make it for yourself or as a gift to someone. On the other hand, it is very easy to assemble. To confirm this, the article contains a do-it-yourself table-book drawings and diagrams with detailed descriptions and instructions.
Economical model
The book table consists of the following elements (mm):
- 2 sides (733x200); table tops (200x800); 2 drawers (727x120); 4 racks (727x70).
The end of the parts is finished with an edge. The edges of the elements are protected with sandpaper. The book table is made using the following materials (mm):
- confirmations 5x70; screws 4x16; butterfly hinges 30-35; plastic linings (thickness 3); furniture corners.
Scheme of fastening the legs of a table-book.
Before you make a book table with your own hands, prepare a drawing. The base of the furniture is assembled according to the diagram. To make a hole for confirmations, you will need an 8 mm drill.
The depth of the hole at the end is 60 mm. The axis of the drawer fasteners is located in the center of the sides. The last elements are pulled together with the drawers (a 50 mm distance from the floor is maintained).
The next step is to screw on the tabletop and window hinges. When fixing the side hinges, make an indent from the edge of the tabletop. The legs are attached to the drawers using loops.
The base of the table top is turned over. The wings are attached to hinges. An economical version of the book-table is ready for use.
To make an original book-table, you will need identical tools.
For accessories, you will need to buy confirmations, corners, hinges and stand legs with a base for fixing (diameter 100, height 730 mm). Experts recommend pre-cutting the chipboard at a furniture factory. To make furniture you will need a PVC edge 2 mm thick.
The components of an elegant book table are presented in the form of the following parts (mm):
- sides (733x400); 2 tabletop wings (900x400); 4 drawers (800x200).
This model is assembled according to a similar scheme (as in version 1).
When fixing the base for the legs to the tabletop, you need to pay attention so that when folding the furniture they do not rest against the sides. Metal supports are not secured with mounting screws. Otherwise, the legs will not move freely into the corresponding niche.
In the 1st version (unlike the 2nd model), a narrow table base is made. There is 1 mobile leg on each side, located at a certain angle. Therefore, an economical table-book is considered unstable furniture.
Selecting a model and drawing
A book-table is a transformable furniture in which the tabletop consists of three parts, where the center remains fixed, and the side “wings” can be folded and unfolded. When lifting the moving part, it is supported on retractable legs. There are various designs of this model:
- A table-book without a central part takes up less space and is as compact as possible when folded. It only has sides and supports. When made independently, they require less material.
- A table with a central but non-functional detail. In such models, the element located in the middle is not equipped with any shelves or partitions. This was done in order to save the maximum amount of space.
- Product with a cabinet in the central part. This model combines a table and storage space. Making a cabinet table with your own hands will require more materials and, accordingly, the skills of the craftsman.
- A transforming table is a model that, if necessary, becomes a niche for chairs, a minibar, dishes and other things.
Without central part
With cabinet
With central part
Transformer
It is really difficult to make a choice among such a variety of models. When figuring out how to make a table-book with your own hands, it would be useful to take into account the recommendations of experts:
It is best for carpentry specialists without experience, as well as for beginners, to give preference to the simplest variation of the book: without an internal niche for things. An experienced master can choose any model he likes. The side parts are usually rectangular in shape. If the cut is ordered in a workshop, then if desired, you can round them. A table of this model can be used as a dining table or coffee table. The assembly details and design will be identical, but the dimensions will differ.
Coffee tables of this type are very comfortable and compact. It is important to consider the types of table materials that will be used in construction. Laminated chipboard for such work is recognized as a classic; the raw material is suitable for all components. But there are other possible variations: cut the tabletop, side “wings”, stiffeners, drawers from chipboard, use timber for the legs
Or make the legs and stands for the side “wings” from steel pipes with wheels at the ends (this option is best suited for a coffee table). You can make the central part, legs, drawers from metal, and take impact-resistant glass for the tabletop.
But there are other possible variations: cut the tabletop, side “wings”, stiffening ribs, drawers from chipboard, use timber for the legs. Or make the legs and stands for the side “wings” from steel pipes with wheels at the ends (this option is best suited for a coffee table). You can make the central part, legs, drawers from metal, and take impact-resistant glass for the tabletop.
If you want to make a book-table with your own hands, drawings and diagrams will be a good help in the work process. You can do them yourself, if you have the necessary skills, but it is preferable to use ready-made options as a basis. This method has many advantages:
- significantly speeds up work on the product;
- no need to build a drawing from scratch;
- less risk of inaccuracy or error;
- if necessary, you can make the necessary changes;
- You can always make a calculation using your own sizes.
Once you are completely satisfied with the parameters of the future product, you can begin to display the design in detail in accordance with the dimensions in the quantity required for production. The detailing and cutting sheet are prepared based on the drawing. Afterwards the cutting is done directly.
Instructions for assembling a crib with a pendulum
Children's cribs are presented in a wide range. They differ in design, construction and additional features. Due to the large number of offers, the selection process often becomes difficult. In this article we will take a closer look at beds with a pendulum - the most popular option.
What it is?
A crib with a pendulum is a piece of furniture that is made of wood and equipped with a swinging mechanism - a pendulum. If the baby has not yet been born, it is difficult to determine whether this model should be preferred. Medical experts disagree, so making a final choice is not easy.
Transformable bed with pendulum and drawers:
The principle of operation of the pendulum mechanism is simple: the rocking chair is set in motion by touching the body with your hand. The baby, moving in the crib, is also able to launch it himself. The main requirements are that it should not stand close to the wall with its moving sides and should be equipped with a lock:
Varieties
All beds with a pendulum allow you to rock your baby directly in the cradle. However, they are divided into different types and are longitudinal, transverse and universal. You can choose the right model by determining your needs and familiarizing yourself with each type in detail.
1) Longitudinal pendulum . Its main advantage is a good imitation of the natural rocking of a child in the mother’s arms. With longitudinal rocking, the baby will calm down and fall asleep much faster.
2) Transverse pendulum . Such cribs are compact in size, so they are suitable for installation in rooms with a small area. They have been used for many years, but previously they tended to turn over to one side. In modern conditions, children's beds are equipped with special devices that prevent them from tipping over. All pendulum products have a locking mechanism, but this does not mean that it will perform its functions properly. Some manufacturers install low-quality parts on their products, so inspection and testing should be carried out during the selection process. It is also important to carry out the installation process correctly.
3) Universal pendulum . Beds of this type provide users with the ability to transform the mechanism. This is convenient if you may need to change the position of a piece of furniture in the future. In this case, parents will be able to convert the bed in a short time. Such models also have the ability to remove side rails and install additional accessories.
How to Assemble a Transformer Table with a Lot of Furniture
Hello everyone, in this video I will talk about how to assemble a transformable table from the Much Furniture store. Review of the DANDY sofa.
Detailed assembly of a Transformable Table from a Lot of Furniture Do-it-yourself assembly of a Multi-Furniture table
Detailed assembly of a Transformer Table from a Lot of Furniture Do-it-yourself assembly of a Multi-Furniture table Instructions: https://vk.cc/9I1Dvh Scalpel: .
Assembling a Transformer Table from a Lot of Furniture
I decided to film a manual for assembling a Transformer table from the Much Furniture store. It all took about 3 hours.
Transformable table from Much Furniture Review Feedback
Hello everyone, in this video I will talk about the Transformer Table from Much Furniture. Terrible quality of Delivery Service of Lots of Furniture.
assembling a transformable table a lot of furniture
Table transformer. Assembly.
Assembling a transforming table Boston. Instructions.
Instructions for assembling the Boston transformable coffee and dining table. www.stol-boston.ru.
Transformable coffee table SZHT-3. Assembly instructions. Bitel
Convenient transforming coffee table. The height of the tabletop will allow you to comfortably work at a laptop while sitting on the sofa, as well as.
coffee table LUX
In this video I will show you how to assemble the LUX coffee table yourself. Because I bought this wonderful coffee table and decided that I could make it.
10 months ago
Assembling the Transformer Deluxe coffee table How to assemble the Transformer Deluxe coffee table
Hello everyone) New Year is coming soon, so we need a transformer) We show you how to assemble it. A very good table and not expensive. Have a nice one.
How to QUICKLY assemble a transforming table.
Write about advertising.
Terrible quality Delivery Service Lots of Furniture Reviews
Hello everyone, in this video I will tell you my review about the terrible quality of the Delivery Service of the Much Furniture Store. How does the delivery service work?
Lux transforming table from Much Furniture
My second review of furniture. This time the Lux Transformer Table was bought in a store with a lot of furniture, the table was tested by the feast and confirmed.
LUX coffee table
Order on the website Mnogomebeli.com, enter the PROMO CODE “VDNB”, get fast delivery! And also when ordering from 40,000 rubles. with promo code as a gift.
Unpacking and review of the table transformation mechanism No. 587-FURNITURE-TRANSFORMER.RF
Unboxing and review of the mechanism of the coffee table No. 587. The mechanism allows you to fold the coffee table into a dining table. Buy .
Transformable Table Lots of Furniture
The Transformer table in a universal wenge color is a smart space saver! With one table you can connect the dining room and.
Transformer table, Lots of Furniture, table top without fastenings
I'm assembling a table, the last moment has come, I need to screw the tabletop, but there are NO fasteners. I had to do it myself.
Assembling a transforming table from a lot of furniture
Table transformer
Table from Much Furniture
Desk LUX from the Mnogo Furniture store. Assembly and a short overview of the Luxury Lots of Furniture table. Review: If you have the means, I advise you to take it.
A new model from the factory of the manufacturer of cabinet and upholstered furniture in Russia, coffee table Lux Sonoma
1.RU - https://fas.st/bUVEJ 2.UA - https://fas.st/z0psr 3.RU - https://fas.st/F5jvj1 4.RU - https://fas.st /LlzcW 5.RU - https://fas.st/dZp5Vq 6.AL - https://ali.ski/RGCx5K.
Fly transformable table (many in stock!) – Own furniture – Buy transformable table in Zaporozhye
A transforming table from the manufacturer can be purchased upon availability in our showroom in different colors. The Ecofurniture online store offers a closer look.
LOTS OF FURNITURE | How they SCREW CUSTOMERS! #mrs_evgeniya
NEVER BUY A LOT OF FURNITURE FROM A STORE. Hello everyone) Today I’ll tell you a not very good story about our experience.
Asti table
Video about how I assembled the Asti table from Much Furniture.
Transformer table from Much Furniture.1
I received the table and everything seemed to be delivered.
My transforming coffee table (Irina Sokovykh)
FOR COMMERCIAL INQUIRIES MY INSTAGRAM https://www.instagram.com/irina.sokovykh/
Transformable table a lot of furniture Review
table transformer.
We are assembling a table from a lot of furniture that was given as a gift.
Lots of Furniture TABLE TRANSFORMER 2
Transformer Table Lots of Furniture 2
They didn’t drill holes for the conferments. Well, maybe I’m being picky))
Transformable table 2 / LOTS OF FURNITURE
For all furniture questions, look for me on social media. networks: VK: https://vk.com/maxim.login OK: https://ok.ru/profile/580909951178 Instagram: .
Sofa DANDY from Much Furniture Review Review
Hello everyone, in this video I will talk about the DANDY Sofa from Much Furniture. Its pros, cons and quality problems. What is a pantograph mechanism?
Lots of furniture, city table
transformer table a lot of furniture assembly
Master of furniture assembly and disassembly in Novosibirsk. 89659992652 Ivan Inexpensive, high quality and fast! -Assembly, disassembly, repair of any cabinet.
Required tools and accessories
Before starting work, you need to prepare all the tools that may be needed during the assembly process:
- screwdriver with drills;
- screwdriver;
- marker, pencil or corrector for markings;
- corner;
- awl;
- roulette;
- level.
Next, you should prepare all the necessary accessories for assembling the folding structure.
| the name of detail | Quantity |
| Butterfly hinges for attaching tabletops and folding legs | 16 pieces |
| Straight casters for easy and smooth folding of the table | 8 pieces |
| Self-tapping screws 4*16 mm | It's better to take a pack of 100 pieces |
| Confirmats 5*75 mm | 45 pieces |
| Metal corners for fastening tabletops | 4 pieces |
| Adjustable feet | 4 pieces |
Step-by-step instructions for assembling a bedside table with drawers
A cabinet is an indispensable piece of furniture in any room, regardless of whether it is residential or not. Of course, it can be purchased at any furniture store, but often it is either a low-quality product or at an unreasonably high price.
Knowing how to assemble a nightstand with drawers will help you handle other items as well.
Making interior items at home always opens up space for creativity and saves money. Instructions explaining how to make this furniture with your own hands are always easy to find on the Internet.
To get a practical bedside table with 4 drawers, you don't need to go to the store and spend money.
Therefore, making a cabinet with drawers will not be difficult for both an experienced carpenter and a beginner in this business.
- What tools and materials will be needed
- Step-by-step instructions for assembling a bedside table with drawers
- How to assemble the frame
- Installation of guides
- Connecting box fragments
- Installation procedure for façade panels
- Final finishing and decoration of the finished bedside table
Top panel design
What tools and materials will be needed
When preparing for work, you need to be patient and also check the availability of materials, components, consumables and tools so that during the process itself there is no need to look for what is missing.
Use quality tools to assemble furniture.
So, the materials available should be:
- wood plywood boards with a laminated surface (4 pieces, measuring 45.5 cm by 70 cm);
- boards for the frame of the cabinet (8 pieces, measuring 6.9 cm by 39.9 cm);
- panels with a laminated surface (4 pieces, measuring 17 cm by 43.5 cm);
- screws (4 cm and 1.6 cm long);
- dowels (2 cm and 1.6 cm long);
- PVA or wood glue;
- acrylic based sealant;
- stain.
The following tools will be useful:
- miter saw;
- electric drill;
- stationery for measurements and drawings;
- sander;
- sandpaper.
Having prepared and checked the availability of everything necessary, you can begin to work.
Step-by-step instructions for assembling a bedside table with drawers
In order not to miss anything, not to get confused in all the details and components, the assembly of a bedside table with drawers must occur in a certain sequence. It is usually customary to start with a drawing so that you can refer to it at any time.
Next, the frame or base is assembled, and so on, moving to the final result in the form of final finishing and decor. It is better to distribute the parts on the floor for better visibility, and place all the fittings in a box. Such organization of the workplace will speed up work and avoid losing screws or other small parts.
How to assemble the frame
If you have a Krag jig in your tool kit, this will allow you to assemble the cabinet without visible holes for fastenings. But this is an optional item. Here you can use what is available or resort to another method.
Draw a sketch of the boxes before making them.
The frame manufacturing process consists of the following steps:
- make holes in all panels and frame supports;
- fasten the side panel and boards with 4 cm screws.
- make holes for the drawers (if their height is 15 cm, using a tape measure and pencil, measure a point 15 cm below the top support and 17 cm above the bottom panel, then repeat for each);
- attach all the supports under the boxes according to the markings made;
- attach the second side panel with screws, having first checked the presence of all supports;
- install the bedside table base.
The frame is ready, you can proceed to the upper part.
Top panel design
The top of the cabinet is covered with a wooden panel. Here you can use various design options: make a small canopy in front or behind the structure.
The drawing can be made in a special program.
To decorate the top part, you need to perform the following manipulations:
- attach the top with 4 cm long screws;
- cut 2 dowels at an angle of 45 degrees;
- cut out the back bar, and starting from it, adjust the size of the protrusions on the sides;
- glue the treated dowels to the frame with wood glue;
- let dry;
- Fill the gaps around the dowels with acrylic sealant.
The frame is completely assembled.
Installation of guides
The smoothness of opening depends on the correctness and accuracy of this stage. This will come in handy:
- 4 sets of guides; 8 boards 13.5 cm by 45 cm - sidewalls;
- 4 boards 13.5 cm by 34.3 cm - back panels.
To install the guides you need:
- apply markings to all sections; boxes;
- attach the guides to the sides of the cabinet;
- place plywood under the sides, pull them out and install guides;
- take out the side panels and make two more connections.
After checking the accuracy of installation and the smooth opening of the drawers, you can move on.
Connecting box fragments
Everything is quite simple here. The remaining panels are screwed to the finished sidewalls with guides.
On a note! All parts must be pre-polished, first with coarse-grained sandpaper and then with finer sandpaper.
All that remains is to screw the handles and insert the drawers into their proper place.
You also need to measure the distances between the sidewalls. This will be useful for subsequent fastening of facades. Attach the bottom of the box.
Installation procedure for façade panels
To install the fronts on the drawers, you need to turn the cabinet over, lifting them up. Apply glue to them and attach the panel. Let the glue dry well.
The fastening of additional parts occurs on a completely finished product.
After this, you can add all the plastic elements.
Final finishing and decoration of the finished bedside table
After the assembly of the bedside table is completed, it can be coated with a protective compound, stain or varnish. This is a matter of taste. Careless finishing can ruin the entire work, its result will partially or completely lose its attractiveness.
The cabinet can be decorated to your liking.
You also need to attach handles to the drawers. It is better to select them to match the tone of the furniture; everything should fit organically into the existing interior.
Assembly Tips and Tricks
It is recommended to assemble the cabinet on a flat, hard surface. After connecting any 4 parts into a solid structure, it is recommended to check its coal content. The fastening of fittings and decorative finishing begins after errors have been eliminated and eliminated. You need to be very careful during manufacturing.
Sometimes, in addition to standard parts, chests of drawers also have additional parts.
It is necessary to immediately remove glue drips if any have formed. When sanding edges, do not scratch the laminated coating, as... It is impossible to seal them later even by re-coating them with varnish. When installing drawers in place, check for smooth movement. If something interferes, do not use force, first find out the cause of the jamming and eliminate it.
Having the necessary materials, tools, and most importantly the desire at hand, even an inexperienced person can make a bedside table with their own hands. This option of assembling furniture for your home will help not only save money, but also get a unique piece of furniture.
Video: assembling a bedside table
Making a table for needlework
It all started with a new sewing machine. Although, it probably just served as a catalyst.
I moved the old machine around the apartment, set it up in the kitchen, or asked my husband to bring a folding table from there. The decision about the need for a permanent place for needlework matured gradually and resulted in the idea of a folding table.
The area for cutting and working should be larger than a regular table. But it shouldn’t take up a lot of space—that means it should fold up. My husband and I came up with a “super design”, which as a result, after purchasing the parts, turned into this, simpler one. Nothing unusual or new, but it turned out to be very convenient to use and quite compact.
I filmed some moments in the process on my phone, recently I came across the pictures and decided to share the idea - maybe someone will need it.
The materials for the table cost 3,600 rubles - it’s unlikely that you can buy one ready-made for that price.
At the end of the article there are a few more photos of the finished table from different angles.
unfolded
folded
For the tabletop, we used 18 mm thick furniture board - this is enough not to sag under the weight of the machine. Laminated chipboard parts were used as legs under the tabletop for the same reason - so that the folding part of the table was stable when working on a typewriter or when cutting. The legs were made on wheels - this makes it easier to lay out the table and does not damage the floor.
The overall dimensions of the table turned out to be sufficient for work - a working area of 128 * 60 cm and an additional tabletop of 70 * 60 cm. The standard height is 70 cm. The table surface was sufficient to place a narrow cabinet on top in the corner. Gradually a shelf appeared above the table, and 2 cabinets under the table. Now everything is nearby, no need to collect the necessary tools and materials throughout the apartment.
Materials:
furniture board 200*60 cm - 1 piece - (main tabletop and folding part)
furniture piece laminated chipboard 80*60 cm - 4 pieces - (2 for the side parts, 2 for the legs for the folding part)
furniture piece laminated chipboard 120*30 cm - 1 piece (for the back of the table, for general rigidity)
metal corners - 8-10 pieces
furniture hinges - 7 pieces (3 pieces for an additional tabletop, 2 pieces for the legs under it)
swivel wheel without brake, 50mm - 2 pieces (on the legs under the folding tabletop)
acrylic furniture varnish - 0.5 l (for covering the tabletop)
Tools
drill, screwdriver, jigsaw, sander
The necessary conditions are direct hands, work skills and desire. Then everything else can be varied
We prepare parts according to dimensions.
We connect the side parts of the table with the backdrop using metal corners.
We attach the tabletop in the same way.
We get the following construction.
Now we attach the folding part to the tabletop with 3 hinges.
We make cutouts in the legs that will be under this additional part and screw in the wheels. After this, we also attach them to the hinges to each other and to the side of the table. My folding part will be on the right, but you can make it mirrored on the left.
In the last photo, the corners of the table have already been rounded and sanded so that the fabric does not cling to the edges. A small block was secured under the edge of the tabletop as a stopper for the legs, so that the structure would not accidentally roll out beyond the tabletop.
The last stage is sanding the surface, slightly rounding the upper corner of the tabletop.
For painting, I chose furniture varnish, white matte translucent, the texture of the wood is visible through it, it is more convenient to work on a light surface.
Several working variations.
I usually cut at the very beginning, so the machine is still in its place, the unfolded part is enough for me to lay out the fabric.
When working, I place the machine on the opening part. There is free space for legs under the tabletop, making it comfortable to sit.
The shelf above the table suddenly acquired an additional railing for cutting tools.
A narrow bedside table is convenient for storing boxes with supplies of thread, zippers, an iron in a case and other small items.
Under the table there are 2 cabinets with fabrics. I also placed a roll of synthetic padding there - when folded, half of it is covered by a folded tabletop and legs on hinges and wheels. On the left, I placed the metal corner on two self-tapping screws on the side of the table.
A handle was made on the table leg, which when unfolded is on the right side, to make it easy to roll out. Later they added magnets for attaching a basket for scraps of fabric and thread - when working, it’s convenient to have such a trash can under your right hand, and it doesn’t take up space on the table.
Gradually acquired all the little things. The basic design of the table has passed the test of work and time - no shortcomings have been revealed. The table turned out to be stable, comfortable and compact.
Now it’s pleasant and convenient to work! And some at first also rested comfortably on new clothes.
I wish everyone joy and pleasure at work!