For many, a fabric panel is an unremarkable decor. But often a simple craft in the hands of a talented craftsman can turn into a work of art. It is impossible to give specific templates here, since everything is built on one’s own imagination and idea.
The main factor remains mastering the technique; various master classes will help with this. In the future, everything depends only on the flight of fancy.
Choosing a theme to create a panel
Before you start work, you should understand that the panel must be designed in a certain style. It should resonate with the decor of the room in which it will be located. Otherwise, the product may stand out from the general theme and amaze everyone present with its tastelessness.
Many ideas and stylistic solutions can be gleaned from various articles, which are accompanied by a large number of photos. All that remains is to choose the idea that you like best and that fits the existing interior.
Classic, country, Provence
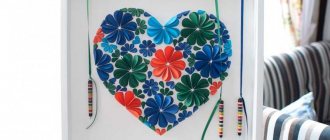
The ideal theme for panels for rooms decorated in classic, country, and Provence styles are various still lifes or floral motifs. Compositions in the form of landscapes also look good. Try to avoid pretentiousness; it is better to give the appearance of the product maximum simplicity and cheerfulness. The composition should bring an atmosphere of relaxation to the interior and evoke only positive emotions.
Abstraction is also appropriate in the interior of the appropriate style. It can be noted that it is a universal option, as it suits, in principle, any style.
Modern
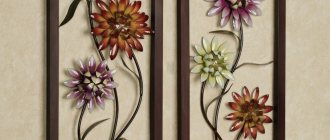
Modernism is distinguished by the presence of strict geometric lines. That is why panels in the Art Nouveau style should contain compositions with different clear patterns. The design of the product should also be moderate. The frames used to frame the panels are quite simple, almost invisible.
Scandinavian style
One of the rare themes in the Slavic expanses is the Scandinavian style. It implies brightness and practicality, and is distinguished by the presence of appropriate ornaments and motifs. Even a novice craftsman can create such a fabric panel for the wall using various available materials, such as beads, shells, and ribbons.
Also on the fabric panel there can be images of deer, Christmas trees, letters, lines, cages and other things.
Loft style
Design solutions in the loft style are very popular in the design of modern interiors. There are also certain requirements here. The subject matter is quite varied, but the panel should be done only in two or three colors.
Despite the strict and laconic lines, the loft-style panel attracts the eye and looks perfect in the interior.
Methods of creating flowers - master classes
An exciting version of needlework is not limited in the choice of techniques and materials. Textile flowers can have round or acute-angled petals and any number of them. They can be flat or voluminous. You can learn how to quickly create real masterpieces very simply. To do this, just study the master classes in detail, select photos for inspiration and feel free to start working step by step.
Required materials and tools
The basis for textile flowers is fabric. It can be any type and size of material. Ribbons, canvases and even multi-colored scraps will do. To make fabric flowers yourself, you will need the following consumables and tools:
- Paints. They will help give the flower a natural shade. You can use gouache, ink, photo paint, ink, food dyes, aniline dyes;
- Plastic palette, wide brushes;
- Carpenter's glue, office glue. Should provide reliable fixation and harden quickly. You can also use a hot gun;
- Floral wire. It will be necessary to prepare material of various thicknesses for the manufacture of leaves and stems;
- The fishing line is transparent, colored. Decorative elements are attached to it - beads, seed beads, small flowers;
- Crepe paper. Needed to create relief, wire upholstery;
- Viscose wool. It is filled with buds and flower cores;
- Needle and thread. For stitching elements, making stamens;
- Brass set for needlework. It includes balls of different sizes, a hook for curling petals, scissors, wire cutters, tweezers, hand cutters;
- Rubber cushions, hard and soft. With their help, leaves are corrugated and petals are squeezed out.
In order for fabric parts to keep the desired shape, they must be specially processed. In addition to materials and tools, you need to prepare one of the following ingredients that increase the rigidity of matter - starch, gelatin, polyvinyl alcohol, wallpaper glue.
Fabric roses
You can complement the soft, homely interior in Provence style with the help of textile flowers. Fabrics with romantic, picturesque patterns are suitable for work. To create a composition with a different mood, you can safely change the colors and textures of materials. Lace, knitwear, chintz, burlap are suitable.
The work process is very simple. We cut strips 5 cm wide, fold them lengthwise and coat the ends with glue for convenience. We form the middle - tightly twist one end of the tape. Then we wrap the remaining flap around it, tucking the edges a little. The fabric must be periodically fixed with thread or glue. The rose can be made neat or deliberately careless by ruffling the textile petals. You can create an original composition from several colors.
Tulips in tilde style
One of the cutest things in the tilde style is a tulip. You can sew a beautiful spring bouquet from any fabric. Flowers made of satin and satin look impressive. Beginners should start with soft, pliable fleece.
First you need to cut out the parts according to the template. You will need a blank for the stem, bud and leaf. The dimensions can be any, but it is better not to exceed the scale of the original. We start with the stem, bend the rectangle and sew its long side. We fill the inverted part with cotton using a pencil. We do the same with halves of leaves and buds. Finished elements must be sewn with a hidden seam.
If you decide to work with synthetic fabrics, their edges should be singed. Otherwise, the material will crumble and will not hold the seams. It is also not recommended to make latex tilde tulips from chintz.
Delicate peony
The best materials for making an airy peony are satin, chiffon, and silk. The fabric should be chosen in pastel colors so that the flower turns out as natural as possible. To work you will need patterns, scissors, glue.
We prepare eight identical round blanks and one of slightly smaller diameter. The contour does not have to be perfectly smooth. Now each petal needs to be given a natural bend. To do this, burn the edges of the circles with a candle. We cut the prepared parts on four sides, not reaching the center, and also scorch them with a flame.
The center of the peony will be yellow threads. They should be wound and cut, creating an imitation of fibers. Having prepared all the details, you can begin assembling the flower. We stack the petals on top of each other and glue the centers together, placing a yellow pestle in the center.
Carnation made of fabric and braid
You can make beautiful carnations using a simple assembly method. You can use a long piece of fabric or braid. The size and volume of the bud inflorescence can be adjusted by the width of the stitch. The final result will also depend on the type of fabric and the length of the strip.
The manufacturing process is very simple. You can be creative with young children. It is enough to gather the braid or ribbon onto a strong thread, pull it together and secure it. We decorate the center with a beautiful bead.
For a large fluffy carnation, a piece of satin fabric is suitable. We make a blank, crumple the fabric with an accordion. We tie the center of the future peony with thread or fishing line and give the flower the desired shape. We straighten the material and form a bud.
Flowers using kanzashi technique
The principle of decorative art lies in the ability to collect and roll petals of various shapes from pieces of fabric. Using tweezers and glue, entire compositions are formed from miniature parts. Petals can be round or acute-angled. For work, use synthetic fabric or tape.
We start by cutting even, identical squares. The number of blanks depends on the design and size of the flower. At the next stage, we make even triangles by folding the pieces of fabric three times. All folds must be carefully aligned. You can fasten the edges with glue and using the flame of a lighter or candle. Having leveled the workpiece, we get a sharp leaf.
To create rounded petals, you will need to bend the square in half and tuck both edges into the center. We move the side corners back and melt them. After processing all the blanks, you can begin assembly. We glue the round parts of the flower, form the correct outline, and fix the leaf on the sides.
Fabric on fabric (basics of work)
Paintings on fabric began to come into fashion relatively recently. But, recently, panels are increasingly beginning to occupy a leading niche in the interior of the room. There are many admirers of such art. Some needlewomen try to make compositions with their own hands.
Related article: 15 ideas for using leftover wallpaper with your own hands
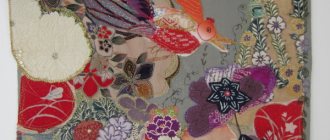
You can often find versions of paintings that are obtained by painting on fabric enclosed in a frame. But such compositions cannot be called panels. It’s a completely different matter when a pattern is created on a fabric using another fabric. This is a real panel. The composition looks gorgeous if the fabric creates a voluminous effect.
Main rules
Full compliance of the panel with the style of the room is the main requirement. But there are no rules without exceptions. If the product is made in a different theme, but the color accents are respected and do not in any way disturb the overall impression, then you should not deny yourself the pleasure of placing the composition on the wall.
When working on creating a decorative panel, there should be:
- knowing of limits;
- compliance with the design of the room;
- full interaction of components with each other.
Techniques for creating fabric panels
You can perform the composition using different techniques:
- applications;
- kanzashi;
- patchwork;
- 3D modeling.
Base manufacturing options
When starting work for the first time, you should understand that you are unlikely to get a work of art the first time. To do this, you need to get at least a little bit skilled. Constant training, perseverance and following the advice of experienced masters will yield results.
It is better to make a panel for the first time from materials that you don’t mind spoiling. And the second and further, having acquired skills, you can aim at expensive workpieces.
There are several options for preparing the basis for creation:
- A base is prepared from very thick cardboard, fiberboard or plywood. A fabric is pulled over the front part of the workpiece, the edges of which are folded to the wrong side. To prevent the canvas from moving, its edges are fixed with glue. In this way, a base is obtained on which the applique elements begin to be attached.
- They take wooden slats and form a frame from them, then they cover it with fabric. To do this, cut out a rectangular fabric according to the dimensions of the frame, adding 2-3 cm so that you can wrap it on the wrong side. After the fabric is stretched, the edges are fixed to the frame using a stapler or small nails.
Related article: DIY wedding decor: master class on creating invitations and other ideas
- Styrofoam is also perfect as a base. On such a blank, a drawing or diagram is drawn with a pencil, then scraps of fabric of different colors and textures are selected. Along the marked lines, the edges of the patches are deepened into the foam using a sharp tool.
After the base is ready, they begin to select the elements from which the drawing will be created. To do this, you can use both multi-colored textiles and any other accessories that are appropriate in the composition and combined with the main elements. The applique is complemented with all kinds of beads, buttons, rhinestones, etc.
Manufacturing Features
The art of creating floral arrangements from fabric and individual floral elements is constantly evolving. For work, one type of fabric or combined flaps can be used. The manufacturing method depends on the type of decor - a finishing element for a dress, a headband or a flower on a stem for a bouquet, wreath, or wedding composition. Analogs that are practically indistinguishable from natural plants can be made using the following techniques:
- Sewing. Use fabric pieces or ribbons. To create flowers from satin and silk you will need thread, needle, scissors;
- Kanzashi. Square pieces of fabric are rolled into petals. For painstaking work you will need satin ribbons, scissors, tweezers, a candle;
- Komono. The sewing technique creates soft flowers from small pieces of fabric;
- Ganutel. Threads and wire springs are used;
- Guilloche. All kinds of patterns are burned onto fabrics with a soldering iron;
- Corrugation. To create the relief, special balls, tweezers, and skewers are used.
New Year themed fabric panel
Even adults expect miracles from the New Year holidays. And for kids, New Year is the most long-awaited holiday. Therefore, they try to decorate the room in an original and truly festive way to create New Year’s comfort. One of the successful decorative elements is a New Year's style panel, with the help of which you can easily achieve your goal.
To perform the composition with your own hands, you need to prepare:
- frame for framing the panel;
- fabric in a blue shade for the background;
- felt scraps, fabric cuts of different colors;
- thick cardboard as a base.
To begin with, the cardboard is covered with blue fabric, firmly securing the edges of the textile on the back side. Then the elements of Santa Claus are cut out of cardboard to form his three-dimensional figure. An outfit is prepared: clothes and a hat are cut out of red material, a mustache, beard, and cap lapel are prepared from white fabric or a piece of fur. For the sleigh, fabric of silver or gold color is used.
Having prepared all the blanks, they begin the general assembly of the composition on cardboard. You can glue parts using silicone glue, which is heated and applied with a special gun. You can see options for New Year's themed panels in the photo below.
Amazing 3D
3-D volume is created by additional decorative elements:
- flowers and buds made of fabric;
- ruffles made of nylon tape;
- beads (can be glued along the contour or randomly);
- felt elements.
A drawing is glued to the base, and then it is supplemented:
- light petals made of airy organza are attached to the flowers;
- the tree branch is complemented by convex leaves and buds;
- clothes - with overhead folds, they add volume.
Texture is perfectly created by knitting threads: they are attached in small bunches along the contours of the pattern or individual details of the picture.
Composition with fabric flowers
Before you start making a more complex picture on a panel, you need to be thoroughly familiar with the technology of its creation. First you need to prepare all the necessary materials and select or draw the appropriate diagram. This will take you no more than an hour, but then it will significantly help in your work.
Let's present step-by-step instructions on how to make a floral panel from fabric with your own hands:
1. First, select pieces of fabric with which you can create flowers. Circles of different diameters are cut out of them.
2. If you want to give the flower petals a beautiful wavy shape, then you must first burn the edges of the circles over a candle.
3. Collect each flower in this way: fold the circles in descending order of diameter.
Related article: Do-it-yourself mandala weaving: simple technique and tips for beginners
4. To prevent future flowers from falling apart, sew them with thread in the center.
5. As a finishing touch, sew a bead in the middle.
6. After all the elements are ready, all that remains is to attach them correctly to the base. Silicone glue is used to attach very small objects. Larger parts should be sewn on.
Flowers do not have to be round. Turn on your imagination, creativity and experiment. Panels made of different fabrics, photos of which are presented below, can help with this.
On the video: a panel with roses made from ribbons with your own hands.
Fabric for painting
In order to make a painting from fabric, you can use a variety of types, it all depends on the style of the painting and its design. The most popular materials for creating fabric paintings:
- jeans;
- leather;
- felt;
- silks;
- satin;
- suede and velor.
Lace, guipure, various shreds, and trimmings are also often used.
Creative panel made from patches
Any housewife will have colorful scraps of fabric in her house that don’t have to be thrown away. You can create a chic panel from multi-colored textiles, especially if we are talking about fans of abstraction. By tinkering a little with the scraps, you can get an original composition, which will later become the pride of the owner of the house.
For the process of making a patchwork panel you will need:
- several scraps of fabric in contrasting shades;
- thick cardboard for the base;
- wooden frame (you can make it yourself from slats);
- threads and sewing machine;
- fabric glue.
All the work will not take much of your time and consists of the following steps:
1. Initially, a schematic picture is formed, then blanks are selected. To avoid confusion, it is better to number them according to the diagram. The resulting composition can be transferred directly to cardboard.
2. Blanks are cut out from the scraps and begin to be placed according to the diagram. To do this, each piece of fabric must be folded in half so that the cut part is not visible on the other side of the future picture, and placed on top of the previous ones.
3. To achieve the required brightness and implement an interesting solution, you need to take a responsible approach to the selection of colors. The shade of the base must be in full accordance with the theme and style of the interior.
4. To fix the patches, you can use either the standard method - sewing on a machine, or use glue designed for working with textiles.
5. The finished composition just needs to be inserted into the frame. You can make several such decorations from scraps, then you will get a modular panel on the wall.
As you can see, making a panel with your own hands is quite simple. This entertainment can also be done for families. This is especially true for children. When working with children, do not forget to control their actions, since scissors are used in the process, and the child may get hurt.
Different techniques for creating paintings from scraps (3 videos)
Beautiful textile panels (45 photos)
Simple steps to creating your own masterpieces
To begin with, any picture must be framed as an idea, that is, you must clearly understand what you want to get in the end. It can be looked up on the Internet, or an independent sketch will be made if you have the ability to draw, or it will be a printed diagram of the future painting.
The next step is to select the material based on your idea. We select the color scheme and texture of the fabric scraps. It is advisable that the fabric does not stretch too much to avoid deformation and its edges from fraying. If this is a painting using the patchwork or quilting technique, then use matching threads, padding polyester or other material that will be used to add volume. If the painting is using the kinusaiga technique, then we stock up on polystyrene foam. Tools such as scissors, a ruler, a needle, carbon paper, and a stationery knife are required. You may also need wooden frames, a stapler, nails, and glue.
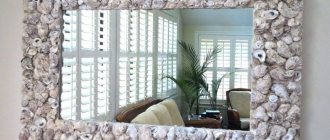
Marine panel
Many people bring back a lot of shells from their seaside vacations. This is an excellent material for decorating your home, which will remind you of warm, carefree days and warm your soul.
For the base you can use an old vinyl record. To get an even background, you will need to paint over the white middle with a black marker or paint.
It is best to attach shells using liquid nails. Collect all your shells, pebbles from the seashore, fragments of shells and other things, try to make an attractive composition out of them. Use your imagination to the fullest. When the panel is ready, you will need to varnish it. This will make the picture stronger and more durable.
What material to choose for wall decoration
A handmade wall panel is a special decor that can enliven the most ordinary surroundings, introduce a new design concept and enliven the atmosphere.
The choice of material and technique to implement an idea depends on many factors:
- Functionality of the premises;
- Wall decoration;
- Creative inclinations;
- Tastes and preferences;
- Availability of materials and tools;
- Skills in working with materials (sewing, knitting, modeling, weaving, drawing).
It is better to place a large panel on the entire wall in a large room where there is a lot of empty space. The easiest way is to buy a painting or put up photo wallpaper. But there is nothing original about this, plus there are high costs, and the new facility will soon become boring.
Another thing is your own “masterpiece”, which you can proudly display to all visitors to your home.
Looking at the unique work, friends and relatives will be interested in how to make such a panel with their own hands?
First, it is better to choose a free wall, and then decide what it will be - a collage of photos, a drawing, modeling or a mosaic of broken tiles. The general design and plot of the image must correspond to the functionality of the room and practicality in care.
For example, it’s easy to paint aquarium fish on a smoothly painted wall on the wall of a bathroom, but the paint must be durable and indelible.
If the material is susceptible to destruction or dust accumulation, it is better to coat the finished product with a colorless varnish, like a photo panel made of salt dough.
The paint base for the panels must match the wall cladding material. For example, if it is acrylic enamel, then acrylic paints are also suitable for painting walls.
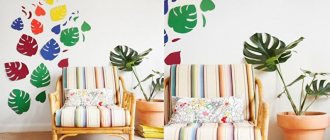
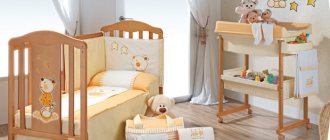
The walls in the nursery can be decorated with wallpaper panels, which can be easily built together with the child from the remnants of rolled materials left over after renovation.
Tip: Let the kids be part of the fun process of creating homemade decor. They will willingly join in the creative process. This will help develop fine motor skills of the fingers and spatial thinking.
Children can collect natural materials - beautiful twigs, leaves and cones for panels. If you don’t know how to draw, have your child spray paint from a can onto a stencil.
They will enthusiastically trace large maple leaves on cardboard, cut out their outlines in order to spray a contour pattern with gold and silver paint on the walls in the hallway. Aerosol paints and stencils in the decor of any room are the best solution for those who do not know how to draw.