Concrete reigns in interiors decorated in a modern style for several seasons. It is found on walls, in architectural details, and small functional objects. This is an excellent material for molding small objects. Many people like it when their lives are filled with beautiful and unusual handmade items, but experience and skill are not always enough to produce them. You don’t need to be a craftsman to create your own cement flowerpots. In this article we will tell and show how to make flower pots from cement with your own hands.
An easy way to create original jewelry
Spring has come, it's time to plant flowers in balcony boxes and flowerpots. Good large flowerpots are expensive, they are heavy, and do not always meet our expectations in size, shape, and color. Lighter pots are fragile and not resistant to frost. An interesting alternative to purchased flowerpots are homemade pots made from concrete using various shapes and decorative methods.
It is important to choose the right size of pots. The dimensions depend on the dimensions of the form used.
Worth knowing:
- The wall thickness of a large container should be about 5 cm to ensure strength;
- for a small pot, a thickness of 1 cm is sufficient;
- for a large container with a width and height exceeding 50 cm, the minimum thickness is 7-8 cm.
Video description
An example of making a flowerpot from a stocking and a tin can can be seen in the video:
Method 3 - sculptural
This method of making a flowerpot from cement is quite complex and requires artistic imagination and experience in sculpting and carving.
Experienced craftsmen use wet fine sand as the basis for creating the mold. It is poured into a suitable container, compacted thoroughly, and then the container is turned over onto a flat surface and removed. If you made sand cakes as a child, then you understand the technology. After the concrete has hardened, the sand can be easily removed from the flowerpot.
The resulting Easter cake is carefully doused with the solution and spread with a spatula over the entire surface. It is important to choose the correct thickness of the cement mixture. When this layer has set, prepare a thicker solution and begin decorating the walls. If you have no experience, you can start by simulating masonry, making lumps of different sizes from the mortar, gluing them to the walls and giving them shape. Then the excess mixture is selected between them, forming relief depressions - seams. When decorating, they are highlighted with color.
An example of a “stone” pots Source vkusnahka.ru
Option using forms
Making your own garden pots from cement is a simpler task than it seems at first glance.
What will you need?
- bag of cement;
- any lubricant - paraffin, sunflower oil;
- protective gloves;
- molds - 2 pieces (one smaller, the other larger - corresponding in shape to the first);
- bucket for mixing concrete;
- spatula or small blade;
- a small heavy object in the form of a load (for example, a stone).
Step by step guide
Step 1: Selecting a Shape
Before you make a cement pot, you need to find 2 containers of different sizes. They should have the same shape, but differ in size. Ideally, the gap between the smaller and larger container is at least 5 cm.
Can be used:
- carton boxes,
- plastic containers,
- old pots,
- glass containers,
- stainless steel containers.
The containers should have a shape from which the pot can be easily removed after drying. For example, cans have grooves that make removing the finished product difficult.
By placing concrete in a wooden box or thick cardboard box and loading a smaller box into it, you can create square pots. To prevent the concrete from soaking the cardboard, thin boards can be placed at the bottom of the box. Cover the box with film and grease the film with oil.
Step 2. Preparation of the solution
You need to prepare a bucket (bowl) for preparing the cement mass. Pour the cement mixture into a bucket and gradually add water, stirring constantly. The packaging of the purchased mixture contains information about the proportions for preparing concrete. You must follow the manufacturer's recommendations.
The mixture should have an acceptable consistency, then it is convenient to spread. Liquid cement takes longer to harden, but the surface of the pot will be smoother. A thick solution is difficult to spread; the finished product will receive more cracks, holes, and air bubbles.
Usually the mixture is prepared in the following proportion: 1 part cement – 2 parts water.
You can enrich concrete flowerpots with additional effects by adding various additives to the freshly prepared mass, giving the products a unique character:
- glass beads,
- small shells,
- small pieces of broken dishes,
- small items.
Step 3: Apply oil to molds
Apply oil to create a greasy, slippery coating on the surface of the forms in contact with the concrete. Thanks to the oil layer, the molds will not stick to the concrete, making it easier to remove the finished product.
Step 4. Filling with cement mortar
It is advisable to wear protective gloves and carefully and slowly pour the cement mixture into the prepared container. The mass is evenly distributed along the bottom of the container.
Answers to questions: how to make a flower pot with drainage holes out of cement?
A pebble or other object is placed at the bottom of the mold. You can drill holes in the finished flowerpot, but wait until the concrete has completely hardened. Hardening takes 2-3 days.
When the lower part of the container is filled, smooth the surface of the mass with a spatula. The smaller mold is then placed inside the larger one. Press down on the smaller mold until the desired bottom thickness is achieved.
Then the form is filled with concrete mixture to the brim and the top of the mixture is leveled.
Expert advice. A heavy object is placed in a smaller container; if the container is sealed, you can pour water to form the weight and secure it at the required level.
Step 5. The cement hardens
You need to be patient and wait for the cement to dry. This will last 2-2.5 days, the hardening time depends on the size of the product. Smaller pots will dry faster, larger ones will take longer.
Step 6. Completion of work
When the concrete is completely dry, the mold is slowly, carefully, gradually taken out. There is no need to worry if small aesthetic irregularities are noticed after the flower pot has cured. You can easily remove minor defects using fine sandpaper.
It will take a week to dry completely. During this time, you can wet the pot once a day with a damp sponge to darken the final color.
Sometimes the product gets cracked when removed. Eliminating such a defect is very simple - just cover the crack with fresh solution.
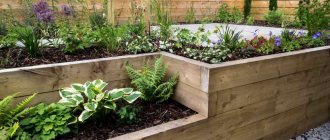
How to make a flower bed
Before you start creating a flower bed, you need to think carefully about where it will be located . To install a flower bed with perennial plants, you should choose a place at the entrance to the site, in the garden. In order for annual and perennial crops to grow and develop well, the place must be illuminated and protected from draft winds. Planning involves choosing a site and plants, resolving issues of flower garden design . It is recommended to make a sketch of the future design on a sheet of paper, which will include the dimensions and configuration of the flower bed, and the number of plants.
For the work you will need cement, small crushed stone, sand, plasticizers, coloring pigment, plastic film, thick cardboard, lumber for formwork, tape, a shovel and scissors. The next step is to transfer the contours of the structure to the chosen location : it is necessary to mark the area along the outer and inner sides of the future flower bed, form a trench 15 cm deep and 20 cm wide. The frame is made of chipboard or fiberboard sheets. Pegs are installed in accordance with the contour, which are recommended to be attached with screws to the formwork. For wavy flower beds, plastic is the best option. To fix the frame from the outside, supports are provided . To obtain a high-quality solution, it is necessary to observe the following proportions: sand (4 parts); cement (1 part); fine crushed stone (4 parts); water. The solution is poured carefully and evenly . After the solution has completely dried, the frame is removed. At the end, the flower garden is filled with fertile soil and decorated with ornamental crops.
Flowerpots made of cement and rags (fabrics)
Making pots from cement and rags with your own hands is very simple and looks very impressive and original.
What you need
- cement mixture;
- water;
- bucket;
- rubber protective gloves, work clothes;
- an object (pot, pan, dish, bucket, log), the shape of which the product will take;
- old rags, a piece of cloth, pieces of fabric;
- a stick for mixing cement and water, preferably a mixer - a low-speed drill with high power;
- cling film;
- acrylic paint;
- clear varnish (preferred).
Any container made of moisture-resistant material - galvanized sheet, aluminum, plastic, impregnated wood - is suitable as a form. For example, old pots and containers in which ready-made plants are sold in garden stores are perfect.
You can use regular cement tile adhesive. Mixtures should be chosen that are quick-drying, intended for external use, resistant to water and frost (for example, Adefilex P9 Express, Mapeklej Extra and others). Before starting work, the glue is diluted to the consistency of thick cottage cheese (cement glue diluted too much with water takes a long time to dry).
As a drapery, an unnecessary piece of material (unnecessary fabric, floor rag) in the shape of a rectangle with dimensions:
- length – at least 1.5 times the circumference of the pot;
- width – at least 1/3 of the height of the form.
It is better to take a fabric made of absorbent material (cotton) - such fabric will be evenly and quickly saturated with cement (glue).
Performance
- Preparing the mold for the pot. Place the mold on a platform, preferably smaller than the mold, and cover with cling film.
- Mix cement and water in a container. Add enough water to obtain a dough consistency. The consistency should not be too liquid, otherwise the solution will drain from the rag. The consistency of thick sour cream is suitable.
- The prepared rags are thoroughly moistened in the solution, wrung out, dipped again in cement and laid out (wrapped) around a pre-prepared mold. You can simply hang the fabric, draping it on the body of the form, trying to give the material the most interesting shape and texture. Draping must be done immediately, before the solution (glue) begins to harden.
- We wait about a week for the solution to dry.
The fabric can simply be hung on the forms, as shown in the photo.
Laying fabric drapery in different ways
You can make a concrete flowerpot from several pieces of fabric, overlapping them. It doesn’t matter where the first flap is placed - on top or bottom of the form. The option looks interesting when the flaps are laid diagonally, lengthwise, crosswise.
The way we apply the fabric depends on our vision. When the first experience is successful, you can improvise. The strips of fabric should stick well to the surface of the mold. The fabric can be draped, folded, waved, wrinkled, or tied with bows. There are many options for showing creative ingenuity and imagination.
You can make a stand or plinth for the pot using various available materials, leftover building materials, for example, a piece of plastic pipe. Prepared pots made from rags and cement will decorate gardens, balconies, houses, and terraces.
Manufacturing technology for hanging pots for indoor plants
For flower arrangements you can use a concrete pot,
made from various shapes and fixtures:
- containers;
- plastic containers;
- household plastic;
- burlap and rags;
- burdock leaf;
- things and shoes.
A concrete planter can be made from any object adapted for pouring the mixture. Hanging pots save space. Products with flowers can be placed at different levels, decorate an opening or a terrace.
To make a flower pot you will need a silicone mold, which you can make yourself. As a starting model, you can use laser-cut plywood according to an invented drawing in a geometric style.
To make the walls more resistant to deformation, the model is made of 2 parts - an external frame and an internal liner. After gluing the parts, use sandpaper to remove any irregularities and cover them with matte paint. After surface treatment, defects appear that can be easily eliminated mechanically.
A piece of cardboard is used as formwork for pouring. To prevent the silicone from sticking to the surface, the mold is treated with a release agent. To create a cavity, an insert is inserted into the structure. Silicone is poured in a thin stream from a height of 1 point so that the composition fills all the voids and the container. The polymerization process of the material occurs within 24 hours.
After the mass has hardened, the mold is removed, the excess is cut off and used to cast flowerpots. When mixing and pouring the composition, it is recommended to knock on the sides of the mold to help release air bubbles.
Mineral pigments of various colors are added to the concrete mixture. You can use bottles and mugs for filling. Cones and pyramids are made from a special polymer composition that can be easily rolled out with a rolling pin. These forms are filled with concrete and formed into pots with a cavity for planting flowers.
Decorating flowerpots
For minimalist arrangements in a modern loft style, raw concrete pots without decoration or paint are suitable. To create romantic, rural, retro gardens, you can decorate ready-made flower pots in various ways.
- When the material is completely dry and hardened, you can paint the product. The finished pot can be painted with special durable paints for plaster or decorated with aerosol paints and varnished.
- You can add interesting texture to fabric and cement pots using tile adhesive. If you choose a high-quality frost-resistant composition, you can leave the pot outside in winter.
- An interesting option is to glue decor to the pots:
- shells;
- pebbles;
- pieces of glass;
- broken tiles.
Large concrete pots made from old buckets
Massive improvised objects are used to make decorative elements used in landscape design. A master class on making flower pots with your own hands can be taken at specialized art centers in Moscow.
The principle of working with concrete when using old buckets is reminiscent of making Easter cakes. To make a cement pot without voids, the substance should be mixed well, and pebbles should be added to obtain a shaped accessory.
Large pots are decorated with multi-colored tiles and accessories. Before you start working with the cement composition, it is recommended to protect your hands from exposure to concrete. You should work with gloves. If a crack appears in the finished product when removed from the mold, the defect must be eliminated by covering it with fresh solution.
Let's sum it up
Instead of buying expensive flower pots, you can easily make your own. This work does not require special precision, skills, or equipment. An old bucket or pot found in the attic can start a new life as an unusual flowerpot. Concrete pots look good in the garden and are durable. Homemade flower pots can be imperfect, and that's the beauty of them. Plants grow well in them and look harmonious in modern gardens. Their small size fits into some modern styles.
Caring for concrete pots is as easy as caring for plastic pots - just wash with water. Homemade pots are not only an easy way to create a functional, original decoration, but also a lot of fun from the work done!
Conclusion
In general, it is quite possible to make not only an “eternal”, but also an exclusive flowerpot yourself. Concrete, a little ingenuity and imagination and years of admiring not only the content, but also the form.
In recent years, the loft style has become increasingly popular, and with it concrete, not only in gardening, but also in the interior. Concrete makes excellent functional and very original furniture. No less interesting is a material such as tadelakt - it is not only the oldest type of plaster, but also an excellent material for covering concrete sinks. The video shows the first experience of landscape design.
Subscribe to our Telegram channel Exclusive posts every week
Aligning the top and bottom edge of the cement pot
To align the edges of the workpiece, trim off the excess fabric.
Next, cut strips of fabric about 2 cm wide. For this purpose, you can use thick non-woven material such as geotextile.
It absorbs cement very well and creates volume. but you can take thinner fabric. Then you will have to apply several layers of it. This will help smooth out any remaining unevenness.
Glue cement-impregnated strips to the edges of the pot.
Briefly about the main thing
Cement is an excellent and easy-to-use material from which it is easy to make a flower pot for your home or garden. The main advantage of cement is its low cost and the ability to make flowerpots of any shape and size. For example, at my dacha there are several vases in the form of iron buckets and wooden tubs of different sizes.
Cement is easy to work with and it is almost impossible to ruin the shape. You just need to mix the solution correctly and do not rush to remove the finished product. It must dry completely, otherwise it will quickly crack.
Question
Write in the comments whether you use flower pots at your dacha or plant flowers in open ground? What other containers can you suggest using in your work?
Materials for work
Flowerpots of unusual configurations installed near the house look impressive. Of course, you can purchase such products in specialized retail establishments. However, you will have to limit yourself in choosing the desired forms. You will be able to choose only from the offered assortment.
You will also have to come to terms with additional financial costs, since not every summer resident can afford the cost of decorative flowerpots. You can do it differently if you attend a master class and watch a training video.
However, it is initially useful to understand what materials and tools will be required for those summer residents who have decided to plunge into the world of landscape design. In order to start making original flower pots you will need the following materials:
- cement (in most cases, preference is given to the M400 brand);
- fabric (any fabric, napkins, towels, bags are suitable, which are no longer possible or too difficult to find useful use in the household);
- reinforcing mesh (using it you can form the most bizarre shapes);
- paint (the best option for painting work is acrylic, water-based epoxy or polymer);
- paint brushes;
- a container in which you can mix the solution;
- protective gloves.
If you want to get a vase of a specific configuration, it is recommended to prepare a suitable form. It will be easy to find on the farm, since it can be a bucket, a log or any other shape, preferably conical.
Many craftsmen even use rubber gloves as a form, and upon completion of the work they receive flowerpots in the form of open palms in which greenery is planted. Stretch packaging film or durable plastic bags can be useful for creating country crafts.
Having an electric drill with a special mixer attachment will speed up the process of creating garden decorations. In this case, it will be possible to knead the solution quickly and you will not need to exert maximum physical strength to complete such tasks.
Useful tips
To achieve results when making flowerpots from cement and rags, you should adhere to the following tips:
- If there is a need to trim any of the edges of the flowerpot, you should use a large sanding mesh for drywall. A regular hacksaw is not an effective solution here; the edges will stand out too much from the general background.
- To decorate flowerpots made from old jeans, it is better to choose metallic acrylic paints. Bronze and greenery will look more advantageous.
- For ease of painting the finished product, white sand should be added to the working solution. Alternatively, you can cover it with plaster.
Video on creating flowerpots from cement and rags: