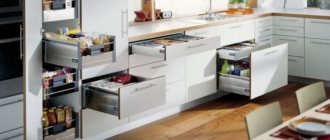
To choose a kitchen design project, you can use special planning programs. Designing in such services is available to anyone who knows how to use the Internet and has basic PC skills. To draw a kitchen online yourself and for free, it is recommended to consider a selection of services and also figure out how to work with them.
Kitchen design from scratch
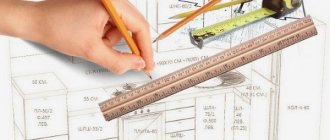
Calculating kitchen furniture does not require special mathematical knowledge. It is enough to carefully measure all the indicators, write them down and not confuse them during sketches.
To create a kitchen from scratch, you need to measure all the indicators and plan the placement of the furniture elements.
Preparing a sketch
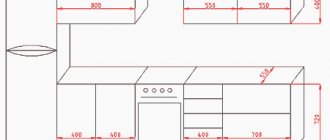
For a preliminary sketch you will need to measure, record readings and draw to scale:
- wall length;
- wall width;
- wall height;
- window locations;
- where are the entrance and balcony doors located?
- sockets and ventilation.
Mark all this in the diagram so that at the first stages you can understand where and what kind of kitchen furniture is placed. Then define what is called the “work triangle area.” This is the constant path that is made in the kitchen between the sink, refrigerator and stove. There should be no obstacles, decor or furniture along this path. Depending on the layout of the kitchen there will be a dining area.
It is necessary to determine where the main furniture and equipment will be located.
When you have placed the main composition on the sketch, allocate the remaining space for cabinets, a dishwasher, other appliances or furniture.
The remaining space is used for decoration and secondary elements.
Determining the minimum configuration of a kitchen set
How to calculate a kitchen set yourself? Before ordering a kitchen set, you need to familiarize yourself with the concept of basic equipment. This is a single set of kitchen furniture blocks 2.4 meters long.
Each headset has a basic configuration.
Placed here:
- 3 wall cabinets 60, 45 and 45 cm wide;
- 4 lower cabinets (under the sink, under the oven, and two cabinets 60 cm wide);
- moisture-resistant tabletop;
- base;
- water trap.
The basic package includes a certain set of elements.
Having such a standard kitchen set, its minimum configuration, makes it more convenient for the seller and buyer to speak the same language. Depending on the area and type of premises, you can easily calculate your equipment and its pricing policy.
Having a sketch will make it easier to explain to the seller what exactly you want.
Working with the viewing angle (camera settings) of the planner
To control objects and kitchen space, learn to change the viewing angle (camera).
Zoom in – Zoom out
Place the mouse cursor anywhere in the planner space. To enlarge (zoom in) objects, scroll the mouse wheel away from you. To reduce (zoom out) the space, scroll the mouse wheel towards you.
Rotate 360 degrees
To rotate the camera (room) as you wish, click on the left mouse button, and while holding it down, control the camera
Carry the camera
Hold down the right mouse button and, while holding it, move the mouse. Arrange the space as it suits you. Combine zoom in/out, rotation and translation for full-fledged work in the designer.
Menu of the “Room” section
Kitchen unit layout options
The layout of the kitchen determines convenience and comfort during cooking and eating.
There are several options for positioning the headset.
Corner (L-shaped) placement
Classic placement of kitchen units in the shape of the letter “L”. This is an option for square or rectangular rooms. The rule of the “working triangle” is followed here, since there is a lot of free space in the middle. Corner placement of kitchen furniture is not suitable for a narrow or very small room.
Corner placement is considered classic and is suitable for square-shaped rooms.
U-shaped placement
U-shaped placement of the headset occupies three walls at once, usually two long and one short. Many household appliances can be placed here, including a washing machine and dishwasher. A large number of cabinets allows you to arrange all the services and kitchen appliances.
In a U-shaped arrangement, the furniture occupies three walls.
Peninsula accommodation
The peninsular planning method is a combination of the L-plan and the island one. Here one long wall and part of the second, short one are completely occupied. In this case, a small protrusion appears. That is, an “island” that is tightly adjacent to the entire kitchen structure of the unit. This is usually a small work desk with a lower cabinet, dividing the kitchen into a work and dining area. But there are other options.
The peninsula layout has a small overhang that is adjacent to the main structure.
Island location
The island layout combines elements of a linear and separate “island”. This is a combination of dining and work areas. One of the walls is occupied by a kitchen unit, and in the middle of the free space there is either an element of the work area or a dining table. The “island” can be of any size, from a bar counter for one to a huge table for a large family.
With an island arrangement, a working or dining area is located in the middle of the room.
Linear method of arrangement
The linear arrangement method is good for small rooms, studios or narrow kitchens. One of the walls is completely occupied by kitchen furniture and appliances. When cooking, a person moves in a straight line from the refrigerator to the sink to the stove. The remaining free space is allocated for a small dining area, folding table or bar counter.
With a linear placement method, all furniture and appliances are placed along one wall.
Double row arrangement
The double-row or parallel design method involves placing the headset and equipment along the walls “facing” each other. In this case, the sink and refrigerator are on one side, and the stove and cabinets are on the other. This option is suitable for a spacious kitchen with large, bright windows.
The two-row arrangement is also called parallel. It is suitable for a large spacious kitchen.
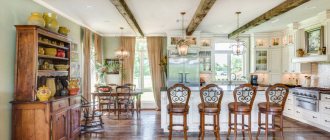
Non-standard examples
Oddly shaped rooms with sloping walls and extra corners are the most difficult to plan. To solve this issue, you can turn to professionals or design the kitchen yourself. Here are some helpful kitchen planning tips shared by experts.
If the room is a walk-through room, for example, with a connected balcony, it is important to use all walls not occupied by openings. For a walk-through kitchen, a straight layout is most suitable.
The arrangement of the headset in the shape of the letter “T” with a peninsula that divides the space into two zones looks original. The central cabinet can act as a dining table or work surface. This layout is only suitable for a large kitchen.
A kitchen moved into the hallway is a narrow space that requires a special approach: shallow furniture, sliding doors instead of hinged ones, small-sized appliances.
In the photo, the kitchen, moved to the hallway, is treated as an extension of the living room using color.
In a kitchen with a bay window or beveled corners, you can create an unusual trapezoidal design that will definitely attract attention. The difficulty is that non-standard premises require special fittings. It is important not to clutter a pentagonal kitchen with an abundance of decor and utensils: you can place a thin console on one of the walls or combine the set with a single tabletop.
Design features of the kitchen set
After you have created a sketch, made accurate calculations, chosen a layout and decided on the material, you transfer the drawings to the workshop. Designs of kitchen sets with dimensions, creation of details, selection of accessories can be left to professionals. In the workshops, wood is cut into the necessary parts.
The sketches are transferred to the workshop for cutting out parts from wood.
3D kitchen planner from “GILD Furniture”: instructions
Preparing to work
To start working in the designer, close the main menu and go to full-screen mode. Click and then . This will make it easier to navigate the left and right menus of the planner. To minimize the window back, click again.
Of the 16 buttons on the panel, only 4 are needed for design:
- Room
- Catalog
- Materials
- Line display mode
Edging parts
Having received the necessary parts, it is important to properly process the edges, since they cannot be hidden with paint or varnish. For this purpose, the ends are edged. This involves sealing all visible areas throughout the thickness of the wood with melamine or plastic tape.
- Place the part vertically so that the cut is at the top.
- Melamine or plastic tape has one adhesive side.
- Apply the adhesive side of the tape to the cut.
- For the best adhesion, the cut with the melamine tape is heated with an iron at medium temperatures through a clean sheet of paper.
- To prevent the plastic tape from melting from the iron, use a hair dryer to heat it.
- If you need to remove all excess and protruding fragments, wait until the part has completely cooled.
- Use a knife or other sharp tool to trim off the unnecessary edge.
- Round the corners, remove cut unevenness and roughness with sandpaper.
It is very important to properly process the edges of wood parts.
Standard module sizes
Dimensions may vary among different companies. The record holder here is Ikea with its 180 cm in the lower tier and 120 cm in the upper. Usually these values are much more modest, and the essence is this: one cabinet - one module.
Hence the standard module width:
- 45 cm,
- 50 cm;
- 60 cm;
- 75 cm;
- 80 cm.
This dispersion is due to the fact that different companies have different views on kitchen units, and they cannot come to a common decision.
It is best to first measure the existing kitchen that needs a new set, and then draw a rough plan yourself. Then, according to this plan, it will be much easier to select the necessary modules, because household appliances such as a refrigerator, stove, hood, dishwasher or washing machine, and so on will already be taken into account.
The only thing that almost all manufacturers agreed on was the height of the lower tier. In modular kitchens it reaches 85 cm, taking into account the base (10 cm) and countertop. This is a comfortable height for people of average height (160–175 cm); others should think about trimming the base or additional legs.
Features of designing corner cabinets
With a U-shaped or L-shaped layout, you need to design a corner cabinet. If the structural blocks are connected to each other at right angles of 90 degrees, you need to carefully plan drawers and opening doors. In this case, special inserts are made. This allows the doors and roll-out drawers not to intersect with each other.
For some layouts, you will need to design a corner cabinet.
If a corner cabinet is joined at a 45-degree angle, during the assembly phase the bottom and top of the cabinet are installed between the sides rather than on top. Only in this case will you get a smooth façade and be able to attach hinges.
Care
Since the set is made of non-natural wood, its lifespan will be shorter than that of solid wood, so it is important to think about proper care of the furniture. The principles are:
- avoid contact with aggressive substances;
- clean with a damp cloth and a small amount of mild detergent or simple laundry soap;
- After cleaning, wipe dry, as moisture can cause swelling;
- treat furniture carefully, avoiding mechanical damage - otherwise moisture may get in there;
- Do not place hot dishes on the countertop.
These simple rules will help extend the life of modular kitchens.
What to consider when designing a drawer
Roll-out boxes are functional and spacious. There are two types of such elements:
- the metabox drawer operates on a roller system using metal guides;
- a box made of chipboard, which is made to individual measurements.
Drawers come in two varieties.
It is also worth understanding the differences between ball and roller guides.
- Roller guides are attached to the lower edge of the bottom of the drawer or cabinet. This is a budget-friendly and durable option for fittings that does not need to be lubricated. The drawer doesn't slide out completely, so you don't get a full view of the contents.
- Ball guides are attached to the central part of the roll-out drawer. They allow you to roll out completely and provide a full view of the kitchen utensils.
It is necessary to decide on the type of guides.
What type of guides you plan to use must be known at the sketching stage. Because for roller ones there is a tolerance of approximately 1 mm.
Components
The number and types of modules differ not only between different companies, but also in different series of the same company. For this reason, finding the perfect lockers can be quite difficult. But in the end, you will get a kitchen that best meets the needs of the housewife - cooking with this is a joy.
Wall cabinets most often come in the following types:
- with drying - they are placed directly above the sink;
- tableware (rarely found among modular ones) - with a glazed facade, behind which a beautiful service can be seen;
- open - without door. Perfect for a country or Provence style kitchen;
- straight, blind - the most ordinary cabinet with the usual door.
It is worth noting that this difference is only in appearance. They can also vary in size. This also applies to the lower level headset. The most commonly presented modules here are:
- under the sink - a necessary thing in every kitchen;
- with shelves - most often they are wide and designed for storing large utensils (pans and pots);
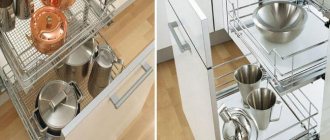
- with drawers - a very practical module, where there is more effective space compared to the usual option with shelves;
- combined - universal modules with both shelves and drawers;
- with a niche for built-in equipment - you should select based on the availability, type and size of the equipment itself;
- pencil case - a tall narrow cabinet.
One series does not necessarily contain all of the above modules. The manufacturer may have only two upper and three lower ones. When choosing, you should proceed from your needs: if there is no built-in equipment, then you don’t need a cabinet for it.
Placement of equipment and sockets
The electrical network and sockets are thought out during the period when you create the first sketches of kitchen units. Even if you don’t currently have a dishwasher, but are planning to buy one in the future, be sure to make an outlet for it. Otherwise, some time after creating your dream kitchen, you will have to solve new problems of lack of network connection points.
It is recommended to provide an outlet for the dishwasher.
Each built-in appliance must have its own outlet.
- For the hob and oven, make two sockets so as not to connect a double or tee. Don't make the sockets too high or low. 0.6-1 m from the floor level is considered optimal.
- The refrigerator usually has a short cord. The socket must be in the area where it is located and on the side where the wire comes out.
- For a washing machine or dishwasher, the sockets are located quite low, 20-40 cm from the floor level.
- If you plan to install an outlet immediately behind the equipment, add 5-10 cm to the depth so that the equipment fits into the niche.
- Install the microwave oven and coffee machine at shoulder or eye level of an adult. Since this is an appliance that is used daily, sockets must be freely accessible.
- The hood requires a separate outlet, which is designed in the upper area behind the kitchen cabinets.
It is recommended to place sockets and switches according to the diagram.
Saving a project
The planner has provided a function for saving the project.
Click on in the lower right corner. If you are saving the project for the first time, the designer will prompt you to log in.
Click “Register” and enter your name, email, phone number and password. This data will be sent to you by email
After authorization, click on again
to save the project. A link to the project will be sent to your email.
The link to the kitchen created in the planner is in the “Project Information” section, in the left column of the planner menu. To go to this section, click on
.
Open 3D designer
How to Design a Very Small Kitchen
In a small kitchen, use every useful inch. Even small rooms can be made cozy, convenient and comfortable.
- If possible, move the dining area to another room. This way you can create your workspace as comfortably as possible.
- Remove doors with hinges that open into the room. Make an arch or sliding structure.
- Make a kitchen set to order or do it yourself. Only individual measurements will give you maximum functionality of the furniture.
- Take your room design seriously. Make a kitchen in light colors without large patterns with light-reflecting surfaces.
If you follow the recommendations, even from a very small room you can extract the maximum useful space.
Now that you know almost everything about the layout, location of appliances and outlets, it's time to take a critical look at the kitchen. You may want to improve and transform something, replace or create something with your own hands.
How to calculate a kitchen wall cabinet with your own hands
Difficulty in calculations is usually caused by corner elements. But, since in our version a direct kitchen is designed and calculated with your own hands, everything is extremely simple and clear.
The depth of kitchen wall cabinets is usually 300mm. There are two wall-mounted kitchen modules that are fundamentally different in design:
- Wardrobe with drying rack. A two-level wire rack for dishes is built into it. Therefore, its dimensions are strictly regulated by the dimensions of the drying itself - the width of the cabinet should be “round”, 500, 600, 700, 800 or 900 mm.
- Cabinet above the stove. According to kitchen standards, the distance between the hob and the cabinet should be 150-200mm greater than that above the rest of the work surface. That is, the cabinet should be shorter than the others in height. A hood can also be built into it. The details of installation and the required dimensions of cuts inside the cabinet can be found in the instructions included with the selected hood model.
The rest of the DIY direct kitchen cabinets have a completely standard design and are easy to calculate. Let's look at the example of a drawing of a kitchen wall cabinet with two shelves.
- Bottom 568x300 – 2 pcs.
- Sidewalls 800x300 – 2 pcs.
- Shelves – 568x280 – 2 pcs.
The back wall of the fiberboard can be inserted into a groove or overlapped. The second method is easier if you need to make a straight kitchen with your own hands - we recommend sticking with it. The rear wall in the groove is usually selected if you plan to install adjustable awnings. But for hanging a straight kitchen this is unnecessary; simple “ears” are sufficient for hanging upper kitchen cabinets and then tying them together into a single, monolithic structure.