DIY wooden headboard
Looking for bedroom decorating ideas? A headboard can make an important contribution to the decor of a room, no matter its size. If you need instructions on how to make a wooden headboard with your own hands , in our article you will find 17 wonderful master classes with step-by-step photos, following which you can easily make a bed headboard at home . If you have a spacious bedroom, a beautiful headboard can be used to highlight and fill the space. In a small room, this will add a special accent to the bedroom, while saving usable space. You can attach the structure to the bed frame or directly to the wall. When it comes to design, there are an endless number of styles and materials that it can be made from, but in this article we present options on how to make a wooden headboard for a bed . We hope everyone will find something here that suits their taste. You can make your own unique headboard whether you have carpentry skills or just enjoy doing wood crafts as a hobby.
Wooden slats as a headboard
This type of headboard saves a lot of space, since we don’t need bedside tables; their role is played by shelves inserted between the slats. You can make a similar headboard yourself by attaching wooden slats to the wall at equal distances from each other.
Option with vertical slats.
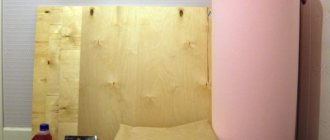
Plywood headboard: a simple solution with cutouts
Inexpensive, DIY wooden headboards don't have to be too complicated. The geometric pattern of round cutouts makes this DIY wood headboard simple yet striking. You just need to find a sheet of plywood measuring 157 x 90 cm. Place round shapes on the plywood and trace to create your design. Use a hole saw blade to cut holes at the marked points. Sand the inside edges of all holes. Cut 1 x 3 boards 8 feet long around the perimeter of the headboard. Attach the boards to the underside of the headboard, thus creating a frame for the plywood. While this step isn't necessary, it just adds some flair and finishing to the headboard, if that's what you're looking for. Paint it the shade you want and hang it on the wall.
Photo source: www.bhg.com/rooms/bedroom/headboard/cheap-chic-headboard-projects
Vintage window or door frames
Using old window frames or doors, for example, can be a great way to make a headboard. Be creative. Nobody said that the headboard really should be the same as it is presented in furniture stores!
Color and shape
Before you buy, decide what kind of headboard you need? How will it fit into your design? And won't it be an unnecessary accent?
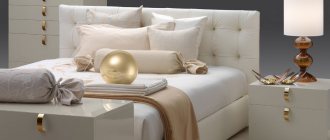
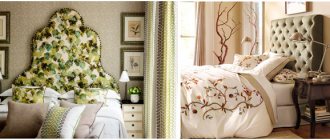
White headboard
The bedroom is a place where people want to relax after an eventful day and get ready for a healthy sleep. That is why light colors are mainly used for its design. A white back will be an elegant addition to styles such as Provence, classic, baroque, minimalism and modern.
Provence is characterized by a forged back, as well as a frame made of solid wood. They are painted white or cream. The second option can be additionally decorated with curly elements or drawings in the form of flowers, branches, leaves, etc.
Classic bedroom with white furniture
To make a backrest in classicism they use:
- wood - a strict and elegant option;
- leather - natural or artificial;
- metal - also painted white.
A white leather bed is one of the most luxurious models, which will be a great addition to a classic interior.
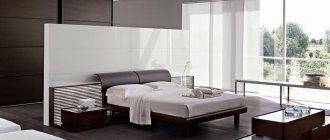
A headboard in Art Nouveau style is always of the correct geometric shape, without the presence of pretentious elements. A simple white panel or a white fabric upholstered backrest will fit into a modern bedroom. It will look good with light and dark walls.
In the Art Nouveau style - the main emphasis is on the headboard with pillows
The white baroque headboard has the following characteristics: it is made of oak or birch, characterized by wavy lines and fabric inserts.
A bedroom decorated in shades of gray will be the best backdrop for a white headboard. The bright colors of the walls will also harmonize with such furniture - the bed will “smooth out” the rich interior.
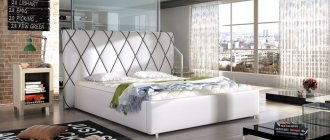
High
High top beds are attractive furniture for modern bedrooms. At one time, such headboards were made in order to additionally protect sleepers from cool walls and drafts. Now such models are used for decoration.
This option is not to everyone's taste.
The origin of high backs is associated with Turkey. Impressive dimensions are compensated by convenience and massiveness. They may not fit into every bedroom. For a room in Provence style, choose a soft backrest; for a classic interior, it is best to opt for natural, unpainted wood.
A rigid back can be made of wood, metal, or plastic. It can be decorated with mirrors, which allows you to achieve volume and add non-standard visual effects.
A mirror panel will add light to the room and visually significantly expand the space.
On a hard and high wall you can arrange shelves or stands. This is ideal for a small bedroom that won't fit bedside tables. Place night lights, books or vases on these shelves.
Luxurious canopy bed
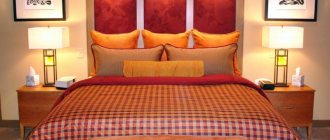
The high soft back creates an atmosphere of security and safety and is comfortable for reading and watching movies. For a classic or Baroque interior, expensive textiles for covering are suitable. A small pattern on the fabric will fit well into a Provencal bedroom.
Very often, decorative pillows are attached to a solid headboard, which instantly changes the impression of the bedroom. They serve as a comfortable headboard and allow you to change the style.
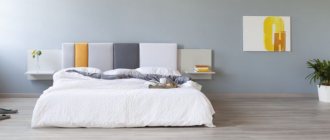
Low
A bed with a low headboard is a more laconic and practical design. The low-rise design is suitable for modern and art deco styles. It approximately reaches the line of the shoulders of a person who is in a semi-sitting position on the bed.
Low headboard is at shoulder level
A low backrest is well suited for apartments with low ceilings. It can be made of wood or plastic, hard or soft. The interior looks interesting with plain low backs that stand out brightly against the background of the walls.
The advantages of this design are:
- space saving - the top of the wall can be decorated with a painting or a wall lamp;
- style and compactness - looks good in a small room;
- Wide variety of materials and upholstery.
Suitable for apartments with low ceilings
Wide
The width depends on your taste . The backrest can be equal to the width of the sleeping bed, or it can occupy the entire space of the wall. Thanks to the second option, it becomes possible to mask wires, sockets, and switches.
A low, wide headboard helps compensate for the lack of height in the room. If it additionally stands out in color, it will expand the room even more. For example, a light, wide headboard contrasts interestingly with dark walls.
Looks great in a large bedroom
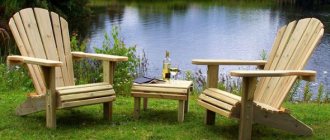
Unedged boards
Use an unedged hardwood board as a natural headboard. Before installation, sand the boards and varnish them.
How to make a curved headboard with your own hands
Like every planned layout, a figured headboard should first be drawn on paper. You can only have one side, as a result, turning it over, you will get the same symmetrical one. In this example, we will look at a figured headboard with a carriage tie.
Materials and tools:
- Foam rubber;
- Plywood;
- Textile;
- Ready-made figure image template;
- Construction stapler;
- Drill;
- Decorative buttons;
- Scissors;
- Decorative edging.
Work process:
- As in the example above, you need to drill holes in the foam rubber, plywood and fabric, placing one layer on top of the other.
- We fasten plywood and foam rubber using a stapler;
- We make upholstery of the outer fabric, but first sew on the buttons;
- The buttons should be secured with fishing line, which you thread through all the holes and secure with a stapler on the back side.
- After securing the fabric, cut off the excess pieces;
- Using a voluminous edging we create a beautiful border of the figured area.
Our work is finished. You can use other fabrics, for example, velvet in dark shades will look rich; usually the same buttons go harmoniously with it. And the figured layout, based on your imagination, can be completely different: in the form of mountains, arches, individual geometric shapes, in the Gothic style, etc.
There is old clapboard on the walls. How to clean it? Restore original color?
To do this, you can use a flat pumice stone or an abrasive wheel. As a result of sanding, the shalevka loses all its protective properties, which means it must be coated with an appropriate antiseptic solution, which not only plays a protective role, but also preserves all the properties of the paint.
Once the preparation is complete, the paint can be coated.
If you use classic paint, it will preserve the original upholstery pattern and will not require additional finishing. If the coating is opaque and completely hides the wood grain, to achieve an attractive and original look, you should take care of additional decorations, for example, elements for decorating windows and floors.
Types of lining profiles
Manufacturers produce different types of profiles, which differ in the type of locks, the size and shape of the back and front sides, and the type or type. If you are planning to decorate the interior of your car, it is better to choose the design of the room in advance - this will help you decide on the selection of the profile.
Standard class plate is often suitable for indoor use
Standard. The basic profile is trapezoidal, with the front side parallel to the back. There are two cross cuts on the back to prevent transportation. One of the edges of the rail is equipped with a corner, the other with a protrusion, together they form a “spike groove” type connection.
Eurolining is one of the most popular types of lining
Eurovision. They are distinguished by the presence of a corner connection and a longer “shelf”, thanks to which the joints between the panels are more noticeable. The home's interior features European millwork, which benefits from the clever design of the spires. There are vents at the rear of the track that are designed to detect excess moisture and prevent crown formation.
The smooth lines of the Softline car distinguish this type of profile from others
A fine line. This type of implant has rounded corners, which reduces the likelihood of runs and netting. But due to the elongated “shelf”, the seams between the panels are very noticeable. Softline Carrier is recommended to be used to decorate bathhouses and canopies.
“Brick” panels are widely used not only for finishing bathrooms and saunas
Calm. The characteristic profile of the profile is the absence of a bevel at the tenon, which makes the joints almost invisible after installation. The effect was used for cladding the façade to simulate “under bruises.” This allows you to increase the thickness of the panels - up to 25 mm.
The Calm Button is one of the most popular profile types.
Landxayc. One of the most expensive types of profiles, since their front side is subject to additional processing to create complex options. Also, using hot stamping you can get a panel with the effect of wood carving. A Landheads vehicle was used for interior decoration of the premises.
Blockxayc. The front side of the profile is rounded, which in its finished form will create the effect of wrapping cylindrical logs. Most often used to decorate the facades of buildings.
Imitation “under a cylindrical barrel” allows you to create original interiors
America. The main difference between the profile is that the back and front surfaces are not parallel to each other. The difference in thickness can be 6-8 mm, and the slope can be 5 degrees. 3a this creates the effect of installing boards on the outside or simulating cladding with siding panels.
American
More information about types of lining
On the modern market of finishing materials you can find coatings made of wood, plastic and metal. The most popular, of course, is wood siding, which is environmentally friendly, provides additional thermal insulation and looks great. Since wood siding is the most popular, we will talk about it in more detail below.
The second most popular option is plastic lining. Conscientious manufacturers use high-quality plastic for its production, resistant to various negative influences: low and high temperatures, high humidity, and so on.
This coating is perfect if the room has a constantly high level of humidity. Most often, plastic siding is used on balconies, loggias and bathrooms. In some cases, external finishing is possible.
Metal cladding is not in great demand, but it is also used for finishing some rooms and external cladding of various structures. Metal panels are the most durable, so their scope can be very wide. However, due to its unpresentable appearance, such a coating is not used in all works.
Preparatory work
A do-it-yourself double bed has a number of advantages - it is the ability to choose the required size, design, shape of the legs, as well as the quality of the finished product in the final result, thanks to which the bedroom turns into a masterpiece.
The main details in its manufacture are:
- design, which can be classic or with a lifting system;
- a drawing to assist in the preparation and manufacture of parts;
- plan of sequential actions.
Layout of a double bed including mattress
Decorative elements
Decorative elements play a big role in finishing the product; thanks to them, the bedroom will sparkle with new colors. One of the options for finishing elements is wooden slats, 5 by 2.5 cm thick, which should also be included in the drawing.
- it is necessary to make the required size of slats from the prepared materials;
- the prepared slats must be sanded and painted with stain, the color of which is chosen based on personal preferences and the design of the room;
- after drying, they are coated with water-based varnish;
- After opening the first layer of varnish, you need to sand the slats to prevent the appearance of all kinds of bubbles. Next, apply two more layers of varnish;
- The painting procedure must also be carried out with the legs.
- decorative trim is attached with glue;
- it is necessary to apply glue to the surface of the frame and finishing slats;
- using clamps, press them for a while, preferably until the glue dries completely;
- all excess glue must be wiped off with a damp cloth;
- The slats can be fastened using either nails or self-tapping screws.
Fastening the lifting mechanism requires additional skills, since its installation must be of high quality and safe. There are three types of mechanisms, each of which is installed differently. Therefore, having chosen a certain type, you need to carefully study its installation diagram or seek the help of specialists.
Manufacturing of elements
The sequence of manufacturing elements for the future bed includes cutting materials, sanding them, drilling holes for screwing in self-tapping screws at an angle and fastening furniture elements using wood glue and self-tapping screws.
Frame
To make the frame, two boards measuring 2.5×20×205 cm and two boards measuring 2.5×20×148.5 cm are cut. How to make the frame yourself:
- The cut boards are cut to the required length using a jigsaw;
- The wood is sanded using a sander or plane;
- All four boards are placed at a 90 degree angle to each other. You can check the connection angle using a square. For more reliable fastening, you can use metal corners at 90 degrees;
- For fastening with self-tapping screws at an angle, we make special holes, and after joining the wood with self-tapping screws, the joints are secured with wood glue.
The corner of each board must be ground and rounded. This will ensure not only safety in operation, but also protect the carpenter making the bed from wounds, scratches, splinters and cuts.
For this fastening, 30 mm self-tapping screws are used. Remains of wood glue, before they dry, are removed with a damp cloth. To process the bed frame with your own hands, you can use not only electric, but also hand-held woodworking tools.
Many people think that the scope of application of lining is limited to cladding the facades of houses. However, this is a misconception. In fact, this material is used in other processes. For example, furniture made from clapboards with your own hands looks very attractive. And numerous photos on the Internet are proof of this.
We build the frame
To make a frame for a future cabinet, as in the photo, take beams of certain parameters. By multiplying the length of one bar successively by the width, height and length of the cabinet, you will determine how many bars you need to purchase. Remember, if you get a fractional number, you need to round it up. Then we will need to purchase 16 m of wooden block. Let's break down our calculations:
- 4 * 0.5 = 2 m.
- 4 * 1.8 = 7.2 m.
- 4 * 1.5 = 6 m.
- 2 + 7.2 + 6 = 15.2 "16 m.
Karas must be assembled using self-tapping screws. There are two ways to perform this task:
- by twisting the bars together: for this you need self-tapping screws 7 cm long;
- by using wooden or metal corners.
Experts recommend using iron corners, as they have a more pleasant appearance and do not dry out like wood products, and therefore do not wobble over time.
To assemble the frame with your own hands, you need to start with the front and rear frames. Twist the bars at 1.8 and 1.5 (equal to the height and length of the cabinet). In the case of constructing a frame using corners, short bars are placed on the frame and twisted. The second frame lies on the floor, and the first frame is placed on it with its legs down. The corners are placed at the joints and screwed.
And if you want to assemble it using long screws, then you will need to place the frame on its side, place the block on the floor, press it to the frame, and then screw all four bars in turn. Place the second frame at the ends of the small bars and screw it.
This is all that needed to be done to assemble the frame for the future product.
Legs
Making legs with your own hands is the easiest step in the entire construction process.
The whole manufacturing process:
- the prepared timber with a cross-section of 10x10 cm needs to be cut into 6 bars 10.5 cm long;
Blank for future legs
- fastening is carried out to the support bars;
- to strengthen the frame, two additional legs are attached under the central support, at a distance of 50 cm from the edges of the frame;
- To decorate them, you can give them any shape. You can saw off one of the corners approximately 3 cm from the bottom, at an angle of 45 degrees, as in the photo;
- Upon completion of the work, all sides must be sanded.
Fastening all created elements:
- as mentioned above, the legs are attached to the frame support boards. To do this, you need to use 60 mm self-tapping screws. You need to spend at least two on each leg;
This is what the leg mounting looks like from the inside
- holes are pre-drilled with a drill, a drill whose diameter coincides with the cross-section of the screws.
Legs attached to frame
Before screwing in the screws, you must first drill holes, which will reduce the risk of splitting the boards.