Textile decoration of the house makes its interior more cozy, soft and comfortable. But it is these qualities that are especially important for the furnishings of a bedroom. Beds are most often decorated with fabric and leather. Such products are beautiful, cozy, but expensive. The decision to cover the bed with fabric yourself will help not only save money, but also create original furniture: a delicate crib for your princess, a solid family bed decorated with a carriage frame, or something else very special.
When choosing the most suitable material for bed upholstery, consider not only the interior of the room (the decor used, its color, shape, texture). Be sure to pay attention to the properties of the fabric. To keep its shape, it must be dense; so that in a year or two you don’t have to think about repairs - durable; Of course, it should not collect too much dust and be easy to clean with the means available to you.
To decorate your beds with your own hands, you can:
- take old furniture, then, taking into account the initial data and your capabilities, improve its appearance;
- use a ready-made product of simple design;
- according to your measurements, make a frame with an orthopedic base yourself or in a workshop.
Materials and tools
First, let's decide what a headboard can be made from and what tools will be needed for this.
Materials:
- Wood (plywood, boards, planks, bars, depending on the chosen style);
- Fabric (for the base as well as the outer upholstery);
- Foam rubber or other soft padding;
- Accessories (buttons, buttons, cords, hooks, etc.).
Headboard Design
Tools:
- Electric puzzle;
- Construction stapler;
- Screwdriver;
- Self-tapping screws (or glue, depending on the manufacturing method);
- Scissors.
In order to make a headboard for a bed with your own hands, you must have at least minimal skills in working with these tools.
How to choose the right option?
Now that we have talked in detail about how to make structures with your own hands, we will explain how to choose the right model. The options from our list can be divided into 3 types: soft, hard and unusual shapes.
- Bedroom
Instead of a headboard: 11 cool design techniques
Soft
Suitable for those who spend a long time in the bedroom in the evenings or in the morning, who like to lean on the back to read a book, work or watch a movie without getting up. For such cases, our selection contains several ideas.
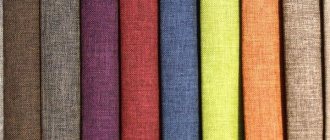
It is important to choose the right upholstery material. It is better if the fabric is wear-resistant and easy to clean. Beware of natural wool in the composition - the surface will be prickly. Modern upholsteries such as velor, flock, jacquard are suitable.
Hard
This is the choice of those who primarily care about design rather than comfort. Choose wood, plastic or metal. Sometimes a rigid back is used as a shelf - such options are also presented in the article.
Simple upholstered headboard for bed
This method is suitable for those who want to decorate their home with a bed with a soft headboard, on which you can lean your back while sitting. The basis for such a backrest will be a rectangular sheet of plywood (it is advisable to choose the thickest one) of a suitable size. You will also need any thick fabric, a beautiful fabric for lining, as well as soft filling.
How to make a headboard:
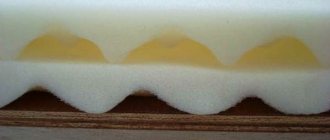
- Two layers of foam are placed on top of each other on a sheet of plywood;
- A simple thick fabric is placed on top. It should extend beyond the edges of the foam and plywood by about 8 inches and be secured to the back of the frame using a staple gun.
- In the same way, the main fabric you have chosen for the headboard is stretched and pinned on top.
- As a result, you will get a soft rectangular structure that will serve as a headboard. This is done quite quickly, and the whole process can be completed in a few hours.
Upholstered headboard - a new design for your bedroom
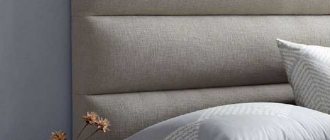
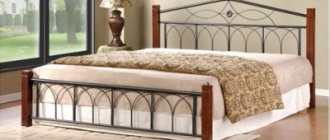
The headboard of such a bed is completely covered with fabric, under which soft foam rubber is placed. For greater decorativeness, various methods of screeds are used. These beds are quite expensive, but the good news is that you don't need to purchase a new bed. You just need to make a new soft headboard - the video and master class will help you with this.
Even the simplest upholstered headboard looks great, and if there is an ottoman with the same finish next to it, the new room design is almost ready.
Curly headboard
Before you make an upholstered headboard the easy way, consider: wouldn't a beautifully curved and textured headrest look better? One of the beautiful headboard options is a curly back.
To make such a headrest for a bed, you need to cut the desired shape from a sheet of plywood. It is better to draw a sketch in advance, from which it will be easy to decide whether this shape is suitable for your bedroom, and whether there will be any problems with cutting it. The fabric is cut in the same way, but with a cut of 15-20 centimeters. Also, in addition to the stapler, you will need glue; it is better to choose a universal one for gluing fabric, foam rubber and wood.
Making a decorated headboard with your own hands:
- The selected shape is cut out of plywood with a jigsaw at the top of the sheet. The bottom should remain rectangular for fixation;
- The fabric is cut with scissors and a design is first applied to it with chalk or a bar of soap. Foam rubber is cut in the same way, but felt-tip pens or markers can be used for marking;
- The foam rubber is attached to the plywood with a stapler;
- Fabric is attached over the foam. It must be passed from behind, placing the structure in a vertical position, in reverse and secured with brackets. For better results, cuts can be made in the fabric;
- The edge of the headboard can be decorated with ribbons, fringe or special furniture potholders;
- To create additional texture, you can use the same nails to repeat the contour of the headboard, stepping back 10-15 centimeters from the edge.
A headrest made in this way will give the room not only an original design, but also additional comfort.
Bright bed in art deco style
It is not worth saying that creating a beautiful, stylish and at the same time high-quality product yourself is absolutely easy. But a little effort, care, good materials and a description of the process will undoubtedly help in the work.
Such a bright bed is perfect for almost any interior and will decorate it. The bed will fit especially well into a spacious room that is not overloaded with decorations and furniture, since it itself is an attention-grabbing decor. The only thing you need to pay attention to is to think over an individual color scheme.
Preparing to decorate the bed
So, first of all, you need to take care of the base of the bed. Having carefully thought through the size of the bed, choosing a ready-made appropriate orthopedic base, drawing the desired headboard shape that suits your interior, you can make the bed itself from MDF. To do this, use the instructions and description of assembling the bed on the Internet or order the work from professionals. The last option is the simplest and most reliable.
To decorate a finished structure with fabric, prepare:
- Decorative textiles.
- Textiles for covering the back parts of the bed.
- Foam rubber about 5 cm thick.
- Furniture glue.
- Scissors.
- Sharp carpenter's knife with replaceable blades.
- Decor for the headboard - finishing furniture nails.
- Hammer.
- Furniture stapler with staples.
- Tape measure, chalk for marking.
- Sandpaper or sander.
- Adhesive tape if you also plan to make the structure's trim (except the headboard) removable.
Before applying decor to the MDF parts, sand the cut areas of the bed base parts and the ends with sandpaper. Having a sanding machine will greatly speed up this process. This way you will be able to avoid damaging the fabric while working.
Description of work
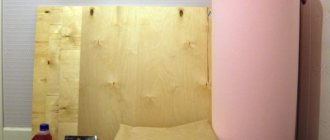
- We start covering the bed with decorative material from the headboard. We dismantle the required part of the frame.
- We cut out a piece from foam rubber that should repeat the outline of the sheathed MDF headboard. We cut it out using a carpenter's knife. The task is not easy. If, as in our project, the headboard has a complex shape with roundness, the cutting of the foam can be ordered at the place of purchase or in a furniture workshop using a prepared pattern.
- Apply glue to the front surface of the headboard, then lay the foam rubber tightly on it so that the curved edges match as much as possible.
- Attach the edge of the foam to the MDF base using a furniture stapler, placing the staples a short distance from each other.
- Cut out decorative material for the headboard. On the right, left and at the bottom, leave an allowance for fastening of about 10 cm. At the top of the figured headboard, make the allowance larger by 5-7 cm, so that it is convenient to carefully lay out the corners, or leave a rectangle so that you can cut off the excess later.
- To ensure that the fabric lies flat, align its bottom edge and begin fastening it with a furniture stapler.
- Then place the headboard in a vertical position and stretch the fabric.
- To properly drape the corners of the figured top, cut the fabric. Fix the laid out fragments with a stapler to the back of the headboard.
- Stretch the fabric in the same way and attach the textiles to the sides of the headboard. Check the correct tension of the fabric and start decorating the surface with furniture nails.
- Using a hammer, carefully attach nails along the top edge of the headboard, laying a strip evenly along the visible outer edge (except for the bottom).
- Then, using chalk and a tape measure, mark with a line the location for the second finishing row of furniture nails at a distance of 15-20 cm from the edge.
- Using a stapler, we fix the decor along the line to the MDF base.
- We lay furniture tape over the staples exactly along the line and secure it with a hammer and nails. Decoration of the headboard is completed.
- To give this part of the bed a finished look, we cut out a blank from technical fabric prepared in advance, making an allowance of 1.5-2 cm for the hem. We fasten the fabric with a stapler.
Now you can start working on decorating the frame.
- We prepare blanks of foam rubber for gluing the base.
- Apply glue to the surface, glue foam rubber along the entire perimeter of the end of the frame (except for the part where the headboard is attached), then along the top part.
In this project, the soft frame of the case is covered with technical fabric, and the decorative cover will be removable and attached with adhesive tape.
- Cut strips of technical material to the size of the surface of the sidewalls, make allowances on all sides by 2-3 cm.
- Fastening with a stapler to the top and then to the bottom of the frame, sew the foam rubber with prepared strips of technical fabric.
- Use a stapler to attach the Velcro tape to the frame.
- Make a pattern for a removable cover. Before cutting out the fabric, try it on again to ensure the item fits correctly.
- After adjustments, the parts can be cut out. Sew the cover. Do not forget to attach adhesive tape to it at the attachment points.
- Place the cover on the frame. Place the headboard in place.
The bed is ready. It will not only decorate the interior of any bedroom, but will also become an excellent place for a complete, comfortable rest.
Wooden headboard
The easiest and cheapest way to get an original headboard with your own hands is to make it from wood. This option is suitable for those who are not afraid of toughness.
Of course, carved elements of bed linen from various types of natural wood would be a very beautiful option. But you can make them yourself only if you have carving skills and a set of necessary tools. In addition, valuable wood species cost a lot of money.
Therefore, the easiest way to make a wooden headboard is from plywood. The sheet can be cut out into any shape and then covered with paint, decorated with patterns, inscriptions, or even illuminated. It is better to fix it on the bed frame so as not to spoil the wall covering. This headboard can be replaced several times with your own hands.
A bed headboard made from boards will look original. Depending on the style chosen, they can be painted, decorated, or left unfinished. The decoration of such a headboard can also be anything. You can throw a variety of soft pillows at the base of the backrest to make the bed more comfortable.
Stages of work
The process of replacing the upholstery of upholstered furniture with your own hands is simple and can be done by anyone who knows how to use basic tools. It is better to do this in the utility room or outside - a lot of dust and dirt may have accumulated inside the sofa. Small children should not be allowed near the disassembled structure; it contains sharp objects, staples, springs, and nails.
Removing old coating
Many upholstery replacement methods involve removing the old material as the first step of the job. For this purpose, you can use scissors, pliers, or a stationery knife. When removing worn upholstery, you need to immediately remove the old staples. All waste should be placed in garbage bags - they have accumulated dust and dirt over many years of service.
Many owners do not immediately purchase upholstery material, but first study the old one and, if possible, preserve it by washing it, cleaning it with a brush or vacuum cleaner. If the fabric is in excellent condition, and the filling is not damaged and everything can be cleaned without affecting the quality, then there is no need to change them.
Remove old upholstery using available tools
Assessment of the condition of the frame and mechanisms
When the casing is removed, all structural elements become available for inspection. If problems are noticed in the operation of the furniture (it creaks, a bolt or nut has fallen off, a fastener is broken), then everything can be repaired yourself. For this purpose, pre-prepared blanks and parts are used.
If wooden furniture elements are damaged, they must be replaced. For these purposes you may need additionally: wood, bolts, nails, nuts. Tools that will be useful are a hacksaw, a tape measure, a hammer, a drill and a drill bit. Wooden elements can be coated with special means, for example, stain or impregnation.
Assess the condition of the frame and mechanisms and, if necessary, replace damaged elements
Pattern creation and cutting
If you don’t plan to throw away the old fabric, but only wash and vacuum it, then the work will be half as much
If you decide to replace everything, then it is important to make the patterns correctly and cut the material. You can use old upholstery for this.
You need to stretch it over a large sheet of paper and cut out a template. Next, apply the pattern to the new fabric and cut out exactly the same upholstery.
If this is not possible, then the task becomes more difficult. You will have to cut it yourself, focusing on drawings made using a tape measure, paper, ruler and pencil. The fabric is cut in such a way that there is a material allowance for seams - up to 2 cm, depending on its type.
Remove old fabric and use it as a pattern
Padding
You can cover furniture with new fabric using a regular stapler. If the patterns are measured correctly and the material is cut as it should, taking into account the filler and design features, then reupholstering will not take much time. It is necessary to secure the allowances with staples using a stapler, cut off the excess fabric, and then assemble the sofa or armchair to its original condition. When reupholstering, it is recommended to follow the advice in master classes; this will help to avoid mistakes.
Even at the stage of creating patterns, you need to take into account the characteristics of the material for the covering in advance, otherwise the finished cutting may not be suitable for furniture. When reupholstering, it is necessary to stretch the fabric. This way you can avoid the appearance of folds where dirt will accumulate.
Use a furniture stapler to cover furniture with new fabric.
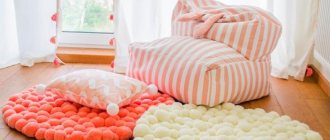
Headrest for a bed made of pillows
Another simple but fun way to make your own headboard is to use regular pillows. And they can be used in different ways.
In the first case, you will need a base for the headboard made of plywood, chipboard and other materials. You can make your own pillows or use ready-made ones. They should be attached along the edges with a furniture stapler to the base. This method is interesting because you can choose any color and pattern of pillows, it all depends on your imagination.
In the second option, the base is not used. Pillows (one long or several small ones) are simply hung on hooks. You can also make a hook mount from plywood, buy a ready-made hanger, or simply install hooks on the wall to hide them behind pillows.
Making a rigid wooden structure
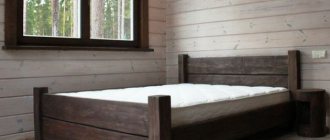
A wooden headboard made from oak boards has a decorative function and very successfully complements the interior.
A rigid wooden headboard made of oak boards will fit into almost any interior.
To create you will need:
- three oak boards 180 cm long and 3 cm thick;
- chisel for peeling bark;
- jigsaw;
- anchor bolts and metal profile for wall mounting;
- manual gas burner;
- car varnish
Manufacturing instructions.
- We position the boards as they will be at the headboard and label them to make processing easier.
- We debark the boards using a chisel.
- To ensure that the boards fit well together, mark the joining line with a pencil and saw off the excess with a jigsaw.
- We install the boards on specially assembled supports.
- We burn the boards using a hand-held gas torch.
- After firing, we coat the boards with varnish; in this case, auto varnish was applied.
- We assemble the structure, fasten the metal profile and hang it on the anchor bolts.
- The headboard is ready.
Method for making a soft headboard using the Carriage Screed technique
The “carriage tie” technique seems expensive and attractive, but in fact this headboard is created from several materials that are practically at hand.
Upholstered headboards with diamond upholstery look stunning.
The capitone method, as it is also called, is done in several steps.
- To begin with, a rough drawing, plywood or MDF sheet cut to shape is outlined.
- A sketch is drawn on a sheet of foam rubber, which will make it clear in which places to make the holes. Next, the circles are cut out exactly according to the drawing, and exactly the same holes are made in the plywood.
- The filler is glued to the main sheet with glue, after which you need to wait for the part to dry completely.
- After gluing, you need to cover the foam rubber with a thin layer of padding polyester, and continue with the final layer of fabric.
- When you cover the frame with fabric, you need to start from the edge, gradually moving towards the center. In this case, a needle and thread are threaded through each hole twice and fixed on the back side of a sheet of plywood or MDF with a stapler.
- After the entire surface is decorated in this way, the remaining fabric at the edges is wrapped over the drawing part and firmly fixed with a regular stapler.
In fact, making a carriage tie is much easier than it seems at first glance, but it will take a lot of your free time. By fastening with threads, parts of the upholstery are stretched, forming a specific pattern - a rhombus or a square, depending on the sequence chosen by the master.
A carriage tie looks beautiful, but is difficult to make.
You can leave it like this, or you can add a little “zest” and sew buttons, decorative fabric roses, and beads into the places where there are tears. Capitonne will look especially impressive with velvety fabric, leather or its substitute.
Elite types of fabrics
One of the most expensive fabrics today is Arpatek fabric. This type of material is considered the latest invention of modern industry. In its properties, arpatek surpasses even natural leather. It consists of one quarter natural fibers and is incredibly pleasant to the touch. This material is the same as leather, noble, expensive in appearance, but soft and thin. Its main advantage is durability and strength. If the leather wears off over time, then Arpatek remains ideal for a long time. It requires virtually no special care. Today it is the most popular material for upholstery. But its cost is also quite high.
Elite fabrics certainly cost a lot, but quality comes first
Relax is an incredibly durable material that practically does not deform over time. The main advantage of relaxation is that it is very easy to wash off various contaminants. Happy parents can allow their children to frolic on a bed upholstered in relaxation without worry. Any type of stain, even from felt-tip pens, can be removed from such fabric within five minutes. The difference between this fabric and arpatek is that it requires maintenance. But this is not difficult - just vacuum or clean occasionally with a soft brush.
You will find out what shades of beds will perfectly suit any interior of your bedroom by reading the article.
How to make a curved headboard with your own hands
Like any planned design, a figured headboard must first be drawn on paper. You can only do it on one side, eventually flipping it over, it will be just as symmetrical. In this example, we will look at a headboard decorated with a carriage bow.
Materials and tools:
- Foam rubber;
- Plywood;
- Textile;
- Ready-made figure image template;
- Construction stapler;
- Drill;
- Decorative buttons;
- Scissors;
- Decorative finishing.
Work process:
- As in the previous example, you need to drill holes in the foam, plywood and fabric, laying one on top of the other.
- We fasten the plywood and foam rubber with a stapler;
- We make the upholstery from the outer fabric, but first we need to sew on the buttons;
- The buttons should be secured with fishing line, which you thread through all the holes and secure with a stapler on the back side.
- Pin the fabric, trim off any excess pieces;
- Using volumetric edging we create a beautiful edge of the figured area.
Our work is done. You can use other fabrics, for example, velvet in dark shades will look rich; usually the same buttons are in harmony with it. And the figured design, depending on your imagination, can be completely different: in the form of mountains, arches, individual geometric shapes, in the Gothic style, etc.
What materials to use
The materials used play an important role in the design. It is desirable that they be environmentally friendly and natural. Therefore, experts advise using breathable wood, stone or natural fabrics. Let's take a closer look at the properties and details of the use of materials:
1. Wood is a suitable solution for decorating the head of a bed. Eco-friendly and natural material ensures air circulation in the bedroom, fills the room with pleasant light and aroma, and ensures a comfortable and safe sleep. It also looks aesthetically pleasing and organic, creating a cozy and warm atmosphere. The versatile wood is used to make shelves, niches, mirror frames and picture frames;
2. Drywall is not as environmentally friendly as wood. However, it is more flexible and easier to install. The material allows you to equip structures of any shape, make stylish and aesthetic products, and bring any idea to life;
3. Glass is a difficult material to process and install. In this case, it is very important to ensure reliable fastening of glass products. Glass looks elegant and fits harmoniously into any interior. Suitable for making niches and shelves. However, it is not recommended to make a headboard entirely out of glass; it is better to combine glass with other types of materials;
4. Mosaic allows you to create original and beautiful patterns, mosaics and even drawings. This is the perfect accent for the bedroom. In addition, the tiles are easy and convenient to care for;
5. Natural brick is suitable for a bedroom decorated in high-tech or loft style. This material makes the room a little cold and restrained, brings freshness and originality to the standard design;
6. Photos, paintings, wallpaper and murals made from paper, cardboard and canvas are a cheap and easy way to decorate your bedroom headboard. This method of updating and design looks stylish and original. At the same time, decorating the headboard with a similar method is not difficult with your own hands. Alternatively, you can simply paint the wall.
7. Textiles and fabric panels are a popular solution. The headboard can be covered with fabric, and then you get a comfortable and comfortable space. It will look elegant and rich. The soft headboard is pleasant to the skin and comfortable to use. Light material looks great, it will bring freshness, lightness to the bedroom and expand the space. See how you can visually enlarge a small room here.
Do not use chipboard, as such material contains toxic damage that is harmful to human health. It can affect sleep, cause allergic reactions, and cause headaches. Metal or plastic are also not suitable. The first will make the structure heavier, and the second will spoil the appearance of the element, making it simple and inexpensive.
Stages of manufacturing different types of headboards
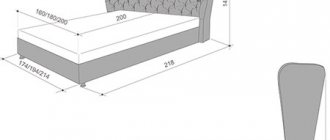
Before you make a soft or hard headboard with your own hands, you need to calculate the dimensions of the element and prepare drawings based on them. Calculations must be made carefully, accurate to the millimeter, so that the finished product fits the bed perfectly in shape and size. If necessary, simple drawings and interesting headboard design ideas can be found on special thematic resources.
Hard wooden
For work you will need the simplest materials. The headboard can be made to the desired size for a 1-, 1.5- or 2-person bed. Before you start manufacturing, you need to prepare:
- chipboard;
- bars;
- puzzle;
- wood glue;
- matte white paint;
- corners and screws for fastening;
- screwdriver
Management:
- Cut a piece of plywood to the desired size. The headboard may protrude slightly beyond the edges of the bed or be flush with the sides.
- Cut the bars into the required quantity. If you want, paint or varnish them.
- Lay long bars horizontally along the edges, and lay short bars between them.
- Secure the elements with glue.
- Screw the headboard to the bed frame using angles and screws.
The rods can be arranged in any order, forming a specific pattern or ornament, securing them both horizontally and vertically.
A wooden headboard can be made according to the following plan:
- Sand the boards with sandpaper, removing all roughness, burrs and other defects.
- Cover the finished elements with varnish or paint.
- Using screws, build a kind of shield from the boards.
- If desired, reinforce the back with a sheet of plywood.
- Attach the finished headboard to the bed or conveniently hang it on the wall.
It is not necessary to make the back in the form of an even rectangle. If the interior style allows, you can imitate a fence or choose another unusual configuration. The advantages of a protective headboard are ease of manufacture and minimal financial costs.
Criteria for choosing a bed with a soft headboard, design options
Upholstery
The soft version of the headboard can be made in a variety of designs and shapes. This will take a little time, about 2 hours. No need to wait for glue or paint to dry.
Necessary materials:
- plywood;
- puzzle;
- foam;
- stapler;
- decorative fabric;
- loops for attaching the back.
Stages of work:
- Cut a piece of plywood to the desired size and shape.
- Attach a fill layer to it.
- Stretch the fabric over the foam so that the edges hang over the edge of the plywood.
- Fasten the textiles with a stapler, making neat turns at the back of the headboard.
- Using loops, secure the finished product to the bed.
A soft back can be made using another technique:
- Build a frame in the form of a rectangle from thin bars. The width of the base is selected individually.
- Place several sheets of foam rubber on the frame and secure them at the edges with a stapler.
- Cover the workpiece with leather or its equivalent. Make careful turns and trim corners if necessary. Secure the material with a stapler - the soft and practical upholstery is ready.
- Attach the headboard to the bed using loops.
A handmade soft headboard can be either part of the overall interior or its accent. The product does not have to be rectangular - the choice of shape depends on the skills and wishes of the craftsman.
Useful tips for beginners
Before reupholstering, you should stretch the workpieces, carefully straighten them, so you can see all the shortcomings that need to be corrected
. It is important that the location of the seams is correct and the edges are parallel to each other. When securing the upholstery, you need to hold the stapler in your right hand, and with your left hand, pull the fabric from the middle of the workpiece to its edge
The bevel should be even so that there is no excess fabric left.
All holes for bolts must be cut carefully with scissors, and not torn using fasteners. Staples that are not completely driven in need to be driven in harder with a hammer. It is better to assemble a sofa, armchair or other furniture after all the upholstery has been completely replaced; it is necessary to install structural elements in advance only if necessary.
Upholstering furniture with new fabric and replacing the filling is a simple process that requires care and attention. Any beginner can do the job; the main thing is the availability of tools, time, and the necessary material. Replacing old upholstery can be a fun family activity - the husband does the repair work, the wife does the cutting and sewing, and the kids do the reupholstery with their parents.
When reupholstering, it is important that the location of the seams is correct and the edges of the workpieces are parallel to each other. If some staples do not fit completely, they can be driven in with a hammer. It is better to assemble the furniture after all the upholstery has been completely replaced.
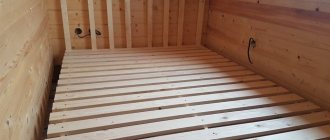
Step-by-step instructions for making a bed
! It should be noted: manufacturing costs will be about 4135 rubles.
To work you should prepare:
- 1. Furniture panel 2000*300*18 mm, 2 pcs. – 1350 rubles.
- 2. Furniture panel 1200*300*18 mm, 2 pcs. – 806 rubles.
- 3. Beam 2000*40*50 mm, 3 pcs. — 1113 rubles.
- 4. Sheathing boards 1300*96*20 mm, 5 PCS. — 486 rubles.
- 5. Screws 3.5*45 mm 100 pcs. – 120 rubles.
- 6. Confirm screw 7x50 mm 14 pcs. – 150 rubles.
- 7. Screw M8*80 mm 4 pcs. – 74 rubles.
- 8. M8 nuts 4 pcs – 36 rubles.
Tools for making a bed:
- 1. Screwdriver.
- 2. Saw.
- 3. Sanding machine.
- 4. Measuring tape.
- 5. Level.
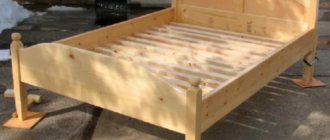
Assembly steps:
- First, the bed frame is assembled. To do this, furniture panels 1200 and 2000 meters long are fastened at the corners. To set a right angle, you can use a homemade chipboard corner (2 chipboard parts of the same size are connected perpendicular to each other using Euro screws). Furniture panels (bed frames) are secured with clamps.
- Next, the two drawers are fastened with confirmatory screws. You will need 3 screws for each corner of the bed.
- Next, you should check the diagonals of the bed: they must be measured with a tape measure. The length of the diagonals must be the same.
- Remains of timber are used for the legs. The length of the legs is about 180 mm.
- Next you need to prepare the timber. To do this, 2 thicknesses of furniture panels (36 mm) and 2 thicknesses of legs (100 mm) are sawn from the length of the beam.
- The prepared beam is tried on: for this, it is placed between the sides of the bed, and the legs are inserted into the corners. It should be a right angle.
- Next, a beam is screwed to each drawer, at a height of 140 mm from the lower edge of the furniture panel. Screws of 3.5 * 45 mm are used for every 10 cm.
- Next, the legs are fixed with a clamp and a through hole with a diameter of 8 mm is drilled. A screw is inserted and tightened with a nut.
- The frame is ready. It is necessary to check the level of the position of the sides of the bed relative to the floor.
- The next step is making the slats for the bed - these are the transverse slats on which the mattress is laid. To do this, the boards are cut and sawed to length from 1300 mm to 1250 mm. This is done to create a reserve for wood swelling.
- The prepared slats are laid on the bed beams at the same distance (30-50 mm). Next they are screwed to the beam. Use 2 screws on each side.
- To increase the strength of the bed, it is necessary to make a stiffening rib: for this, another beam is attached in the middle, parallel to the side beams, which will support the middle part of the bed.
- Next, you should sand the bed with a sander using sandpaper (grit 180).
- After sanding with a machine, the bed must be cleaned of dust and applied with Watco Danish Oil (light walnut).
All! The bed is ready.
The frame can be used as an independent bed, the head of which will be any wall of the room. If you want to make a full-fledged bed, then you need to think about making a headboard for it.