There is no point in saying that the bed is the main furniture of the bedroom; this axiom is not disputed by anyone. In this article we will tell you how to make her back beautiful, comfortable, stylish and prestigious.
Upholstered headboard
All elements of a bed serve a very important function; you cannot be satisfied if it has a great design, but creaks and wobbles at night. Or vice versa, the furniture is made with a tenfold safety margin, but in appearance it does not meet even the most modest requirements.
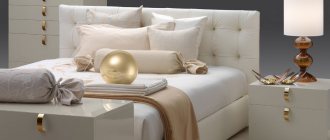
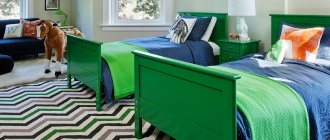
A soft, contrasting headboard on which lush, voluminous folds in the fabric are laid in a certain way
In this article we will tell you how you can independently significantly improve the functionality and appearance of your headboard, make it soft and safe.
Is a headboard necessary?
Furniture manufacturers today offer customers a variety of bed options, and in most cases they do not have at least a footboard.
This makes the design really interesting, but because of this, their practicality is questionable, because both of these components, the headboard and footboard, perform certain functions.
In particular they:
- Decorate and enrich the composition;
- They allow you to conveniently arrange things when changing bed linen or can be used to hang pajamas or a robe;
- You can lean on them if it’s uncomfortable to stand, or support working tools while cleaning the room.
When buying a bed, you should carefully consider the design. However, it is not difficult to decorate them yourself or even make them from scratch if you are unable to get used to the new stock.
The headboard is less functional in comparison with the footboard, but in the center of attention, it will not allow the TV remote control to fall on the floor, a newspaper, a book under the bed, it protects against the cold coming from the walls, and makes the bedroom more comfortable.
Budget option: simple and convenient
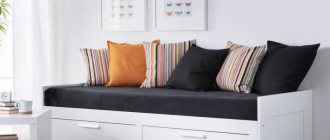
The simplest option for the back of a sofa is a regular pillow. This design can be called budgetary, since it does not require significant financial costs. For work, you can select several pieces of pillows; they will be attached to a wooden frame or nailed directly to the wall.
The first option is more preferable, since the fabric can be removed for washing if necessary. A good method is wide loops, to which the pillows can be easily attached with buttons or Velcro. They will look attractive. It is possible to constantly change pillowcases to match the color of the bed linen. An example can be seen in Fig. 3. Instead of pillows, you can use soft squares. They are more attractive, but difficult to implement.
Square plywood structures the size of a small floor are used for work. Such elements are not only covered with fabric, but also framed with foam rubber to make them soft. The blanks themselves are fixed to the wall surface in any order, but most often they come in parallel rows of 3 pieces.
The construction of a backrest for a sofa or bed may be required in various cases. Most often this is the replacement of an old headboard or backrest, or the construction of a new one in the absence of one in the first place. Such a backrest can make a sofa the central element of the interior, give the room a mood, make it more attractive and comfortable.
Bed head height
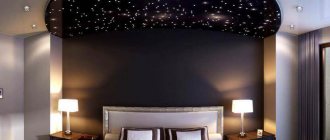
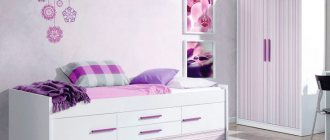
The headboard can be high or small, of different shapes. The head of the bed by the window in the bedroom, if the bed is against the wall, is better to make it high. It will brighten the room and make the bed more comfortable.
When the bed is not placed against a wall, the headboard may be low. Its main purpose is not to serve as a support for the back or pillows.
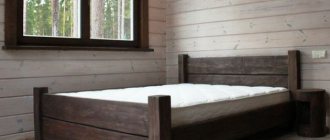
Made from hard materials
The headboard, made of metal, with an openwork pattern, is a luxurious, elegant option for furniture design. This is a traditional headboard option. It is not conservative at all, it is enchanting and festive.
And yet it is not used in most modern design stylistic trends. The only exception is steam punk.
- It has long been associated with Art Nouveau, Romanticism, and Gothic style. But, of course, it all depends on the pattern and the desire of the owner. Forging allows you to create a headboard in a country style, with images of animals, birds, or in a fishing style.
- A pattern in the form of maple leaves, cherry blossoms, flowers, and a landscape is what you need for an eco-style bedroom. By ordering from a specialist an option with a current design, a patterned headboard for a metal bed, you can change the existing furniture as desired and bring it in line with your own preferences.
- The lattice-shaped headboard made of metal has strict, conservative features. It is not noticeable in itself, but can perform all practical functions. It can also be painted in any color, contain inlay, engraving.
- Having studied the existing proposals of designers, photos of the headboard in the bedroom, the most spectacular examples of one type or another, store catalogs, you can draw your own version of the ideal design, contact specialists to bring the idea to life, or decorate the metal elements of existing furniture yourself.
Step-by-step instructions for making a soft headboard
The work is carried out in several stages, each of which must be approached very responsibly. We will consider the most difficult option for making a soft headboard - a carriage tie.
History of the Capitone stitch
The first stage is preparing the buttons
As mentioned above, ready-made buttons are sold in specialized stores, but real craftsmen prefer to make them themselves. This does not take much time and allows you to get unique bed decor elements. Not only the color and finishing material is selected, but also the diameter, as a result - the screed looks very natural and harmonious. Before starting work, you need to buy blanks that are suitable for all parameters.
Step 1. Cut out a round leather base for the buttons. To do this, you need to find a suitable plastic lid for the container. The diameter of the lid should be about a centimeter larger than the diameter of the button. These extra five millimeters are needed for bending and fixing the material.
Cover-stamp
The lid is slightly larger than a button
Step 2. Mark circles on a piece of leather. This should be done with the selected lid, press on the stamp pad and then touch the pieces of leather. Of course, the color of the material and the color of the paint must be different. Leave gaps between the circles only for cutting, saving expensive material.
Make circles with the lid
Practical advice. Before starting work, you should decide on the number of buttons. This depends on the size of the headboard and the parameters of the diamonds. In our case, we plan to make only two rows of diamonds.
Step 3. Use sharp scissors to carefully cut out circles. First, it is recommended to cut out squares, and then stamped circles from them, removing the corners of the squares.
Blanks are cut out of leather Trimming corners
Step 4: Crim the buttons. To do this, you need to use a special simple machine; you can buy or rent it. The machine compresses the matrix; it consists of two parts, each intended for its own workpiece.
How is crimping done?
- A blank with an eyelet for thread is inserted into the lower part; place the matrix on the frame of the device.
- Cover the hole in the top of the die with the cut circle of leather. When doing this, make sure that the front side of the material is facing down.
Laying blanks in the upper and lower press dies - Place the other half of the button blank in the center and press it into the recess. In this case, excess skin should protrude evenly along the circumference of the workpiece.
- Place it on the die on the bed and press the machine handle. It will lower the rod, the two halves of the matrix will compress and crimp the button.
Pressing The button is removed from the press
Our bed requires 20 pieces, but we need to make a few in reserve, they can later be useful for repairing the headboard.
Ready-made buttons for carriage ties
Stage two - preparing the headboard
A very important stage. First, you need to mark diamonds on the plate and decide on the location of the buttons.
Step 1. Draw parallel lines on the back, the distance between them should be equal to half the height of the diamonds. Use a square and a ruler, paying close attention to all dimensions. The appearance of the headboard depends on the accuracy of this operation.
Step 2. Place dots at the locations of the vertices. Check that the distances between them are perfectly symmetrical and equal.
Step 3. Drill through holes at the tops of the diamonds. The diameter of the drill is small; only a thin awl should fit into it. In practice, holes Ø2–3 mm are drilled.
Drilling holes
We will have three rows of buttons on the bed, now we can count their total number.
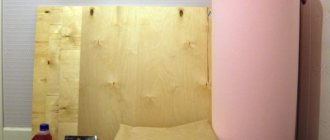
The third stage - fixing the foam rubber
To create a soft layer, foam rubber 3–5 cm thick is used, this will make it possible to create a voluminous texture of the headboard.
Step 1. Using a sharp knife, cut a piece of foam to size. Great precision is not needed; a few millimeters in one direction or another do not play any role.
Cutting foam
Step 2. Using all-purpose glue, glue the material to the headboard. Be sure to spread on both surfaces; before pressing, it is recommended to wait for about 1–2 minutes; the layer thickness is several tenths of a millimeter.
Step 3. Carefully glue the foam rubber, press it over the entire surface.
Practical advice. There is no need to achieve very high adhesion. The foam rubber will be additionally held in place by the upholstery material and buttons.
Some craftsmen make a soft headboard without gluing, but we decided to play it safe.
Foam rubber is glued to the base
Step 4. Turn the backrest over and use a sharp knife to carefully cut off the excess foam. Make sure that the angle is exactly 90°, do not make bevels or slopes, they will be noticeable around the perimeter of the back.
Trimming excess
Step 5. On the foam rubber, mark the location of the buttons with dots. To do this, push an awl or other strong wire into the previously drilled holes until it comes out of the fabric. Use a felt-tip pen to make marks.
Step 6. Using a special device, cut holes in the foam rubber with a diameter of ≈ 2 cm in these places.
Hole cutter
Cutting process
Not all craftsmen cut holes in the foam rubber for buttons. Why?
- You need to have a special tool; for one bed there is no point in purchasing a large set of accessories.
- The button in the hole does not have a stop area and tilts easily - one side falls into the hole. This really spoils the appearance.
- Over time, the sheathing material stretches and sags in the hole. If the foam rubber is not cut, it constantly levels the skin and keeps it in its original condition.
The conclusion is that it’s extra work and a waste of time. What to do - make your own decision; in practice, the simplified method has proven its real advantages.
Step 7. Cover the foam with padding polyester. It is used for final leveling of surfaces and smoothing out all irregularities. The padding polyester is fixed around the perimeter with a stapler, the length of the staples is no more than 6 mm. Do not use long ones; they are not completely driven into hard surfaces, which becomes a problem during further finishing of the headboard.
The foam rubber is covered with padding polyester. Attaching the padding polyester from the inside out.
Cut off excess material. Using your fingers, slightly break the padding polyester in the holes of the foam rubber.
Sintepon is pressed into the holes
The fourth stage - back trim
The penultimate stage, it must be done very carefully.
Step 1. Thread the buttons. Length approximately 30 cm, double threads, strong silk should be used.
Buttons have threads threaded through them
Step 2: Pull the leather over the headboard. This is a very important point, do not allow unnecessary folds to appear, all folds must be symmetrical. To prevent the appearance of folds, a thin strip is nailed on the inside, then it is covered with leather and forms a perfectly straight joining line.
Leather fastening Rail Tensioned material
Practical advice. To facilitate the tensioning process and improve quality, it is recommended to make a simple device. It consists of two slats and clamping clips. One rail has a groove made of two strips of fiberboard, and the second has a tenon made of the same material. The skin is placed in the groove of the lower rail, pressed with the tenon of the upper one and secured with clips. When pulling, you need to work with a device; it distributes the load evenly and over a large length. Due to this technology, the likelihood of wrinkles is minimized.
Tensioner
The process of tensioning the material
Step 3. Pull the corner. This is the most difficult section; the work is carried out in several stages.
- Find the center of the corner, stretch the skin a little, align it with the side lines. Secure the leather with one staple.
- On the side piece, also find the center and pull it a little. The requirements are the same - the place of tightening must be aligned with the already existing lateral line.
- Continue to gradually stretch the remaining sections in both directions.
Tight angle
If everything is done correctly, the end result should be an even turn without wrinkles. Cut off excess skin.
Fifth stage - installation of buttons
Final operation. Using a long awl, pull the strings of buttons through the holes in the headboard. Install all elements at once; you must constantly monitor their position.
Threads are threaded through the holes
Pull the ropes one by one and secure them with staples. All work is done by eye, the quality depends on the professionalism of the master. It is recommended to do the final zigzag fixation of the threads only after re-checking the position of all buttons.
The threads are fixed with a stapler. It is important that the tension is uniform
To improve the presentation, fabric can be attached to the back of the headboard. It does not carry any technical load, and after installing the bed it is completely invisible. The fabric is used only to increase the prestige of the craftsmen’s work.
Fabric for the wrong side
You should not cover the first headboard with expensive leather; first, it is recommended to work with cheaper materials. Only after acquiring practical skills can you take on complex products and expensive materials.
Upholstered headboard
Not so long ago, a soft headboard was considered a sign of true luxury. Today this element of furniture can be found on many beds, however, the cost of such furniture is not affordable for all of our compatriots. There is a way to have luxury furniture without breaking the bank. You already know how to make a soft headboard, all that remains is to buy a bed. But you can also make it yourself; there is a detailed article on how to do it on our website.
Upholstered headboard
To make sure the bedroom is comfortable, the headboard can be made of fabric or leather. It’s not difficult to cope with such a task on your own if you have sewing equipment, but if you turn to a sewing workshop, a repairman, or a furniture maker, you can only be surprised at how cheap the work is.
A soft headboard is easy to install; it can hide another headboard, bringing the design concept of the bed closer to the concept of transformable furniture.
Stone and mosaic
Stone and mosaic look very interesting and unusual at the head of a bed; they attract attention both with their pattern and their unusual texture.
A stone headboard will not retain heat well, and when you touch such a covering, you may even want to move away from it - so this is not the best choice. If this option is the most preferable, then designers recommend making the headboard not entirely from stone, but diluting it and adding, for example, elements of wood or leather, you can hang a sconce with warm light.
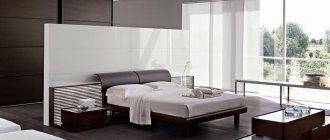
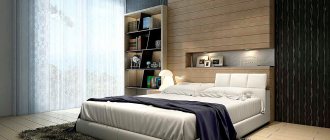
Headboard with rigid base
A rigid base and fabric drapery are what you need to give the interior a new note, a modern sound. The ensemble will be harmonious with a new pouf, carpet, if you choose tone-on-tone covering material for the headboard.
The base can be made from:
- Trees,
- Plastic,
- Plywood or cardboard.
This headboard is not attached to the bed, but to the wall. It’s a great idea to buy a bed with this configuration or create the necessary additional element yourself, since this is a very effective design, a win-win solution.
Finishing materials: pros and cons
The choice of material for decorative finishing of the bed is limited only by the design decision. Below we discuss common cladding methods, as well as their pros and cons. Fabric and artificial leather are the most practical, safe and aesthetically pleasing.
| Material | Advantages | Flaws |
| Velours |
|
|
| Scotchgard |
|
|
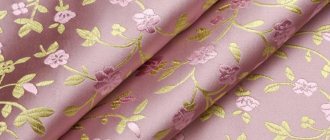
| Jacquard |
|
|
| Chenille |
|
|
| Flock |
|
|
| Microfiber |
|
|
| Velveteen |
|
|
| Arpatek |
| High price. |
| Faux leather |
|
|
| Genuine Leather |
|
|
| Faux suede |
|
|
Advice
Give preference to dense fabrics that are easy to care for (chenille, jacquard). Artificial leather and arpatek have almost the same characteristics as natural leather, but they are cheaper.
Wall drapery
A popular type of headboard is wall drapery, soft columns up to the ceiling or a solid panel.
In fact, there is no headboard as such, but the space is emphasized and a balanced composition is created. The bedroom will be twice as cozy and comfortable.
- Drapery materials are glued to the wall, just like regular wallpaper.
- The main thing is to ensure the correct tension.
- Otherwise, the method is not complicated and it is not even necessary to invite specialists to carry out the work.
- Draping the wall can also be done using a slatted method.
Professional approach
In modern interior design, there are several bed making schemes. In all cases, the fashion trend is multi-layering and an abundance of multi-format (often decorative) pillows. The schemes include some elements that are unusual to us, but widespread in Europe and America; The following elements may be present:
- Bed valance (skirt). An optional detail, which, however, makes the room more comfortable. It has a second, utilitarian function - it hides the space under the bed where things are often stored. The skirt is placed on the spring base of the bed, evenly distributed around the perimeter.
Bed valance Source madrasahhebat.com
- Mattress cover. It matches the size of the mattress and fits tightly onto it. A useful element that protects the mattress from dirt; You can't feel it from the outside, but it helps in rearranging the sheets. Some models have down filling and are practical in cold regions. There are options for hot climates that help remove heat from the bed.
Mattress pad Source adaziaire.club
- The sheet has an elastic band. A very convenient invention - there will be no wrinkles or bumps on the bed. If desired, you can lay a regular sheet on top (although you will have to fold the corners in a special way, “hospital corners”) or a second one with an elastic band.
- Decorative fold. The edge at the foot is often folded under the mattress, so the hanging sides look neater. To create a layered effect, the edge of the bedspread and sheets at the head are folded back, highlighting an area for pillows. Sometimes the top edge is bent and folded two or three times to increase the effect.
With lapel Source secure.img2-fg.wfcdn.com
- Additional details. The bed is decorated with an additional beautiful blanket (knitted or quilted), folded lengthwise and placed at the foot of the bed. The decorative element can be laid out like a main blanket and the edges folded back together.
In ethnic style Source www.margaret-wright.com
- Pillows. Large pillows for sleeping (as a rule, their pillowcases are made of natural fabrics) are placed directly at the head of the bed. Decorative items are placed in plain sight, in front of the main ones. They are made from a variety of materials and decorated with embroidery, prints, fur inserts, and sequins.
- Foot of the bed. Here you can often see a banquette, chest, pouf or bench. During sleep, the bedspread and decorative pillows are removed here.
In black and lilac colors Source lifeofanotherleague.com
Photo wallpaper at the head of the bed
The easiest and most effective way to decorate a headboard in a bedroom with your own hands is photo wallpaper.
- They are brighter than standard wallpaper. Image clarity, naturalism, and contrast are their advantages.
- The other part of the wall can be painted with water-based paint, emphasizing its secondary importance. This background will be perfect.
- Or use artificial stone, tiles or mirror.
Photo wallpaper at the head of the bed in the bedroom will promote relaxation, it will be easy to replenish your strength and get a good night's sleep.
Basic option
In the morning, the owners get ready for work. Despite the rush, it is important to take the time to make your bed so that you can return to a cozy environment in the evening. There is a basic method that demonstrates how to make a bed beautifully and spend a minimum of time.
Making your bed look neat at home starts with the sheets. It is carefully spread out, smoothed, and the ends are tucked under the mattress. A blanket is placed on top of the sheet, which exceeds the dimensions of the mattress in length or width. You can deal with the excess in two ways: leave it loose or carefully fold it in.
The bedspread must be large enough. It is left hanging to the floor, or the bottom edge is folded under the mattress (an option common in hotels). The head of the bed is decorated with pillows.
Home comfort Source design-homes.ru
See also: Catalog of companies that specialize in designing country houses
Plaster stucco molding
For a baroque style bedroom, an excellent option for decorating the space at the headboard is plaster stucco. This is a good move for creating decor in other styles that are characterized by the use of this artistic technique.
Plaster stucco can be chosen for an avant-garde style bedroom. It is characterized by multidimensionality and does not require much thought on how to decorate the headboard in the bedroom.
A panel is created, a real painting.
- You can make it yourself. It can also be the best option for an antique style bedroom.
- More suitable, perhaps, than all other ideas for decorating a headboard.
- It can be a real painting, portrait, landscape or stucco in the form of an art object, a cloud, a shell, an aquarium, a sky map with constellations, or a labyrinth.
- It will enrich the composition and will look great with sculptures, columns, arches or a canopy at the head of the bed.
Textile
Textiles above the bed are a classic look for a headboard. Remember how you used to look at the patterns of the carpet on the wall before going to bed? The fashion for carpets has long passed, and many other interesting options for designing a headboard have appeared.
Photo: diylightingpros.com
Calculate the exact cost of repairs using an online calculator
and receive a free detailed estimate for repairs
Calculate
Decorating with textiles is convenient because you can choose any size, color, texture and shape. For any style you can choose the perfect material. All you need is imagination and good taste.
Photo: homystyle.com