IKEA furniture is made from high-quality materials, it is multifunctional, so many people try to purchase this or that piece of furniture here for their home, apartment or cottage. Prices for a bed, table or wardrobe from IKEA are lower than most competitors because the items are sold unassembled. Buyers can order assembly upon purchase or assemble the furniture themselves.
How to assemble furniture from IKEA yourself
Tools
Assembly occurs not only with the help of instructions, but also with the correctly selected tools. Depending on the type of product being assembled, additional The tools may vary, but the most commonly needed are the following:
- flat screwdriver;
- crosshead screwdriver;
- hammer;
- screwdriver
If for some reason you do not have the tools required by the instructions, buy them at the nearest construction supermarket. You should not try to make do with improvised materials, replacing, say, a Phillips screwdriver with a kitchen knife. This is wrong, since the assembly will be unsuccessful or fail, and the knife can also damage not only the surface of the furniture, but also you.
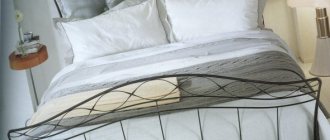
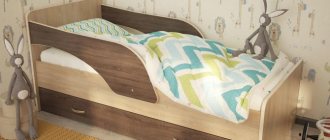
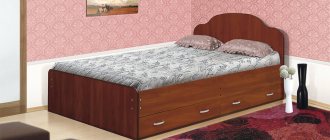
Bed “Malm”: reviews and description
The Ikea company pleases with a huge range of all kinds of furniture for the home. Beds of this brand are in great demand, and one of the most popular series is the Malm double beds. Read the full description of this model, as well as reviews of the “Malm” series.
Description of double beds
“Ikea” is famous for its foresight, so even beds of the same series differ from each other in functional details, finishing colors and bed sizes.
You will be interested in: Luntek mattresses: customer reviews, descriptions, characteristics and photos
Today, as part of the “Malm” line, the store offers the following double beds.
The following colors are available for the Malm series: white veneer, bleached oak, brown ash stain, black-brown. Conveniently, you don’t have to purchase under-bed drawers right away. You can buy them later when you need them.
Another important point when choosing a bed is the slatted bottom. For the Malm series of such components, three options have been created:
Choose the appropriate “Malm” option based on the width of the sleeping bed, the type of slatted bottom, the color of the veneer, the number of under-bed drawers, and the presence of a bottom lifting mechanism.
Review of positive reviews about the Malm bed
Ikea is a reliable furniture manufacturer, so reviews of this bed are mostly positive.
- Most people, according to reviews of the Malm bed, like the appearance of this sleeping bed. The bed design is modern and stylish.
- This is a very convenient option not only for sleeping, but also for storing things.
- It’s convenient that under-bed drawers can be purchased separately.
- The veneer colors are classic, these options will suit any bedroom interior.
- In addition to the bed, you can buy other furniture from the “Malm” series: bedside tables, chests of drawers, tables.
- Low cost of this model. Moreover, you can choose either a more expensive or cheaper option. This will not affect the appearance of the bed.
- This furniture is made from natural materials - veneer and birch. Very environmentally friendly.
- There are several mattress options available. Since the dimensions of this bed are standard, most mattresses will fit here, whether from Ikea or not.
- All furniture from Ikea is very easy to assemble, this bed is no exception - on average, people spend about two hours on its assembly.
Step-by-step instruction
- Remove the packaging from the furniture by carefully cutting off the packing tape and cardboard box. You should not use a knife so as not to damage the furniture inside the package.
- Find instructions, remove packaging.
- Remove small parts and place them on a flat surface. Bolts, screws, nuts and screws must be placed separately. To organize, you need to use boxes that are labeled according to the instructions.
- Turn on the light to perform assembly in a bright room. All holes must be clearly visible. Sitting in the dark is not an option because you might miss small details. In summer and spring, when there is more natural light, it is recommended to assemble the piece of furniture next to a window.
- Use tools to secure parts to ensure proper tightening of nuts and bolts. Most people can get by with a regular Phillips head screwdriver, but it won't get the nuts firmly in place.
- Assembly is carried out only according to the instructions, which indicate the marking numbers of each part and fastening material.
- You need to constantly check which side is indicated on the diagram - front or back. The lower part of the furniture is designated as the unpainted side of the desired item. Before fastening, each piece of furniture is checked against the markings, which are marked on the instructions with numbers or letters.
How to assemble a Malm single bed?
To properly assemble the Malm single bed, you need to take a look at the IKEA assembly manual. First you will need to install the fittings, and then assemble the frame using fasteners. In the end, you only need to install the grille under the mattress.
Video instructions for assembling a Malm single bed:
Scheme
The assembly diagram is provided in accordance with the official instructions from IKEA. First of all, lay out the accessories and check the package for compliance with the instructions.
Note:
- 1 — threaded stud (rod);
- 2 — lock-nut;
- 3 — plug washer;
- 4 - furniture pad;
- 5 - wooden dowel;
- 6, 7 and 9 - flat euroscrews of various sizes;
- 8 — bushing;
- 10 — IKEA wrench (included);
- 11 — bracket.
Designations like “number + x” indicate the number of parts required for assembly.
Scheme for installing accessories and assembling the frame:
Installation diagram of brackets for forming a frame for slats:
Malm is one of the most popular models in the IKEA range of single beds (you can find a general diagram for assembling single beds here). It is characterized by high strength, durability, versatility and affordable price.
Installation of accessories
At the first stage, it is necessary to install fittings and fasteners into the mounting holes of the frame. To do this you will need 4 parts:
- leg;
- headboard (how to make a bed headboard yourself and cover it?);
- and 2 longitudinal drawers (side strips).
From fastening elements:
- wooden dowels;
- threaded studs;
- and furniture attachments (legs).
Instructions:
- look at the head of the bed, there are 4 holes: 2 located along a vertical line and 2 along a horizontal line;
- Using a wrench, install 2 threaded studs (on both sides) into the upper mounting holes along a vertical line;
- Determine the location of the headboard by the mounting holes at the ends - they are located in the lower part;
- look at the foot of the bed, there are also 4 holes along vertical and horizontal lines;
- By analogy with the headboard, 2 threaded studs on both sides need to be installed in the holes along a vertical line;
- check the instructions: at this stage there should be 2 threaded rods in both parts;
- Install furniture attachments - 4 pieces - into the mounting holes at the ends of the headboard and legs;
- lightly tap them with a hammer or press down with force, the fixation should be as tight as possible;
- Install wooden dowels in both drawers along the mounting holes at the junctions with the headboard and leg;
- one hole on the drawers should remain free - the threaded studs previously installed on the leg and headboard are placed there.
The result should be 4 parts with installed fasteners. At the next stage, a frame will be formed from them.
Frame
Now it's time to connect all the parts. Place them on the surface in proportion to their location in the finished product. Place the headboard, the longitudinal drawers next to it, and the leg below. Then:
- carefully connect all the parts together using fasteners;
- first install the leg, then the headboard, press down or lightly tap with a hammer;
- in the round holes of the longitudinal drawers, the thread from the stud installed earlier will be visible;
- There should be 4 studs in total, install a plug washer on each of them;
- the pin should be placed in the groove of the washer, there will be a thread left for installing the nut;
- Using a wrench, screw the lock nut along the threads of the studs until it stops in the plug.
The frame is ready. Now you need to place the longitudinal and transverse brackets for laying the grid under the mattress.
Headboard
In some configurations, the Malm headboard consists of two parts fastened together. One serves as the base for the frame, and the second serves as a decorative headboard. In this case it is necessary:
- insert wooden dowels all the way into the ends of the bottom panel holding the frame;
- Using an adjustable wrench, install the rods into the top panel of the headboard up to the limiter mark;
- connect the parts together by placing the top panel on the bottom;
- on the bottom panel there are round holes from which the rods look out;
- Install a lock nut on each rod and tighten with a wrench.
Attention
Each headboard panel has an average of 7-8 mounting holes. In total, you need to install 5 wooden dowels and 4 studs. Some holes will remain empty and will serve as connection points for fasteners.
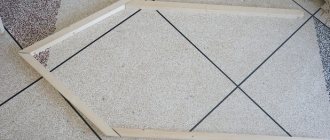
Laying slats and installing the base
On the inside of the side drawers there are two rows of holes for fixing the corner support for brackets and slats. The profile is fixed in one of two rows depending on the thickness of the mattress.
Instructions:
- install the corner support on the inside of the drawer, secure it with screws along the holes;
- The kit contains two profiles combined with each other: separate them to form two brackets;
- on one side, the brackets are stacked with holes on top of each other, the result is a structure resembling the shape of a compass;
- on the corner support of the left-side drawer there is a round hole in the middle;
- both brackets must be installed there, intersecting the holes and secured with a screw;
- two beams on the opposite side of the structure are attached in a similar way to the inside of the opposite drawer;
- all screws located in a vertical position are closed with threaded bushings;
- Screws are installed in the middle holes of the brackets for fixation; they are also closed with threaded bushings.
Advice
The orthopedic lattice is not fixed to the frame supports, but is simply laid on top of the brackets.
To prevent it from moving out, clamps are installed on the corner support in the space between the slats in increments of 20–25 cm. First install the bushing, then screw the screw into it.
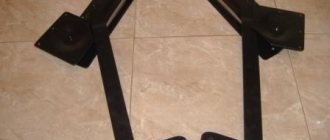
How to assemble a canopy?
First you need to determine the location of the future canopy. To do this, lay the tires around the bed, leaving a small gap for the curtain to move freely. Further:
- measure the required length of the tire, set a mark on the crossbar;
- place the tire in the miter box, remove excess material with a hacksaw;
- Install connectors on the back side of the bus along the edges;
- re-compare the markings by placing the parts around the bed;
- on the ceiling, mark the locations for the holes and drill them with a drill;
- install the fasteners along the prepared holes, secure the screws;
- insert the tires over the fasteners, press down until you hear a click.
It is necessary to install 4 rails along the perimeter of the ceiling above the bed, without installing corner elements. First, place a couple of curtains on the hooks that are attached to the runners. Then install the corner joints, press until you hear a click. The canopy is ready.
Important
If the bed is in a corner, you will only need two corner joints and probably one curtain. Before purchasing curtains, measure the area above the bed to have an idea of the required width of the fabric.
You might be interested in learning how to make a canopy over your bed with your own hands.
What to do if there are no assembly instructions in the box
If it so happens that your box of IKEA furniture does not contain assembly instructions, do not despair. The company has already resolved this issue a long time ago. You need to go to the official IKEA website, enter the item number of the product in the search bar (it is on the product box), consisting of 8 digits.
In the product card, go to the “Assembly Instructions” tab and download the online instructions. The file will be in pdf format, and for your own convenience you can print it.
Large furniture and its disassembly
If small items, such as a bedside table or a small chest of drawers, manufacturers of furniture structures often offer to purchase already assembled, in the case of large-sized objects this approach is initially doomed to failure. But a cabinet or wall can get boring, break down, and require dismantling when moving. And here we will have to solve problems as they arise. Dismantling an Ikea cabinet, like other large-sized furniture, always begins with searching for instructions. Of course, professionals already know all the technological processes. But those who decide to act independently will have to spend some time in the preparatory stage.
Disassembling an Ikea cabinet must be done:
- In a prepared room. It is better to cover the free space of the floor with special paper or plastic film.
- Taking into account the manufacturer's recommendations. If you need to use a screwdriver rather than a hand tool, it is better to use this tip.
- It’s simply impossible to hold large parts together if only one person works.
- Carefully. Any mistakes will lead to the fact that it will no longer be possible to reassemble the structure.
- With part numbering. This will make subsequent assembly easier.
Useful tips
Not everything always works out the first time, but this is not a reason to despair and call the experts. It is enough to review all stages to determine where the failure occurred in furniture assembly. All stages are interconnected, so there are no unnecessary elements or parts in the packaging.
The mistake made can be corrected if you re-read the instructions and description of the assembly process. Problems usually arise when connecting parts of cabinets or beds, where there are more elements and small parts than a table or shelf. It is recommended that before assembly, you carefully look at the diagram of the product, imagine which parts are assembled after which. Then they need to be laid out in the same order, and also marked as bolts and nuts.
Five reasons to order IKEA furniture assembly from us
Only full-time specialists. No third party contractors! This way we ensure full control over each employee.
We do not change the order price on the fly. You can calculate the cost of assembling IKEA furniture at home using our calculator on the website or in the application for Android or iOS.
We provide a full range of services. After assembling IKEA furniture, you will probably need to clean the premises. You can also order this service, like many others, from us.
We work in Moscow and the Moscow region. Assembly of IKEA furniture may be required not only in a city apartment, but also in a country cottage. Wherever it is, our specialists will come to you at the appointed time.
We work not only with individuals, but also with organizations. Have you moved to a new office and want to continue the company's activities as soon as possible? Call Gembo employees and we will complete all the work as soon as possible.
Place an order for assembling IKEA furniture at home right now by phone, through the website or using the mobile application! We will come to you at the appointed time and bring your apartment, house or office into perfect condition.
Leave a request and a manager will call you back shortly. That's right, a manager, not a plumber. You will discuss the work you need in a language you understand!
Which IKEA furniture is better not to assemble yourself?
Despite the fact that the Swedish brand has won the hearts of millions of people around the world precisely thanks to the ease of assembling their own products, there are still complex projects here. The Apartment Therapy portal conducted its own survey and identified the three most exhausting IKEA puzzles, for the assembly of which it is better not to skimp and hire a specially trained person.
1. Any bunk bed
2. Bed frame with drawers and headboard with shelf Brimnes
3. Trisil bed frame
Review of the Malm bed from IKEA
No sofa can replace a comfortable bed. But how to choose the one that meets all the criteria of comfort and quality? Today I invite you to evaluate the IKEA Malm bed, which is quite popular among buyers and deserves high marks, but at the same time has certain disadvantages. We’ll talk about everything in order below.
Sizes and prices
The Malm bed is in the middle price category. The cost depends on the size, the presence of storage compartments, and the number of slats (slats) at the bottom.
Lexvik in the interior photo
Are you interested in: Lexvik in the interior photo . (This is a collection of photos on this topic, but relevance is not guaranteed.) If you find that a photo violates copyright or is inappropriate, please notify us ( [email protected] ).
Lexvik children's extendable bed
Children's review. source
Furniture visualizations and modeling gallery. source
Ikea Lexvik
. source
Leksvik
Pine CD Cabinets + Set of 5 Ikea antique pine shelves – materials. source
Furniture - chests of drawers Section, Nightstands - lexvik
Ikea cabinets Category. source
For an older child, motherhood Ikea cribs. source
There is a cabinet in the Auchan. source
Stain, antique, with 5 drawers LEKSVIK
catalog Chest of drawers. source
In the city of Kazan, a children’s bed, 2,000 - cost, photo
1. source
Ikea Lexvik chest of drawers photo
. source
Wardrobe IKEA Lexvik photo
. source
Ikea Lexvik
. source
With a child who grows up together, an IKEA bed. source
lexicon
white - view images by tag. source
In Kazakhstan there are changing tables. source
Children's sliding bed IKEA Lexvik photo
. source
LEKSVIK
. source
Ikea hallway furniture - view images by tag. source
Bunk bed for children
Bunk beds designed for children are in constant demand. They are ideal for a small bedroom. This design allows you to free up space for a desk or games even in a small room. And the children themselves happily sleep on such a bed.
@homelifehustle
@ourhomeindublin
IKEA offers children's bunk beds that meet the safety requirements for such products. They are durable and reliable. The upper tiers are equipped with comfortable sides that protect children from falling from a height. Special anti-slip coatings are used on stairs. The sleeping area is spacious and comfortable, allowing you to use the bed for many years. It can even fit an adult.
Children's bunk beds at IKEA are represented by the following models:
- Tuffing – 9,999 rubles,
@fourkidsdeep
@balq15
- Svirta – 10,999 rubles,
@mie_cl
- Midal – 11,999 rubles.
@dorispepsi
- Vitval – 19,999 rubles,
@ania.m.adamiak
@bauerspann
ASSEMBLY OF IKEA BEDS
A bed is a sleeping place that must be comfortable. In fact, a person spends a lot of time in bed throughout his life. In a sleepy state, the body regains strength, completely rests and relaxes. If you slept well, then the day will be good. Therefore, a very important point is choosing a bed so that it is always comfortable to sleep and spend time on.
IKEA offers a huge range of beds for every taste and color. But, of course, in addition to buying a bed, you will definitely need to assemble an IKEA bed. And so that at this moment there are no questions about how and whether everything was done correctly, we offer our services with a quality guarantee.
A guarantee is provided for the entire range of services for assembly, installation and disassembly of furniture products. Our team consists of only the best highly qualified employees, masters of their craft. Each employee has extensive experience in this field, have skills and knowledge. The staff of our organization is not large, which allows us to quickly identify an unprofessional craftsman.
Advantages
• you can order our services directly on our website;
• we provide full service: assembly, disassembly, transportation;
• you can pay for services after inspecting the quality of the work performed;
• numerous promotions are held;
• all work is performed with high quality and on time;
• guarantees are provided for all services.
Types of collected service products
The assembly of the IKEA bed is carried out by our specialists, taking into account all the rules and observing assembly technologies. We collect all types of beds:
Our team will produce side furniture IKEA bed frame base of any sizes and designs. The most common ones today are double beds. A characteristic feature of such products is a lifting mechanism that allows you to fold the necessary bedding. Our specialists will also help you assemble beds with drawers.
Before you start assembling and installing the bed, you need to prepare and lay out all the parts. First, the frame of the product is assembled, and then the service specialists will fasten all the fittings and fix the backrest.
If the bed is designed with a lifting mechanism, then the work requires precision. It is a little more complicated than assembling a regular bed. After the frame base is assembled, the legs and lifting mechanisms are attached. This work requires accuracy and clarity for the mechanism to work properly. Based on this, it is better to entrust such work to qualified and responsible performers who have extensive experience and knowledge.
Assembly of bunk beds
The assembly of an IKEA bunk bed is carried out by the service with any designs and components. Such furniture products can be supplemented with drawers and auxiliary elements. The assembly of the IKEA loft bed is also carried out by the company’s specialists. Considering the complexity of installation of the structure, it is better to also contact our service area. Each work is performed according to the instructions included with the product. Employees can assemble both wooden, metal and combined beds.
Features of work
Based on the features of all bed designs, their width, installation location and other points, assembly is carried out. You can, of course, assemble the bed yourself, but highly qualified employees of our service will do it more carefully, quickly and in a short time. And most importantly, you don’t have to rack your brains and look for time for this.
All work takes place one by one. The best option for assembly would be a spacious room with little furniture and other items. Our specialists will quickly install the bottom, assemble the frame, fix all the parts and install the back wall. Bolts and connections are securely fastened thanks to professionalism.
All work is carried out only according to instructions. Therefore, if the bed is assembled with high quality, then sleeping on it will be comfortable and safe.
All work is carried out quickly, in a short time. The bed is installed strictly in the place specified by the customer.
To assemble the bed correctly and efficiently, specialists use the following tools:
• Electric drill with drill sets.
This is exactly the principle that the SB-SERVICE team works on - high quality, reliable, fast!
IKEA sideboard - catalog of display cabinets for kitchen utensils
The buffet has a long history. Its name is translated from Latin as “shiny table”. Such cupboards appeared in the Middle Ages and took a strong place in the interior. Large rich houses also had pantries, special rooms next to the kitchen, where a large supply of dishes was stored in simple, often open cabinets. Now you can find original ideas in furniture stores such as Ikea.
Buffet for the kitchen
The buffets were different in size and design: single-tier and two-tier. And in the 17th century, craftsmen began to make corner sideboards, where family silver, expensive porcelain sets and pairs of teas were stored. They were usually locked with a key. You can find out how to arrange a small kitchen in this material.