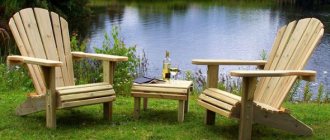
Products for children are a special type of product, which means that the prices of such products are rather high. Caring parents should show skill and imagination and make a child seat with their own hands. You can sew a popular bean bag chair using patterns and a detailed description of all stages of work, or build a smaller copy of adult furniture from scrap materials. The main thing is that the product is light, mobile and safe. After all, this is not just furniture for little consumers, but also elements of a game.
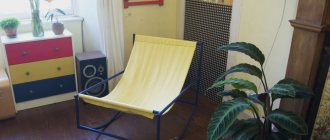
Children's chairs made of foam rubber
Children's furniture is a special category of goods, the prices of which are often quite high.
However, if parents are patient, show their talents, and use their imagination, then they can easily make children's chairs with their own hands with minimal financial costs. One of the easy-to-make, but at the same time very popular, original and comfortable chairs is the bean bag chair, which can be made from scrap materials. Another option is to make a wooden frame, which is lined with foam rubber and covered with fabric.
Original and comfortable children's chairs can be made even from scrap materials that everyone probably has at home. For example, a chair can be “assembled” from large sheets of foam rubber, onto which covers can be sewn from a beautiful, bright material. You can also make a child's chair from seats and pillows from old chairs - just sew new covers on them from any material, and then sew the parts in the shape of a chair.
Let's take a closer look at the most interesting options for children's chairs that you can make yourself at home.
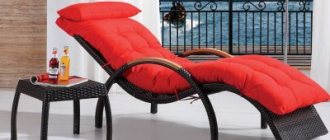
The main options for hanging chairs: cocoon, hammock, nest
Modern shopping centers provide a wide selection of seating options, some of which are not difficult to make at home. Of course, creating a wicker hanging chair with your own hands will be easier for someone who is familiar with sewing, weaving, or at least knitting.
The work of making a chair will be enough for everyone in the family, because it is appropriate to involve children in decorating the finished product, whose ideas are often more interesting than those of adults. Before you make a hanging chair with your own hands, you need to examine the unnecessary things that take up space in the garage or pantry, because they may well become the basis for a hanging hammock or children's swing. In any case, finding and buying components for a chair is much cheaper than purchasing a finished product.
It is the easiest way to make a hanging hammock chair with a soft frame with your own hands. Unlike a hammock bed, which is distinguished by the presence of two fastenings, for a hammock swing it is enough to make only one fastening, and it will be slightly smaller in size than the standard version.
To make a hanging ball chair or nest, you will need a gymnastic hoop, but not a plastic one, but a durable metal one. Among other models, the ball is the most popular because it has an unusual, interesting shape and laconic design that fits into any interior. Based on personal preferences, weaving techniques, colors and decorative ornaments are selected. In addition to the hoop, to make a ball chair, it is enough to have thick textiles, wooden blocks and decorative cord for weaving.
The fastest and easiest option is to make your own hanging hammock chair
Swing chairs are made from various materials, and the frame can be either hard or soft. Despite its simple design, the chair looks attractive and sophisticated. This hanging chair is used for a summer house, veranda, balcony, as well as for living rooms, such as a bedroom, living room or children's room. The main materials that will be required for self-production are textiles, wood blocks and threads to create a seat and backrest.
The cocoon chair, or egg, is considered a favorite model of hanging furniture for children because it has high sides and a small entrance. In such a chair you can comfortably hide from prying eyes and do your favorite things in solitude: read, knit or just dream. When making a hanging cocoon chair with your own hands, the frame is made quite rigid, and the walls are woven using various techniques using wicker, rattan, twigs or any other suitable materials.
To create a wicker chair on a rigid frame, acrylic threads, wicker, metal, plastic or rattan are used. According to reviews, the hanging chair resembles a rocking chair, which is not installed on legs, but is attached either to the ceiling or to a tree branch. To make the base, textiles, leather base, wooden slats, wicker or rattan are used.
Upholstered
To build a child seat from foam rubber, you will need to perform the following steps:
- Creating a wood frame;
- Covering it with foam rubber material;
- Covering with fabrics.
Suitable materials for making the frame are plywood or chipboard. They are light enough and at the same time durable for constructing children's furniture.
Creating the frame of a future chair is quite simple:
- First, we need to form a semicircle from chipboard sheets, which will be the future base seat. Using self-tapping screws, we attach three long blocks (about 40 cm each) to the base at right angles; on them we will install the frame of the back of the product.
- Next, you need to cut out the front pillars from plywood. We measure the exact size of the semicircular part, after which it will be necessary to cut out two rectangular parts from hardboard. They should be exactly the same in length as the long beams, and in width - as half the length of the semicircular part of the frame.
- All that remains is to attach all parts of the frame to the bars using self-tapping screws and a drill.
- When the frame of the product is ready, you need to move on to the next step - covering it with foam rubber. To cover the sides of the chair, the foam should be thinner, but for the back and seat it should be thick enough.
- Foam rubber must be glued using a special glue, which is often called “foam rubber”; it contains substances such as polyurethane and neoprene. The consistency of this glue is quite viscous, so it will not saturate the entire layer of foam rubber, which is very important, since after drying the impregnated layer becomes very hard and easily loses its shape.
It is very convenient to cut foam rubber using a sharp knife; a stationery knife or a knife designed for cutting linoleum is ideal for this purpose.
- cover the resulting chair with regular furniture fabric or leatherette. The advantage of the latter is that it is much easier to care for; any dirt will be washed off quite easily, but fabric materials are more easily soiled and cleaning them will not be so easy.
If you wish, you can also make your own bracket with armrests for the chair.
For more information on how to sew a children's chair from foam rubber, see the following video.
Some general information
Whatever one may say, it is a rocking chair, especially one standing in the garden or near a lit fireplace, that many associate with comfort, a pleasant evening in a narrow family circle, peace and quiet. In such an environment you can have a great rest and relaxation by reading your favorite book or watching a good movie. The rhythmic rocking movements of the rocking chair will help you get ready for sleep and simply feel peace, which is so rare in modern life, filled with bustle and heavy thought processes.
It is still unknown exactly how and where the very first rocking chair came from. Usually many people associate it with old England, fireplaces and rugs. At the moment, there are two main versions of the history of the origin of this chair. According to one of them, the first rocking chair was invented by the Viennese furniture maker, experimenter and innovator, as well as a fan of bent wood, Michael Thoneta in the mid-19th century. However, there is one more fact that casts doubt on this version. Thus, at the end of the 18th century, the word “rocking chair” was added to the English dictionary, and since the 1800s, such chairs began to be produced by many English furniture manufacturers. But the fame and peak of popularity of rocking chairs came precisely in the 19th century. They were used mainly by rich and aristocratic people, as well as those involved in literary and artistic arts.
According to the second version, the rocking chair was invented by Benjamin Franklin. In terms of time, this was also the 19th century. But there are those who refute this version, believing that Franklin was just the one who became the first owner of the rocking chair.
In a word, we can say that the beginning of the history of the chair is the 18th-19th centuries. The sources are silent about the rest. And, nevertheless, rocking chairs still remain popular and in demand, and are primarily intended to create a special ambiance and comfortable environment in a certain place.
Frameless
The main advantages of a frameless chair with foam filling are its mobility, maximum safety and high comfort. Such furniture for a child can also become an interesting element of the game.
Making a frameless chair with your own hands is not difficult. The main skill that will be useful to you is sewing. In fact, bean bags are a fabric cover in which a special filler is placed. Such furniture easily adapts to the body shape of the baby who sits on it.
To make this furniture you need to prepare the following materials and tools:
- Graph paper for pattern;
- The material from which the inner bag will be made. It can be natural, synthetic or semi-synthetic. The length of the fabric depends on the size of the chair being made. The universal size of such furniture is considered to be 90x120 cm, for this you will need 2.5-3 m of fabric (the width of the roll must be at least 120 cm);
- The material from which the outer case will be made. The length of the fabric should be the same as for the inner bag. Choose durable natural materials. The colors should be bright and harmoniously combined with the rest of the nursery’s interior;
- Zippers , the length of which should be from 300 to 1000 mm. The zipper of the outer cover can also be replaced with Velcro. Thanks to the clasp, the top cover can be removed and washed;
- Pencil, chalk, scissors, ruler and tape measure;
- Strong threads for seams;
- Synthetic filling. This can be either professional polystyrene foam filler (in the form of small, very light balls, which will require about three hundred liters), or such inexpensive material as foam rubber, which many people probably have at home.
- Sewing machine.
Stages of work:
- We transfer the provided pattern onto graph paper in real size and cut it out;
- We transfer the pattern to the fabric and cut out the elements for sewing the inner and outer bag;
- We manually sew the parts together using a basting stitch, and it is necessary to immediately sew zippers into each cover;
- Use a sewing machine to sew all basting seams with strong thread;
- The bag must be turned out, after which you can start filling.
See below for more details.
The safest and easiest way at home is to use the familiar foam rubber as a filler , since during the procedure of filling the bag with polystyrene foam, a certain number of balls may scatter, in which case they can be collected with a vacuum cleaner. And it is best to ask children to wait in another room (to avoid the polystyrene foam filling getting into the respiratory tract).
A children's soft chair is a universal piece of furniture that will make your baby's room much more comfortable and interesting, especially if you create this furniture with your own hands. You can use your imagination and sew a chair cover in the shape of your child’s favorite fairy-tale character or in the shape of funny animals. The most important thing is that you need to do all stages of the work very carefully and scrupulously, then you will certainly get an excellent result that will please both you and the baby.
The main advantages of furniture made with your own hands are its convenience, originality (after all, you will not find a second such thing anywhere else), as well as minimal financial costs.
Creating a pattern
In order for the product to turn out smooth, you need to make a detailed pattern, taking into account all the nuances of the material and the shape of the object. You can quickly create a pattern yourself, but there are also a large number of ready-made solutions. If we talk about making your own pattern, you need:
- Make patterns;
- Using them, draw several elements that will make up the chair;
- Place the pattern on the fabric and cut out all the details.
Important! Patterns can be completely different, depending on what properties the chair should have and what materials will be made. Below are several ready-made schemes.
Bag pattern for adults and children
Ottoman diagram
Pattern with detailed dimensions for children and adults
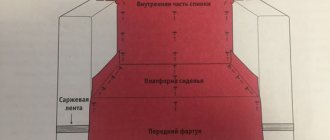
A pattern is made on graph paper and then transferred to fabric where the details are cut out. It is worth leaving allowances for stitching and marking them with dotted lines. The pattern itself will consist of the following set of parts:
- 6 wedge-shaped figures. Their width is 15 cm and 40 at the ends. Length - 130 cm, diameter 50 cm;
- The top is in the form of a diamond with a side of 15 cm;
- The bottom is in the form of a diamond with a side of 40 cm.
For a child, the wedges will be as follows: height - 90 cm, diameter - 45 cm, width - from 22 to 40 cm. The composition of the cross is the same in all cases.
Making a pear chair at home
A master class on making any product begins with preparing all the necessary materials and tools. First of all you will need:
- Fabric for the cover 3 by 2 meters;
- Fabric for cover inside;
- Long zippers of 100 and 30 cm;
- Filler;
- Threads.
Tools you may need:
- Sewing machine;
- Centimeter;
- Scissors;
- Pencil or soap;
- Graph paper for creating a pattern.
Step-by-step manufacturing instructions:
- Create a pattern and transfer it to fabric;
- Cut out all the parts;
- Zigzag the edges of the parts;
- Fold the side wedges and stitch 15 cm at the top and bottom;
- Sew a zipper into them;
- Sew down the side seams of the other wedge and stitch from the “face”;
- Sew the inner cover in the same way.
You might be interested in this: Patterns and sewing of children's sundresses for girls
Pear
Bucket-shaped bean bag chair
For a similar design, other details are cut out: two circles and a rectangle with a rounded notch along the length of the side. The dimensions are as follows:
- Large circle - 80 cm diameter;
- Small circle - 70 cm diameter;
- The height of the back of the chair is 110 cm;
- The height of the low point is 40 cm;
- Rectangle with a length of 260 cm.
Ladle
Do-it-yourself children's chair made of foam rubber - selection of material and 2 assembly options
Prices for children's furniture are quite high, but a chair for a baby is not a bed or an office chair with mechanics, so you can make it yourself at home. I offer a step-by-step master class on how to independently assemble 2 versions of such furniture; all you have to do is choose the model you like.
Upholstered children's furniture is highly expensive.
Foam rubber children's furniture is divided into 2 large areas - these are rigid structures, upholstered with foam rubber and frameless chairs.
Upholstered
Upholstered chairs initially have a rigid frame made of wood, thick plywood or chipboard. Next, a layer of furniture foam rubber is glued or stuffed onto this frame, after which the entire structure is sheathed with some kind of furniture fabric.
If the structure is assembled and sheathed correctly, then such furniture will serve for decades. But at the same time, the frame chair turns out to be quite heavy and it is difficult for the baby to move or carry it. Plus, even despite the soft upholstery, a child can hit himself hard on such a chair while playing.
Kinds
Today, there are several main types and ideas of hanging chairs.
The first option is with a rigid frame. Their production is based on plastic or other materials. The frame itself is wrapped in fabric. Sometimes vines can be used to make the frame.
The second main option is a frameless chair. This option is very similar to a hammock. Its main difference is its size. The hammock is significantly larger.
Cocoon chair. This type of chair can surely be called an introvert's dream. Most of it is hidden from public view by walls.
In order to understand how to properly make a hanging chair, you need to study not only the manufacturing instructions, but also choose the right material, which one has what rigidity, and many other useful materials.
Option number 1: child seat on a rigid frame
The reduced dimensions of the structure do not at all mean a lightweight assembly scheme. Children's furniture is created according to the same principles as chairs with standard dimensions, and since children are very mobile, the fastening of the units is carried out with a double margin of safety.
Materials and tools
As already mentioned, a rigid frame for a child seat can be assembled from plywood, chipboard, wood and MDF boards.
- Plywood is considered the most suitable material for such purposes; it is durable and relatively light. In theory, you can use any plywood, even thin three-layer plywood, for a child seat, but in practice it is better to take a sheet 6-8 mm thick;
For a child's chair, it is advisable to use plywood of the "FK" brand, the price for it is reasonable, plus there is complete order with environmental friendliness, as for the grade, the chair is in any case completely covered, so plywood of any grade, except 4, is suitable.
Formaldehyde is used in the production of FSF plywood, so it is prohibited to make household furniture from it.
- Chipboard - the only advantage of particle boards is that they are cheap. Chipboard material is heavy, plus under constant mechanical loads it can delaminate over time;
- Natural wood is a wonderful, environmentally friendly material. Working with wood is easy and convenient, but the frame of a small chair turns out to be too massive. The recommended thickness of the board is 20 mm, the timber is taken 30x40 mm, no matter how hard you try, the frame comes out voluminous;
- MDF - fiberboards are equal in weight to chipboard, but they are denser and do not delaminate. The material costs the same as plywood, but plywood has higher strength, so MDF is rarely used for such purposes.
The density of foam rubber for a child seat does not matter much, but according to the rules, it is advisable to use material with a density of 25 kg/m³ for heavily loaded upholstery.
Table of parameters of popular brands of furniture foam rubber.
The frame will be assembled using wood screws; you shouldn’t take too long ones, 30-40 mm is enough. The structure is dry, with closed fasteners, so take ordinary steel screws, without anti-corrosion coating.
- Screwdriver;
- Wood hacksaw;
- Furniture stapler;
- Scissors;
- Knife;
- Roulette;
- Pencil.
To assemble the frame for a child seat, a standard set of household tools is enough.
Description of work
The whole complex of work is divided into 3 stages:
- Cutting out parts and assembling the chair frame using self-tapping screws;
- Cut the foam rubber and cover the frame with it;
- Cutting the furniture fabric and finishing the upholstery of the chair.
Work order
For a small design, a hand-drawn sketch is enough, the main thing is that you understand how many parts there are in the chair and what size they are.
The chair was made from scrap materials. The load-bearing sides were made of OSB, the seat was made of chipboard, and the back was made of plywood.
First, wooden blocks were screwed to the bottom of the seat, at points bordering the sides and back.
The sides are cut out of OSB and are screwed to the side of the seat. Two self-tapping screws are driven into the end of the chipboard seat, and the other 2 self-tapping screws are driven into the support bars.
The back consists of 3 plywood sections, they are screwed in the same way as the sides, with 4 screws each.
Small metal ties were used as additional fasteners, which were secured with small self-tapping screws. There were 2 ties for each joint, top and bottom.
For the ties, we took a metal strip with holes; it can be easily cut with metal scissors or pliers. On the market, such tape is sold for reinforcing brickwork and other similar works.
It was also decided to close the front part under the seat; for this, a piece of OSB was cut out and screwed on with self-tapping screws.
Furniture foam rubber 40 mm thick was used for upholstery. The foam rubber was attached around the perimeter using a furniture stapler.
A single piece of foam rubber was used to upholster the backrest, and individual squares were cut out for the armrests.
- First, the material is fixed in the area of the seat and the inside of the back;
- Then the foam rubber with an overlap of 50 - 70 mm from the edge is cut, wrapped and fixed with a stapler.
It was not possible to cover everything entirely, so I had to unscrew the armrests and cover the seat and back separately, and the armrests separately. No complex patterns were made; basically, the material was wrapped and fixed with a stapler.
The seat and back were completely covered, so that the frame was not visible anywhere.
The armrests were covered with a soft part and a hard panel inside. Then we screwed the armrest to the chair and wrapped the outer part, securing it with a stapler from below, from the inside. This approach made it possible to hide the screws.
Option number 2: frameless foam chair
If you have difficulty with carpentry work, be it cutting plywood or fixing parts with a screwdriver, then you can try sewing a frameless foam chair with your own hands.
Materials and tools
We have dealt with foam rubber; for homemade furniture, it is advisable to use a material with a density of 25 kg/m³. Solid thick sheets are expensive, so it makes sense to choose a thick foam mat 40 - 50 mm thick.
Foam rubber is a good material, but the furniture will last twice as long if you use polyurethane foam instead of foam rubber. This filler is used in the manufacture of orthopedic mattresses.
As a filler, polyurethane foam is an order of magnitude better than foam rubber.
Frameless foam furniture consists of 3 parts:
- A relatively hard foam rubber board, here, the denser the foam rubber, the better the furniture will keep its shape;
- Foam rubber is placed in the inner cover, which is equipped with a zipper. Durable, lint-free fabric is used for the inner cover;
- To ensure that the furniture lasts as long as possible, an outer cover is also sewn. The configuration, dimensions and patterns of the outer cover are similar to the inner cover, and the material is selected at the request of the owner; the following fabrics are most often used.
Fabric options for outer cover:
- Jacquard is an expensive, but strong and durable material. Most jacquard models have large and bright patterns with a silky sheen;
Jacquard material is expensive, but high quality.
- Velor is a fine-haired fabric that is pleasant to the touch. The price of velor is high, plus this fabric is difficult to care for. It is not advisable to use velor specifically for a child seat; you will waste money, and the material will quickly wear out and get dirty;
- Scotchgard is a modern semi-synthetic analogue of jacquard; it is difficult for a non-specialist to distinguish between these materials, but scotchgard is half the price of jacquard;
- Chenille is a durable fabric with thick colored thread. Visually, chenille looks rough; some compare it to tarpaulin or burlap, but this is its charm; the large spiral thread gives the canvas a special charm. The price of the material is average, and most importantly, caring for chenille is not difficult;
Using chenille for upholstery of child seats is considered the golden mean.
- Flock - here we are dealing with a symbiosis of cotton and polyester. The synthetic base is noticeable to the naked eye and can be felt by touch, but the price of flock is affordable, plus the material is durable, elastic and easy to clean.
The polyester base increases the elasticity and wear resistance of the flock.
As for the tools, here you need a tailor's kit:
- Sewing machine;
- Needles and threads;
- Tailor's scissors;
- Knife;
- Colored chalk for marking patterns;
- Pins;
- Tailor's meter or tape measure;
- Zipper for sewing into the case.
A minimum set of tailoring tools is inexpensive.
Filler selection
To sew frameless beans with your own hands, you can use different fillers. Each material has certain characteristics. Some are not suitable for allergy sufferers, others are too expensive, and others are not suitable for outdoor use. However, all existing types can be divided into several main categories:
Natural:
- wood chips and sawdust;
- bird feathers;
- horsehair;
- wool;
- buckwheat husk.
Synthetics:
- expanded polystyrene;
- polypropylene;
- polyurethane foam;
- holofiber.
Materials on hand:
- flakes;
- legumes;
- hay, straw;
- paper;
- pieces of foam rubber;
- cotton wool;
- old clothes, textiles.
There are many types of raw materials that can be used to fill frameless furniture. The main thing is to choose the right fabric for sewing the cover, through which the used filler will not drip.
DIY children's frameless chair
It is just as important for a child of any age to participate in family life as it is for an adult. He needs his personal belongings and the opportunity to express his thoughts and opinions in the family circle. Clothing and furniture also play an important role. Probably everyone dreamed of their own place at the common table. It's very easy to do. Design your own soft and comfortable chair for your baby. Choose a performance style and form that suits the child’s age and interests.
Now he will have a personal item that will belong only to him. This is a very pleasant and valuable gift for children, because they so want to feel like adults.
IMPORTANT! Thanks to such a gift, you can instill a sense of responsibility for your things and actions. The main thing is to present everything correctly. Tell your child that if it is his personal furniture, he must take proper care of it. This will help in nurturing and developing good qualities.
To begin with, we will tell you how to properly make an upholstered chair that does not have a frame. This type is the easiest to implement.
Materials and tools
If you are really thinking about creating a child seat, then first you need to think through everything, read articles on this topic and, most importantly, prepare all the items necessary for the work. Depending on the chosen model, they can be supplemented, but the main accessories are as follows:
- Pencil with a ruler for drawing.
- Thick fabric.
- Scissors.
- Zipper or rope to close the bag.
- Soft and pleasant filling.
The essence of creating a product is to sew together two pieces of fabric and fill them from the inside with synthetic material.
Stages of work
The manufacturing process does not take much time and is quite simple to perform. The whole work consists of constructing a pattern, cutting the fabric, sewing the bag and filling it with synthetic material:
- Pattern. Draw an image of the desired shape on graph paper. A pear-shaped piece or a regular bag is best suited for this. You can choose the sizes individually according to the baby’s height.
- Cut out the fabrics. Transfer all dimensions from the pattern to the fabric with a special chalk or a piece of pointed soap and cut the required part along the lines with scissors. Don't forget to take fabric with extra seams.
- Creating a bag. Sew the two resulting flaps around the perimeter. Leave the top open; we will place the filler in it.
- Filling. Place all the synthetic filling inside through the unstitched edge. Load the bag 2/3 full to prevent it from tearing under the weight when someone sits on it.
- We close the chair. Thread a zipper through the hole so you can open the bag at any time. You can use a thick rope and use it to tie the neck. Both methods are perfect for closing the structure.
Varieties
Children's bicycle seats differ in the mounting location. They can be located in the front or rear, depending on the bike model and personal preferences. The front models are mounted on the steering tube or on the bicycle frame, the rear models are mounted on the seat tube or trunk.
Rear-facing seats provide the child with greater comfort and are suitable for long trips. The front models allow you to watch the baby while moving, which is much calmer for many parents. There are several types of products. When choosing a front or rear mount, you should consider the following parameters:
- child's age;
- bicycle model;
- where the selected model will be mounted (rear or front location);
- quality of assembly and materials used in production.
The main thing is that the child must be protected in the chair on all sides and securely secured. It is necessary to ensure that the seat belts do not squeeze or rub the skin. Such conditions create a minimal risk of injury.
The smaller the child, the more comfortable and safe the chair should be.
Each of the varieties has its own advantages and disadvantages. The choice depends on the age of the passenger, on what distances and on what roads they are supposed to travel. Most parents, when choosing a front-mounted bike seat, are guided by the following reasons:
- the child is clearly visible while moving;
- nothing prevents him from watching the road;
- the trunk can be used for its intended purpose;
- The model is suitable for bicycles equipped with a rear shock absorber.
Typically, front bicycle seats are purchased for very young children. However, we should not forget about the significant disadvantages that characterize these models:
- The front-mount seat is smaller and narrower than rear-mount models;
- they block the cyclist's view;
- Designed for a weight of no more than 15 kg;
- In the event of a fall, there is a high risk of injury to the child.
It must be remembered that when the bicycle seat is installed in the front, the risk of injury if the bicycle falls increases. The driver should drive especially carefully, choosing flat sections of the road. You should also not speed up too much.
If the baby is used to traveling with his parents, he is not capricious, and can withstand trips well, it is better to purchase a high-quality rear child seat from reliable manufacturers. The most popular products are those that are mounted on the seat tube. They are comfortable and protect the passenger well in an unexpected situation. The devices have the following advantages:
- comfortable and quite spacious;
- easy to attach to the frame;
- characterized by good shock absorption;
- Suitable for various bicycle models;
- can withstand significant weight – up to 25 kg;
- if necessary, they can serve as a trunk;
- the likelihood of being injured in a fall is significantly reduced.
This device will be convenient for a child from 3 years old. You can safely leave it behind the cyclist. A rear seat tube mounted bike seat is the most popular option. It also has disadvantages, they need to be taken into account when choosing a model:
- the child has limited visibility, he may be bored and therefore capricious;
- the baby is not visible to the parents;
- This option is inconvenient if the bike has rear shock absorbers.
Another advantage of the rear bike seat is the ability to install it on the trunk. The models can withstand high loads and are suitable for most bicycles, but are not very comfortable on mountain or country roads because they do not have the necessary shock absorption.
Front
Rear
Frame chair made of foam rubber for a child
This option will have clear edges and a base. It will require additional equipment and the process itself will take more time, but this design will be more reliable and convenient for a small child. Soft frameless options have a simple design, are easy to wash and can be easily lifted and moved.
Models with a frame have more complex designs. But such a thing will last longer and will stand securely without changing its shape, which will protect against falls and injuries.
ATTENTION! The base can be upholstered with a special thick fabric over foam rubber and decorative figures of your favorite characters can be made.
What is needed for a children's soft chair
To create such a masterpiece you will need:
- Chipboard.
- Wooden boards and bars to strengthen the body.
- Sheets of plywood.
- Hardboard.
- Glue.
- Foam inserts.
- Thick fabric.
- Jigsaw.
- Self-tapping screws.
If you want to decorate the chair beautifully, you can use colored fabric inserts, bright prints, rhinestones, and beads. It all depends on the wishes of the child.
Manufacturing process
The first step is to create the correct drawing, according to which further work will be carried out. To do this, according to the dimensions, create a diagram of the future chair on graph paper.
After the preparatory part and construction of the plan, you can begin to implement it:
- According to the drawing, cut out the necessary parts: frame, racks, curly side parts and seat.
- Make the base in the shape of a semicircle with a height of approximately 600–700 mm.
- Attach tall blocks to the center of the back and to both corners. Attach a block half as long in the middle of the front edge.
- After this, create a frame and a seat from hardboard. Saw off the rectangles and attach them to the base using self-tapping screws.
- Cover the entire structure with foam rubber.
- Finally, cover the chair with thick, colorful fabric. This is easy to do using a construction stapler or pushpins.
IMPORTANT! The child constantly likes to play and twirl, which can lead to injury. To solve this issue, you can attach special fasteners or safety straps to the handles. The baby will be securely fixed and will not fall.
Congratulations, you and your child now have a wonderful addition to the interior of their room.
Chair covers and capes
Seat covers vary in function, shape and structure. Formal and cute, formal and quirky, you can include covers for every occasion and every chair.
The high chair is decorated with a fabric bag with a light print or embroidery, the high wooden chair has a beautiful cloak on the back and a seat sewn in its clay. An unusual case can also be sewn onto a fishing chair, but it will look better on models with high backs.
Depending on the requirements and tasks, chair covers can be divided into different types:
- Coverings are intended for daily use, are often washed and therefore must be firmly and carefully sewn. Coverings should be as functional as possible, easy to take off and put on. The fabric for their seams must be strong, wear-resistant and durable;
- Holiday parties. Holiday covers are designed for a special occasion. You can use more decorative elements: Ruchins, envelopes, bows, bows and pearls. The purpose of party covers is to decorate for a special occasion, not to hide a chair. Therefore, the cover design can be creative.
How to make decoupage chairs read this article: //6.com////—decoupage.html.
The cover form can be divided into three groups:
- An integral element that covers the entire chair. They are the most versatile. Suitable for any occasion and any interior. They allow you to cover the entire chair and, if necessary, hide all imperfections. These cases look holistic and thorough. Among the disadvantages of fixed bodies are the relative complexity of sewing and higher (compared to other types) fabric consumption;
- Back and rear covers. Separate seat and back covers can be a good solution for everyday use. The seat of the chair is usually dirtier than the back. Therefore, the cover should be washed more often. Individual covers are especially suitable for informal, bright environments. For example, for a summer kitchen, a garden pavilion or a children's room;
- Coat on the back. Covers on the back can only be officially attributed to the covers. Their purpose is holiday decoration. These capes are simply sewn (if you don't know the hooks on the shoulder) and don't take up much fabric. Covers can be used to decorate chairs for New Year's Eve, children's parties and other purposes.
Favorite handmade children's chairs
Products for children are a special type of product, which means that the prices of such products are rather high. Caring parents should show skill and imagination and make a child seat with their own hands. You can sew a popular bean bag chair using patterns and a detailed description of all stages of work, or build a smaller copy of adult furniture from scrap materials. The main thing is that the product is light, mobile and safe. After all, this is not just furniture for little consumers, but also elements of a game.
Car seat for a child - safety first
Now almost every family has a car, sometimes even more than one. Unfortunately, the increase in the number of cars on the roads entails an increase in the frequency of accidents, in which the youngest passengers often become victims . Despite the warnings of the traffic police and laws adopted to protect the health and life of children in the car, some parents still consider a child car seat an unnecessary attribute of the trip.
Frameless chair that can change shape
Making your own bean bag chair is not difficult at all. This process does not require large expenses or special skills; you just need to know how to sew. The beanbag has many names: ball, pear, sacco, bean-bag. Essentially, this is a large fabric cover in which a special synthetic filler has been placed. Thanks to this, the bag easily adapts to the body shape of the child who sits on it.
Materials and tools
If you decide to make a soft bean bag chair with your own hands, you will need:
- Graph paper to make it convenient to draw the exact pattern of the product.
- Durable fabric for inner bag. You can choose inexpensive natural, synthetic or semi-synthetic material. Satin, mattress or raincoat fabric, as well as materials with water-repellent properties, are well suited. The footage depends on the size of the chair you plan to sew. For a pear-shaped chair with a diameter of 900 mm and a height of 1200 mm, you need to purchase 2.5 m of fabric, the width of which is about 120 cm (we recommend taking with a small margin). This is a universal size of this chair that will suit children of different ages.
- Textile material for outer cover. The footage needs to be the same size. For the outer cover, the choice of fabric is much wider. Strong natural fabrics are suitable, as well as jacquard, flock, faux leather and even faux fur. Choose a color that will be in maximum harmony with the interior of the children's room, or you can simply decorate a plain bright material with a cheerful applique.
- Two zippers 300-1000 mm long. One of the zippers (on the outer cover) can be replaced with special Velcro. Over time, the filler decreases in volume, so you need a hole to fill it. In addition, the top cover will get dirty; the clasp will allow you to remove it for washing or cleaning. If you want to update the interior, you can easily replace the top bag with a new one.
- A simple pencil to draw the pattern.
- Meter ruler or tape measure.
- Chalk for marking patterns on fabric.
- Scissors.
- To ensure reliable seams, we recommend using strong reinforced threads.
- Synthetic filler. The best one today is polystyrene foam. These are light balls with a diameter ranging from 5-10 mm. For the chair we are going to make (diameter 900 mm, height 1200 mm), we need 200-300 liters of polystyrene foam. By weight it will be a little more than a kilogram.
- Sewing machine.
Description of work
- We carefully study the pattern according to which we will make a pear-shaped bean bag chair. We transfer the diagram onto graph paper, enlarging the image to real size. If desired, you can proportionally reduce or increase the parameters. After transferring the pattern, cut it out.
The final stage is decoration
Cozy handmade knitted chairs
You can leave the finished chair in its original form, or you can make it an exceptional element of the interior by decorating it. For needlewomen there are endless possibilities.
Pear chair in the corner of a children's room for a girl
| Decor option | Description |
| Decoration | You can trim it with ribbon, decorate it with applique, apply embroidery, sew on crocheted decorative elements. |
| Knitting | The outer cover can be knitted rather than sewn. For greater convenience, sew a small pillow to match the chair. If the second cover is knitted, then the pillow can also be knitted. |
| A small blanket or blanket (plain, plush or nap) | Can be thrown over a chair |
In general, there are many options. Be guided by taste and imagination.
Fluffy fur chair for a cozy living room
Children's chair made from scrap materials
The child seat can be made into a more traditional look. Such models can be seen in specialized stores and in artistic photographs. They are expensive and not available to everyone.
And around us there are a lot of unnecessary things and materials. It turns out that you can use them to build a beautiful soft chair for a child. In this case, the result is a classic model worthy of becoming a favorite piece of children's furniture.
Tools and materials
- Remains of plywood. To make the structure lighter, you can use foam.
- Hardboard. The leaf can be given a rounded shape.
- Chipboard planks.
- Bars.
- Drill with drills.
- Furniture screws.
- Clean corrugated cardboard.
- Knife for cutting paper.
- Sandpaper.
- Sewing machine.
- Ruler.
- Wood glue.
- Glue "Moment".
- Foam rubber.
- Upholstery material (you can combine different, matching colors or textures).
- Interlining or other technical fabric.
Work order
- First, we form a semicircular base seat from chipboard boards.
- Perpendicular to the base, we attach 3 high bars (about 400 mm) with self-tapping screws, on which we will install the back frame. If desired, the central bar of the backrest can be made 50-70 mm higher. We attach the small one (100 mm) in the center of the end.
- We cut out shaped front pillars from plywood (depending on what pieces of plywood you use, it can be 2 parts or 1 whole).
- Having measured the exact length of the rounded part, we cut out 2 rectangles from hardboard. Its length is equal to the length of the tall bars, and its width is half the length of the rounded part.
- Using a drill, we attach the frame parts to the bars with self-tapping screws. The chair frame is ready.
- We install the frame on the legs. They can be children's cubes or bars, sanded with sandpaper.
- We cut out and glue pieces of cardboard around the back of the frame with wood glue, forming a wide back of the chair. If you want the chair to be lighter, you can alternate cardboard with layers of foam.
- Having completed this stage of work, after drying, carefully use a knife to level and round the surface of the back.
- We attach paper to various parts to make patterns for the foam rubber. Having cut out the foam rubber along them, we symmetrically glue the resulting base of the chair.
- If possible, apply non-woven fabric on top of the foam rubber (with glue or using a stapler) or other inexpensive fabric that will additionally secure it. It will also serve as additional protection against rapid abrasion.
- We sew a cover for the chair separately from decorative fabric. We put on the finished cover and sew it up by hand.
- We sew an additional soft pillow from foam rubber and fabric according to the shape of the seat.
What you will need
This option is quite simple, just prepare all the necessary materials and tools in advance. In particular you will need:
- boards, at least one centimeter thick;
- foam rubber on most of the surface;
- construction stapler;
- screwdriver;
- self-tapping screws;
- upholstery fabric;
- ornaments for decoration.
If your child is very small, then in any case you should take thicker boards, because there is always the possibility that a heavier person could sit on the chair. Having prepared drawings and diagrams, you can easily make a chair of any format that you choose in advance.
What size should it be
A piece of furniture such as a beanbag chair is made in two sizes - 50 and 100 centimeters in diameter. These parameters directly depend on a person’s build and height. For a person up to 150 centimeters tall, a diameter of 70 centimeters is suitable. If the height is from 150 to 170 centimeters, the chair must be made from 80 centimeters in diameter, and so on in increasing order.
You might be interested in what kind of leave-in and wash-out fabric markets there are.
Parts that need to be sewn
Manufacturing Features
To begin with, you should carefully prepare the frame. Naturally, you should start with the seat, since it should be the most durable and comfortable part of this furniture. It is made in the form of a small square or rectangle - this choice remains with the one doing this work. The main thing is to make it smooth and as strong as possible. For further convenience, you should thoroughly sand the surface. A chair for a child must be movable, so you should purchase comfortable office wheels in advance and use them for their intended purpose.
Furniture for children should be safe. Therefore, make sure that the chair does not have sharp edges of nails, chips or other parts that can cause harm, even if the upholstery is made of foam rubber. In addition, sanded boards can be varnished, because this not only provides additional safety, but also protection against fungus and rot.
The back can be made from thinner boards, since it does not take on the main load. But it needs to be fixed no less efficiently, since if it breaks, it will be difficult for you to get to the base and restore your product. How to do it correctly so that the child is comfortable? It all depends on how you stretch the foam. You can attach it in a thick layer to the seat and gradually narrow it towards the top; this option is similar to an orthopedic model and will be useful for the child.
Handles are mostly made at the discretion of the manufacturer. It is not difficult to make a children's soft chair with your own hands, and it is in this case that you can completely use your imagination. You can make handles in absolutely different ways: smooth, carved, inclined or raised to the base, and so on.
The main thing is that children cannot get hurt from them and at the same time use them for their intended purpose. In order for them to show their shape, you can use thinner foam rubber than for the back and seat. It will convey the shape more clearly and make the child seat more expressive. In addition, with thin foam rubber the handles will be much easier to decorate.
Useful tips
If you are determined to reupholster the furniture yourself, you need to know special tricks that will help you avoid ruining your favorite chair. There are contraindications to self-stretching, these include:
- The furniture has a complex geometric shape.
- Furniture should be upholstered with natural fabric or very expensive material.
- The furniture is expensive or antique.
When choosing upholstery, do not forget to take into account the overall interior of the room, the chair should fit into it, and the fabric itself should match the room
The old upholstery must be removed very carefully, as it will serve as a convenient template for creating new covers. The pattern on the fabric must match on all parts of the upholstery
If you have never reupholstered furniture, try to start with the simplest thing - it could be a stool, ottoman or an old chair that is not particularly valuable. Thanks to these tips, renovating old, worn-out furniture will be successful and will be an enjoyable and exciting experience for you.
Decoration of the finished model
The chair you make must be properly decorated so that your child likes it. To do this, you need to take upholstery in bright colors, but at the same time easy to wash. You can add various ornaments, bows and other decorative elements to it, because only you know how to make furniture for your child.
Remember that you will definitely like such a gift, since you are giving it from the bottom of your heart. In addition, in order for the child to immerse himself in the manufacturing process, it is enough to offer him help in the work. He can simply provide the necessary tools, but feel needed. This way you can spend more time with your child and at the same time create an original chair that will subsequently decorate your room.