Preparing the base
You can remove the old coating from a chest of drawers in various ways: using washing liquids or a hair dryer. Both options are quite effective.
Using flushing fluids
To remove old coating from the wooden surface of a chest of drawers, it is convenient to use removers. This may be the well-known drug Antikras-Universal. The optimal temperature for working with the composition is from 8 to 25⁰C.
To remove grease, it is necessary to treat the surface with a solvent, and to remove dirt, it is enough to rinse thoroughly with water. After cleaning the surface from dirt, treat it with a remover, then leave for 5–15 minutes.
When the paint begins to bubble and crack, you can begin to remove it. To do this you will need a metal spatula. Old paint must be removed within 2.5 hours. Otherwise, the remover will dry out, making it difficult to remove.
After the paint is completely removed, re-treat the work area with solvent.
Many substances are highly toxic or have an unpleasant odor. Do not forget to use personal protective equipment and ventilate the room well.
Using a hair dryer
In order to get rid of paint using a hair dryer, you need to heat the paint layer, moving from bottom to top. Due to the hot air, the temperature of the paint will increase and it can be easily removed with a spatula. This must be done with a hairdryer until the surface has cooled down.
Putty
After you have cleared the chest of drawers of old paintwork, it’s time to start puttingty. Wooden furniture often contains cracks, fallen knots, chips and other damage. Such defects must be puttied, otherwise after painting the chest of drawers they will come out. Acrylic putties are best suited, and they can be applied using a rubber or steel spatula.
Grinding
After puttying, the surface will have various types of unevenness and roughness. For this reason, sanding is necessary to remove visible imperfections. Sandpaper No. 160–200 is suitable for this. If possible, it is put on a grinding machine, and if there is not one, then the surface is leveled manually.
We paint old furniture white or give life to unnecessary things
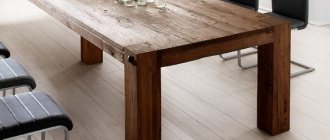
Often an old chest of drawers, chair, table or cabinet made of solid wood is very dear to us, like a memory. It’s a shame to throw them away, and they no longer fit into the new interior. Therefore, the task is to update it. How to paint furniture at home?
I suggest the most elegant, fresh color is white. Painting furniture is a great way to extend the life of old furnishings and equipment and give them new life.
For example, white distressed furniture can be finished in such a way that it looks very stylish. You will need to process the furniture in two stages:
- whitening;
- light sanding with sandpaper.
Wooden products made from solid wood are best suited for this purpose: oak, pine, birch, beech.
To work you should prepare:
- dark dye and white acrylic paint or two colors of acrylic paints;
- white wax candles;
- brushes;
- coarse and fine-grained sandpaper;
- textile;
- knife.
- Clean the surface of the chest of drawers or chair from dust, wipe it several times with a damp cloth and leave until completely dry.
- If the surface is painted, you need to remove the varnish layer with sandpaper (first coarse and then fine-grained).
- Places that you want to highlight: carved decorations, slats, edges, should be covered with darker paint (brown and blue shades are ideal here). Leave the paint to dry.
- To get an uneven and natural effect of worn corners, wax the areas previously painted with dark paint. The wax will make it so that the next coat of paint will not adhere tightly to these areas.
- Cover the entire surface with white paint, preferably several times, with breaks to dry. Avoid stains.
6. Areas covered with an additional layer of paint and wax should be rubbed with a knife. Don't press too hard - this way you will get a good effect.
7. Rub the entire surface with fine sandpaper to level the surface.
Whitening with whitening paste
Bleaching using a bleaching paste consists of rubbing the wood with a special paste containing wax and pigment. The wood surface will develop distinctive white lines, making it look older. Porous wood is suitable for such bleaching - trees such as oak and ash.
You need to buy in the store:
- special paste,
- prepare paint in the chosen color,
- metal brush,
- hard brush,
- textile,
- a piece of coarse and fine-grained sandpaper.
- Wipe the clean surface of a chair or chest of drawers from dust several times with a damp cloth and leave until dry.
- If the surface is painted, you need to remove the varnish layer with sandpaper.
- Paint the surface with paint and let it dry.
- Using a wire brush on the wood, make tiny grooves according to the grain orientation.
- Apply the whitening paste, fill the grooves well and wait for the paste to dry.
- Wipe the surface with a dry cloth.
- Cover the surface with varnish.
Express whitening
If you want to give a simple wooden stool new life, you can do it with a washed-off white paint effect. Nothing could be simpler.
- Rub the wooden surface with sandpaper.
- Using a brush, apply a coat of paint.
- When the paint dries, remove excess paint with a napkin.
- Coat the wood with varnish.
The purpose of the chest of drawers and its color
When choosing a design for a chest of drawers, it is important to consider in which part of the house you will place it: bedroom, living room, children's room or dining room.
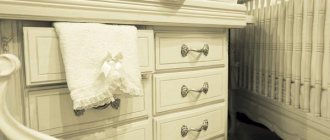
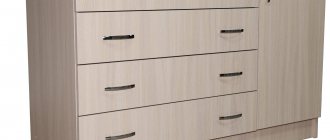
Bedroom furniture should have many drawers of different sizes; such models are presented in abundance on the Ikea website. As a rule, the upper compartments are small and are intended for storing accessories and linen. The lower ones are more impressive and can accommodate bedding. If you attach a mirror to the tabletop, you can combine the chest of drawers with the dressing table.
It is better to choose calm pastel colors for this piece of furniture for the bedroom. These colors can be: beige, soft pink, white, milky, cream.
Chests of drawers for the living room have more of a decorative function. Such furniture is decorated with beautiful carvings or all kinds of inserts made of leather, rattan and even precious metals. The color palette should match the overall design of the room.
If the chest of drawers is intended for the kitchen, then models with opening doors and drawers are best suited. The color should be in harmony with the rest of the furniture in the room and the tone of the walls.
For a child's room, a chest of drawers with large drawers is suitable, in which you can put toys, books, pencils and all the accessories necessary for a child. This time you can experiment with the palette.
How to choose the right paints and varnishes
The modern market offers the consumer a wide variety of paint and varnish coatings. How can an ordinary person understand the characteristics?
In order for the painting of a chest of drawers to be successful, and the result to please the owner for a long time, you need to choose dyes that are resistant to abrasion and mechanical damage. Oil or enamel coatings have these qualities, which are not suitable for restoring a chest of drawers. But, the best option would be acrylic compositions.
They have the following characteristics:
- no pungent odor;
- harmlessness;
- optimal price;
- ease of use;
- the ability to change color using tint;
- can be diluted with water.
Painting of chipboard and plastic products
Restored furniture is not always made of wood. It can be made of chipboard or plastic.
To paint chipboard furniture, follow the same steps as for wooden furniture:
- removing old paint;
- putty;
- grinding.
You will have to apply paint to the chipboard surface in several layers to obtain an aesthetic appearance of the object.
Plastic products are best coated with acrylic paints or other water-based dyes. Brushes should be of good quality. It’s better to overpay and achieve the desired result than to save money and end up with damaged furniture, the surface of which will be covered with brush hairs.
When does coloring make sense?
After you take a closer look at the price tags in furniture stores, you begin to think about alternative ways to update your interior. A good way to update would be to repaint existing furnishings. There are several reasons why people think about painting furniture and begin to study the issue in detail:
- I would like to update the furniture in my dacha. Most country house sets are made up of outdated furniture of different styles and colors. The update will help bring all items to a single style, making the interior harmonious and cozy.
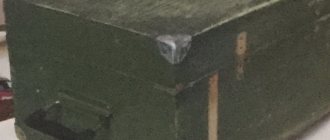
- It's a shame to throw away your old headset. Many sets left over from Soviet times are durable and can last for decades. But their surface has long lost its attractiveness, and the objects themselves look obsolete; Restoration and painting (possibly with a color change) will help extend their life.
How to refresh an old item Source aviarydecor.com
- The house has an inherited rare wardrobe or retro chest of drawers. Antique furniture is valuable for its original appearance, often more refined than modern models, but its appearance is far from perfect. Skillful restoration will transform an old item beyond recognition and make it a decoration for any living room or bedroom.
- You want to refresh the interior, but you are not mentally prepared for a full renovation. In this case, point changes are used. They often change the color of one wall, make it an accent wall, and purchase new textiles and lamps. An effective way would be to repaint furniture in a new, sometimes unexpected color: when a brown cabinet turns white or olive, the interior is transformed beyond recognition.
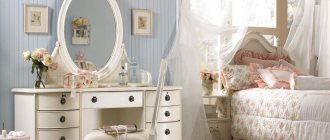
- I want to change my style. They resort to artificial aging of facades when they want to decorate the interior with vintage notes (for example, Provence or shabby chic). A chest of drawers or a wardrobe begins to resemble an antique thanks to a special painting technology. A decorative layer with noble cracks can be obtained in several ways.
Nightstand with aged effect Source luniqueblog.com
Painting furniture with acrylic paints
If you decide to repaint the chest of drawers with acrylic paints, then you need to choose the right tool. You can paint furniture with either a roller or a brush designed for working with such paints. It all depends on personal preference.
When going to the store to buy a tool, you should remember a few rules:
- choose only high-quality tools;
- To thoroughly paint furniture parts, you may need brushes of different widths.
- Even if you decide to work with a roller, it is better to handle small parts with a brush.
Before starting the process, the surface must be coated with a primer. Acrylic-based compositions are best suited. When choosing a material, you need to pay attention to three points: drying time, surface area to be treated and color, which should match the tone of the paint.
Apply the primer in a small layer and be sure to let it dry. After this, you can begin applying acrylic paint.
Briefly about the main thing
You can give obsolete furniture a new life by painting it a different color. The method is also suitable if you want to change your boring interior without going into renovations. Before painting, furniture must be prepared and the type of surface determined.
Preparation is a multi-step process, and skipping its stages is highly undesirable. Different types of paint and varnish products are used for repainting. Stain tints the material, varnish and wax complete the process. The main composition, paint, is chosen based on its performance characteristics. To ensure that the paint lays evenly, surface defects must first be repaired and work in good lighting.
Furniture varnishing
If the chest of drawers was made of solid wood, then its surface can be varnished in several layers. You should choose the coating responsibly; the result of the work will depend on it.
There are special varnishes designed for working with furniture. You should not take shiplap varnish or the one intended for the floor. These compounds can ruin the appearance of a piece of furniture.
There are two types of varnishes: water-based and solvent-based. It is better to choose the first option, as it does not have an unpleasant odor. This makes it possible to work without personal protective equipment. In addition, these compounds dry quickly.
Unusual ways
By showing ingenuity, imagination and creativity, you can decorate the chest of drawers beautifully, unusually, individually. The result of your efforts will be an original item that has no analogues.
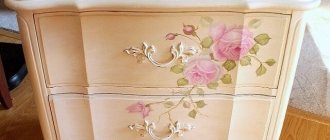
Idea No. 1: Flower meadow
This design will fit perfectly into a bedroom or the interior of a country house.
To work you will need:
- wallpaper with large floral print;
- furniture handles made of glass or acrylic;
- pencil;
- ruler;
- scissors or stationery knife;
- transparent PVA glue.
From a sheet of wallpaper you need to cut out a piece with an allowance of 10 cm. Glue it to the front of the chest of drawers, tucking the edges inward. To avoid swelling of the wallpaper and the formation of wrinkles, the sheet must be carefully smoothed with a dry cloth or a special spatula. When the surface is dry, coat with clear acrylic varnish.
After waiting for the inside to dry completely, carefully make a hole for the handle. In the same way, you can glue linen or cotton fabric to a wooden surface.
Idea #2: Stencil Lettering
This chest of drawers is suitable for laconic interiors and children's rooms.
To work you will need:
- stencils with letters;
- light paint for wood;
- brushes
After painting the chest of drawers, you should wait until the color dries completely. Then apply the stencils to the surface, draw letters and words in a contrasting color. To secure the effect, coat the top with clear varnish.
In order to turn an old chest of drawers into an interesting interior element with your own hands, no special skills are required. The main thing in this matter is patience and creativity.
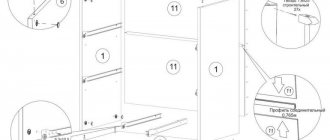
Work order:
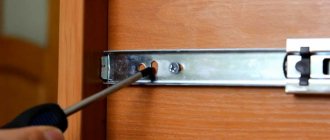
At first I wanted to paint it like this without removing the door, then I realized that it would be inconvenient. So I took a risk. and took it off. It turned out not to be difficult. True, worries about how to put them back on were present until the last moment. In the end, I also screwed it myself; I didn’t have the patience to wait for my husband))).
I pulled out the built-in lights and wrapped them in a suspended state with masking tape. The same tape was used to protect the walls on the sides of the cabinet, the floor, and the mirrors on the doors. Prepared the workplace. I decided to paint it. on the bed)))! I covered it carefully with polyethylene. And I have never regretted this choice. The bed was large and high, everything fit, there was no need to bend over and crawl on all fours. I prepared approximately equal stacks of books and wrapped them in cling film. They are needed as substrates so that the doors can be lifted and painted as if suspended; the painted edges will not come into contact with a flat surface.
Stage 2.
I sanded all surfaces that needed to be painted. It is necessary to sand lightly, without fanaticism, with the finest sandpaper. Light circular movements. Purpose: to create roughness without removing the laminated layer. If there are dents and scratches, they should be filled with putty at this stage. After sanding, thoroughly wipe all surfaces with degreaser. It will remove dirt, grease marks, and everything that can disrupt the adhesion of the primer and paint.
Stage 3.
Primer. I went through hard-to-reach places with a brush, the rest with a roller. A thick layer is absolutely not necessary; it must be covered with primer without drips and in a thin layer. Uneven coloring is not a problem, but there should be no gaps. I didn’t prime the rattan inserts; the paint applied well to them anyway.
They are easy to paint - just roll them with a roller; with a brush it is more difficult not to go beyond the edges. Wipe off any blemishes immediately with a cloth. Each layer was dried, as recommended, acrylic dries in an hour and, in principle, you can carefully turn it over and paint the door on the other side.
Stage 5.
I assembled the closet. I screwed the doors and handles. I removed the masking tape and cleaned everything up. At first I planned to keep the doors open for two days, I was afraid that they would stick. Nothing like that - you can close it right away.
Dresser.
Mirror.
Important!
Acrylic paints dry quite quickly “touch-free”, but polymerize for at least a month; with a primer the process can take even longer. The painted product can be used almost immediately (or it’s better to wait 2 days) and even wiped with a damp cloth. But within a month, the coating remains very vulnerable; it must be handled carefully, not scratched or rubbed with force. If shelves or horizontal surfaces are painted, then it is better not to immediately place things on them that may “stick”, wait until the paint “sets”. Although I immediately put everything I needed on the chest of drawers, nothing stuck).
Here you go. The work is labor-intensive, but I was pleased with the result. The paint job ends up looking no worse than the factory paint, no brush marks are visible. It holds up well too. I haven’t tried scratching, I use the furniture as usual. But usually I don’t scratch it))). Although I will conduct an experiment in a month. The room has been pretty updated). Alas, the photos after compression leave much to be desired; in fact, the colors are brighter and cleaner, but this is not so important.
If you also want to redo furniture and have questions, write and I will answer. And if such a rework seems complicated to someone, I assure you that it is not, labor-intensive - yes, but quite doable without any experience. You can just start with internal, unnoticeable parts, or with small furniture, a chair, for example. The rework took three days. At the same time, I managed to cook and... suffer from bronchitis + my leg is still slightly lame after the cast. The “disabled painter” was able to paint, which means you can too))).