A furniture stapler, or, as they also like to call it, a strobe shooter, is a very necessary thing. But sometimes, even when recently purchased, it begins to work incorrectly and either does not drive the staples into the tree completely, or they completely get stuck in the tool. In most cases, this can be “cured” by simple adjustments or is associated with improper use of the tool. But there are situations when the stapler has already exhausted its service life to such an extent that the parts in it have simply worn out or have worn out over time. How to fix a stapler so that it works again as before, and is it even possible to do this in principle?
How to fix a stapler? DIY furniture stapler repair
A furniture stapler, or, as they also like to call it, a strobe shooter, is a very necessary thing. But sometimes, even when recently purchased, it begins to work incorrectly and either does not drive the staples into the tree completely, or they completely get stuck in the tool. In most cases, this can be “cured” by simple adjustments or is associated with improper use of the tool. But there are situations when the stapler has already exhausted its service life to such an extent that the parts in it have simply worn out or have worn out over time. How to fix a stapler so that it works again as before, and is it even possible to do this in principle?
Reliable manufacturers
To use the tool for a long time, you need to choose products from a trusted brand. The five best manufacturers of furniture staplers are shown in the table.
| Manufacturer | Product type | Peculiarities |
| Novus | Mechanical, electrical | Zinc alloy body, lever strike force adjustment, clear window, shockless release, multiple strike function, equal distance lock, extended spout for hard to reach places, safe loading of staples |
| "Bison" | Mechanical, electrical | Fastening of low-voltage cables, staples and nails, protection against accidental operation, electronic adjustment of impact force |
| Black&Decker | Mechanical, electrical | Impact force adjustment in steps, non-contact operation |
| Hammer Flex | Mechanical, electrical | Non-slip coating, nails and staples, large magazine, step-by-step impact force adjustment |
| Kolner | Mechanical, electrical | Nails and staples, rubberized handle, involuntary start safety device, electronic magazine full indicator, light weight |
Taking into account all the listed characteristics, everyone can easily choose the optimal furniture stapler for their home. Even if the tool will not be used often, it is better to purchase a high-quality mechanism, which will be much easier and more comfortable to work with.
"Bison"
Black&Decker
Hammer Flex
Kolner
Novus
Two main varieties and their structure
But in order to begin repairing a stapler or to understand from problems what may “break” in it or cause these problems, you should familiarize yourself with the structure diagram of staplers in more detail. We present to your attention two types of mechanical furniture staplers, which are most widespread. The most common is this option, in which the spring adjustment screw is located on top.
Here is another type of stapler, where the spring tension screw is located under the handle. This is a rarer variety.
It can be seen that the operating principle of both mechanisms is similar, and therefore the setup and repair will be almost the same, as well as the causes of problems with the operation of the tool.
Classification
There are different types of construction staplers: staplers.
Manual
This category also includes manually operated mechanical devices.
These devices hammer the staples in with forceful blows. Compared to manual analogues, the performance of this model is much higher. This tool is convenient for performing the following work:
- Fastening insulating material.
- Installation of roofing felt.
This tool is used for installing cables with a voltage load of 50 V. The maximum cable diameter is 7.5 mm. These staplers are used when performing the following work:
- Cable fixation.
- Laying an electrical network.
- Installation of communication lines.
Classic model
This hand-operated tool has become a true classic. After the release lever is pressed, the staple is driven into the material. A special category is hybrid models, with which you can perform several types of described operations.
They have only one drawback: a relatively high price.
The problem of incomplete driving of staples
This problem can be solved by simply setting up the tool. If the stapler does not jam staples, repairs will not be necessary. Just tighten the spring adjustment screw. The tighter the screw is screwed in, the more tension the spring will be under and the next time it is lowered it will push the bracket to the end.
If the problem is not in the settings and the stapler was working normally before and suddenly stopped, most likely the problem is that one of the next staples was jammed and stuck in the slot. Over and over again, the striking mechanism hits it, but it is stuck firmly, thereby preventing the magazine clamping device from moving the next staple to the “starting” position. Here you need to open the magazine and remove the jammed staple. With the next shot everything will fall into place.
Operating principle
Depending on the type of drive, tools are divided into electric and pneumatic.
Electrical
These devices are widely used in everyday life. Working with an electric stapler is a pleasure; you just need to connect the device to the power supply. However, an electrical device, in comparison with its manual counterpart, is much more expensive. It is profitable to buy it for professional craftsmen who are constantly repairing furniture. Naturally, it is not profitable to buy such a model for a one-time repair. Manual models are suitable for household use.
Pneumatic
These models are not used in everyday life, since their use requires a compressor unit. You can buy your own compact compressor, but how quickly such a purchase will pay off is the question. Therefore, buying a pneumatic device is beneficial for companies producing and professionally repairing furniture.
The problem of issuing a pair of staples at once
How to repair a stapler yourself if it starts producing a pair of staples at once? This problem is more serious. Due to improper use or over time, the firing pin of the impact mechanism may become deformed. If the metal from which the striking part of the mechanism is made was of poor quality, which applies to almost all cheap and Chinese models, its striker can either flatten or bend slightly, as a result of which, with the next blow, it will catch not one, but a pair of staples at once. How to fix the stapler in this case and is it even possible in principle? You can correct the situation, but you will have to disassemble the entire stapler. You can read about the procedure in the next section.
Stapling Types
There is also an open type. In this case, the staples are bent outward. This method is preferable to use in cases where only temporary stitching of sheets is necessary. Papers fastened in this way can be easily separated, and the marks are practically invisible.
Sometimes in offices they use a special stationery stapler with straight staples. It is necessary in situations where it is necessary to attach paper (some kind of announcement or document) to a special board with a soft surface. It can be made, for example, from cork.
The problem with staples that keep getting stuck
This problem stems from the same area as in the previous case. Even though the striker of the impact mechanism fits into the slot, if it is even slightly bent, staples will constantly get stuck between it and the guide wall of the casing. At first, it will work normally every other time, and then it will become impossible for it to work at all due to the fact that the staples that become clogged over and over again will deform it more and more. In these cases, it can be stated that the stapler is broken, and how to fix it should be described in more detail.
First of all, you should prepare the necessary tools. What you will need to completely disassemble the stapler:
- a regular screwdriver;
- metal file;
- pliers;
- hammer;
- vice (required).
When everything is prepared, you can start disassembling. There is nothing complicated about this and you shouldn’t be afraid that you won’t be able to assemble it later. You simply won't be able to do it any other way. For repair you need:
- Open the magazine and remove the remaining staples.
- Turn out the adjusting screw completely.
- Remove the released spring through the hole at the top.
- Now disassemble the body. The casing parts are held in place with pins. They have molded caps on one side and locking washers on the other. They must be pulled out so that each pin can freely come out of its hole.
Breakdown prevention measures
Some craftsmen advise that when storing a tool for a long time, loosen the screw of the furniture stapler that regulates the compression of the spring. The less the spring is compressed, the greater the possibility that it will not sag in the shortest possible time and will last several times longer than stated in the warranty card. Of course, before the next use it will need to be adjusted again, but this is the lesser of two evils. It's better to spend a few staples on resetting than to go to the store for a new stapler.
An important factor in preventing “diseases” of a tool such as a stapler is its lubrication. Regardless of whether it was in constant use or in storage, it is advisable to lubricate the mechanical parts of the tool once every three months, then you won’t have to rack your brain every time about why the stapler is not working well and how to repair the tool. What should be lubricated and how:
- Unscrew the adjustment screw completely, pour some sewing machine oil into the hole, screw the screw into place and fire a few dry shots.
- Then open the magazine where the staple blocks are inserted and pour some lubricant into the slot of the impact mechanism. Raise the stapler upside down and fire a few more blank shots.
- It is also advisable to lubricate the mechanism (rammer) for feeding staples.
This simple maintenance won't take much time, but will extend the life of your instrument.
Recommendations from experts
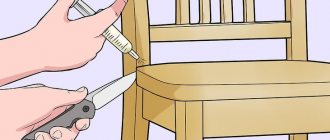
A common mistake why a stapler bends staples is the wrong choice of products. How to adjust the tool is the most common mistake users make. Most models are equipped with a special adjustment screw. It allows you to increase or decrease the speed of bracket departure. The first is relevant in the case of hard materials, the second when working with loose or soft substrates, fabrics, PVC panels.
It also happens that the staple is not immersed in the material to the depth required by the master. That is, the workpiece is not securely pressed to the base. Here you need to perform two actions: press the tool to the area and press the adjustment screw with your other hand. This will additionally eliminate recoil after the shot.
An example of a stapler with an adjusting screw Source autopiter.ru
Removing the magazine bottom plate makes it easier to remove a stuck or bent clip. But before doing this, you should first remove the support rod, which prevents the remainder of the unused clip from flying out. The process here is simple. You need to pull the hooks away from where the fasteners exit. Next, just pull down a little. It is worth noting that such manipulations are not a solution to how to refill a construction stapler. But this way you can check for the presence of residual fasteners.
U-shaped brackets cannot be inserted incorrectly. Novice craftsmen often try to insert nails into the central part of the store. However, this is a mistake - it needs to be placed in one of the compartments under the legs of conventional fasteners. If necessary, you can insert two clips of studs at once and fire them simultaneously.
Clips with nails for a household stapler Source ozone.ru
When performing certain manipulations other than work, regardless of the type of stapler, it is important to monitor the position of the lever. An accidental shot can be dangerous. Therefore, it is necessary to lower the lever all the way and secure it with a special loop. In this case, the fasteners must be fired.
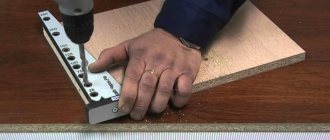
How to hammer staples into plywood with a hand stapler? Is there a shock adjustment?
There is a manual stapler Stayer 3150. It does a good job of driving staples into wooden boards. And then it was necessary to pin a fabric support to a piece of plywood, to a thin, ordinary three-piece plywood. And the brackets will only fit in there a couple of millimeters, but nothing further. When you try to finish them off with a hammer, they bend, complete nonsense. Is the trick in parentheses or something else? But I think my braces are also Stayer, branded. recommended according to passport A-053 type. Maybe there is something tougher? Which ones to look for? Or are there some cunning special methods of work, such as making sure to make the sign of the cross over yourself?
Is it possible to adjust the impact force? There is some kind of screw with a notch sticking out from above, but by God, I did not understand the relationship between tightening or unscrewing it with the depth of driving the staples into the plywood.
I understand that there are supers with a compressor - those are no problem, but for the sake of a dozen staples it’s worth looking for some smarter way to achieve your goal. Surely someone figured out some trick. Share, please!
T-34, use this screw to adjust, and try placing something solid under the plywood. If that doesn’t work, try searching for “steel, hardened with bevel (for hardwood, chipboard and plywood)”
Kubera wrote: If that doesn’t work, try searching for “steel, hardened with bevel (for hardwood, chipboard and plywood)”
And it’s better not “branded”
T-34 wrote: But it seems like I also have Stayer braces, branded ones.
And branded ones. Rapid or Novus. Type 53.
Alex___dr, I have staples from “Fit”, though type 140, and a splinter “Zyubr”
These seem to be thicker than type 53.
Alex___dr wrote: These seem to be thicker than type 53.
type 53: width 11.4, thickness 0.7 mm; and type 140: 10.6 and 1.2 mm, respectively, but type 53, judging by the Internet, also has hardened staples
Kubera wrote: type 53: width 11.4, thickness 0.7 mm; and type 140: 10.6 and 1.2 mm, respectively, but type 53, judging by the Internet, also has hardened staples
Yes, but what about the issue of interchangeability? Will 140 fit instead of 53? You can’t push them into the staple receptacle, it’s tight there. And these are 10.6 and 11.4. And there seem to be no complaints about the staples - they do not bend or deform upon impact. They just stick in a little, but don’t pierce through the plywood and don’t shoot the sackcloth to the plywood. This neat letter P sticks out.
Not just parentheses
Some staplers can work not only with staples, but also with studs of various shapes. The designations of what the stapler works with are indicated on its body or in the instructions.
I tuck the nails into the stapler in the same way as with staples, but you need to be careful after pulling out the spring. A row of nails must be loaded along one of the outer edges of the letter “P”, and not inside this very letter!
If you want it to produce two nails side by side when working with a stapler, load the second row along the second outer edge. Next, the spring is inserted and the stapler is closed.
A stapler (translated from English as “stitcher”) is a necessary thing in everyday life and at work. A stationery stapler is designed for fastening sheets and files. There are five types of staplers: manual, manual office, desktop horizontal or vertical, stitching, printing. They all differ, first of all, in the number of sheets that can be stitched at a time.
You will need
- – stapler;
- – staples.
Instructions
1.
Determine what type of stapler you have. To do this, see how many sheets you can sew at a time. The most primitive in design are pocket staplers. They are prepared for stapling up to 10 sheets. Manual office ones have a special recess on the fingers and allow you to fasten up to 30 sheets. Tabletop horizontal or vertical ones have a rubber or plastic sole; they sew up to 50 sheets. Stitching machines allow you to staple up to 150 sheets, while printing machines, which have a maximum stitching depth, can bind up to 250 sheets at a time. The specificity of stapling with a stapler is through fastening, which you carry out using a metal staple. The staple pierces the sheets being stapled right through, and its ends rest against the plate located at the end of the other side of the stapler.
2.
Before loading the stapler, determine the size of staples that is suitable for it. Staples (also called paper clips) come in several types: No. 10, 26/8, 26/6, 24/8, 24/6. These numbers are written on the packaging. Staples must be packaged in cardboard boxes of 500, 1000 or 2000 pieces. You will find out which of the above are suitable for your stapler by looking at its packaging.
3.
In order to load the stapler with the selected staples, bend its cover. It is connected by a spring to a plastic element, the one that presses the staples to the opposite edge of the metal groove, the one that holds the staples. Opening the cover will pull the spring and, consequently, the plastic element, thus freeing up space for new staples.
4.
Take one section of staples and place them in the metal groove, ends facing down. Close the lid and click the stapler once to test. If a staple with concave ends inward falls out of it, it means you did everything correctly, but if this did not happen, or the staple was bent abnormally, then repeat the procedure or change the stapler.
Using a stapler without any nails, you can fasten materials of small width and density. It is an indispensable tool in the office, construction and furniture industries. In this article we will figure out how to insert paper clips into a stapler.
Stapler device
The main elements that ensure the operation of any stapler are the magazine and the impact-return device. The magazine contains a holder with U-shaped guides into which a cassette with consumables (staples, nails) is inserted. The magazine is equipped with a consumable supply mechanism and is made in the form of a spring-loaded pusher, on one side having a thrust plate, on the other - a clamp for fastening in the shop. The impact-return device is a striker made in the form of a plate with dimensions corresponding to the dimensions of the staples or pin used, the diameter and length of which correspond to the length and diameter of the nail head. The firing pin is mounted on a firing pin, which has a shape depending on the design of the stapler and, on the other hand, rests against a spring, the force of which is regulated by a screw. To eliminate shock loads, the device is provided with a buffer (shock absorber), which is made in the form of a polyurethane gasket installed in the device body.
The device is controlled:
- in a mechanical stapler - with a lever hinged on the stapler body and, on the other hand, having a movable rocker arm that fits into the groove of the striker;
- in an electric stapler, the function of the striker is performed by the electromagnet solenoid. When the button is pressed, the contacts close. The current passes through the elements of the control unit, made in the form of a circuit board, to the electromagnet coil, as a result of which the device operates;
— in a pneumatic stapler, the piston of the pneumatic cylinder performs the hammer function. When the trigger is pressed, acting on the pneumatic distributor, compressed air enters the cavity of the pneumatic cylinder, resulting in an impact action.
Terms of use
Before using a construction stapler, you need to check whether it has fasteners. This is justified by the fact that its location is limited. The process involves performing one of three actions:
- lumbago;
- removing the bottom plate, on which side projections are provided for this purpose;
- removing the support rod with the spring.
Stapler with the support rod removed and the bottom plate removed Source onlinetrade.ru
Refilling should be done only after the magazine has been released. The procedure is performed after removing the support rod. For this purpose, the protruding edge is equipped with a plate with a small hook. Just press on it and slide it down. There is a specially formed groove inside the tool that will not allow the fasteners to be placed incorrectly. That is, the clip is simply inserted into the magazine and pressed against the support rod.
If the clip does not fit into the magazine, then there is no need to try to insert it into the magazine. This means that the design of a particular model is not suitable for a particular fastener. The limitations here for the morgue concern not only the depth of the selected staples. This may also apply to the width and thickness of products and their shape. Not every tool is universal and suitable for shooting brackets or nails.
An example of a universal tool Source vseinstrumenti.ru