Decorating a window using curtains creates coziness, protects from insects, dust and sunlight. The curtain divides the room into zones and emphasizes the interior. Curtains are distinguished by type of fastening, material and design. When buying a cornice, take into account the small subtleties of installation and the little secrets of interior design.
What to measure before hanging curtains
To determine the length of the wall curtain, you need to measure the width of the window opening and the gap between the window and the ceiling. In the case of ceiling cornices, you need to know the width of the window opening and the ceiling surface.
| Interval | Optimal parameters |
| Distance from the end of the rod to the wall | 15-40 cm on each side |
| Distance from rod to window | from 5 cm or 2/3 of the gap between the ceiling and window |
| Distance from rod to ceiling | 1/3 of the gap between the ceiling and the window |
Once the measurements have been taken and you are ready to install the curtain, prepare a set of tools. Necessary items for self-installation:
- Pencil with soft lead.
- Construction level.
- Long ruler.
- Set of dowels and screws.
- Drill.
- Phillips screwdriver or screwdriver.
Advice! If, despite the measurements, the cornice pipe turns out to be longer than necessary, cut it with a hacksaw. The solution is relevant for plastic and wooden rods.
A little about choosing curtains
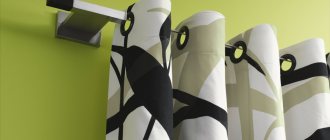
For curtains, curtain rods are available in two-row, three-row and simple, in one row. For light curtains, simple, single-row products are used. If you are hanging curtains with tulle, then it is better to use curtain rods in 2 rows. When using lambrequins - three-row curtains.
The length of the curtain should be 5-10 cm higher from the floor, then it is easier to clean the floor covering, and the fabric does not get so dirty. By choosing a width that covers the entire wall, the space of the room visually increases. It is better to buy plain ones. White or black curtains match any interior.
Installing a cornice on brackets on the wall
Round collapsible brackets are designed for installing lightweight wooden or plastic curtain rods. They consist of a washer and a pad with a hole for the rod.
Algorithm for installing round brackets and mounting the rod:
- Draw a horizontal line with a pencil in the place where you plan to hang the curtains. When manipulating, use a building level and a long ruler.
- Place marks on the areas where the brackets are attached. At this stage, make sure that the elements are located strictly opposite each other at the same distance from the walls and ceiling.
- Drill holes at the marks and install dowels.
- Place the washers on the wall and line up all the holes. Using a screwdriver, tighten the screws that came with the dowels.
- Screw the cover with the hole for the holder onto the washer and insert the holder.
- Insert the curtain rod pipe into the brackets, having first placed the curtain rings on it. Secure the structure with the tips.
Installation of round collapsible brackets
For metal cornices, L-shaped brackets are suitable. They are attached to the wall according to the same principle as round ones - using dowels and self-tapping screws. Their fundamental difference is in the method of mounting the rod. The base is fixed using screw clamps.
Installation of L-shaped brackets for cornices
Idea! Instead of L-shaped and round brackets, you can use holders with horizontal holes to lay the rod on top of the mount. This is an ideal option for installing wooden curtains on the wall.
Installation of brackets-holders for cornices
How to choose the right one
To answer the question “how to properly hang a curtain over a window?”, you first need to determine the way in which all the elements of the future integral structure will be installed.
- First, you need to learn about fastening methods. This depends on the density and strength of the base on which the future cornice will hang - the wall should not be too thin, otherwise the cornice may fall off and fall to the floor along with a rather large piece of the wall, forming a hole in the surface that will be difficult to repair.
- Secondly, you need to determine the load that will be constantly on the cornice - the smaller it is, the lighter the structure should be.
- Thirdly, you need to pay attention to the material from which the cornice is made. In addition to the appearance (which should serve as a separate decoration for the room), you need to remember again about the load - a light plastic cornice will not withstand dense tapestries, and therefore the material must be chosen depending on the weight of the future curtains.
- Fourthly, it is important to remember about the control of the cornice, since in the case when it has an electric drive in its design, it must be installed completely differently from ordinary cornices.
Do not forget about safety precautions when attaching curtain rods.
Design selection
The right choice of design is a very important point that simply cannot be left to chance unless you want to ruin the appearance of the room completely and irrevocably. The cornice and curtains should match the interior of the room in color and, preferably, material:
The range of curtain rods from various manufacturers is more than wide.
The cornice should be chosen to match the color of various furniture elements, for example, a coffee table or cabinet. You can also refer to the color of small decorative details on furniture - sofa legs, sofa or cabinet decorations (the color of cabinet or chest of drawers handles, for example, will look good on the cornice).
Round cornices make rooms more comfortable.
In this way, an atmosphere of harmony and comfort will be created in the room, which will be visible in the entire design of the room.
In the dining area it is appropriate to hang minimalist curtains and tulle.
It is better to choose curtains so that their color matches the main colors of the furniture in the room - the sofa and the closet. For example, if the upholstery of the sofa and armchairs is gray, then you can choose a steel color, deep blue for the curtains, so that everything together looks beautiful and harmonious, as one whole.
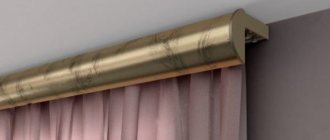
The tire cornice is more invisible, so it is easier to use in the interior.
Size selection
Size is also important when choosing suitable curtain and cornice models. To figure out exactly how long the curtain rod should be, you first need to decide where to attach it.
Curtain rods can enhance the beauty of curtains.
Often, curtains are simply attached to the wall as an element of room interior decor, and for this purpose there is no need to choose a cornice model that is too long.
The installation height of the cornice above the window should be taken into account taking into account the aesthetic component.
It is worth examining the walls of the room and choosing the most suitable place for beautiful curtains. Then measure the required length of the curtain rod and buy a suitable option, on which you can then hang the curtains.
Curtain rods have a wide range of materials used for their manufacture.
It is also important not to forget about the size of the curtains themselves - their length and width. If you want to cover a decent part of the wall with fabric, you can choose a length so that it reaches the floor, but usually the curtain hanging on the wall is made half as long as the one that covers the windows.
Ceiling cornices are convenient because they are invisible in the interior, therefore they are suitable for modern design.
Installation of ceiling cornice
Wall brackets with holes for a rod can be fixed to the ceiling. Procedure:
- Mark a line for installing the cornice on the ceiling and determine where to attach the brackets.
- Drill holes, insert dowels into the concrete base, attach brackets to the holes and secure the structure with self-tapping screws.
- Insert the rod into the holders, secure the edges with the tips.
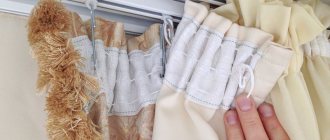
Another option is to install a bus ceiling cornice. It is a long strip with tracks where grooves with hooks for attaching curtains are located. Types of products: single-row, double-row, three-row.
How to hang a tire structure:
- Prepare drills of two sizes: one should be slightly larger than the screw head, the second should be suitable for the parameters of the fastener rod.
- Using a large drill, make holes between the tracks in the front part of the structure, and a smaller drill on the back wall. The distance between the holes is 50-60 cm.
- Attach the cornice to the ceiling, center it relative to the window, and mark the locations for fasteners on the ceiling.
- Drill holes in the ceiling and install dowels.
- Attach the tire, align the holes on it and on the ceiling, secure the structure with self-tapping screws.
Installation of busbar cornice on the ceiling
Examples and photos of correct installation of curtains
Properly executed hanging of curtains helps to better perceive the interior. The photos provided confirm this.
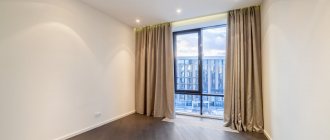
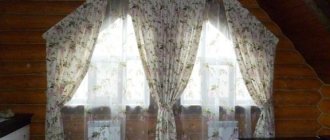
Exquisite, laconic curtains in the living room perfectly match the design, beneficially increasing the height of the window (door) opening.
To visually increase the height, fabric with vertical stripes was chosen
The kitchen will be decorated with curtains on a round system. A stylish curtain in combination with wood looks noble and elegant, combined with classic kitchen furniture. Securely attached curtains will last a long time, decorating the opening.
Cornices on forged or wooden brackets are suitable for a classic interior.
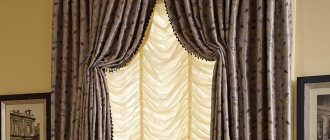
How to choose and hang a curtain for curtains on a bedroom wall is demonstrated in the following example. A metal structure is perfect for the Baroque style, giving the room an atmosphere of romance, wealth, and charm. Light, airy curtains fall down, giving the room an elegant nobility.
The cornices are highlighted in black, but their design is quite simple so as not to attract too much attention, because in Baroque the main thing is expensive furniture and rich textiles
When choosing a cornice for a bedroom, it is recommended to consider:
- cornice size;
- apartment size;
- the shape of the window system.
The examples provided above confirm that a reasonably selected system and its competent installation visually improve the perception of rooms and emphasize the originality of the curtains.
How to install a curtain on a suspended ceiling
It will not be possible to hang the curtain directly on the tension fabric - it is not able to withstand the load. Before installing the covering, it is necessary to pre-install the embedded bars for the cornice or provide a niche. Let's consider both options.
Mortgages
A prerequisite is that the lower parts of the bars must be in the plane of the PVC coating. If they are higher, you risk damaging the suspended ceiling during installation of the cornice.
Ceiling cornices are attached to the bars using self-tapping screws. Use long fasteners, but note that their size should not exceed the height of the bar. The diagram shows an example of the design.
Mortgages for cornices in suspended ceilings
How to avoid mistakes
What mistakes can you make when installing a cornice and hanging curtains on it? First of all, you can make a mistake with the choice of materials: the cornice may not be strong enough for the selected curtains (for example, plastic will not withstand thick velvet fabric).
It will also be unsuccessful to try to fix a strong, heavy cornice (for example, made of aluminum or wood) on a thin wall, which may even collapse after repair work. A frequent occurrence is errors in calculations, uneven construction of segments, due to which the cornice can be positioned rather crookedly and spoil the entire appearance of the room.
The cornice is an indispensable element of the interior, without which it is impossible to hang curtains.
Curtains hanging on the wall are a new way to decorate a room, give it some unusualness and originality, which is already quite common and continues to gain popularity among people not only due to its beauty, but also due to its ease of implementation at home.
The cornice affects the overall perception of the curtains and the room.
Work on mistakes
What to do if mistakes were made when choosing or calculating the mounting locations for the cornice? The main thing is not to rush to despair and get upset. Let's look at two of the most common mistakes made by beginners.
The problem of a cornice that is too long can be solved with the help of a hacksaw; the only limitation is the presence of decorative elements; there is a high probability that the cornice will lose its visual appeal.
If the cornice turns out to be too small or the standard models are not suitable for a long wall, you will have to go in search of special connecting elements that will easily allow the main length to join the additional one without disturbing the movement of the hook-runners.
How to properly secure curtains in your home - step-by-step guide
It is difficult to imagine a house without a single curtain on the windows. Fashionable blinds and curtains around the perimeter of the window are convenient, but curtains add coziness and warmth to the room. In order for the idea to be fully realized, you need to correctly select and install the cornice, and also correctly attach the curtain to it.
Tip 1: choose the right curtain
There are two types of cornices - ceiling and wall. The former are mounted on the ceiling at any distance from the top of the window, the latter - on the wall in the immediate vicinity of the window.
The choice of curtain depends on whether a suspended ceiling is installed in the apartment and whether a niche is prepared for the cornice.
In addition, there are so-called rail and baguette cornices, which are suitable for installation on both the ceiling and the wall.
Basic installation rules
Before installing cornices, you need to get acquainted with several rules that will help you avoid most of the troubles when operating structures.
Plasterboard walls that are located close to the “main base” require long fasteners that can not only enter the main wall, but also be securely fastened to it. The optimal type of fastener for such bases is considered to be a plastic butterfly dowel or Molly dowel (made of metal). The first element ensures reliable fixation of curtains whose weight does not exceed 12 kg. “Girl” is a heavyweight: Molly is able to hold a “barbell” of up to 45 kg.
Source
The final stage
After the marks have been made, you need to remove the tire, drill holes and install plastic dowels. Now all that remains is to put the cornice in place, connect the holes and screw in the screws.
If double-sided tape was used during the work, this would allow you to hold the bar, but if not, you should mount the mount first at the ends, and only then in the middle. After this you can hang the curtains.
What is important to consider
When purchasing a particular model, pay attention not only to the material, but also to the design features. Manufacturers offer pipe, frame, string and rack cornices. Of all the features of their designs, reliability of operation is most influenced by the type of mounting plates used. The following types of plates are used for fastening:
- Single point. The hole is located in the center of the part. A dowel selected according to the type and length will allow you to firmly fix the bracket even on a hollow base. The weight of the fabric may cause the structure to deform slightly.
- Three-point. The ideal way to attach curtains to a wall made of concrete or wood. Some types of three-point plates (those with closely spaced holes) are not suitable for installation if the substrate is porous. Aerated concrete can simply crumble under load. If the base is a hollow material, only the top hole is fixed with a dowel. Self-tapping screws are screwed into the rest so that the bracket does not rotate.
General requirements for curtain rods
The devices with which curtains are placed in the right place and fixed in a certain position are called curtain rods.
Domestic and foreign manufacturers offer many varieties of these devices. The operating conditions of these devices in everyday life, as a rule, are far from extreme, and yet curtain rods must meet the following requirements:
- strength - failure of the product is fraught not only with damage to the cladding of the load-bearing base, injury when falling on a person, but also with fire from contact of a fallen curtain with some types of heaters or open fire;
- environmentally friendly – do not release harmful substances into the air;
- durability - installing a new device to replace a failed device spoils the finish of the supporting base;
- ease of daily care;
- a sufficient degree of aesthetics - the design of the accessory should be combined with the decoration of the curtains or, at least, not harm their decorative effect.
In addition, depending on operating conditions, these products may be subject to additional requirements, for example, moisture resistance and resistance to fungus formation when installed in rooms with high humidity.
Influence of material on fastening parameters
The choice of a curtain rod device depends not only on the tastes of the owners, the conditions of its operation and interior features. Sometimes strength characteristics come first. There are curtain rods made from several types of materials on the market.
Wooden
Wooden accessories are made in the form of a bar (crossbar) with tips of different shapes. The rod is fixed on external brackets; there may be two or more of them, depending on the length of the structure. The rod is complemented by clips or rings for curtains; it can be hidden by a decorative panel. Models with one or two rows are common; the latter allow you to decorate the opening with curtains made of different types of fabrics.
Classic wooden structures have a noble appearance, withstand decor made from heavy materials and are able to decorate interiors of different styles. Their strength depends on how well the components are made. When purchasing, it is important to check that there are no defects on the parts: chips, cracks or knots.
Plastic
Budget-friendly and easy to install, they do not attract unnecessary attention, and in a standard apartment with low ceilings they do not burden the space.
Their versatility is also an advantage: the vast majority of models have standard lengths of 1.5, 2 and 2.5 m. This, if necessary, allows you to easily join or shorten a plastic profile, as well as make a broken-shaped cornice, with or without a strip.
Plastic products are varied in color and texture; their low weight allows them to be mounted on any base, above any opening, or to the ceiling. They are often decorated with an external strip; Thanks to easy care, they are used in the kitchen. The only disadvantage of plastic is its fragility, and therefore an inevitable limitation in the weight of the fabric. For heavy velvet curtains, you will have to find more reliable support; otherwise, the fastening will sag and eventually burst.
Baguettes
A baguette cornice is a cornice in which the fasteners supporting the fabric and the fasteners of the structure itself are covered with a decorative strip. The basis can be a metal pipe, an aluminum or plastic profile, or a string.
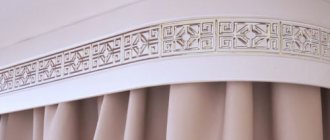
The decorative overlay (insert) is varied in design. It can be metal, plastic, inlay, carved or smooth wood, stucco, leather or fabric decor.
A baguette cornice with spectacular inserts looks elegant and can become an accent detail of an interior in different styles. Depending on the rod material and finish, heavy-duty hardware may be required for installation.
Metal and metal-plastic
Metal curtain rods are preferred as the most durable and reliable. They are designed for massive curtains, multi-layered, made of heavy fabrics. The manufacturing materials are steel, brass, bronze and aluminum, the most budget-friendly and therefore popular option.
To decorate such models, chrome plating, nickel plating, forging, casting, gilding with a patina effect, and silver plating are used. When installing on a wall, their load-bearing capacity and base parameters are taken into account.
Metal-plastic cornices successfully combine the strength of metal and the moisture resistance of the decorative outer layer. Wall and ceiling mounting models are available, suitable for use in wet areas.
Mounting holes
Holes should be drilled according to the marks, the diameter of which will depend on the dimensions of the dowel. After the hole has been made, a dowel must be inserted into it.
It is important that the dowel goes in completely. However, if you can’t “drive” the dowel a few millimeters, the extra piece can be cut off with a knife.
Distance from ceiling
When installing a cornice, it is important to choose the right place for its location. One of the criteria that you should pay attention to is the distance of the structure from the ceiling. This value is not regulated by any standards or design guidelines. The optimal distance is from 5 to 15 cm from the surface. But no one is stopping the apartment owner from moving the cornice higher or lower. The main thing is that the product with curtains is in perfect harmony with the main interior.
Please note that when marking, experts recommend focusing on the plane of the ceiling, and not on the level or sash of the window.
How to attach a cornice to a wall: step-by-step instructions
The presented sequence of actions allows you to securely fasten any type of wall molding.
Marking the installation locations
We pre-assemble collapsible structures into a finished product according to the manufacturer's instructions. Thanks to this, there is no need to calculate the distances between the supporting parts, taking into account the sizes of decorative elements and plugs. We simply measure all the necessary distances and transfer them to the wall in the following sequence:
- Using a simple pencil, make a vertical notch on the wallpaper in the center of the window.
If you are doing the work for the first time, you may not be able to apply the markings correctly right away. In order not to smear the pencil on the wallpaper, we make marks on masking tape (paper tape), which peels off easily and does not leave marks.
- At the required height, we make several horizontal marks in the places where the fasteners are installed.
We set the required size from the ceiling using a tape measure. This allows you to smooth out the curvature if the overlap level is not horizontal.
- From the middle of the window opening to the sides we set aside a distance equal to half the width between the mounting cups.
It is important to ensure that there are no electrical wires at the mounting points. To do this, we check the project or control the electrical interference with an indicator.
- We attach the holder supports and mark the points for the holes.
For narrow windows, two attachment points at the edges are sufficient. In wide eaves it is necessary to provide intermediate support. Specific distances depend on the rigidity of the products and are regulated by the manufacturer. If there are no special instructions, the number of brackets is determined by the length of the guides:
- Up to 2.0 m - 2 holders;
- 2.0-4.0 m - 3 holders.
For flat plastic tires we make markings in increments of 60 cm.
When curtains are drawn, it often happens that they go further than necessary. You have to pull them back and correct them. To avoid this, leave a space between the attachment point and the plug for one ring with a clothespin. It holds the curtain in its extreme position.
We fasten the brackets
Most curtain rods are supplied with standard fasteners by manufacturers. But it is not always possible to use it. The mounting option must be selected based on the wall material:
- For concrete, classic dowels with plastic spacers are suitable.
- It is better to attach it to drywall with metal screws in the places where the guide profile is installed. In the absence of a load-bearing element, it is necessary to use “butterflies” - these are dowel bushings that open when the screw is tightened.
- For foam blocks, special plastic bushings are used. Their main difference is a high thread with a large pitch, straight or conical.
When drilling holes, a lot of dust is generated, which settles on the wallpaper. Especially if they have a textured surface. Therefore, it is better to use hammer drills with dust extraction.
A mailing envelope or a “pocket” made from a sheet of paper folded in half will help you get rid of dust without special equipment. It is enough to stick it with tape under the future hole. All dust falls inside and the surface remains clean.
Assembling curtain rods
We insert the guide rod holders into the mounting cups or mounting plates. Depending on the design features, we screw them onto the threads or clamp them with locking screws.
We place rings with clothespins on the guides. We take their quantity at the rate of 10 pieces per meter of curtain fabric:
- With two-point fastening, we move all the rings to the middle.
- With three-point, we divide the total number in half and place it so that after installation they are on opposite sides of the central support.
We install the rods on the holders and center them. Be sure to visually evaluate the view from the side. Only after this do we tighten all the latches. If the end caps come separately, install and secure them.
Characteristics and Features
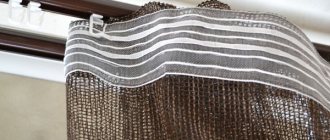
Suspensions of this type are made of plastic and can be presented in the form of a hollow part with slots for the movement of runners with hooks, or in the form of a part of the same shape, but filled with different materials. Filling increases the strength of the product and gives it slightly different characteristics.
Conventional curtain fasteners made of plastic are 100% resistant to water and are not inferior in wear resistance to their metal counterparts. At the same time, the cost of such products is much lower. Externally, such curtains look like a flat box with slits on the bottom side. It is in these slots that the design feature runners move, to which the curtain hooks are attached.
The ends of the hollow part are closed with special plugs, and to prevent the hooks from falling out, the grooves through which they are inserted into the structure are closed with stoppers. The entire curtain weighs very little and is attached to the wall using brackets. At the same time, it is possible to fix the structure on the ceiling if desired.
Related article: The best way to insulate the walls of a brick house from the outside