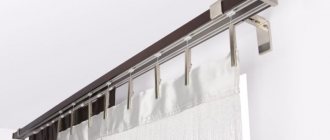
Creating comfort in a home is a whole science in which there are no trifles: every detail and design element plays its role, helping to make it elegant and comfortable. An important role in this matter is played by correctly selected and hung curtains.
No interior is complete without beautiful curtains that frame the window openings.
Gone are the days when the housewife, armed with a needle, manually sewed loops on the curtain to secure it on the curtain rod hooks. This uninteresting activity took up a lot of time and required patience and accuracy.
The main thing is to secure the fabric in such a way that it decorates the room and creates a special mood.
Today, these problems are much easier to solve if you learn how to hang curtains on curtain tape on hooks.
Combination of curtains with room design
Fashion trends strive to create the most concise and comfortable environment.
Simplicity, functionality, naturalness and combination with interior details are the basic truths that help to stay within the bounds of both good and trendy taste in order to beautifully hang curtains on the windows. Option 1. Matching the colors of textiles and curtains. The main thing is to adhere to the rule of harmony: all shades of textile and upholstery materials must be in harmony with each other
It is enough to pay attention to the color of decorative pillows, tablecloths, upholstery, lampshades and choose textiles and the tone of the curtains in accordance with them
The color of the sofa and curtains should be in harmony with the existing decoration
Option 2. Maintain monochrome. If the textiles in the room have different shades of a certain color, you need to combine the curtain with one of the existing options.
For a monochrome interior, it is good to combine fabrics of different textures, made in different shades of the same color.
Important! The window design should remain concise. The main thing is the main color of the curtain, and its accent details are secondary aspects that you need to be careful with
Option 3. Repeating patterns and designs. The most unusual option for combining curtains against the background of the overall interior. Curtains with large patterns will look beautiful in spacious rooms. Accordingly, small patterns will ideally highlight a small room.
The variety of patterns is endless, their choice is determined by the stylistic component of the interior
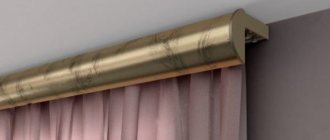
Window decoration with curtains on the ceiling cornice
Ceiling cornices are more advantageous in both practical and aesthetic terms than conventional wall cornices. Firstly, the structure itself is installed on the ceiling. In classic versions of the cornice, installation is carried out in the middle of the wall section, which is located above the window. Thus, the upper edge of the curtains does not completely cover the space under the ceiling, creates an extra horizontal line and makes the walls visually shorter. The ceiling cornice eliminates all these shortcomings.
Hanging curtains on a ceiling cornice is much easier than it sometimes seems to non-professionals.
Secondly, ceiling cornices have many design options and designs:
- Pipes of various diameters, stylized in retro style;
- Thin strings;
- Baguettes that gather fabric into massive folds;
- Practical tires.
Ceiling cornices are a very successful design.
Some types of ceiling curtain rods can cover the top of the curtains using frames, which also come in different sizes, colors, styles and materials. For example, a plastic frame with a shade like the ceiling is suitable for a classic interior. And the minimalism and consistency of modernism will be emphasized by light-colored metal.
For jacquard or country interiors, you can use wooden frames.
Thirdly, cornices can vary in shape:
- Straight,
- Curly (wave, snake, etc.),
- With bends (bay window, multi-row bay window with bends, reverse two-strip bay window with bends, double-row cornice),
- Single-tier and multi-tier.
Ceiling curtain rods have proven themselves excellent in use.
Fourthly, there are many options for attaching fabric to the cornice. They can be presented as:
- Kryuchkov;
- Rings;
- Tires;
- Strings, etc.
In order for the curtain to hang beautifully, the distance between the hooks should not exceed six centimeters.
However, all these types are not universal for every type of cornice. For example, cornices consisting of only one string are best used in rooms where the windows are decorated with light tulle so that the structure can support the weight of the fabric.
Beautifully selected curtains for the ceiling cornice add comfort to the room.
Important! There is only one piece of fabric per row of strings or hooks. Otherwise, the fastenings inside the cornice may not support the weight of all the curtains
If the interior needs to achieve maximum multi-layering or complexity of window design, then it is better to use a plastic ceiling cornice for curtains of a double-row type fastened with hooks. They withstand dense and heavy fabrics better.
Many rows will allow you to display several types of fabrics and decorative elements on one window.
Features of thread curtains
To give the room an exotic and original look, you can hang curtains on the window or door. They do not need additional finishing; they can be used to separate part of the room. You can install in several ways:
- simply by hanging it on a crossbar where it can move easily;
- we sew the braid to the top, collecting the threads into a thicker muslin, securing it to the cornice with rings and hooks;
- sew the braid with fan-shaped hooks, which will create the effect of straight folds;
- secure the threads with adhesive tape.
Strands can be woven into braids, separated with hooks consisting of two parts, etc.
Proper installation with appropriate fastening and design of curtains will be an excellent way to decorate your home, make it more cozy, attractive and comfortable for human life.
Basic mistakes when installing cornices and hanging curtains
Be sure to use plugs and stoppers for curtains so that the fabric is evenly distributed along the entire length. Installation by eye is the wrong option. Before installing the cornice, you need to symmetrically mark the junction of the structure with the ceiling. Installing the cornice yourself is not advisable and difficult. After all, you cannot simultaneously fix the screws with a hammer drill and ensure that the cornice does not deviate from the line. For different ceiling finishes - different screws
So, for example, for a putty base, plastic fasteners are needed, and for a concrete base, steel fasteners are needed.
It is important to use an additional ceiling mount in the middle of the cornice if it is medium or large in size.
The cornice itself must be longer than the width of the window: at least 20 cm on each side. The distance from the window to the curtain should be at least 10 cm so that the fabric does not touch the radiator. Self-tapping screws must be installed in the wall along with dowels. You need to measure the length of the fabric not from the base of the cornice, but from the junction of the fabric and the fastening. The main mistake of incorrect measurements is that many do not take into account the width of the curtain tape, which is included in the curtain length indicators when ordering. Thus, most curtains are the wrong length.
How to hang a ceiling curtain yourself
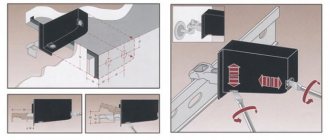
In this section of the publication, the main attention will be focused on the installation of tire profile cornices. And this is quite easy to explain
String or rod ceiling cornices are attached with precision. That is, in certain places, usually slightly to the left and right of the window, brackets (racks, hangers) are mounted to the ceiling. Sometimes, if the cornice is very long, a third bracket is added - in the place where the curtains or drapes to be drawn will meet. Then all the “equipment”, that is, a crossbar or a cable (fishing line), is suspended from these brackets. Very often, such brackets have a decorative shape, and visual concealment of fastening elements is provided - plugs, caps, etc. But the principle itself is the same.
With the tire cornice, things are somewhat different. The fundamental difference is that the structure is first assembled on the floor, then raised to the ceiling and attached to it in finished form. All that remains is to put on the hooks and install the plugs (unless, of course, the master did not do this right away, which is more reasonable) - and after that you can hang the drapery.
Such cornices are suitable for the vast majority of types of ceilings, including those that combine very well with suspended ones. Moreover, with tension ones, several options for “coexistence” are possible at once. We'll talk about all this below.
In the meantime, first of all, let’s take a closer look at the design of the plastic profile tire curtain rod.
A few words about the design of a profile ceiling cornice
To make it easier to explain the installation procedure, it makes sense to recall the structure of a profile ceiling cornice - its most common type, in the form of a flat plastic tire. Models from different manufacturers may have differences in nuances, but the general principle still remains unchanged.
| Illustration | Part name and necessary explanations. |
| The double-row tire is perhaps the most popular among other varieties. Allows you to hang two levels of curtains, for example, heavy curtains for covering windows at night, and light tulle curtains for the day. The length of a standard tire is usually 2500 mm, but in some models it can vary in one direction or the other. It can be easily cut to the required size, and if it is necessary to use a longer cornice, the tires can be easily spliced using special adapter inserts. As a rule, mounting holes are located in the center of the bus with a pitch of usually 500 mm for mounting to the ceiling. If desired or necessary, it is easy to drill such holes in the right place yourself. The dimensions of this part (like all others in the proposed table) are indicated using the example of one model. But you can find others on sale, again, both thicker and wider, and vice versa. | |
| The tire is three-row - the only difference is the presence of an additional guide for hooks, which increases the size in width. Otherwise, everything said in the cell above applies to it. Naturally, three rows of guides provide owners with more imagination in decorating window openings with curtains. | |
| The rotating element (corner) allows you to make the previously mentioned end of the cornice rounded towards the wall. The corners are left and right - and there is no interchangeability here, since the parts have clamps for connecting to the bus. When joining a straight strip and a corner, the guide grooves for moving the suspension hooks completely coincide. In the center of the bend, as a rule, there is also a mounting hole for fastening. | |
| The same, but in a three-row design. | |
| Decorative facade strip, called a baguette or hood. Well hides the area where curtains and light curtains are hung on hooks. It is attached to the front side of the tire, for which a “locking pair” is provided in the form of protrusions and grooves (different models may have their own characteristics). Most often it comes to stores in coils and is sold by the meter. Flexible, able to freely follow the bends of the assembled tire. The buyer can be offered various design options for the blend (baguette). | |
| End caps - to “lock” all the grooves and cavities along the edges of the assembled cornice. An optional part in some kits, but with plugs the appearance is better, and the design will be easier to clean from dust. | |
| Stoppers – are installed in guide grooves to set the boundaries of movement of curtains. They are inserted from the outside onto an already mounted cornice, in the right place, according to the owners. A completely different form (and even principle of operation) of such stoppers is also possible, but figuring it out is not difficult. | |
| Hooks for hanging curtains. On the left is a hook equipped with miniature rollers, on the right - with a head that simply moves along a guide groove. Based on experience of use and reviews, roller blinds are easier to “manage,” but stationary curtains sometimes begin to jam. This is not the only form of hooks - there are others, which are also easy to figure out. Very often (but not always) the required number of hooks is immediately included in the kit of the cornice. If not, you will have to buy more individually. |
Installation of ceiling curtains on a hard ceiling
Several ceiling options are possible here - a reinforced concrete ceiling, a wooden ceiling lining and a suspended structure, in which plasterboard sheets are most often used to create a ceiling plane. Installation of the cornice in all cases will be approximately the same - the main difference will lie in the fasteners used.
How to hang a profile cornice on a reinforced concrete ceiling
Perhaps one of the most common cases. If only because the majority of city residents live in multi-storey buildings, where such floors completely predominate.
Let's look at the installation of such a cornice using an example - step by step.
| Illustration | Brief description of the operation performed |
| We have to install this cornice on the ceiling. It is still in the package, sealed in film. But it is already clear that the model is two-row. The mounting hole through which the structure will be attached to the ceiling is very clearly visible. | |
| The apartment owners decided to install a cornice with rotating sections towards the wall. Therefore, in addition to the tire itself, a set of corners was purchased - with a left and right part. | |
| Flexible decorative tape - the hood was purchased by the meter, taking into account the length of the tire and the rounded side sections. It is recommended to always take with a small reserve - it is not expensive, but it can come in handy. | |
| The purchased set of parts is complemented by plugs that will cover the mounting holes, hooks for hanging curtains and a stopper, which were described above. | |
| This illustration clearly shows the principle of connecting the main busbar to the rotating part (angle). There are guide protrusions on the corner that should fit into the grooves of the tire. | |
| Then all that remains is to carefully push the corner towards the bus until there is a characteristic click - and the parts will receive a fairly reliable connection, taking into account the fact that they will all be fixed to the same plane. | |
| And this illustration clearly demonstrates how in this model of cornice a decorative hood is attached to the rail. It (the hood) has a groove with two sides turned towards each other. It is between these sides that the guide protrusion of the tire should fit - it exactly matches the dimensions and geometry of the groove. It seems simple - but there are nuances... | |
| There are models in which simply squeezing the force of the hand is enough to connect the hood to the tire - the decorative strip is fixed with its groove on the protrusion of the eaves with a click. | |
| But in the example demonstrated, this will not work. You have to run the edges of the tape onto the tire groove from the end and then pull it along the entire length. To do this, the corner parts of the tire must be removed for now - threading the tape through the turning section and stretching it along the entire length of the cornice, and even with a second turn, is an almost impossible task. | |
| Even on a long straight section, sometimes you have to resort to “forceful methods” - carefully push the tire along the belt using a rubber hammer with gentle, directed blows. | |
| After this application, there should be enough tape left on both sides of the tire to cover the turning areas. This is why it is recommended to take a lens hood with a small margin, so as not to make a mistake. It is on these free areas of the hood that the corner elements are placed one by one with a groove... | |
| ...and, putting on the tape, gradually move towards the main tire... | |
| ...where then the parts are joined together, as shown above, but with a decorative strip. | |
| Here is the assembly for joining the strip and the corner in assembled form. It is probably clear that all these actions should be carried out on the “ground”, before attaching the cornice to the ceiling. Installing such a decorative tape on an already assembled and installed cornice is hardly a feasible task. | |
| Since there was extra decorative tape, there will be a small excess at both ends. They can be cut off either immediately or after installing the end caps - this will make it more accurate. | |
| For example, the master is installing a plug, but for now he left a reserve of decorative strip, simply cutting it at an angle so that it does not interfere with installation. | |
| But here the plug is already installed - and you can cut the bar perfectly exactly along the resulting smooth end. Similar actions, of course, are carried out at the opposite end of the cornice. The cornice can be considered practically assembled, and you can proceed to the process of attaching it to the ceiling. | |
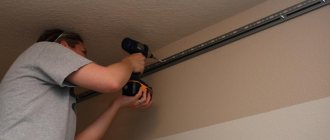
| At this stage, of course, it would be nice to enlist the help of a friend. The cornice itself is not heavy, but it is long and bulky, and therefore, when marking, it costs nothing to allow for displacement and error. And the task now is to attach the cornice to the ceiling surface exactly along the intended line of its facade... | |
| ... and then use a pencil or marker to mark points through the mounting holes that will become the centers of the holes for the fasteners. | |
| Then the hammer drill is prepared for work - the drilling mode with chiselling is set, a drill with a diameter of 6 or 8 mm is inserted into the chuck (depending on the diameter of the selected mounting dowels. Then holes are drilled at the marking points. The master simultaneously uses a vacuum cleaner, bringing the suction pipe to the drilling site - to the resulting debris did not fall onto the floor. | |
| In the example demonstrated, the mater uses 6x40 mm dowel-nails. You can take a little longer - 6x60, so that you can be sure that even the heaviest curtains will not tear them out of their sockets. | |
| Plas dowels are inserted into the holes made... | |
| ... and hammer into them to their entire length. | |
| Then the assembled cornice is again installed in the place prepared for it - this time finally. Dowel-nails are inserted through the holes into the plastic plugs, and using a hammer and punch, carefully (so as not to damage the plastic tire) they are driven as deep as possible, ideally until they stop completely. If it is impossible to drive the dowel-nail all the way in, use a screwdriver to screw it in until it stops. | |
| With high-quality installation, the cornice will eventually press tightly against the ceiling along its entire length. In fact, the installation of the cornice itself has already been completed. | |
| There are some small "touches" left. Thus, the existing plugs can be used to close the mounting holes. These “plugs” are simply inserted into the holes and lock themselves there. | |
| Agree, with the mounting holes closed with plugs, the cornice looks much neater. | |
| The last step in our example is the master installing stoppers - there are rectangular windows for them on the edges of both guides. | |
| And the installer hung a package of hooks on one of the stoppers. And the owners will then decide for themselves how many and on which guide they need hanging points for drapes or curtains. The work on installing the ceiling cornice is successfully completed! |
Installation of a cornice on a suspended plasterboard ceiling
In many ways, the installation of the cornice is similar. The whole difference is in the attachment to the ceiling surface.
For a thin plasterboard sheet (and gypsum board with a thickness of only 9 mm is usually used on the ceiling), dowel-nails are in no way suitable. This means we need to look for another solution.
Three options can be offered:
- The first is to place a galvanized metal ceiling profile in advance, even at the stage of creating a frame (lating) for plasterboard sheets, exactly along the line of fastening the cornice. Then the plastic profile can be fixed to the ceiling surface using metal screws, those used for installing drywall. This profile can be a component of the lathing system. If not, then it won’t be difficult to simply install one additional one specifically for the cornice.
- The second is similar to the first, but you can use a wooden block or strip as an embedded part, securing it to the sheathing elements. Then ordinary wood screws of the required length will be suitable for fastening (for example, 35 mm will be enough).
- The third is when there is no embedded part, that is, they decided to hang the cornice after the plasterboard suspended ceiling was installed. But even in this case, the issue is resolved quickly and with little bloodshed. Simply, special plasterboard dowels will be used to secure the tire. There are several types of them
— Dowel (anchor) “butterfly”
Easy to use and fairly secure mount. To install it, a hole is drilled in the drywall with a diameter corresponding to the diameter of the anchor (usually indicated on it, or it’s easy to check with a caliper).
Butterfly anchor and the principle of its installation.
Then into this hole, for which it is enough to squeeze them towards the center with your fingers. Then the screw is tightened so that the anchor is completely seated. Next, the self-tapping screw is unscrewed, and the cornice rail is attached to it. The more the self-tapping screw is screwed in, the stronger the folding “wings” are pressed from the inside to the plasterboard sheet, and the tighter the fastening is.
— Anchor MO LA
In many ways, the design and principle of fastening is similar to the “butterfly”. However, it is made of metal; instead of a self-tapping screw, a screw is used, which is screwed into a rigidly fixed nut located at the end.
MOLA anchor and brief graphic instructions for its use.
On the outside there is a fixed press washer with two sharp protrusions turned towards the surface of the drywall - this is to prevent the anchor from turning when the screw rotates. The installation is the same as that of the “butterfly”. That is, first the anchor is inserted into the drilled hole, then the screw is screwed in all the way (this will give the desired deformation of the petals behind the wall), then the screw is unscrewed - and the necessary part of the cornice is finally attached to it to the thin gypsum board ceiling.
— Dowel DRIVA
Such fasteners can be metal or polymer - the principle of their design and fastening does not change. The anchor itself has the shape of a screw with wide and sharp turns. Often there is a drill at the end - then you don’t even have to make a hole in the drywall.
One of the variants of the DRIVA type dowel and the principle of its fastening in a plasterboard partition.
The plastic or metal anchor itself (without a self-tapping screw) is first screwed into the plasterboard surface at the intended point until it stops at the wide side. And in front of us is a ready-made dowel-hole for screwing in the self-tapping screw that secures the tire.
Expert opinion: Afanasyev E.V.
Chief editor of the Stroyday.ru project. Engineer.
You need to be careful with such dowels - if you screw them in at the first stage of the process with excessive force, they can crumble the drilled hole, and the fastening therefore becomes unreliable.
* * * * * * *
Otherwise, attaching the cornice to the ceiling is no different from the example shown above.
The cornice is attached to the wooden ceiling
Here you don’t have to “bother” at all and don’t write much. This is the simplest case, when no drilling or any special fasteners are required, ordinary wood screws and a screwdriver are sufficient.
Placing a ceiling cornice on a suspended ceiling
Stretch ceilings have made a “revolution” in the field of interior decoration, and their popularity is constantly growing. Therefore, it would be strange if questions do not arise as to whether and how to hang a ceiling cornice on a suspended ceiling.
Let’s say right away that it is possible, especially if you prepared for it ahead of time. There are several options here too.
Installation of ceiling cornice on embedded parts
There is no point in installing a suspended ceiling yourself. If there is no experience, then the likelihood of getting a decent result is frighteningly small, and expensive material may be damaged.
But when you call a team of craftsmen to install such a ceiling, and your plans include installing a ceiling cornice, do not forget to point this out to the specialists. Then they will simply install the embedded part along the line of the future cornice. The most obvious solution is a wooden beam. But it may well be a galvanized profile, which is used for plasterboard structures. The whole difference subsequently is only in the choice of fasteners, screws for wood or metal.
Embedded timber (board) from wall to wall - this is where, after tensioning the canvas, you can hang any ceiling cornice.
Experienced craftsmen will place the embedded part so that its lower edge is level with the future canvas, literally 1 mm above the planned level of the ceiling plane. And then, when attaching the tire to a profile or beam, the geometry and appearance of the coating will not suffer at all.
Expert opinion: Afanasyev E.V.
Chief editor of the Stroyday.ru project. Engineer.
By the way, some teams, in order to save material, practice installing not a continuous embedded part along the entire length, but several support platforms, say, from fragments of plywood. It’s just that when attaching the cornice, you will need to make sure not to make a mistake with the location of these support points.
Such embedded platforms are installed for the installation of ceiling lighting fixtures. But several similar (even significantly smaller in size) plates, arranged at intervals of 500 mm along the same line, will be enough to fasten a long cornice.
Installation, even independent, of a ceiling cornice on embedded parts is almost as simple as on a wooden ceiling. But there is an important nuance - in those areas where the canvas will be pierced with self-tapping screws, it is necessary to stick small pieces of reinforced tape, approximately 50x50 mm. This ensures that the hole does not become a spreading tear.
Pieces of reinforced tape, glued in places where the stretch ceiling fabric is punctured with self-tapping screws, protects against tearing or spreading.
Expert opinion: Afanasyev E.V.
Chief editor of the Stroyday.ru project. Engineer.
By the way, reinforcement of puncture points is largely intended for PVC sheets. Fabric ceilings do not suffer from spreading. But I wouldn’t risk it - I would still stick the tape in this case too. This will not take much time or any serious material resources, but will be incomparably calmer.
One more thing - many installers promise that PVC film will never creep. They say that there were no such cases in their practice. I’m not sure whether to believe such statements: fifty times it didn’t crawl, on the fifty-first one it would break... And in any case, I would have reinforced the attachment points anyway - it wouldn’t hurt.
As a result, after installing the cornice, it will fit tightly to the stretched canvas without deforming it. Approximately as shown in the illustration.
An approximate diagram of fastening a ceiling cornice on a suspended ceiling to an embedded part.
Let us repeat - for this method you need to warn the specialists who arrived to install the stretch ceiling in advance. Yes, this will make the overall estimate somewhat heavier, but it’s worth it.
The ceiling cornice is hidden in a niche of the stretch ceiling
Many people love this option. Indeed, it looks impressive when the cornice is completely invisible, since it is located above the plane of the ceiling, and the curtains fall from a niche running along the window.
An example of an interior with a ceiling cornice hidden in a niche of a stretch ceiling
Again, you will have to entrust this to the team that will stretch your ceiling. Only the canvas will not go all the way to the wall with the window, but to the partition made, for example, from the same timber. The partition is positioned so that the cornice fits freely between it and the wall and there remains a distance for the curtains at the required distance so that they do not touch the window sill or the protruding heating radiator.
One of the schemes for installing a ceiling cornice in a niche of a stretch ceiling.
An approximate diagram is shown in the illustration above. By the way, for such purposes, many craftsmen use not timber, but a special rectangular aluminum profile.
And sometimes the scheme is complicated - they completely cover with canvas the entire space up to the cornice, including the inner vertical wall of the embedded beam, and even the gap from the cornice to the wall. Of course, all this increases the cost of work - so the choice is up to the homeowners as to how they like it and what is available to them.
You shouldn’t take on such a task on your own; it requires considerable experience.
What to do if the ceiling is already stretched?
This also happens - the suspended ceiling has been in use for a long time, and then the owners suddenly realize that they cannot continue to live without a busbar ceiling cornice. How should they be?
The easiest way is to call a team of craftsmen again. For them, although this is not an easy task, it is quite an ordinary task. They are able to remove the canvas from one side of the room in order to secure the embedded beam, which can then easily be used to mount the cornice. Presumably, if the owners wish, specialists can also handle creating a niche in the ceiling. Of course, all this must be paid for - but the owners themselves are to blame for not thinking about the future for the future.
But if you absolutely don’t want to call a professional, but you absolutely need a ceiling cornice on a suspended ceiling, can you do it yourself?
Yes, it is also possible if you act carefully.
To do this, you will need several thermal rings with an internal diameter of about 50 mm and glue for them. It is best to take a special one, Kosmo, which is probably sold in the same place where thermal rings are sold - in the department of a hardware store that sells accessories for suspended ceilings.
Thermal rings and special glue for them.
In addition, you will need a piece of polypropylene pipe with an outer diameter of 40 mm. and for fastening - dowels with plastic plugs of 8 or 10 mm, but with an increased length of the self-tapping screw. Such that this length is enough to enter the clogged dowel plug at least 30-35 mm, the distance between the ceiling and the tension fabric, and the thickness of the profile cornice. For example, 100 or 120 mm long.
How this task is performed:
- Attachment points are marked along the holes in the assembled cornice - directly on the stretched canvas.
- Next, the rings are coated one by one with a thin layer of glue and glued to the canvas at the designated points, so that this point is exactly in the center of the circle.
- The glue hardens quickly, so after gluing the last ring, you can already return to the first. Now our goal is to cut out the core of the circle, exactly along the inner border of the ring. A thin stationery knife with replaceable blades is best suited for this. Thus, we get a hole, but it will not creep and will not tear further, since it is fenced with a thermal ring, which serves precisely this purpose.
Cutting out the fabric inside the glued thermal ring.
- The next step is to individually measure the distance from the ceiling surface to the stretched fabric at each point using a ruler. And exactly according to this measured value, a section of polypropylene pipe is cut. The pipe should be cut with special scissors, ensuring that the end is perpendicular to the walls of the pipe - this is important.
- Then, carefully using a hammer drill, with the obligatory collection of debris with a vacuum cleaner, holes are drilled in the ceiling for plastic dowel plugs. Such a plug is inserted into each hole and pushed into it along its entire length - you will have to use a hammer with some kind of improvised punch, so that it passes through the hole made.
- You can begin installing the cornice. A self-tapping screw is passed through the mounting hole, and on the other side it must pass through a section of pipe. And so on at each attachment point. For convenience, you can coat the ends of the pipe sections with instant glue and temporarily glue them to the ceiling - it will become easier.
- Next, the cornice is installed in place, the ends of the screws will go through the tubular channels to their dowel plugs. And all that remains is to screw the structure to a rigid base. The pipe sections will rest with one end against the ceiling, the other against the upper surface of the cornice, which will thus itself be located exactly at the level of the ceiling.
- After tightening all the screws, the cornice will be ready to accept curtains. If everything is done carefully and accurately, no deformations will occur on the stretched canvas, and the cornice will look like it fits tightly with its entire upper wall to the ceiling surface.
* * * * * * *
There is another simple option if you are terrified of even touching the stretch ceiling. You can pretend that the cornice is on the ceiling, but in reality it will be mounted on the wall using L-shaped brackets. If you try to position the tire as close to the ceiling surface as possible, then perhaps no one will notice such a change. It will be quite beautiful!
The cornice is almost adjacent to the ceiling surface, but in fact it is secured to the wall with brackets.
And at the end of the publication, watch a video that reveals some of the nuances of attaching a ceiling cornice to a tension thread.
Features of hanging tulle
The comfort and originality of the room’s interior depends on the ability to correctly design and place tulle. To make it look elegant and beautiful, you need to take into account all the nuances of handling tulle curtains.
After the curtain tape is attached to it, you need to tighten the cords (cords) tightly so that they do not pull out when tightening.
If necessary, they can be tied into knots, but be sure to check their tightness.
Note! In order for the curtain to stay tight and not slip, and also to present a complete composition, it is necessary to secure the clips and hooks. In this case, the number of loops on them should be the same
Benefits of using curtain tape
Curtain tape is made from different fabrics. For curtains it is made from thin materials using veil or organza
It is important that the material is thin, but has sufficient strength. Dense bases require the use of a different texture and thickness of braid
Curtain tape helps achieve the following results:
- simplify sewing curtains;
- avoid the need to sew on hook loops;
- drape fabrics of different densities and textures;
- decorate the window opening in an unusual way;
- adjust the size of the curtains.
This braid helps to get beautiful folds that are the same size and shape. After washing, the product does not shrink and retains its shape.
Curtain tape helps to carefully trim the edge and secure the product in the bedroom or in another room without using special clothespins.
Types of curtain fastenings
Today there are many devices and methods on the market that allow you to securely hang curtains.
Curtains can be secured using:
- eyelets;
- rings;
- hooks;
- braids;
- drawstrings;
- loops and ties;
- clip.
The choice of fastening mechanism is made taking into account the individual preferences of the owner, the type of cornice, and the characteristics of the opening being decorated. One of the most common types of accessories for fixing canvases are hooks.
These products are easy to install and use, fairly inexpensive, reliably hold the material, and come in a variety of shapes and colors.
How to properly hang curtains and tulle on curtain tape
Today there are a large number of ways in which you can hang curtains. Decorative braid is beginning to gain particular popularity, with which you can beautifully drape fabric and give the room an attractive look. To make everything look beautiful, you need to hang the tulle and curtains correctly on the cornice.
What types of curtain hooks are there and how to hang them on a curtain rod
Today you can find on sale a large number of cornices made of different materials: wood, metal, string, ceiling. In addition, there are a large number of fastenings on which the window sheet is subsequently hung.
Hook rings are one of the most popular options. In most cases, these types of fastenings are already included with the curtain rods.
The drawstrings are a pocket located on the top of the cornice. Round cornices can be inserted into such pockets.
Crocodile clips are fastenings that resemble a clothespin with teeth. It is not recommended to hang heavy canvases on such models, as they can be easily damaged.
Clips are similar in appearance to crocodiles, only there are no teeth. Ideal for tulle.
Fabric loops - made from the same fabric as curtains.
You can create drapery for curtains yourself or use mounting tape.
Attention! If necessary, you can fix the tulle and curtain on one cornice.
How to hang curtain tape on hooks
Hanging hooks on curtains correctly is not so difficult if you follow some recommendations
It is important to consider that hooks must be threaded only into special fabric pockets
The first thing to do is check the laces - they must be securely tied, otherwise they may fly out while tightening.
It is best to work together with someone, as a result of which it will be possible to adjust the density of the existing patterns.
As you tighten the decorative tape, check the uniformity of the patterns on the fabric. Once the desired result is obtained, it is worth securing the edges of the lace by making knots.
Since there may be thread left after completing the work, it is recommended to wind it into a skein and secure it under the cornice.
Advice! If necessary, you can move the hooks to another row, thereby adjusting the height of the fabric. To prevent the fabric from sagging, a distance of 5-6 cm must be maintained between the hooks.
How to hang tulle on a curtain tape
Today, there are a considerable number of mounting options, but most experts recommend hanging tulle on curtain tape. This method of decorating a window opening is simple and quite economical. With the help of tulle you can emphasize the delicacy of the room, make it light, and not weigh it down.
Rings, hooks, eyelets, decorative braid, and special secret pockets can be used as fastenings. Most housewives prefer ribbons, as they can be used to drape fabric.
There are several ways to drape tulle:
- the tulle is sheathed on top with a special braid, and then given the required shape by simply pulling the thread;
- the decorative border is sewn to the tulle, having first retreated 15-20 cm from the top edge, this option allows you to give visual lightness to the material;
- if necessary, the braid can be threaded into the prepared pockets, after which an accordion is created on the fabric and secured with knots on the lace.
If necessary, you can use your imagination and make the room much more comfortable and original.
How to hang curtains on curtain tape
Using curtain tape, you can hang not only tulle, but also curtains made of dense material. Decorative braid is produced in widths from 2.5 cm to 17 cm. In this case, you will need to form the folds yourself - manually.
To ensure that the folds are placed evenly along the entire length of the fabric, it is necessary to use clamps. In this case, you can tie the laces together and secure them to the door handle. After this, you can pull the braid with one hand and collect the folds of the required size with the other.
Attention! The distance between the folds must be the same, and possible creases and distortions should be avoided.
How to hang a lambrequin on a curtain tape
Hanging a lambrequin is as easy as hanging curtains. Before starting work, it is recommended to first prepare all the necessary elements. To hang a lambrequin, you must have it on hand;
- cornice;
- sticky tape;
- braid.
The lambrequin is attached to decorative braid according to the same principle as curtains. Only in this case, the remaining tape should be cut off, as well as the lace. In some cases, glue is used as a fixative.
Rings
Ring curtains are made from various fabric textures and are attached to the holder using rings. Hooks, clips, clips can be attached to the rings; they are also called “crocodiles”. Since clips will not be able to support heavy fabrics, this method is acceptable for lighter fabrics.
When hanging or removing tulle or curtains, be careful, because the teeth of the crocodile clips can accidentally damage the fabric.
In order for the curtain to hang in beautiful folds, simply attaching it to the cornice is not enough. Folds can be made while sewing, or while hanging the curtains from the ceiling.
In order for curtain products to look beautiful and rich, it is necessary that there is enough material for sewing them. Usually they take 1.5-2 times, or even 3 times more of the required width.
The curtain fabric should protrude beyond the edges of the window by no less than 15-20 cm and be several centimeters longer than the curtain. Ideally selected sizes will decorate the window opening, adding completeness to the interior.
How to properly and beautifully hang tulle on a curtain tape
If a very thin and delicate fabric was purchased for the curtain, when decorating it, it is important to know how to hang the tulle on hooks, and to be extremely careful and attentive, avoiding unnecessary punctures of the fabric, so as not to deform it
The braid sewn to the curtain allows you to decorate the window opening in an original way and drape the curtain with soft waves.
It should be noted right away that to work with such thin materials, you will need transparent or translucent tape. It is available in various widths. The craftswoman decides which one is suitable for decoration.
Curtain braid is a simple, quick way to hang light tulle, curtains or heavy curtains.
Before hanging tulle curtains, you will need:
- measure and carefully trim the fabric,
- cut off excess;
- process the edges and cut areas.
After this, you can sew the ribbon in the following order:
- bend the top edge to the width of the strip;
- carefully iron the edge of the fold;
- Tuck the edges inward and attach it to the edge of the ironed fold line, which will prolong its service.
As a rule, narrow (2.5-4 cm) braids are used on curtains where drapery is not needed.
Additional Information. Before starting work, it is necessary to wash the fabric so as not to spoil the finished curtain if it suddenly happens that the material shrinks after washing.
The art of drapery
Drapery - one-sided, counter or bow folds on the curtain. Few folds are made on thick tulle, and thin fabric is draped with frequent and narrow folds, and work done by hand lasts longer.
Using tiebacks, staples, rings, and sometimes thread, horizontal and vertical draperies of bizarre shapes are created.
Tip: when planning drapery, you will need to take fabric 1.5-3 times wider than the length of the cornice and purchase a special ribbon with loops in 2-3 rows.
To drape the bottom of a light curtain, the edge is raised in 1-3 places to the desired height and fastened to the canvas.
To create a classic wave, 1-2 sags are formed on the inner edge of the curtain.
If you intercept the middle of the curtain or the top and bottom, you will get an elegant “column” or “vase”.
By draping in one-way folds, the vertical waves of the fabric are laid to one side.
To create counter folds, every two folds face each other.
Bow folds are formed by folding two folds inward from the outer sides.
Distributing the fabric in uniform vertical ridges, the curtain is decorated with pencil folds.
Complex Flemish folds. A braid with two rows of loops is taken and the upper and lower threads are simultaneously pulled together, creating a knot similar to a V. The bottom of the resulting fold is strongly pulled together, maintaining the expressiveness of the upper gather.
The weighted bottom of the curtains will help maintain drapery.
For this use:
- weight tape;
- embroidery at the bottom of the curtain with rhinestones, threads, sequins or beads;
- lace inserts.
Examples of pleat assembly
When forming drapery, you will have to take into account the texture and density of the material. As for tulle, as well as organza, veil, mesh tulle, extreme care is required, taking into account the size of the fabric and the ornament.
In order for the folds to be soft and beautiful, the screed must be formed on both sides at the same time.
The resulting composition is fixed with a knot.
There are many drapery options. Which one to choose depends on the taste of the housewife.
Do not forget that for each drapery option there is its own assembly factor (AC).
- The most universal is the “pencil” method. It is not difficult to implement and does not require a lot of material consumption. Best (KS) – 1.5. Particularly suitable for light fabrics.
- The stitch style creates uniform rows of folds, the number and density of which is determined by the tension of the cord.
- Thin curtains with lurex threads, golden and silver glitter look great with voluminous, uneven waves of puffs. The luxurious look of the curtain is achieved through the use of a wide curtain strip with four rows of cords. Optimal (KS – from 2.5.)
- “Fan” speaks for itself, looks rich and elegant.
- Diamond-shaped screeds form a “butterfly” relief.
- If the fabric of the curtain tape is connected at the bottom with a double tuck, you get a “glass” or “glass” drapery - it is called differently. A strip with two rows of loops and (KS) 2.5 is suitable for it.
- Curtains made of tulle, organza or veil with a bow bookmark look very cute. It is obtained by tightening the laces in such a way that double and single bows are placed close to each other. It is better to take braid from chiffon, mesh or organza with (KS) from 2.5 to 3.
Original ideas for different rooms
Rooms with different purposes need different ideas for decorating curtains.
For the living room, the choice of curtains is perhaps the widest. This is due to the fact that guests are received in the hall and they always try to make this particular room especially elegant and festive. It is possible to select curtains for the living room taking into account the color scheme and general style of the room.
There are quite original ideas for decorating curtains for the living room. For example, tulle, decorated with a second layer of fabric in the form of ribbons or spirals, looks very unusual. There is also an interesting option when the curtains are draped and attached crosswise to different sides of the window opening. Another novelty is that one curtain is longer than the other; folds are laid on it and placed over the top of the window in the form of a lambrequin.
In the bedroom, functionality and convenience come to the fore. Curtains, first of all, should protect the room from the bright morning rays of the sun, the light of lanterns at night, and on the first floors - from prying eyes. In the warm season, experts recommend using lighter fabrics, and thicker ones in the winter. If you are a supporter of light, weightless fabrics in the bedroom, it is permissible, in addition to the decorative decoration of the window, to additionally protect the glass with Roman roller blinds. This will allow, without overloading the interior, to make the room intimate and impenetrable to prying eyes.
Curtains in the dining room should not only be functional and beautiful, but also safe. If the window is located near the stove, there is a risk of a long beautiful curtain catching fire. In this case, blinds (they can be vertical and horizontal) or Roman blinds made of fabric or bamboo will help. If you are a fan of curtains, asymmetrical drapery on one side and a multi-layered design will come to your rescue. This will make the kitchen decoration non-trivial, at the same time safe and elegant.
- In modern interiors, a solution such as a bathroom with a window is often found. Light, airy tulle, loosely draped on a rod or secured with loops or rings, is perfect for the bathroom.
- The windows in the hallway leave room for imagination, since there is no need to close and open them during the day. Therefore, the composition can be static: in the form of Viennese curtains or intricate draperies.
To learn how to hang curtains correctly, watch the following video.
Ties
Curtains with ties can be made from any fabric. In this option, hanging the curtain from the ceiling cornice is done by tying ribbons sewn to the top of the product into a knot or bow. To hang curtains correctly, you need to take into account that the denser and heavier the fabric, the thicker and wider the ties must be, so that they can support heavy fabrics. It is especially good to use this method for airy natural tulle in light shades or curtains with a pattern of flowers, when bows will complement the lightness of the composition. Such a curtain will decorate the bedroom, kitchen, and will look good in a girl’s room, bringing a touch of romance and lightness.
Types of curtain fastening
Various methods have been invented for attaching curtains to the curtain rod. The main ones include rings, eyelets, loops and ties. Let's take a closer look at the good ideas.
How to properly hang curtains on clothespins, rings and eyelets
Eyelets are wide rings of metal or plastic sewn into the top of the curtain. The curtain can be easily strung on a cornice or you can hook the eyelets with hooks.
Eyelets are a rather interesting option for attaching curtains
Ideal for heavy textiles and solid apartment design
Like a flowing waterfall
In addition to heavy classics, eyelet curtains fit chicly into grunge, retro, loft and modern minimalism. The eyelets do not complicate the process of curtaining; it happens easily, the folds fall symmetrically. Even the heaviest fabric hangs calmly on the eyelets. But the metal can scratch the curtain rod while moving the fabric. To hang curtains, you will need to remove the entire rod.
The rings look like eyelets, but they are located outside the fabric. The rings themselves are strung on the cornice, and the curtain is already attached to them in any way. Rings are also made of metal, plastic or wood.
Wooden rings are perfect for eco-style, rustic, country, classic
The curtains have special hooks for rings
Rings create large folds in the fabric. They also calmly hold thick curtains, move easily but noisily along the cornice, and are durable. If you want to use this method of fastening, then you need to think about how to attach the curtains themselves to the rings.
How to hang a curtain with loops and ties
The loops and ties are made of fabric. Loops are wide strips of fabric up to 20 cm. They are sewn to the curtain at each end and strung onto the cornice. Sometimes Velcro, buttons or snaps are provided.
Loops make the interior especially homey and cute
Curtains with hinges are convenient to hang, and they do not create noise when moving
If there is no fastener on the hinges, then you will need to remove the rod in order to hang the curtain. The loops move along the cornice in a difficult way, so you will always be bothered by the same question: how to beautifully assemble the curtains? But you can get the hang of it and learn how to make folds the way you want to see them.
Another option for fastening the type of loops is ties. They look like knots or bows. Often made from the same fabric as the curtains and simply sewn onto them. Sometimes the ties are selected separately and can be threaded through the holes.
A great option for light fabric: it looks cute and romantic
The ties are attached without removing the rod, but they slide along the cornice rather poorly
The ties are more difficult to distribute evenly along the cornice and also take a long time to hang.
This is interesting: Wild stone in the interior of an apartment
Variety of assortment
Manufacturers offer hundreds of different options for curtain hooks. But among them there are several main types:
- Plastic, metal and metal-plastic.
Plastic models are characterized by low price, lack of noise when moving curtains along the curtain rod guides, and resistance to external influences, due to which they can be used not only in residential premises, but also in the kitchen or bathroom. However, they also have some disadvantages. Over time, under the influence of the weight of the canvas, they become deformed, easily break if handled carelessly, are not able to withstand heavy weight, and therefore are only suitable for attaching light curtains.
Types of braid
Before attaching curtains, curtains or curtains to the cornice, you will have to choose high-quality and necessary accessories for them. One of these elements will be curtain braid. It is a tape with special cords threaded inside it. Such garters have the following functions:
- form ready-made loops for hooks;
- regulate the number and size of fabric folds.
When choosing curtain tape, pay attention to the following parameters:
- density and quality of the material;
- The width of the line;
- type of fastenings;
- possible ways of draping fabric.
When there is no need to hide the loops, you can use cotton braid. It is more convenient for sewing, but has one “tricky” feature. When washed, the material shrinks by almost 20%.
Before attaching such a curtain tape, it is very important to wash it, dry it and gently steam it with an iron.
Also, the braid under the cornice varies in width:
The final result will be influenced by the number of rows of loops. To create simple folds on tulle or curtains, it is enough to limit yourself to 2 rows. More than 3 will allow you to assemble a canvas with decorative flowing flounces and voluminous folds from the top edge of the product. They can be formed:
- vertically for curtains like Roman and French;
- horizontally for classic curtains, tulle, curtains with lambrequin, Italian curtains.
Finally, the type of tape may differ in the type of fastening and fixation:
- Hooks and loops. This is a soft fitting that allows you to form folds of various types. Up to 2 rows of loops can be placed here, on which tulle or a light translucent curtain is hung. For 4 rows, it is possible to hang thick curtains and drapes without additional hems or hems.
- Eyelets. If you plan to use eyelets, the curtain tape is fixed on metal rings. The folds will be formed manually.
- "Krits-krats" or Velcro tape. On the reverse side of the tape there is an adhesive strip for fixing the tape to the fabric itself. One of its varieties is Velcro, which consists of 2 elements (loops and hooks).
- Self-adhesive. This is a tougher version of curtain tape, made according to the “krits-krats” principle.
- Hot-melt adhesive. In this case, the adhesive strip is heated with an iron. The layer becomes liquid and, under the influence of temperature, the tape is instantly glued to the curtain.
Advantages
The convenience of curtain tape is that it is very easy to sew on a machine to any fabric, creating folds of varying densities. You can also adjust their size and quantity using cords running along the tape. With the advent of such fittings, it has become much easier to hang tulle, drapes, curtains and curtains on cornices.
Curtain tape has a number of advantages, including:
- there is no need to manually sew on loops (they are already provided for in ready-made versions of ribbons);
- the process of sewing curtains of varying complexity is simplified;
- the width and length of tulle, curtains and drapes can be adjusted without radical measures (hemming, trimming, etc.);
- Neither the tape nor the fittings themselves wear out or deteriorate over time;
- pulls together in minutes thanks to the cords;
- gives clear and neat folds to match the “mood” of the room itself;
- fabric of any texture and density is draped in an elegant and unusual way.
With curtain tape, it becomes possible to decorate the window opening in an original way, as well as radically change the style of the interior.
Types of fastening without cornice
There are special options that do not require installation of a frame:
- novel;
- roll;
- attachment point;
- with fabric fastener.
Roman curtains
Roman blinds are usually mounted on a special frame, which consists of an aluminum profile, a lifting mechanism and a control unit.
If for one reason or another you can’t buy a special frame, don’t worry. The shutter can be fastened with Velcro, which is sold at sewing supply and headphone stores. One part of the Velcro is glued to the regular frame, the other to the curtain.
But it is more practical to use a special frame.
Curtains are the ideal assistant for creating coziness and comfort in your home!
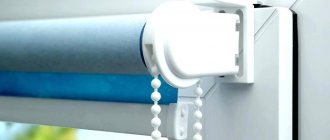
Roller blinds
A roller blind is a fabric wound around a rod.
Methods for attaching curtains:
- open type (outside the opening);
- closed type (inside the opening).
Roller shutters with a closed type of fastening are best installed on large windows and doors. If the opening is not large or there are no window sills, then curtains are installed above the opening.
Fastening roller blinds depends on their system:
- the use of metal or plastic brackets in the opening;
- free hanging;
- on spring brackets without fastening to frames;
- on double-sided tape;
- self-tapping screws for the frame.
Roller blinds are very easy to install. Anyone can do this!
Before securing it with tape, it is heated with a hairdryer, then the protective film is removed and glued to the surface. Further installation is carried out according to the usual scheme.
The classic version of assembling roller blinds:
- installation of brackets with dowels;
- installation of curtains in brackets on the control side;
- installation of chains with which curtains are checked;
- mounting bracket cover.
Curtains are attached to the opening sash using hanging brackets that are installed on top of the sash.
Point mount
The name itself reveals the essence of fashion. The curtain is attached above the window in several places. These can be hooks on which rings or eyelets are put on.
Therefore, when decorating a window with a curtain, you can create an unusual and original design - add romance.
The disadvantage of such a console is that it is static. The tent cannot be moved. A solution may be to use a tie or magnetic clip to hold the fabric in position so that part of the window remains slightly open.
Textile clasp
Usually fastened with Velcro. When there is no opportunity or desire to install a frame, this option can be a good solution.
Not long ago, self-adhesive Velcro was used as a fastener for fabric curtains.
The most important thing is that the curtain can be hung with Velcro both inside the frame (for example, coffee curtains) and on the wall. Great! And it's easy to shoot.
As you can see, there are many different ways to hang curtains. Among them there are both very original ones and those that add special elegance, comfort or romance to the interior. Choose yours!
The main thing to remember is that the method of placing curtains should correspond to the interior of the room.
We attach blinds to plastic windows
There are several ways to connect curtains:
- outside the window;
- inside the opening;
- on the doors.
Depending on the method, the required length of the curtains is selected.
In the first option, 10 cm of width and height must be added to the size of the opening. Be sure to check if the window can be opened with the shutters up.
The photo shows how to attach curtains to the ceiling
In the second option, you need minus 4 cm from the size of the opening in width and 2 cm from the height.
In the third option: the width of the glass plus three centimeters. In this case, the curtains should not interfere with the rotation of the window handle.
The shutters are attached with dowels and screws. They can be attached to the ceiling.
First, drill into the wall and insert a dowel. Then screw the holder with self-tapping screws. Using a spirit level on the opposite side, install the stand in the same way.
To install curtains wider than half a meter from the ceiling, you need to use three mounting brackets.
Step-by-step instructions for using curtain tape on hooks
To decorate a room, it is important to know how to hang curtains with tape on a rod for a more durable “fit.” The product can already be sewn industrially, or it can be attached independently
In order for the finished composition to hold firmly, it is important to know the order of its design and choose the right braid, taking into account such an indicator as the assembly coefficient.
The KS determines the “pitch” of the fastenings, depending on the width, which matters for the number of assemblies and their splendor.
When hanging curtains, it is important to sew the hook tape correctly. This operation is performed as follows:
- cut off a piece from the strip equal to the length of the curtain plus an increase of five centimeters;
- lay the ends of the braid down 2.5 cm each and smooth them;
- pull out the cords so that they hang freely and are not secured;
- place the tape over the allowance for the top trim and pin;
- stitch, retreating 12 mm from the top and bottom, stitch twice.
If the curtain tape has several ropes, we sew it along each of them.
Important! It is necessary to stitch in such a way as to close the fold so that the cords remain free. Then, stepping back 10cm from the side edge, you need to hang a hook - it will be the outermost one
Having folded the curtain along this hook, the next one is hung on two loops at once - the outermost one and the one opposite it. This action is called a technical twist. It can be done differently: tuck it in immediately when the strip is sewn on
Then, stepping back 10cm from the side edge, you need to hang the hook - it will be the outermost one. Having folded the curtain along this hook, the next one is hung on two loops at once - the outermost one and the one opposite it. This action is called a technical twist. It can be done differently: tuck it in immediately when the strip is sewn on.
The folds obtained on the braid after tightening the ropes should be evenly leveled.
The next element is threaded into the loop close to the collar, and it is threaded into the second one - after five centimeters. The result should be a fold. Further formation of drapery using curtain tape on hooks is done in a similar way.
Curtain tape is a convenient device used on any curtain, curtain or drapery.
Description
A drawstring on a curtain is a way to secure drapes, curtains, or tulle to a cornice. It is somewhat different from the usual hooks, because it is a different hanging scheme. Here a stitch is made on a sewing machine, creating a “tunnel” at the top of the fabric. A pipe is placed there, screwed to the wall above the window, or a fishing line.
Since curtains of this type are placed on a cornice or rod without the use of hooks, they are considered the most convenient to install and subsequently maintain.
This looks aesthetically pleasing and elegant, since the curtains are gathered into a beautiful drapery, both at the top end and at the bottom. And if you add decorative elements, you can create a designer product. This fastening method does not limit the design or selection of material; it is suitable for delicate thin fabrics and thick curtains.
As a rule, the width of the curtain is slightly larger than the width of the fastening, which is why soft vertical folds are created on the curtain, giving the design weightlessness and lightness.
The length of the drawstring curtains is selected depending on the features of the interior, the shape and size of the window opening.
Classification
Curtain and curtain hooks for wall and ceiling cornices are distinguished by material of manufacture and design. For their manufacture use:
- high quality plastic;
- metal (mainly brass, aluminum and steel);
- metal-plastic is a modern combined material.
Plastic options are suitable for light and medium weight curtains. In addition to the most affordable price among products of this type, they have another undoubted advantage - noiselessness when moving along the ledge. But over time, plastic hooks wear out and lose their shape, which entails a violation of the overall composition. This is caused by the curtains sliding off their hinges due to deformation of the hooks.
Hooks for curtains in the bathroom can be chosen either plastic or metal-plastic, or metal, chrome-plated on the outside, as in the photo below.
Adviсe
There are various ways to properly hang a curtain on a curtain tape. You should know that the distance between the hooks should not exceed 6 cm. Only after fixing them on the hinges, the finished canvas is hung on the cornice.
All created folds on the curtains dictate a certain style in interior design:
- pencil-type assembly with neutral colors is suitable for a classic style, for cabinets or offices;
- the “fan” assembly will look good in a living room or bedroom with a luxurious and expensive interior;
- A “glass” with floor-length curtains or tulle will decorate spacious rooms, hallways and a relaxation room;
- light “puffs” will look appropriate in a nursery or kitchen;
- The bow arrangement will fit perfectly into the romantic interior of the bedroom.
You can sew curtain tape either using a machine or by hand, using the following rules:
- Seams. They should not stand out on the front side of curtains or tulle.
- Hooks and rings. If you use similar fittings, place them across the entire width of the curtain tape. The only thing is that they cannot be hung on threads, because this will unsightly pull the tulle itself together.
- The effect of airiness from the folds. To make curtains or curtains easily fall in beautiful folds, sew the curtain tape with an indent of up to 20 cm from the top edge. This way, even a curtain made from the most durable fabric will acquire an airy effect.
- Uniformity of tulle. If you choose a plain, translucent or nylon tulle without patterns, then it is better to hide the curtain tape on the wrong side of the curtain.
Use interesting ways to assemble tulle, curtains and drapes to create a comfortable and stylish atmosphere in your home.
Pats
Curtains with patches are curtain products with decorative loops sewn on top. They are hung on a round rod curtain rod, or rather, the rod is threaded through the loops. If we talk about interior decoration, then this is a universal option for decorating the windows of a child’s room, living room, bedroom, and kitchen. The width of the loops can be different, as well as the fabric for sewing them. For curtains with patties, a lambrequin is not used, because the presence of loops gives individuality to each curtain.
What is important to know about the practical use of tulle in the interior
Tulle is a word of French origin, masculine, although in the Russian-speaking environment there is also a feminine version. The name was fixed after the invention of special textiles at the manufactory of the town of the same name. Since then, many have been interested in the question of how tulle should hang on windows and at the balcony door.
The concept of “tulle” unites many fabrics produced using different technologies from various materials.
Today, under the general name “window tulle”, several textile samples are produced from different types of fibers:
- veil;
- taffeta;
- marabou gas and almost invisible illusion gas;
- nylon with embroidery;
- large, medium and fine mesh;
- analogue of “tulle”;
- organza (made of silk or viscose);
- curtain fabric made of polyester fiber;
- polyester curtains;
- linen textiles for windows;
- non-flammable synthetic fabrics for kitchen decoration (also suitable for smokers’ bedrooms).
The veil comes in classic white, colored and draped
Before purchasing, you need to have an idea of what material is suitable for draperies and how to hang tulle correctly. For southern windows, dense taffeta that diffuses daylight is more acceptable. This material bristles at the folds, so it is not used for soft draperies.
The choice of tulle largely determines the illumination of the room
A yellow veil will add bright colors to the kitchen interior
Some fabrics are made from transparent or almost invisible fibers
Before hanging the tulle, it is important to consider how to attach it, for example, with loops or eyelets. The use of “gas” - multi-layered styles and curtains for dark rooms where you need to let in as much light as possible
Tulle, produced by a special weave that leaves space inside the material, is called gas tulle.
The colors are very varied:
- flower bouquets;
- all kinds of plant elements;
- gradient (color transition from dark to light);
- abstraction, rainbow stains;
- large and small pattern;
- drawings on ethnic and oriental themes.
The choice of textiles depends on many factors. The mesh looks extravagant, but does not diffuse light well. It is more suitable for rooms that do not receive direct sunlight.
Among the varieties of mesh tulle there are models with different sizes and shapes of cells
DIY tulle for the kitchen
To sew tulle with your own hands, you need to follow a certain procedure:
Choose a suitable material, learn about the characteristics of the fabric, pay attention to transparency, structure, color scheme, presence and type of pattern. To form tulle, the following are used: veils, organza, mesh.
Prepare fabric for sewing
It is necessary to take measurements and then cut out the workpiece.
The last stage, sewing.
Sequencing:
- Fold the sides 1-2 cm and stitch on a typewriter. You need to make an even width along the entire length of the fabric; to do this, you need to keep the fabric taut. Use thread for sewing in the same color scheme as the tulle.
- You need to sew a curtain tape to the top one using two lines, preferably with a width of 5 cm.
- Pull the curtain tape to the desired length, trim off the excess parts.
- Attach the tulle to the cornice.
Methods for fixing curtains
In order to hang tulle, you can use one of the traditional and affordable methods.
- Drawstring type. The curtain fabric is simply folded or an additional strip is sewn on, a drawstring is sewn through which the cornice pipe or string is threaded. If you leave a narrow strip of fabric on top, a beautiful frill will form. The disadvantage of this option is that it is difficult to move the blade along the pipe.
- On rings with hooks. Hooks are “tightly” sewn to the top of the tulle (it is better to use transparent plastic). You can wash the fabric with them. Decorative rings are put on the cornice, to which the hooks are attached. Rings can be of different colors; they are matched to the cornice or tulle shade.
- On the eyelets. Holes are made in the upper part of the fabric used into which eyelets are inserted. A cornice is passed through the holes. There is another option - you can hang the tulle on the cornice using ribbons or braid threaded through the eyelets.
- On the hinges. An original method of decorating the top part of the tulle. Loops can be constructed from ribbons or braid. The disadvantages of this option include the fact that when using long loops, a noticeable gap is formed between the tulle and the cornice.
- On clips. Products that work on the principle of delicate clips allow you to quickly remove and put on the curtain. They can only be used for lightweight single-layer structures. If you gather the fabric, beautiful vertical waves are formed. The clips do not stretch or tear fragile fabric.
The process of securing the material takes only a few minutes and is simple, especially if the folds in the fabric have already been formed and secured with tape or braid.
How to choose the right one
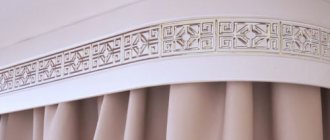
To choose the right ceiling cornice, you must first decide what function it will perform: decorative or only functional.
If we are talking not only about the function of the cornice, but also about its use as a room decoration, then you should choose a model with a decorative strip, or, as it is also called, with face molding. Typically, such a strip is glued to a special adhesive tape provided on the cornice, or inserted into a groove originally made in the structure.
Cornices with decorative strips serve as interior decoration.
If there is adhesive tape on the cornice, you can sew a decorative strip yourself from decorative material or curtain fabric so that everything looks organic. If grooves are made in the design of the cornice, then you need to insert a plastic strip into them, which can either be included in the kit or purchased separately.