The building materials market offers a huge amount of materials intended for finishing premises. However, some names may surprise even professionals, not to mention ordinary apartment owners. For example, blocks made of a material such as plaster. It turns out that this is a very popular product, blocks and partitions from which in some cases are the only possible solution for repairs. Therefore, we will tell you in more detail about the features of the material, tips for installation and processing.
Definition of plaster
As you can guess from the name, this is a gypsum material. It is used to create partition blocks to divide the interior space into apartments or rooms.
What is plaster - it is a building material created from a mixture of gypsum powder and mineral fillers, giving the finished structure certain properties:
- Reducing the total weight of the product;
- Improving the strength of the finished product;
- Increased thermal insulation and sound absorption;
- For products operated in conditions of high humidity, hydrophobic additives are introduced into the plaster composition.
In many sources, this material is called alabaster in another way. In fact, alabaster is a product obtained by firing gypsum stone, followed by grinding and pressing into any design and shape. As with gypsum plaster, mineral additives are added to it. It turns out that alabaster is a derivative product of gypsum stone, but the concepts cannot be equated with each other due to different properties.
Peculiarities
Silicate tongue-and-groove slabs are a high-quality and inexpensive finishing solution. Almost any design can be assembled from them. Assembly is carried out practically according to the same principles as in the famous Lego constructor. You can visually confuse silicate blocks with gypsum analogues. But their production technology is fundamentally different. Products based on silicates are more widely used than products made from gypsum, and their efficiency will be higher.
This construction raw material has a fairly high density. This increases the strength of the structure, but also makes it heavier. Therefore, the area of the product is more than 2 times smaller than that of a gypsum structure.
However, this drawback (associated with low porosity) cannot be considered any serious obstacle to normal use, because such products are used only indoors. Positive characteristics of silicate-based blocks:
- excellent load-bearing capacity (due to high density);
- small number of pores, reducing moisture penetration;
- low cost (about 50% more affordable than analogues);
- significant output volumes at all specialized enterprises;
- high dimensional accuracy;
- Possibility of installation both on the subfloor and on the ceilings;
- no need for additional plastering.
Silicate tongue-and-groove slabs are usually used to quickly and efficiently erect load-bearing walls inside a house. But their mass use is impractical. This provokes an excessive load on the foundation of the building and makes it more complicated and more expensive. But as a material for an interior partition, a silicate block is ideal in all respects.
Plaster partitions - what are they?
Plasterboard partitions are a universal solution for dividing living space into functional zones. They are actively used in new construction for several reasons:
- Light weight does not increase the load on the foundation;
- The tongue-and-groove connection makes installation quick and easy; assembly is carried out according to the principle of the designer;
- Low thermal conductivity ensures heat retention in rooms;
- A high level of noise insulation due to the porosity of the material provides relatively comfortable conditions for people in adjacent rooms;
- Mold does not grow on plaster;
- The linear expansion of partitions does not actually change when the humidity in the room changes.
Plasterboard walls can separate not only rooms within the same living space, but also neighboring apartments. For such cases, thicker double blocks are chosen.
It is worth noting that plaster partitions cannot act as load-bearing structures.
Silicate or gypsum?
If we compare the soundproofing characteristics of gypsum blocks and silicate ones, the latter, with equal parameters, conduct sounds worse (40-43 dB for gypsum and 48-52 dB for silicate). So for better sound insulation we choose silicate.
Dimensions according to GOST and TU
But silicate blocks of the same size have greater weight and higher thermal conductivity (they conduct heat better). The key in the choice is weight, since sound and thermal insulation can be improved with the help of additional layers of special materials, but there is no way to reduce the weight of the partition. And if its mass is critical for the overlap, nothing good can be expected.
How to make the right choice
There are 2 types of gypsum slabs:
- 1) Solid thickness 35…40 mm;
- 2) Hollow 8…10 cm thick.
Hollow ones have a more dense structure throughout the entire volume and are characterized by increased strength. Hollow ones are lighter, they retain heat better due to their structure, and retain sound up to 39...43 dB.
How to choose the right blocks:
- Both hollow and solid gypsum plaster slabs are suitable for arranging interior partitions.
- It is not recommended to overload the floor on wooden joists, so preference should be given to hollow blocks;
- All types of partitions are suitable for floors with monolithic screed;
- To fence important rooms (bathrooms), it is necessary to choose moisture-resistant products.
Preparation for installation
When choosing gypsum panels as partitions, you need to properly prepare:
- Materials: the blocks themselves, soft damper cork tape for the backing, mounting adhesive for gypsum blocks;
- Tools: marking cords, pencils, large-toothed hacksaw, spatulas, level;
- May be useful (assessed according to the situation): M100 cement mortar for leveling the floor or timber for installation on joists under the partition.
You should not design a fence more than 3.5 m high and more than 6 meters wide due to the design features of the partition. It is within these limits that the structure will be as strong and stable as possible.
A plaster wall should only be mounted on a leveled base. If it is a concrete screed, it is necessary to level out differences in height of more than 3 mm with a cement mortar of at least M100 grade. When installing on joists around the perimeter, you need to install a supporting beam.
Next, you need to mark the doorways and mark them on the floor with a thick line or notches on the beam. In order not to do unnecessary work, it is wise to determine the location of the openings taking into account the width of the blocks, so as not to cut them again. For example, a door will be installed at a distance of 2 gypsum plaster slabs from one wall, then on the other, only the slabs adjacent to the opposite wall will need to be trimmed.
Before installation, it is necessary to keep the blocks in the room for several hours so that they accept the ambient temperature and do not deform after assembling the partition.
Technical and design characteristics
Gypsum is a non-flammable, environmentally friendly material.
To understand the question of how to properly install gypsum partitions when building a house, and what they are, let’s consider the main characteristics of the slabs.
The properties of any sheet material are determined by the base substance.
In this case, such a base is alabaster or gypsum: the substance is absolutely environmentally friendly, non-flammable, does not smell and does not emit toxins.
The advantages of plaster partitions certainly include:
- small material thickness and light weight;
- almost zero electrical conductivity;
- resistant to rot and insects;
- not susceptible to the development of fungus or mold;
- convenient and easy to install.
The material does not change its physical properties under the influence of moisture or temperature, which means it is stable in size.
| Characteristic | Regular gypsum board | Hydrophobic gypsum board |
| Dimensions | 900 * 300 * 80 mm | 900 * 300 * 80 mm |
| Color | White | Green |
| Soundproofing | 41 dB | 41 dB |
| Water absorption | 35 — 37% | 5% |
| Compressive strength | 5.0 MPa (50 kgf/sq. cm) | 5.0 MPa (50 kgf/sq. cm) |
| Fracture strength | 2.4 MPa (24 kgf/sq. cm) | 2.4 MPa (24 kgf/sq. cm) |
| Fire resistance limit | Over 2.5 hours | Over 2.5 hours |
| Fire spread limit | 0 | 0 |
Boards are made from gypsum with the addition of various mineral or organic additives under the influence of low temperatures. Thanks to the “recipes” of the slab, they reduce weight and improve its sound insulation properties.
With the help of additives, dimensional stability is achieved and the risk of cracks is reduced.
Installation of plaster partition
All structures of a new building shrink over time and are capable of changing their linear dimensions. Wood and reinforced concrete, which are commonly chosen for construction, behave differently than plaster. To prevent dissimilar elements from having a destructive effect on each other due to different amounts of shrinkage after 1-3 years, a compensation damper tape made of cork should be attached to the floor under the partition. It will allow the structures to move independently of each other.
Following the markings with a spatula, apply the same glue to the floor on which the partition will be mounted. Place a tape over the solution and press it.
Installation of blocks begins an hour after rolling out the tape.
- Glue is applied to the damper tape and the first row of slabs is installed. The blocks can be placed on the groove, or you can cut off the ridge and place the element on the floor. The choice depends on your convenience. Glue is applied to the lower base and into the groove, an adjacent block is inserted, pressed and excess mortar is removed with a spatula.
- The second row is mounted relative to the first in a checkerboard pattern. The blocks must overlap the lower vertical joints both in the plane of the walls and at their intersections.
The progress of work must be monitored at every stage:
- The maximum permissible seam size is 2 mm.
- The evenness and verticality of the fence is checked when installing each block.
When finished, perforated metal corners are attached to the outer corners with glue, and the internal intersections are reinforced with sickle tape.
To give rigidity to the partition, gypsum blocks should be attached to the wall using hangers, corners or reinforcement. Each 1st, 3rd, 5th row (or all) is fixed to the fasteners with self-tapping screws, and the bar or corner itself is fixed to the wall with dowels.
There should be 1.5...2.0 cm left from the top row to the ceiling as a technological gap. It is filled with polyurethane foam and, after it dries, puttyed and covered with a ceiling plinth.
Preparatory work
Carefully prepare the surface where the masonry will be carried out. To do this, use a broom, brush, or any other tool that will clean the area where the wall is installed.
To successfully install a tongue-and-groove wall, level the surface. If the floor is cement, first remove all cracks, gouges and holes.
Or use concrete contact primer. Similar work is performed in 2 stages, applying 2 layers.
To find out how smooth the surface is, use a level. In order to properly mount the wall, counting on the absence of defects in it, differences and deviations of the surface do not exceed 3 mm.
Prepared surface for masonry
A regular screed is also used, which gives a better effect than any other methods.
To prevent the wall from resonating or vibrating, a damper layer is used, which will have a positive effect on sound insulation. As such a layer, a cork backing tape with a thickness of at least 4 cm is used. It is installed where the new masonry comes into contact with the floor and the adjacent wall. The tape is installed using glue, which is also used for fixation.
Tape installation
Apply a layer of adhesive using a spatula. Moreover, a thin layer is enough on a surface specially prepared for this, onto which the tape is rolled out on top. After which it is pressed to the surface for high-quality fixation.
Creating window and door openings in a plaster wall
To make a doorway, the blocks are laid according to the markings indicated at the preparation stage strictly vertically. When the opening reaches the top mark, act depending on the situation:
- When constructing an opening less than 90 cm wide, an auxiliary wooden lintel is attached to the plasterboard using self-tapping screws. The blocks are placed on it in the same way as the main masonry was laid - using glue with overlapping rows. When the mounting solution has dried, the jumper can be removed.
- When creating a wide opening over 90 cm, you will need to install a lintel made of a wooden batten with a height of at least 3 cm or a metal spacer. The lintel should extend 50 cm onto the supporting walls on each side. The element will remain in the partition; there is no need to dismantle it.
To mount a window or door frame, use foam and frame dowels.
Beginning the formation of a plasterboard wall frame
So, with the assignment of profiles and the choice of tools completed, you can begin planning and placing the future wall. The floor and adjacent walls on which the new wall will be fixed must be at the stage immediately before finishing, that is, the floor is level with a screed, the walls are plastered. For example, consider the formation of a wall from the UW, CW profile. On the floor we mark the placement of the future wall. The following points are taken into account:
- Almost nowhere can you find perfectly right angles between walls in rooms. This is especially true for old buildings. The distance between them at different ends may differ by several centimeters. When marking a new plasterboard wall, you should take this into account and refer not to one wall, but to both, which run parallel. In this case, the distances are averaged. This way you can avoid the visual curvature of the resulting room.
- If, in addition to the construction of the wall, all walls are sheathed with plasterboard, then first the frame or at least the marking of the sheathing is laid out so as to create the most right angles, and after that you can only begin to build the wall.
- When outlining the first line of the wall, it is taken into account that the guide profile will be aligned along it, and not the resulting wall. The thickness of the plasterboard, a layer of putty and finishing will be added to this mark.
Having decided on the first line on the floor, you can transfer it to the ceiling and walls. A plumb line is used for this. If you can use a laser level, this will greatly simplify the task.
Support posts made of CW profile are attached to the edges of the guides. Also, racks are installed in places where a door or window opening will be formed, which are necessary when constructing an interior wall made of plasterboard. It is best to attach the profiles first to the bottom rail. Then it is threaded into the upper guide and installed strictly vertically in level. Only after this is it fixed to the upper guide. When positioning these profiles, allowance is made for covering strips of plasterboard over the profile. The profiles are installed with the front side facing into the opening. The racks are secured to the guides using flea screws.
The structure of a plasterboard partition.
The supporting profiles along the perimeter of door and window openings must be reinforced with wooden blocks, which are inserted inside the profile and secured with self-tapping screws. The bar is selected according to the width of the profile. If an AU profile is used, then you can do without bars.
The next step begins the installation of vertical CW support profiles along the entire length of the frame. The first profile from the adjacent wall is installed at a distance of 550 mm, all subsequent ones are strictly at a distance of 600 mm from each other, measuring the distance from the middle of each profile. The vertical installation of the profiles must be checked.
In order to mark the top of the doorway and the horizontal edges of the window openings, the same UW guide profile is used. A piece of profile is cut 30 cm larger than the width of the opening. On the front side, on the bend of the side bends of the profile, marks are placed at a distance of 15 cm from each edge. The distance between the marks is equal to the width of the opening. The profile sides are cut at an angle of 45 degrees, starting from the edge of the profile to the mark and to the base of the profile. After this, the edges of the profile are bent, and a U-shaped structure is obtained.
The resulting blank is placed with its bent edges onto the posts on the sides of the opening and raised to the required height. It is secured using self-tapping screws, which screw the edges of the profile to the posts. The resulting oblique ears, which formed on the main horizontal part of the workpiece, are also screwed on. The perimeter of window openings is formed in the same way.
This completes the formation of the frame. You can proceed to the process of fixing the drywall sheets. The sheet sizes are standardized: 1200x2000 mm, 1200x2500 or 1200x3000 mm. In most cases, ceilings in residential areas are higher and are at least 2.75 m, so one sheet of height may not be enough. Small strips of drywall will need to be added.
The first sheet that will be installed close to the edge, most often to the adjacent wall, must be removed from the side chamfer. To do this, a strip 50 mm wide is cut along its entire length on one side.
Result of work
Laying communications
Often, various communications are laid inside partitions:
- Thin pipeline;
- Electrical cables with boxes;
- Sewerage and heating lines are installed through the blocks.
Gypsum plaster is a durable material, so chipping it is not prohibited. On the contrary, the partition allows you to lay any communications both inside itself (in voids) and through through holes.
Gypsum plaster does not support combustion and does not ignite, so the electric cable can be laid without a protective cable channel directly through voids or grooves. If it is necessary to expand the canal, you can increase the permeability of internal voids with wide crowns up to 45 mm.
At the same time, you need to remember:
- The distance between the grooves must be at least 10 cm;
- The depth of installation of communications is at least 1 cm from the surface of the block.
About plastering
To answer the question of whether tongue-and-groove slabs need to be plastered, let’s remember what plastering is. This is the process of rough finishing of building surfaces to correct misalignments, deviations from the vertical and other irregularities of more than 30-50 mm. Correction of smaller deviations up to 10 mm is called puttying. Each process uses its own building mixtures. Read: How to plaster drywall.
It is worth noting that modern plaster mixtures make it possible to minimize the plaster layer and reduce its thickness to 5 mm.
How to attach to a plaster wall
Hanging a shelf or TV to a plaster wall is difficult, but using plaster is a completely solvable task.
Fastening of light objects to the plaster wall is carried out using plastic dowels, the inner legs of which are straightened into the cavity of the block and securely fixed.
For the installation of heavy equipment and plumbing fixtures in partitions made of solid blocks, it is better to use through metal studs.
Attaching conventional screws and nails to a plaster wall will not be effective.
Is it necessary to plaster tongue-and-groove slabs?
If a partition made of PGP is made correctly, then, by definition, it should not have distortions or deviations from the vertical. The smooth surface of the PGP slabs does not require serious leveling. Therefore, all manufacturers of GGP slabs write the phrase “does not require plastering” in their instructions.
Hence the answer to the question whether it is necessary to plaster the pgp; a simple answer is not necessary if the partition is built correctly.
However, not always and not everyone can build an even vertical partition with minimal deviations from the vertical. In addition, it is possible that the partition simply cannot be built flush with other structures on the wall. For example, there are columns on the wall that are shifted horizontally by 5 cm. You need to make a partition between them. It is clear that the partition will be displaced relative to one column by 5 cm, which must be removed with plaster.
Therefore, another question arises - is it possible to plaster tongue-and-groove slabs. The answer to this question is yes. It remains to be seen what.
Partition repair
When using partitions, different situations arise; over time, some sections of the wall become damaged, and potholes form that require repair.
How to repair a hole in a plaster wall:
- The first thing you need to do is clear the pothole and remove any dust from it.
- Priming the surface of the pit is necessary; it is better to use deep penetration solutions.
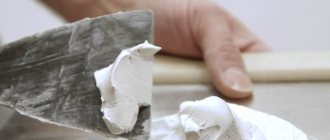
- For filling, it is optimal to use a gypsum mixture for plastering surfaces. It is diluted according to the instructions; to improve plasticity, you can add a little PVA glue when kneading.
- The pothole is filled with mortar using a spatula. The mixture is stretched beyond the recess. To improve the adhesion of the mixture, the dried surface can be sprayed with water from a spray bottle.
- Once the pothole is filled, the finished surface needs to be reinforced. For this it is better to use a nylon mesh. It is cheaper than metal, and with minor repairs its strength is sufficient. It is necessary to protect the hearth from cracking when the gypsum plaster dries. The mesh is applied to the undried solution and pressed with a spatula, covering the top with the same solution or embedded in the already applied one.
After completing the repair work, when the plaster has dried, the edges are sanded with fine sandpaper and further finishing is carried out (wallpapering, painting, etc.).
How to plaster tongue-and-groove slabs
If you have a situation where you need to plaster tongue-and-groove slabs, feel free to proceed.
GGP blocks are produced on the basis of gypsum, which means that the surface of the partition made of GGP will be gypsum. Let us remember the basic rule of plastering - the plaster layer cannot be stronger than the base.
This means that concrete walls can be plastered with any plaster compositions, but gypsum walls can only be plastered with gypsum-based compositions. Plaster surfaces cannot be plastered with cement plasters.
Therefore, any gypsum plaster mixture is suitable for plastering PGP. I repeat, cement, cement-lime mixtures are not used on the gypsum surface.