Brass die bases have become very popular due to their durability and good engravability. The heat-resistant structure prevents bending and deformation. To increase rigidity, reinforcement is used: a metal base that is fixed to the stamp. This technology increases thermal capacity and rigidity.
Magnesium branding is an economical option with a lower level of rigidity. This material is more suitable for embossing leather, notepads, and soap. The low cost is due to the softness of the material: magnesium is 2 times easier to engrave than brass.
We make wood stamps according to the customer’s individual design. You send us a drawing or an inscription that needs to be engraved, and we make a product based on it. Engraving is done on brass with a width of 12 mm. It is possible to produce cliches of any size, but it is worth considering that for complex layouts with a large number of small lines it is necessary to use more brass.
The burning cliche can be equipped with a soldering iron or a hairpin with a handle. Depending on the size, we select the required power of the soldering iron and make an adapter that allows you to fix the product on it. You can buy a tree stamp from us in cash or by bank transfer. We can deliver within Belarus by delivery service or in Minsk by courier.
How to burn with a brand?
The stamp is heated with an open fire for 5-7 minutes, after which the imprint is placed. Advice: it is better to make the first print as a test print to see whether the product is overheated or underheated.
Important: you cannot cool the cliche by immersing it in water - this will lead to its failure.
| Square | Price |
| 2 CM | 50 rub |
| 3 CM | 55 rub. |
| 4 CM | 65 RUR |
| 5 CM | 70 rub |
| 6 CM | 75 RUR |
| 7 CM | 80 rub |
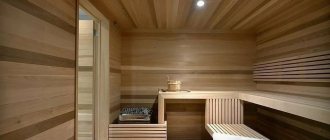
Wood heating
Dotting (dotting) – writing numbers in dots. Used when accounting for round timber. In a broad sense, “timber pointing” is the measurement of round timber to determine the volume of wood in a log or stack of logs. The length and diameter of the log are measured, the corresponding value of the volume of wood is found using the log block and added to the total if there are several logs (see “Volume of round timber”)
Roundwood cubator Tables of roundwood pointing Measuring the volume of roundwood Measuring the volume of firewood Marking the forest
Pointing (pointing) of round timber is a procedure for measuring the volume of wood. It got its name from its consonance with the dot method of the “envelope” - a schematic notation of numbers in which the number 10 (ten) looks like a square with drawn diagonals - a closed “envelope”
Dotting (dotting) – quick recording
“Dotting” (dotting) is a method of writing numbers. Shorthand accelerated schematic writing. Widely used in forestry. Because of this schematic recording of the results, the procedure for measuring round timber was called “Pointing (pointing) the forest.”
Dotting using the “envelope” method is a schematic recording of numbers in which the number 10 (ten) looks like a square with drawn diagonals - a closed “envelope”. The technique of writing numbers is very simple and can be clearly seen in the animated drawing below. The numbers 1,2,3,4 correspond to the first four points along the vertices of the represented square, numbers 5,6 are the diagonals of the square, numbers 7,8,9 are its sides. The number 10 appears as the last, closing side of the square. That's the whole "envelope". After this, the drawing of the second square begins, and the first one is visually perceived as the integer 10 (ten). You just need to get used to it. The order in which the points, diagonals and sides are applied does not matter. In the finished “envelope” this is not visible, but in the half-drawn one it is easy to identify the missing parts of the “closed envelope”.
To dot (put dots) means to count. You can count any objects, not just wooden blocks. Dotting, as a type of applied notation, is ideal when working with large numbers of similar numbers. The point of dotting is to visualize the process of recording and processing similar data.
To computer geeks, dotting (dotting) will seem like an anachronism, an outdated grandma’s method. They say that there are programs and cubic tables. A perfectly acceptable reasoning. But foresters will hold the point in high esteem for a long time. In the forest, where there is no Internet, it’s not very fun to poke at the keyboard in 30-degree frost. The finger cannot withstand the load and quickly breaks :):):):).
On the other hand, when measuring the volume of round timber, it is not at all necessary to use dot notation. You can write sizes in the usual decimal system and add the numbers “in a column.” The volume of timber will not change.
Roundwood volume
The volume of round timber is determined after pointing (counting) the number of round timber in the stack. To determine the volume of round timber, open the cubeturner and look at the volume of counted (grooved) timber. The author apologizes for the slang of the word “forest”. The forest is growing trees, felled logs and logs are already timber, forest products.
Kubaturnik is a special table for calculating the volume of round timber. Along the vertical axis of the cubature are the diameters, and along the horizontal axis are the length dimensions of the logs. At the intersection of the vertical and horizontal - the volume for a log of the required length and diameter. Cubaturnik is colloquially called GOST 2708-75 ROUND TIMBER Tables of volumes (download).pdf [1.1 Mb] (downloads: 2694)
Round timber marking
Branding of forests and forest products played an important role in the formation of the concept of “pointing (pointing) of round timber.” Simultaneous branding and accounting of timber products is a common practice in forestry. Branding, measuring and recording the results (pointing, pointing) is one whole action for recording forests and timber. A mark placed on wood is intuitively perceived as a dot. Hence, the second intuitive name for branding is dotting. In fact, marking and measuring forests and timber is correctly called dotting, if the results are recorded in dots.
The forester's mark is a special mark on a tree trunk, applied by impact. The main task of forest branding is to facilitate the accounting and sorting of round timber and forest products during the commodity circulation of wood. The history of branding trees and logs dates back to tsarist times.
Historical meaning of forest branding
The history of forest branding begins in the distant times of an individual approach to cutting down trees. Since time immemorial, a system of marks has been used in the forest. The forester had a stamp of release or logging. The mark was made on the butt of the forester's ax (hammer) in the form of a relief image and was applied using the impact method. Hitting the butt of an ax (hammer) on a tree trunk that had previously been cleared of bark, the forester branded round timber “on the stump”, stumps and already cut down trees - he placed “dot” marks.
: Stencil
Cut out the desired design from a sheet of vinyl. It will have to be made absolutely tiny!
Remember that the design will have to be drawn backwards, especially if it is text - as with everything related to printing. It must be flipped horizontally to show up properly on the wood.
Firmly glue the workpiece to the nail head.
Making wooden badges
The badge is a piece of art and collectible. You can make badges that will be of interest to all ages, as well as representatives of different cultures. The main thing is to have a desire to make a high-quality, original, designer product. Each person is unique and has his own tastes and preferences in choosing badges, but, unfortunately, it is not always possible to find suitable badges in stores. There are several ways to make badges. They can be coated with acrylic paint, or printed on a laser printer.
Use of laser technology
The easiest way to make them is to buy wooden badge blanks and then paint them with acrylic paints, but there is another way. Creating an icon begins with a design template with a clear outline. Following the outline, the printer will cut out the shape of the badge from thin wooden plywood. After laser cutting technology, wood is completely processed by hand: cleaning, sanding, coating with a water-repellent layer, painting with environmentally friendly enamel, then waterproof varnish is applied in such a layer that even machine washing will not spoil the badge.
Features of stamps on leather
Leather is one of the most wear-resistant materials and is used to make various items: shoes, clothing, office supplies, document covers, cases. Procedures for processing and decorating leather and leatherette must be of high quality, which is why embossing is used.
Its main advantages:
durability - the stamp cannot be washed off or wiped off;- spectacular look - embossing on leatherette and leather looks interesting and expensive;
- the use of additional materials - foil and other materials can give the effect of gold stamping on the skin;
- the ability to apply a print over a large area allows you to cover the entire product with a pattern;
- the owner of a leather product can independently select a design or make a cliché.
Welder's personal mark - how it is assigned, where it is placed
The profession of a welder is not as simple as it seems at first glance. Otherwise, there would be no special certification and qualification tests of knowledge to extend or increase the rank. All this indicates the increased responsibility of the welder before performing labor-intensive and important welds and connections. A mandatory element in this case is the welder’s personal mark.
Why is it necessary?
When welding critical metal structures, next to the welded seam, each certified welder makes an impression with a stamp. This procedure confirms the execution of a specific connection by the person whose stamp numbers are applied to the product.
Production in Russia
Production companies representing EPAL operate throughout Europe, but have not yet mastered the Russian market. The good news is that negotiations are already underway on the location of a European branch, which could produce Euro pallets with the mark . Plus, any third-party company can de jure obtain the right to assemble, but it will have to go through a difficult recognition process. The algorithm of actions is as follows:
- all production data is structured into a report;
- a manufacturer from the Russian Federation contacts the representative office of the European Association and provides data on the production of pallets at its own sites;
- if, based on the results of the inspection, the EPAL commission recognizes that production is carried out in accordance with all requirements and rules (and there are more of them than it might seem, attention is paid to raw materials, technologies, organization of processes, up to the arrangement of smoking areas for employees at a sufficient distance from the timber warehouse), the applicant receives an EPAL license.
This is enough to produce high-quality pallets, but not to receive the EUR mark (if the company produces not in Europe). In addition to the license, for legal work you need to undergo phytosanitary certification (obtain an IPPC certificate). Here the manufacturer will be faced with a new set of requirements for the quality of wood, its processing before assembling pallets, and equipment for disinfection.
As practice shows, it can take years to obtain the necessary permits for labeling. Therefore, only a few are engaged in the production of new Euro pallets with a stamp in the Russian Federation. Most companies sell used pallets after processing (at best).
How to make a tree stamp
by - refers to one of the ancient types of artistic graphics and decorative processing. The origins of hot wood stamping originate in Russian folk art.
- euro pallets or pallets
- lumber and furniture boards
- graphics on souvenirs, on signage, etc.
The modern type of processing is carried out using a special one , on the surface of which an individual design is engraved. The imprint remains on the wooden surface thanks to the work of the burning element, which heats the metal to a certain temperature. For best artistic effect, it must be pre-treated. It is also used for marking, decorating and designing various wood materials. Our company offers you metal ones that will perfectly decorate any type of wooden product.
The price starts from 1,400 rubles and depends on the size, complexity of the design, and the presence/absence of a heater in the kit.
Pikirler • 5
As I understand it, easy paths are not for the author. My easy way would be this: draw what you need on paper, scan it, mirror it and print it on a laser print. Transfer to the workpiece according to LUT and etch in half an hour. So that is all!
@Vit Kh I’m on first-name terms with the computer. But isn’t it expensive to buy a scanner or a printer for one operation if I no longer need it? You would also suggest buying a CNC machine, with a metal cutter, for one operation. But it will engrave in general, with an accuracy of one micron, exactly.
living Wood, no power needed. 6-12 V 0.3-1A is enough
@living Wood Actually, they say that a mobile phone charger is enough. I haven't tried it myself, I don't know. By the way, when I get back from vacation, I’ll have to try making myself a stamp at work. I watched the videos on YouTube and they turned out great. And with an engraver you need perseverance and a steady hand. But you did it, well done. I am also like that by nature. My work colleagues are surprised by my hobbies.
@Vit Kh Fortunately, we have a very close relationship with the computer, but what if we need to do it, but we don’t have a laser printer or scanner at hand. Although I do not deny that etching will give a better result, it does require a fairly powerful power supply.
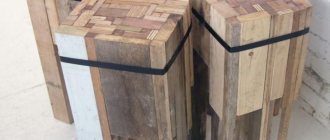
Stilts for decoration with imitation of a human foot
When repairing and finishing, running around with a stool, table or even a stepladder is terribly tiring. Naturally, this applies primarily to ceilings and upper parts of walls. I wanted to simplify this work. The thought of stilts immediately came to mind, but in stores they cost a lot of money, even on Ali, about 6 thousand rubles. As one famous advertisement says: why pay more? After some thought, it was decided to make stilts with our own hands. Moreover, very little material was used. By and large, all this can be made from waste that is found at every construction site. The only exceptions will be corners, screws and belts. But all this took 150 rubles, no more.
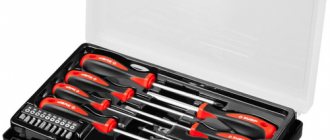
DIY knife
Many professionals do not accept purchased tools and prefer to work with ones they made with their own hands. This makes sense, because every knife, every chisel is perfectly adjusted to the master’s hand. This tool is convenient to use, your hand does not get tired, and it is easy to control the pressure.
This is a reasonable approach. Having experience working with metal and good steel, you can start making a universal Bogorodsk knife for wood carving or a hatchet knife. To do this, you can use a broken blade from a mechanical hacksaw with a thickness of 2 mm. A powerful electric sharpener is sufficient for the tool.
The outline of the blade is transferred to the workpiece and carefully processed along the contour. During operation, the workpiece must be periodically cooled by dipping it in a container of water.
For a person familiar with woodworking, making a handle will not be difficult. An ideal handle can be made from a cast made from plasticine held in your hand. A wooden block of suitable size is marked and clamped in a vice. Using a hacksaw (it is better to use a hacksaw for metal) remove excess. For final finishing, use a rasp and sandpaper.
The handle is placed on the blade. For durability, it is impregnated with linseed oil or coated with several layers of varnish. All that remains is to sharpen the homemade knife and you can get to work.
Whether to make a tool with your own hands or buy a ready-made one is up to the master to decide. Perhaps it’s better to get your hands on a tool from a store, and later, having gained experience, you can make the tool yourself.