Almost all girls love to play with dolls, especially Barbie. For children, such games become the first experience of family life; passions boil in dollhouses, toy people communicate, and everyday situations are played out. Games will not be realistic without an appropriate interior. The furnishings of Barbie's home should be as similar as possible to a real home. If adult women want to have unique things in their wardrobe, then their daughters just need original and beautiful Barbie furniture to be happy. If parents decide to make furniture for Barbie with their own hands and involve their child, then the baby will have an interesting pastime for the evening and new elements for play.
Cardboard bed
We will need:
- corrugated cardboard;
- self-adhesive paper for finishing;
- scissors;
- stationery knife;
- glue;
- fabric for pastel accessories;
- cotton wool;
- metal wire.
Cut out parts from cardboard using a pattern. We bring to your attention several options for patterns:
In order for our bed to be strong and stable, we need to make several such parts, glue them together, and it is also recommended to fasten them with metal wire.
You can leave it in this form, but it is better to cover it with a self-adhesive film of a suitable color, sew a mattress and pillows from the fabric, filling them with cotton wool or any other filler, and don’t forget about pastel linen.
You can also make a bed with soft walls; for this you just need to cover it with synthetic padding and fabric.
A few more decorating ideas are provided in the photo:
This is interesting: Methods for decorating furniture for a dollhouse with your own hands
Origami paper chair
To work, we will need a square sheet of paper (white or colored). When choosing a size, be guided by the required dimensions of the future chair.
Scheme:
To learn how to make an origami chair, we suggest using a video tutorial. Follow MK's step-by-step instructions and the entire manufacturing process will take you no more than 10 minutes.
Video: Master classes on creating an origami chair
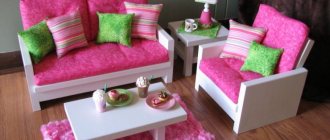
Armchair and sofa
Now we can start making furniture for the living room, because our doll needs somewhere to receive guests.
So, let's start making the chair.
In order to make a similar option, we will need:
- thick cardboard or corrugated cardboard;
- plain paper;
- cardboard thread tube or old felt-tip pen;
- thin foam;
- glue;
- scissors;
- upholstery material (you can use any fabric you like);
- pencil, ruler.
It is necessary to cut out a pattern from plain paper.
To make the seat stable, cut out several identical parts from corrugated cardboard and glue them together. We collect all the parts as shown in the photo.
We need thread tubes for the armrest; they need to be secured with PVA or Moment glue.
In order to close the holes between the seat and the armrest, it is necessary to cut out suitable size strips of cardboard and, gluing them together, place them under the armrest.
That's it, let's start upholstering our chair. To do this, we cover it with thin foam rubber and fabric.
We do the same with removable pillows.
This is the charming chair we came up with:
A few more photo ideas.
As for the sofa, the manufacturing scheme will be approximately the same. You can change the shape and size, but the essence of the assembly will be the same. We bring to your attention several options for inspiration.
In fact, cardboard is a very versatile material for this type of product, and most importantly, it is very flexible, which allows you to create different shapes. Using the same principle, you can create different furniture: chests of drawers, cabinets, tables, coffee tables, kitchen sets, all kinds of bedside tables and much more. Don't stop and create with your children, creating a unique interior for dolls.
For inspiration, we offer several ideas for various furniture with detailed diagrams.
Table and chair:
Wardrobe and chest of drawers:
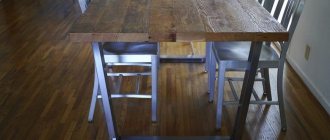
How to make a table for dolls
This stylish doll table is easy to make. You just need a few things and you can put the table together in about half an hour.
Here the author used popsicle sticks, they are easy to work with. What's more, they add a beautiful, stylish look to everything you do! If you want, you can use colored sticks to make the doll table more colorful.
All you need is 16 standard 15cm sticks and a hot glue gun.
Carefully arrange the 8 popsicle sticks, one under the other, so that the shorter edges are in line. Apply hot glue along the line on both sides. Apply glue to the two sticks and press. Your tabletop is ready. Let's move on to the legs. Take two sticks and connect them into the letter “X”. Repeat the same with the other two sticks. Apply a bead of hot glue to one end of the sticks and place the other over it. Flip over and glue another stick matching the first one and place the tip of the "X" in between. Repeat to make the second leg. Apply glue to both sides of the tabletop. Place the leg and press firmly. Repeat the same with the other leg. Your doll table is ready!
Photo source: sewcraftyme.com/diy-doll-table-american-girl-doll-table-diy.html
DIY doll table...from a photo frame
Are you looking for a fun and simple doll table that can be paired with chairs? Here! Transform an inexpensive photo frame into the perfect doll table, complete with a versatile tabletop that you can customize to fit your chairs. You'll need a photo frame with a removable back made of cardboard or chipboard (Tip: Flat frames with a plastic rather than glass panel work best as they are child-safe). PVC pipes with fittings and fabric. All details are on the website.
Photo source: matildajo.com/frametable/
How to determine the size of furniture
A doll is a small copy of a person, so its furniture is the same as ours, only smaller.
To determine the scale you will need:
- meter;
- doll;
- a sample of the furniture you want to make.
Actions:
- We measure your height and the size of the doll.
- Let's find out the parameters of the existing furniture.
- The resulting numbers, for example, 168 and 14, must be correlated; for this we will find the quotient, 14/168 = 0.083. This will be the similarity coefficient of objects.
- We calculate the dimensions of the furniture for the doll; to do this, we multiply the height and width of the object by the resulting figure from the point above.
For a standard Barbie doll, this coefficient can be taken as 0.09.
Taking this into account, the following parameters will be acceptable (dimensions are presented in centimeters):
- single bed - width from 7.5 and length - from 16;
- double - width from 13, and length - also from 16;
- for a chair, the seat height starts from 4;
- the table must be at least 6.5.
Sofa made of newspaper tubes
For the sofa you will need: • approximately 200 blank tubes, about 30 cm long; • clothespins; • side cutter; • colored cardboard; • ruler.
The procedure for making newspaper tubes: 1. The newspaper is cut into pieces of the same width and length. 2. Each layer is coated with glue. 3. As a basis, you can use: a knitting needle, a sewing needle and a ballpoint pen. A strip of newspaper is wound around it. 4. The base is pulled out and the tube is given time to dry.
The process of assembling a sofa: 1. A base is woven from dry tubes - 15 pieces in the transverse direction and 5 in the longitudinal direction. 2. We form a side in 5 rows. 3. We increase the racks, making about 6 legs. 4. We cut off the blanks. 5. Add skewers to the middle posts for strength. 6. We break at a distance of 5 cm, first the first blanks, then the second - also at a distance of 5 cm, secure the racks - glue a clothespin to them. 7. Trim off the excess length of the legs. 8. We insert the racks in the back area. 9. We weave a few more rows - full, then 2 incomplete (shortened). 10. We form the height with strips of cardboard. 11. We weave 3 more rows and close them. 12. Fix the crossbar with cross-sections. 13. Wrap each leg. 14. We decorate the product at our discretion.
https://youtube.com/watch?v=sCyJMJJ7kW0
https://youtube.com/watch?v=sCyJMJJ7kW0
Cabinet made of wooden rulers
Cut and sand the rulers to prevent splinters. Everything was glued with PVA glue. After the product has completely dried, it can be painted. For a beautiful, even color, you need to cover the cabinet first with a layer of white paint, and then with the desired color.
In the same way, you can make tables, chairs, bedside tables and other furniture for dolls.
Materials for making furniture
Creativity is a multifaceted and diverse way of expressing a person’s inner state and there are no boundaries for it in materials. But, despite this, there is such a parameter as the prevalence of the raw materials used.
Plywood
Plywood is a wonderful raw material, but it is also very demanding. When working with it you will need perseverance and precision.
Advantages of plywood products:
- aesthetic appearance;
- durability and practicality;
- safety;
- convenience.
Despite all the advantages of this material, it has a number of disadvantages when working.
Disadvantages of work:
- a long and rather labor-intensive process;
- requires additional specialized tools;
- price;
- Availability - sale only in construction stores.
Cardboard
Children are characterized by spontaneity, so at any moment a child may need a bed or a chair for a doll, and this is where boxes accumulated over the years come in handy.
Cardboard is a good analogue of plywood, although it is inferior to it in durability, since it is easier to damage than wood.
Cardboard products have:
- ease of design;
- availability;
- lack of work skills.
Disadvantages of working with cardboard:
- requires mandatory finishing and decoration;
- poor resistance to external factors, such as water;
- the difficulty of repairing such items.
Matchboxes
“Matches are not toys for children!” - Surely everyone remembers this statement, it can be continued: “but matchboxes are just like toys.”
Working with such material is very simple and requires a minimum of time; this option is well suited for busy parents and young children.
Pros:
- availability;
- speed and ease of operation;
- Opportunity to work with very young children.
Minuses:
- fragility;
- the need for decoration;
- exposure to external factors;
- fire hazard;
- Suitable for small toys only.
Plastic jars
Every day we buy products in plastic packaging, after which we end up with a large amount of seemingly unnecessary garbage, but if we add a little imagination to it, we get a wonderfully furnished room for a child’s favorite toy.
Positive aspects of creativity from plastic:
- cleansing the environment;
- strength and resistance to child actions;
- instilling frugality;
- development of abstract thinking;
- cheapness.
Negative aspects of using such a product:
- flexibility of plastic;
- danger (the child may cut himself);
- fire hazard;
- a labor-intensive decorating process to add aesthetics.
Wire
Wire is, first of all, metal and, accordingly, all its properties will be transferred to the product being manufactured. Choosing this form of creativity will certainly require a lot of effort, but the end result will be pleasant.
Positive aspects of metal attributes of doll life:
- resistance to environmental conditions;
- strength;
- pleasant appearance;
- durability.
Negative characteristics:
- injury hazard;
- labor-intensive manufacturing process;
- the need to use special devices or male power;
- high cost.
Egg tablets
Few people can come up with a secondary use for egg containers, but in the age of the Internet, they can also be used, for example, making furniture for their toys with children.
Pros:
- development of fantasy;
- simple manufacturing process;
- saving;
- development of thrift for objects and nature in a child.
Minuses:
- mandatory decoration;
- short service life;
- not suitable for large dolls.
This is interesting: Types of stickers for kindergarten lockers, tips for choosing
Table
Do-it-yourself furniture for dolls cannot exist without such a necessary item as a table. It’s even easier to make than a kitchen or a bed. There are many options for drawings, photos, and diagrams for creating them. You can use ready-made ones, or you can just think and decide how to make a furniture table for dolls out of a box with your own hands from what you have on hand.
For example, this miniature table. To create it you need to prepare: • a plastic bottle; • a scrap of fabric; • cardboard sheet; • scissors and glue.
Step-by-step instructions: 1. Cut out 4 table supports from the bottle. For greater stability, bend the legs when cutting. 2. Next, cut out a circle from cardboard; it will serve as a tabletop. Glue it to the bottom of the bottle. 3. From a scrap of fabric prepared in advance, a tablecloth is cut out in the form of a circle, with a diameter slightly larger than the tabletop. 4. The table is covered with a tablecloth. For ease of use, we glue the ends to the supports. It’s also easy and quick to build a dining table from plywood. A diagram of do-it-yourself furniture for dolls made of cardboard and plywood is attached.
Doll bookcase or shelf made of rulers
You can make furniture for dolls with your own hands from school wooden rulers. They are good because they are already processed and have the same width and thickness. In the stationery store you can find the right size - larger/smaller, wider/narrower - as desired. For example, to make a doll bookcase you need 6 rulers 15 cm long.
Making a toy bookshelf from wooden rulers is easy.
You will also need a jigsaw for the job. If you have an electric one, great; if not, a manual one will do, since there’s not too much work. You also need fine-grain sandpaper, glue (PVA or wood glue) and paints (acrylic or gouache).
We cut segments from the rulers: 4 pieces of 6 cm, one - 8 cm. Sand the edges until smooth, and also remove the markings and barcodes. Between the two rulers we place the shelves (which are 6 cm each), on top we leave approximately the same distance - under the lid (a segment of 8 cm). We coat the joints with PVA or carpentry glue, connect them and tighten them with masking tape, and leave them for a day. When the glue dries, glue on the very last part - the lid on top. Actually, the shelf itself is ready, all that remains is to paint it.
You can use rulers to make other pieces of furniture for dolls.
To obtain an even and bright color, it is better to cover the structure with white, and after drying, paint it with the desired shade. You can also decorate doll furniture made by yourself using the decoupage technique.
hands for dolls with your own hands
Moms Many who want to give a surprise to their daughters are interested in the question: “ How to sew doll clothes
?. Everything is quite simple, if you are familiar with the basics of sewing.
Firstly, you need to stock up on the following set of tools: scissors, decorative needles, threads, measuring tape, sewing overlock machine.
Secondly, you should choose fabrics for the Child. It will be much easier to put on the accessories and remove things from the dolls if they are fastened with Velcro. Therefore, third parties should be prepared in advance.
B - Velcro, before making clothes for dolls
, you should take measurements. To do this, you need to use a measuring tape to measure the circumference of your chest, waist, hips, length of the product, armpits from the distance to the waist line. Measurements are taken with tension without tape. To the resulting dimensions on each side, add 0.3 cm for allowances.
If you are interested in making things for dolls or Barbie-like toys with “model appearance,” then it’s quite simple, let’s look at the example of Dress. The dress will consist of 2 parts: bodice and both. skirt parts are made in the form of rectangles, the edges of which need to be processed with an overlocker. After this we do a fitting. In front we pin the chest with needles from the line to the waist. We adjust the bottom to the waist line. After this, we hem the parts and secure them with Velcro. The straps are made in the same way. You can decorate the Dress with rhinestones, sequins, and complement the Items.
Do-it-yourself accessories for dolls are very quick and quite simple, you just need to show imagination and ingenuity. When making them, you can experiment with materials, textures and fittings.
Selection of materials
Most often, furniture for Barbie's house is made of plywood or cardboard. The first material produces durable, strong, solid products, but working with it requires perseverance and time. In addition, special tools are needed.
But cardboard is almost always at hand; even a child can easily handle it. It is not as strong, but if you glue several layers together, you can create a durable table or chair. However, cardboard is inferior to plywood in aesthetics - if it is not decorated, the furniture will look dull and unattractive. What else might be suitable for making dollhouse furnishings:
- Matchboxes need decoration. Otherwise, they are very convenient, especially if you need a chest of drawers, a cabinet or other storage product.
- Plastic jars are also useful for educational purposes. Using their example, you can explain to your child the importance of caring for the environment and reusing raw materials. However, plastic requires a lot of attention - it is important to process all the edges as carefully as possible so that the baby does not cut himself.
- Wire is most often used for making accessories, but it can also be used to make furniture in general.
- Boxes - juice boxes, shoe boxes, egg boxes, any other boxes. They are usually easy to work with, as long as you glue enough layers together for strength.
If you don’t have anything at hand, and you need furniture urgently, you can make it out of paper (if you have colored paper, you won’t have to think about the decor). Of course, it makes fragile products, but this material is the easiest to work with. In addition, if you get tired of paper furniture, you can easily replace it with new one.
Plasticine or polymer clay can be used as an auxiliary material; interesting decorative elements can be made from them.
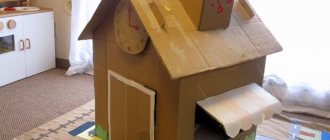
Cardboard box furniture
From one TV box you can make all the furniture in the house. To create it you will need:
- The box itself.
- Double sided tape.
- Scissors.
- Regular wide tape.
- Glue gun or PVA glue.
- Materials for decoration.
All furniture must be cut out, cut into the necessary parts and glued together.
Next begins the most interesting process - finishing. Cardboard can be painted, covered with wallpaper or paper . to the front of a cabinet or dressing table, imitating a mirror. You need to put a tablecloth on the table, and pillows on the sofa - this will add coziness.
Be sure to involve the child himself in the decorating process. This is a great opportunity to feel like an interior designer and show creative thinking. Anything can be used: small stones, shells, beads, rhinestones, stickers.
What available tools and materials may be useful?
To create doll furniture and decorate the interior of a toy house, the following will be useful:
- matchboxes - they will become drawers of chests of drawers, desks, dressing tables, cabinets, chests of drawers for linen;
- cigarette packs – suitable for equipping Barbie’s dressing room and storing her boots;
- shoe boxes - these will make beds, tables, cabinets for large dolls;
- boxes of baby cereal, perfume, and other cosmetics;
- colored plastic bottles, yogurt cups;
- soft foam sponges, viscose napkins;
- pieces of plywood, fiberboard, wood cuts, boards;
- scraps of fabric, leather, gauze;
- plastic “eggs” from Kinder surprises;
- remnants of wire, chains, foil;
- sewing, knitting threads, laces;
- metal tin cans;
- paper, cardboard, wallpaper, PVA glue;
- tape, colored self-adhesive film;
- polystyrene foam, plasticine, polymer clay;
- gouache, acrylic, nail polish;
- beads, buttons, LED lights.
With minimal skills in wood carving, sewing by hand or on a machine, embroidery, it is easy to create incredible doll crafts.
Decoration
Decor is the final stage of furniture manufacturing; it is the most important. It determines how much the child will like the furniture and how it will fit into the design of the doll’s home. When decorating products, you can use any available materials that are available in the house.
The main rules for decorating furniture for Barbie:
- Maintain a consistent style throughout the entire furniture set.
- Do not use flammable materials.
- When choosing a decoration method, pay attention to the hypoallergenicity and durability of materials.
- It is dangerous for a child under 5 years old to use small parts, such as beads.
- Take a responsible approach to securing decorative parts so that the child can enjoy playing for a long time without worrying about the safety of the furniture.
We decorate non-standard furniture
After the furniture is assembled, you can move on to the decorating stage. There is no need to limit yourself here, and there can be a huge number of options. Starting from simple ones, among which we can highlight pasting with colored paper, to unusual decoration options, where we can mention painting with varnish and much more.
You can decorate assembled furniture using various techniques. Are you good at drawing? Don't deny yourself the pleasure of creating your own creation. Paint the surface some base color, and when this layer dries, apply a pattern or color image to it.
It can also be decoupage. Use multi-layer napkins with suitable patterns. A thin thread glued in several folds will look interesting.
Dimensions
Furniture dimensions are determined in two ways. If you plan to furnish a house for a standard Barbie, you should use the proportions of 1:6 (reduce the parameters of ordinary cabinets, chests of drawers, beds and other products by 6 times). You can go a more complex and precise way:
- Measure the height of the doll and yours.
- Find out the similarity coefficient - the relationship between the obtained indicators.
- Measure the dimensions of the furniture in the house.
- Calculate them for the dollhouse by multiplying the similarity coefficient by the parameters from the previous paragraph.
Purpose of pictures on lockers for kindergarten, requirements for them
Based on the 1:6 proportions, the standard furniture height is:
- Table - from 13 cm (the dining table will be the same height, but may have a round shape).
- Chair - from 8 cm.
- Wardrobe - from 33 cm.
- Chest of drawers - from 11 cm.
Bed width - from 15 cm, length - from 32 cm. In addition to Barbie girls, dolls can be men, children or babies. Their traditional height:
- men - 15 cm;
- children - 7.5–10 cm;
- infants - 6.5–7.5 cm
To avoid confusion with measurements, you can look at the parameters of factory products.
Product classification
Furniture for dolls is produced in a wide range, you can always choose an option for any budget and for children of all age categories. The main thing is to pay attention to the quality of the materials that were used in its manufacture, to assess the degree of safety of the structures for children's health. Toys should be smooth, without sharp corners or unpleasant odors. If the child has not yet reached 5 years of age, it is necessary to exclude the presence of small parts. Practicality and functionality of products are important.
The certificate of conformity provided by the seller is a guarantee of the proper quality and safety of doll furniture.
By accuracy
Despite the same purpose, furniture can differ dramatically in appearance. There are products made from solid plastic, the general outlines of which only vaguely resemble real beds. Another thing is a miniature doll crib that exactly replicates the details of real furniture. It may have wooden sides, a decorated headboard, slats, a soft mattress, and a bed. Older children prefer these smaller copies.
Doll miniatures are usually made by hand, which naturally affects the cost. If the baby is only 3-4 years old, or even younger, it makes no sense to spend money on such toys. At this age, the child will not be able to evaluate the accuracy of the imitation of the product and will quickly break it.
To size
The most common scale for toy furniture is 1:12. This value is observed in the manufacture of collectible items, suitable for many types of mini-dolls, no more than 15 cm in height. The dimensions of the main interior items will be: wardrobe - no less than 16.5 cm, chair height with back - 7.5 cm, its seats are 4 cm, the table is 6.5 cm, the dimensions of the bed are 16 x 7.5 cm. For larger dolls, other values are provided:
- For Barbie, 29–30 cm tall, furniture in a scale of 1:6 is suitable. That is, instead of a standard 16.5 cm cabinet, a design with a height of at least 33 cm is ideal.
- For BABY BORN, whose height reaches 50 cm, a table with a height of 19–20 cm and a bed of 52 x 25 cm are optimal.
- Furniture for large dolls is selected individually.
In order not to be mistaken with the dimensions, you need to divide the average height of a person (170 cm) by the length of the doll, and then use the resulting scale. Furniture that is too large will look just as unnatural as furniture that is too small. This nuance should not be neglected.
By type of furniture
Doll furniture is not much different from ordinary furniture. You can furnish the home of any toy with the following items:
- A bed with beautiful bed linen and bedspread.
- Bedside table, chest of drawers with or without drawers.
- A couch, a sofa, a sofa.
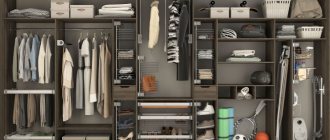
- A solid or hinged wardrobe with all kinds of decorative elements.
- Table, chairs, both for the kitchen and for the office.
Ready-made furniture sets for dolls can also include ottomans, armchairs, dressing tables, and shelving. The set of kitchen products usually includes a buffet, stands for dishes, and for baby dolls there are playpens and changing tables.
Toy furniture can be solid, collapsible, soft, cabinet, individual, serial. It is divided into many types according to operational purpose (for the bath, bedroom, dining room), and functionality (for sitting, lying, storing things).
By material
The reliability and durability of doll furniture sets directly depend on the quality of the materials from which they are made. Experienced craftsmen usually use:
- plywood or natural wood;
- plastic;
- metal;
- polymer clay.
You can also create beautiful furniture for dolls from scrap materials. In this case, cardboard, paper, newspapers, and plastic bottles are used. It is not necessary to be a highly qualified specialist to make a bed for a baby doll, but it is worth considering that homemade furniture will not fit into an expensive high-quality doll house.
Distinctive characteristics of different types of cabinets for children's rooms, their sizes Plywood Natural wood
Plastic Metal
Polymer clay Cardboard Newspapers Plastic bottles
Required tools and materials
The basic set of necessary tools includes:
- stationery items (scissors, glue, ruler, pencils);
- napkins;
- cardboard;
- oilcloth;
- threads with needles.
The complete list depends on what kind of furniture you plan to make. Most items are easy to make from cardboard. But if you want the light to come on in the refrigerator when you open it, a blowtorch and LEDs with wires will come in handy. For upholstered furniture you will need to stock up on fabrics and filling.
The set of necessary materials also depends on who makes the furniture. If this is joint creativity with a child, it is better to start with basic things that are feasible for his age. And if you want to make a surprise and give a house furnished to the smallest detail, both special tools and any available material will be useful: a plane, a jigsaw, an awl, foil, fabric scraps, even ice cream sticks.
Children especially like furniture that replicates items in a real home. You can find identical fabrics and colors, make similar furnishings and decor.
Master class on sculpting Monster High from polymer clay:
1. First you need to draw a sketch of the keychain. There are a lot of logos and emblems with the image of the Hi monster on the Internet, so it won’t be difficult for you to print out the finished drawing or redraw the image on a sheet of paper. You choose the size of the sketch yourself, based on the personal wishes of the child and his age. Cut out the drawn or printed design with scissors. Photo 2.
2. White polymer clay must be rolled out either using a pasta machine at its maximum thickness and folding a layer of clay into two layers, or using a rolling pin, but then make sure that the width of the layer is at least 7 mm. Photo 3.
3. Without removing the paper sketch from the surface of the plastic, use a blade to carefully cut out the figure along the contours of the sketch. Photo 4.
4. We put on disposable gloves and smooth out all the bumps and sharp corners. When working with white clay, wet wipes are necessary, since white plastic collects a lot of lint and fine dust, and by wiping the surface of the layer with wipes, you will remove all these specks without problems. Photo 5.
5. We make the decor of the bow - roll out raspberry-colored plastic on the thinnest setting of the pasta machine and carefully wrap it around the bow. In this case, we press the crimson plastic only in the upper part of the bow, carefully fixing it in each hollow. The layer that falls on the front side of the keychain - do not press it! Photo 6.
6. On the back side of the accessory, excess crimson plastic should be cut off with a blade or a stationery knife. Photo 7.
7. Place the paper sketch on the workpiece again and carefully press the outline of the lower edge of the bow with the point of a needle. Remove the paper design and carefully use a blade to cut out the bottom edge of the bow along the pressed contour. Photo 8, 9.
8. Take a modeling elastic stack and trim the bottom edges of the bow with it so that they become rounded and give the bow volume. Photo 10.
9. Use the sharp part of a needle or toothpick to separate the middle of the bow and press small grooves from the middle in the center of each half of the bow. Photo 11.
10. Form the eyes. Roll out black plastic to a minimum thickness and place a paper sketch on its surface. Use the point of a needle to push through the eye sockets. Photo 12.
11. Remove the paper sketch from the layer and use a scalpel to cut out the eye sockets according to the pressed contours, not forgetting about the two small eyelashes on the outer sides of the eyes. Photo 13.
12. Place the eyes on the surface of the blank keychain and use a modeling stack with a soft spatula to round all the sides of the eye sockets. Photo 14.
13. Roll a small ball out of black plastic and press it with your finger to make it flat (its diameter should not exceed 4 mm). Photo 15.
14. Place the flattened ball under the eye sockets and press it down lightly for better adhesion to the bottom layer of clay. Place the keychain blank in the oven for firing. Photo 16.
Other furniture contents
A photo of do-it-yourself furniture for dolls will help you decide on those interior items that your daughter needs for her ideal house.
A sofa made from small kitchen sponges, a kitchen wall made from cardboard blocks, a sink made from the bottom of a plastic cup or miniature plate, a faucet made from a plastic straw, etc. can serve as a complement to the decor.
Household appliances:
- Microwave – sharpener, with a removable lid;
- Refrigerator – tea box;
- TV – a matchbox with a picture pasted on;
- A floor lamp or lamp - a tube and an old wooden spool of thread.
The variety of ideas is huge, the main thing is desire, and the materials will be found on your own. Encourage your little housewife to create furniture, then these items will be filled not only with new creative thoughts, but also with great love.
Tips for planning and filling a house
Most dollhouses have the following rooms:
- living room;
- bathroom;
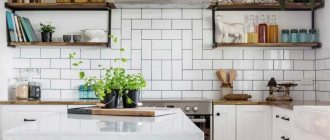
- kitchen;
- bedroom;
- children's room.
In order for the rooms not to look empty, they need to be filled with basic interior items. If necessary, rooms are complemented with small decorative elements - mirrors, curtains, pillows, flower pots. A sofa, one or more bedside tables, armchairs, a miniature coffee table and a TV must be installed in the living room; lamps are also often installed.
The kitchen must have a set, stove, refrigerator, dining table and several chairs. The bedroom is equipped with a bed, a wardrobe, bedside tables, and a large mirror for dolls. The bathroom requires a toilet, sink, mirror, and shower. The filling of a children's room depends on the age of the baby doll. Typically, such a room contains a cradle or a miniature bed, toys, chairs and a desk.
Living room
Bathroom
KitchenBedroomChildren's room
Decorating ideas
Like an ordinary house, a dollhouse can be decorated endlessly - adding new details, updating dishes or textiles, moving furniture. Moreover, accessories are easy to create from scrap materials:
- Pillows are stuffed with padding polyester, just like upholstered furniture.
- Buttons are useful not only for the handles of chests of drawers or bedside tables, but also for decorating pillowcases, blankets, and other textiles.
- Plastic corks can be used to make ottomans, and wine corks can be used under tables and armchairs.
- Straws and toothpicks are suitable for slats - both frame and external, and they also make a good base for floor lamps.
- Fabrics add the most comfort. You can change bedding, update curtains for the season, or even recreate different styles, from country to classic.
- Wallpaper can also be made from scraps of fabric or pasted over the walls with decorative tape (the size of the pattern on it is more suitable in proportion to a doll's house).
- Foil will make a mirror in a dressing table or closet.
- You can even use chocolate egg containers or shoe covers - they make great pans and pots.
When choosing decor material, you need to take into account the age of the child. For example, beads, like any other small parts, should only be used with children over 5 years old. Paints must be safe, as well as varnish.
Despite the huge range of products for dolls, hand-made items still remain unrivaled. Accessories and furniture made of cardboard, plywood or plain paper help develop a child’s imagination; they have more warmth than factory-made ones. In addition, it is not necessary to settle on complex models - assembling a chest of drawers from matchboxes will take no more than half an hour (including drying), and an ottoman made from cork, despite its simplicity, will look better than a factory one.
Variety of wardrobes for children's rooms, reasons for their popularity
However, if you wish, you can take advantage of master classes for professionals - they tell in detail how to make furniture for Barbie that looks like it came out of a designer’s workshop. Everything goes into use, from used plastic containers to specialized tools. A little effort - and the decor of the house will be the envy of any furniture department of designer toys. Such items will be completely exclusive, which will also delight children.
How to arrange a dollhouse
Several sets of different furniture for Barbie will help to combine roomboxes made of plywood and wood (fragments of a house, separate rooms) with windows, panoramic glazing, homemade or purchased. When choosing, you need to give preference to miniatures of the same style. The connecting link between rooms on different floors are stairs - steps, handrails, railings also need to be designed in accordance with the general situation. The shape and material of the furniture sets must correspond to the chosen style. The discrepancy between decorative elements will be immediately noticeable, especially when recreating ancient decoration. It is necessary to avoid dissonance when decorating walls and upholstery.
Roomboxes (translated as “room in a box”) were invented as an economical option for a doll house. They are popular with both children and adults due to the ability to create any interior in miniature, showing design skills and imagination. You can often see rooms in different styles, princess bedrooms, children's bedrooms and so on.
For the finishing touch, you can add lighting - chandeliers and sconces make the house attractive for play. It is advisable to hang curtains and choose textiles that suit the interior. The front transparent protective wall will protect the room from dust. It is undesirable to choose a ready-made house with a facade and roof from a 1:12 doll miniature; the height of the doorways here is only 19 cm, which is only suitable for playing Snow White visiting the dwarves, despite the furniture and interior furnishings suitable for Barbie.
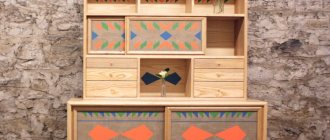
Dresser or dressing table
It is very convenient to cut from a small box, where the cabinet is about 7 cm, the wall for the mirror is 16 cm, the width is 8 cm. Connect everything by gluing foil as a mirror and handles with beads. Decorate according to your desire and imagination.
Another simplified version of a chest of drawers is glued matchboxes. All children will like it because it has drawers.
It is enough to glue the boxes tightly to each other, or you can additionally attach a cardboard frame. Cover with wallpaper, napkins or other decor.
Furniture for dolls made from matchboxes
This is just a godsend for creating a dollhouse environment. You can create a huge number of pieces of furniture from them:
Chest of drawers, bedside table. You just need to glue the boxes together and decorate them with gift paper or simply paint them with paint. Beads can become handles. To understand how to make a bedside table for dolls, you need to look at a real bedside table and make an exact copy of it from boxes. You can decorate it using paints or wrapping paper.- Table. In the same way you can create a desk, coffee table or dressing table. It can be with or without drawers. The connected boxes need to be sealed with self-adhesive tape or painted. You can decorate them using decoupage technique. The mirror on your dressing table can be a piece of foil or a DVD.
- Sofa. Glued matchboxes can be covered with soft fabric to create a sofa.
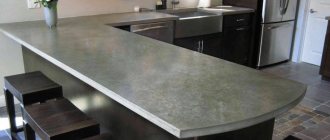
- Kitchen set. Glued matchbox blocks make a great work surface for a kitchen with lots of drawers.