home furnishings
Complex paintings made of wood are aerobatics. Wood's best friend is epoxy resin. Although you will need a lot of it, it is worth it.
Create an unusual pattern from small logs and fill it with resin. An interesting option would be to install a small colored light bulb inside before the resin hardens. You will be surprised when you see the result. Products combined with epoxy resin get a classy look and attract attention.
It is very easy to make toys for the New Year's holiday from wood. Saw various figures and glue photographs to them.
All this will add creativity to a cozy environment. Real craftsmen have bookends, try it, maybe you have talent too?
What equipment will you need?
In the case of serial or mass production of wooden utensils, you will need a carpentry workshop with a large number of machines that will help in performing procurement operations.
- But for the process of wood carving and other manual operations, you can get by with a small set of tools. Here is the required minimum:
- A set of saws - hacksaws should be of different sizes and with distinguishable tooth sizes;
- Chisels – it is desirable to have several chisels, both with a flat working part and with a figured one, there are 12 types in total;
- Cutters – for high-quality wood carving you need to have several cutters that differ in size and shape of the cutting element;
- Planer – ideally there should also be several of them;
- Jigsaw.
Although simpler wood products such as an olive wood cutting board can be made using half of the tools listed.
That's all that can be useful, because in ancient times there were masters who carved dishes from wood, having 1-2 tools, but their works were considered masterpieces. Today such craftsmen can also be found.
Benefits of working with wood
It is worth mentioning how exactly wood differs from other available materials:
- Wood of various species has a soft, but quite durable structure. The internal base lends itself perfectly to a variety of processing techniques: firing, cutting, sawing.
- For optimal work, no special skills or abilities are required; the master only needs to be able to handle certain sets of tools.
- Wood, even without decorative finishing, gives finished products an excellent natural shade.
- A large collection of ready-made projects and a wide range of products available for work.
Craftsmen today have free access to detailed instructions, video tutorials on how to carry out creative work, diagrams and interesting drawings. You can familiarize yourself with any of them on web resources for practical design, creativity and landscape design.
Advantages and disadvantages
Decor made from slats has the following advantages:
- environmental cleanliness;
- ample opportunities for designers to create various compositions that differ in color and size;
- repairability of the slatted coating: the ability to eliminate defects on the surface, restore color, replace individual elements, etc.;
- the ability to change the appearance by external processing (painting);
- versatility, possibility of use in premises for various purposes;
- increased feeling of coziness and comfort.
- affordable price;
- ease of installation;
- masking all wall defects;
Decor made from wooden slats also has certain disadvantages:
- cladding with lathing reduces the total area of the room;
- the flammability of wood, which increases the fire hazard of the entire room;
- insufficient durability of some types of wood.
To decide on the use of wooden slats, you should carefully analyze the pros and cons of such cladding, taking into account specific conditions.
Features of working with the material
Wood, like any other natural material, is susceptible to various damaging factors. Excessive humidity, scorching rays of the sun, pests and fungi can quickly destroy the structure of the wood surface, leading to rot and cracks. As a result, appearance, shape, and size are lost.
Such a craft can no longer fully fulfill its aesthetic or practical functions. To avoid such problems, a number of features should be observed when working with the material:
- Before starting creative work, the prepared material is carefully inspected for cracks, sharp chips, nicks, pest passages and fungus.
- Sharp edges are cut down and sanded with sandpaper.
- Absolutely all wooden surfaces must be subjected to high-quality impregnation with an antiseptic, antipyretic, moisture-resistant and antifungal compounds. This approach allows you to significantly increase the possible service life of a decorative product.
- An additional protective layer can be created by applying stain and then transparent acrylic varnish. In addition, this technique gives the wooden surface a pleasant glossy shine and stylish appearance.
To fasten the prepared parts, both strong glue and self-tapping screws, metal corners, and nails are used. It is important to ensure that when working along the outer contour there are no protruding sharp edges that can lead to injury (especially for children).
Features of wooden utensils
No material can be compared with wood. Skeptics may argue that these are relics of the past. But a number of advantages of wooden utensils say the opposite.
Advantages
The benefits include:
- Impact resistance. Does not break like ceramics or glass.
- It has no sharp corners or edges and does not cause wounds while eating.
- Does not absorb food odors.
- Gives off a pleasant smell. The aromas of pine drown out everything else.
- When exposed to high temperatures, the material does not release toxic chemical elements.
- Retains heat and food stays hot for a long time. A good help for metal thermoses.
- Convenient to carry. The birch bark cup does not heat up from the hot contents and does not burn your hands.
- Has an aesthetically attractive appearance.
- Economical in terms of cleaning.
It is strictly prohibited to place in the dishwasher. Also, do not wash with chemical detergents.
On the other hand, it is enough to spend money on alcohol, vodka or vinegar (mix with water) and disinfect it once a month. As for daily washing, the best remedy is also natural - water.
Flaws
However, there are a number of minor drawbacks. They are related to operation and care rules.
What disadvantages should you pay attention to?
- Over time it starts to get dark. Hydrogen peroxide and water will correct the situation. First, treat with a cloth moistened with hydrogen peroxide. Then rinse with water.
- Doesn't like humidity. When exposed to moisture, cracks appear. To avoid such effects, it is wiped daily with vegetable oil. And wipe dry with a towel after washing.
- Cutting boards, for example, can become warped. Sanding will help restore the surface smoothness.
What can be used for wood crafts
Almost all known species can be used as a starting material for making cool wood crafts. The forms of wood material that are at hand in everyday life can also be different:
- Beautiful stumps in good condition, cut from garden plots and kept well in a dry place, can become the basis for the manufacture of a unique piece of country furniture.
- Solid wood in the form of bars, which are used to build houses or utility rooms on sites, can be suitable for carvings that decorate the facade of a building or the interior.
- Crafts made from wood cuts of various thicknesses and diameters are a material for solving many technical and decorative problems.
- Boards, as well as their small waste, can become a tempting basis for the imagination of a person endowed with artistic imagination.
- Scrap plywood often lies unused in many thrifty homeowners' pantries, and many useful items can be made from it.
- The whimsical natural shapes of branches and snags found during a walk in the forest or park will be good material for realizing creative ideas.
- Finishing veneer always remains in the form of scraps after working with furniture. Don’t rush to throw away the leftovers, as you can make interesting crafts out of them.
To make all kinds of wood products, various blanks can be useful, such as pallets, slats, cut pieces of bars or branches, beautiful tree roots.
Frame of branches
The smaller the workpiece, the easier it is to make. On the other hand, the level of difficulty is influenced by originality. The frame of branches is proof of this. Its creation occurs in stages:
- First, four branches with a diameter of about 10 mm are cut or sawn;
- Next, the branches are adjusted to the dimensions of the future frame;
- The next step is to attach the sticks to each other so that their edges protrude outward (felt rope is used to wrap the sticks crosswise);
- Next, a paper, fabric or leather base with an image is attached to the frame.
The plot is secured using glue or staples. The frame remains to be supplemented with a rope for hanging.
Which tree to choose for work
For independent work, you can use a variety of forms of wood:
- Solid wood in the form of timber. Similar material is used for arranging baths and saunas. But for craftsmen, the bars are a valuable basis for creative pursuits.
- Beautiful stumps. A real stump with preserved bark and intact inner pulp is a real boon for DIY work.
- Wood cuts. Crafts made from wood cuts can also be used to decorate children's playgrounds, decorative decoration of a summer cottage, apartment and private property.
- Branches and driftwood. An excellent material that allows you to give your crafts the most realistic shape and decor.
- Veneer. A finishing material used for decorative pasting of a number of surfaces. After repairs, you should not dispose of the remaining parts - they can be successfully used for creative activities.
- Plywood. Pressed sawdust can also be conditionally classified as wood for making crafts at home. In addition, plywood sheets will undoubtedly be found in the household of any zealous owner.
- Crafts made from boards can decorate your home or children's playhouse.
For independent work, you can use small blocks, wooden pallets, slats and many other forms of wood blanks. Crafts made from tree roots in a wide variety of variations have a special style and original decor.
Textile elements
It is difficult to imagine a kitchen without textile decoration. Of course, hand-embroidered tablecloths are very rare in modern conditions: most housewives are accustomed to spending their free time on more interesting things than constant washing.
But curtains, potholders, and towels still remain unchanged attributes of the kitchen. And openwork crocheted crafts with patterns for the kitchen can decorate tables no worse than store-bought napkins.
Curtains
You should not decorate the kitchen with curtains with complex folds. And simple curtains can be made with your own hands using completely simple operations. The following will look nice:
- simple classic curtains consisting of two panels of fabric;
- unusual cafe curtains;
- Japanese canvas with weights at the bottom.
To make such window decorations, complex manipulations with fabric will not be required, so any housewife can make them.
Potholders
To make potholders you will need:
- a piece of dense material or separate shreds, which are stitched into a single fabric in the most amusing way;
- a piece of filler that protects your hands from heat;
- strong threads.
The simplest DIY fabric crafts for the kitchen can be made in the form of a simple rectangle or circle, while skilled craftswomen can make more complex mittens and houses.
You can supplement the potholders with dolls for the teapot, covers for chairs and stools.
If you choose the material to match the curtains, you will get a very harmonious and complete kitchen.
Carpet
The floor of a spacious kitchen can be decorated with a rug. You can make it from old T-shirts, twine or scraps of fabric. But it is worth considering that the kitchen is a rather difficult place for any rug to survive.
Temperature changes and high humidity will not be the best conditions for coating, and crumbs and untidy drops of water will collect on the surface.
How to choose the right material
Instructions on how to create crafts from wood.
The appearance of the craft depends on the quality of the harvested branches. What is important is the color, appearance, and the absence of visible defects and damage.
The main thing to pay attention to:
- no resin;
- For some crafts, good flexibility of branches or twigs is important;
- We discard parts of the tree damaged by plant pests; they are not suitable.
To maintain the environmental friendliness of the area and not harm the trees, it is better to collect fallen branches or use branches after pruning trees.
Useful tips
- Do not work with wood that has just been brought in from the cold. It should “rest” for at least a day.
- If you don't have a screwdriver, make holes with a diameter half as large as the screws themselves. Screwing them in by hand will be much easier.
Examples of original objects and decorations made of wood, wood materials in a large selection of photographs.
OLYMPUS DIGITAL CAMERA
Let's discuss this article together:
Click to cancel reply.
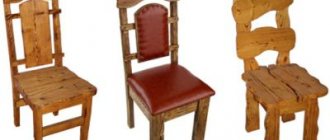
DIY wood products
Furniture
From time immemorial, carpentry has been a man's domain. Simple items for the home or wood crafts for the garden can be made without any special skills. The main thing is to stock up on the necessary tools, materials, and a little bit of enthusiasm, and you will succeed.
Decorative driftwood
There are a huge number of ideas on how to make a stylish piece of decor from ordinary driftwood. Various versions of them often appear on the Internet among photos of wood crafts.
If you place small pots with soil in a hollow snag, disguise them with moss, a stand on which the snag will be placed, decorate with beautiful small pebbles and dry blades of grass, you will get a real mini flowerbed. It will be even more beautiful if the potted plants bloom.
Candlestick
Make a wooden craft with your own hands in just 5 minutes? Easily!
Prepare 2-3 dozen straight branches of the same length. If desired, paint them with any paint, or leave them as is, in their natural form.
Degrease a pot-bellied, short glass. Starting from the bottom, glue the blanks vertically in a checkerboard pattern. Leave to dry.
Bird feeders
There are many ideas on how to make this product for birds. The most original option are feeders made of wood. Its natural scents will complement the noble idea, which aims to help birds feed themselves in the winter season. The feeder has a harmonious image with tree branches.
Games
You can make a board from a piece of wood as a base for playing tic-tac-toe. The smallest parts of this game are also made from wooden cuts. A flat wooden canvas is drawn into squares.
In small wooden circles you should draw circle shapes and crosses. Other well-known games are chess, checkers, and so on. Photos of DIY wood crafts will help you when working with the technique.
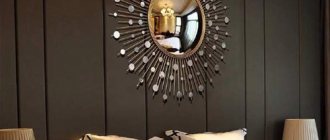
Frame
Easy wood crafts.
Note!
A decorative frame made of twigs for a photo frame or mirror will perfectly highlight the style of the room.
Several decorative elements made from other materials - pearls, decorative stones, twine, colored glass beads located among the branches - will highlight the beauty and naturalness of the tree.
Slingshots for aesthetes
Slingshots can create enormous scope for creativity. Some craftsmen follow the path of creating toy slingshots, for example, making them in the form of colored pencils, while others strive to turn the slingshot into a presentable souvenir. If the former are made for petty pranks, then the latter are for “satisfying the sense of beauty.”
An example of the latter is a hickory slingshot called the BCX, which was clearly designed with not just little boys in mind, but their dads as well. Polished coating, unusual shape, comfortable grip - even holding such a weapon in your hands is already pleasant, let alone shooting. In addition, there is no need to hurt someone - the slingshot comes with a target, which seems to imply that you only need to shoot at it.
Shelf
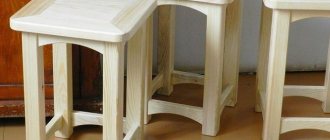
Make a shelf even lighter than a stool. Cut a piece of the required length and width from a solid piece of wood, sand it and open it with varnish or paint. Let it dry.
If the shelf turned out well, you can watch a video master class on creating crafts from wood and try to make more complex structures.
Flowers made of wood
Wood is one of the easy-to-work materials for home crafts. Since ancient times, craftsmen have covered furniture, frames, and household utensils with floral patterns.
Some turned out to be more skillful in conveying the natural beauty of a rose or cornflower in a wooden craft, while others stylized simpler and more unified images.
But every attempt to cut a whole flower from a wooden blank leaves interesting results. Each master creates his own technology for creating a flower from wood.
You can see photographs of complex roses, which, like living ones, decorate mirror frames or crowns of furniture sets. There are works assembled by analogy with a construction set, from individual parts, petals, branches for the trunk.
For these purposes, shavings and veneer are used, which, after gluing in a certain order, can be painted in different colors and coated with a protective varnish.
Crafts for the garden
A variety of wooden crafts for the dacha will perfectly complement the exterior of the site.
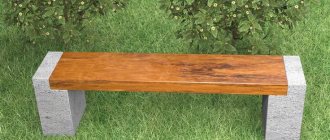
- The simplest option for using wood would be an ordinary bench.
- For this, two thick logs are useful, on which a thick board is fixed.
- The simplest bench is ready.
More experienced craftsmen can add a backrest and armrests or decorate it with carved columns.
- A table and stools made of thick stumps will look cozy, and children will certainly love a treadmill made of wooden posts. They just need to be dug deeper into the ground or installed on a concrete pad.
- An unusual path made from saw cuts will decorate any area. You can create it in the most ordinary way or decorate the lawn with it, laying out wooden circles at some distance from each other.
A wooden bridge installed over a low flower border or over a dry stream, a cart with bicycle wheels, a decorative well made of small logs, a house for a gnome or a mill will look elegant.
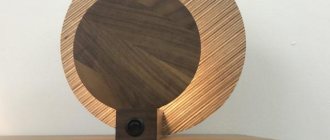
Watch
Drill a medium-sized round cut in the middle. Sand and varnish. After the workpiece has completely dried, attach the clock mechanism to it. Paint the dial with acrylic paint. That's all. The clock is ready.
As you can see, the craft is very simple to perform. The biggest difficulty you will face is the need to obtain a working clock mechanism.
Animal figurines
Original wooden crafts for the garden often depict recognizable, stylized animals or birds. From several saw parts you can easily make a figurine of a hare, bear or owl. More complex three-dimensional sculptures of animals are one of the most difficult types of creativity.
For more realistic images, it is necessary to study photographs of the selected animal, make preliminary sketches of the future work and choose the right type of wood so that too soft wood does not crumble in the most delicate places.
The most common figure among carvers at all times was the bear. Its massive figure without complex elements is easily cut from a single block, hemp or thick board.
The imagination of carvers also often turns to stylized figurines of elephants, which decorate many interiors. It is a little more difficult to carve birds with open wings, but you can learn patience as you work on each feather of an eagle or falcon's wings.
Crafts that glow with love.
Here are the simplest and cutest country crafts made from wood. For the craft, you need to cut a log (ask when you are sawing the firewood with a grinder to make several thin cuts). Or you can do it without cutting - just take a board of any size.
We drill holes in the wood so thick that a store-bought glass pebble will fit into it. Such sets of multi-colored decorative glass stones are sold - in the gift department, and in the department where there are candles, vases and everything for holiday decor.
You can simply drill such holes with glass into a board and hang it on an apple tree. You can drill such holes in the fence - if the sun shines into it at least once a day at a low angle.
That's very beautiful. Magically. Like in fairyland. Your children will be delighted with this wooden craft.
Crafts from tree branches
If a hobby has become a part of your life, you can replenish your supply of branches on every walk. The material is lying under your feet in the literal sense of the word.
Crafts for children
All kinds of toys for little ones have always been in demand as environmentally friendly products. They were used to make cars, cubes, construction sets, figurines of people and animals. An interesting wooden craft for children in the form of a dollhouse with opening doors and windows.
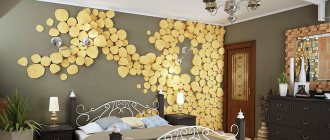
A decorative fence for a house can be made from thin, flexible branches. Recently, beautiful and easy-to-make wall decorations, made from sawn timber with smooth pebbles glued onto it, creating a certain theme, have become popular.
The entire work is completed with colorful lines and fragments, and then varnished.
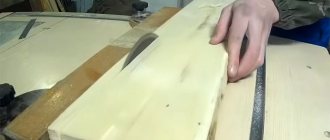
Using boards
You can make wooden crafts with your own hands from an ordinary board. This:
- Ordinary and painted cutting boards (you can decorate them using burning or decoupage techniques);
- Tabletops (on a large board you can even create an imitation of a stream or pond);
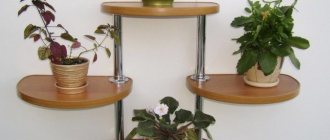
- Various shelves.
In this case, the shelves can be installed on conventional fasteners or hung on belts or thick twine, clothesline or rope.
You can even use small logs, installing them like a log house. As you can see in the photo of wooden crafts, such cute decoration elements create a cozy mood and are used to decorate rooms in rural styles.
Unusual solar boards will be a good decoration.
This master class on creating wood crafts is particularly simple:
- The wooden board is carefully sanded.
- Small through holes are drilled in it.
- Pieces of multi-colored glass or glass balls are inserted into the resulting gaps (they can be purchased at craft stores).
The sun's rays, passing through multi-colored elements, will color the room in an unusual way, giving it cozy warmth and comfort.
From small boards you can put together a cozy flower pot for home flowers.
Hangers made from boards will decorate the hallway. A minimalist design will be created by simple smooth boards with ordinary hooks. For a rural style, the original shapes of boards with wooden pegs are more suitable.
Decoupage napkins are designed to decorate simple wood. Although even a simple tree will look very nice.
Small tablets will become the basis for an original clock. It is enough to mark the dial and install the clock mechanism.
A funny wigwam for a cat will be created by three boards fixed at an angle of 60 degrees.
Use of logs
The simplest log from the forest will be an excellent material. Of course, a large log is unlikely to be useful in an ordinary apartment, but its parts can become an original pencil holder. You can do it by simply making the corresponding holes with a drill.
- A cute candlestick made from a log will decorate a table or bedside table before the New Year.
- And thick logs can serve as a bench in eco-style.
Various ideas for an apartment
There are many options for how to use wood inside a living space: in an apartment or in a private house. And the first thing that comes to mind is the manufacture of furniture.
Tables, chairs, beds, folding sofas, shelves and racks can be made from boards, bars, plywood and other lumber.
A lot of useful things can be added to children’s rooms: cabinets, desks, so-called “attic” beds. Wood is also used to make safe furniture for small children.
Wooden structures are reliable, and also, since wood is a natural material, they do not contain various harmful “additives”. You can add hangers and shelves for shoes in the hallway. As you can see, there are a lot of options.
Designer products
If you are looking for fresh ideas for inspiration, we are happy to share with you some original solutions. For example, what do you think about a water-saving sink made from wood?
Do you think it's difficult? But no! You will need a piece of hardwood board. We make a recess in the center, then drill holes to drain the water.
After sanding, coat the wooden sink with a layer of epoxy resin and install the faucet. It looks very unusual, but that’s what the bet is on.
Tired of the usual chandeliers and “naked” light bulbs sticking out of the ceiling? Well, there is an alternative solution - a decorative pendant lamp, which you can make yourself from plywood and wood.
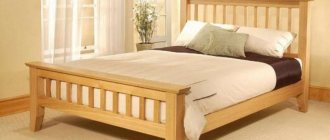
How about a spacious bed? It is not always advisable to buy it, since it is expensive and breaks quickly. It is better to make a double bed from old wooden beams yourself.
It couldn't be easier to assemble. First we assemble the frame of the required size. We make a headboard and then install support slats (made of wood or metal) under the mattress.
This is one of those DIYs that is perfect for a rustic interior.
Wooden children's beds
Do you want to give a pleasant surprise to your baby? Then make an attic-type bed-house for him. Believe me, a child will be more happy with such a gift than with any toys.
What is so special about this design? Well, first of all, it is a spacious and comfortable bed. Secondly, under the bed there is additional space for children's games. Essentially, this is a small house.
There are also simpler “attic” structures made of wood - for example, a loft bed with a ladder. To assemble such a bed you will need wooden blocks and plywood.
This loft-type bed will fit perfectly into the interior of a small room. The space under the bed can be used to install cabinets, chests of drawers or other furniture.
What can you do on your site?
Fencing.
The fence is an important part of any site. And to make it, you don’t have to buy expensive materials; you can use the “gifts of the forest.” A picket fence made from branches collected in the forest will look original.
Fences are needed not only to surround your garden from the outside, but also to divide the space internally.
These can be slatted walls that will appeal to climbing plants, or flower boxes arranged vertically in a checkerboard pattern. This wall looks very beautiful thanks to the flowering plants.
Flowerbed.
This is the kind of craft that no garden can do without. But a stump left from a cut down tree, a log, or even an ordinary large log can become a flowerbed. But you will have to arm yourself with a chisel and a hammer to hollow out a recess in which the flowers will then grow.
You can make it simpler and decorate a ready-made flowerbed with twigs or neat bars.
Bridges.
The decorative bridge will delight both children and adults. You can even dig an artificial pond for it, but even without water such an element will look quite natural.
Track.
Ordinary paths instantly change the impression of your dacha or garden. Neatly designed paths help create the “face” of the site.
And making them is as easy as shelling pears:
- It is enough to prepare tree cuts and collect pebbles from the shore of the nearest body of water. At the same time, the cuts do not have to be the same diameter - it will be even more interesting if they are different, but the thickness should be the same.
- Don't forget to first dig a trench (its depth should not exceed 10 cm) and fill it with sand.
- Cuttings, pebbles, earth are laid on top, and lawn grass seeds are planted.
Application
Zoning (partitions)
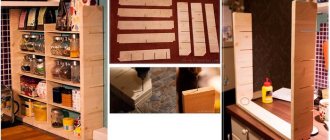
Wooden buffels are ideal for zoning spacious rooms. An openwork partition, assembled from thin slats, visually divides the room into zones, and at the same time perfectly transmits light. Using this design, you can separate the dining table in the living room, fence off the office, and add comfort to the relaxation area. There are a lot of options.
Another advantage of partitions made from slats is that they are extremely simple to make. Almost everyone can do this.
You just need to fix the load-bearing beams on the ceiling and floor, and attach the buffels to them using nails, screws or metal corners. After which all that remains is to cover them with stain, varnish or paint, and the work can be considered complete. And if the structure becomes boring or loses its relevance, it can be easily dismantled without leaving behind piles of construction waste.
Wooden slats with a cross section of 20×50 and 50×50 mm are strong enough so that bookshelves and even an LCD panel can be hung on the partition.
Wall decoration
Reiki provides the interior artist with unlimited scope for creativity. By placing the boards vertically, horizontally and at an angle, you can “draw” the most complex ornaments on the walls.
If the walls have a smooth surface and clear geometry, buffels can simply be glued to them using liquid nails or other building compound. If the conditions for installation are not ideal (and this is usually the case), a supporting frame is needed. The slats are attached to it using nails or self-tapping screws.
However, there is a much more convenient installation method. This is a hidden fastening system using special clips that are not visible on the front surface of the skin.
Ceiling decoration
Slatted ceilings have not lost their popularity for many years, and there are good reasons for this. A sheet of thin wooden planks effectively hides the unevenness of the floor slab. Under it you can hide electrical wiring and other communications. It is especially important that all engineering components will be well ventilated, they can be inspected at any time for damage, and access for repairs is always open. After all, removing several slats and then putting them back costs nothing.
Floor covering
A lattice false floor made of moisture-resistant wood (for example, larch) will come in handy in a steam room. Layed on top of the tiles, it will relieve steamers from the unpleasant contact of bare feet with the tiled surface.
Stair railing
Buffels are perhaps the ideal tool for constructing stair railings. By sewing up a wall from floor to ceiling with vertical slats, you can create a reliable fence and completely protect yourself from accidental falls.
Headboard
A rather original way to use slats in the interior is to create a headboard for a bed. For greater expressiveness, such a design can be illuminated using LEDs, which, by the way, will serve as a night light if the residents of the house are uncomfortable in complete darkness.
Slats can correct imperfect room geometry. Vertical planks visually “raise” a low ceiling, while horizontal planks make the room wider
Furniture facades
A simple frame, two pairs of hinges and a little imagination - and you can get an original facade for a clothes closet or kitchen unit. To be fair, it is worth noting that many housewives do not like such doors, since dust gets inside the furniture frame. And yet slatted facades have the right to life, if only because they decorate the interior and make it original.
Of course, in this article we have listed only the main ways to use slats in the interior. This inexpensive and easy-to-handle material offers many more possibilities.
For example, you can assemble an original lampshade or tabletop for a coffee table from thin wooden planks. But before you start work, you need to purchase lumber, and not make a mistake when choosing.
To protect the wooden slats from moisture and temperature changes, as well as to add decorativeness to it, it is stained or painted, and then varnished
Tips for beginners on working with wood
- When you decide to assemble the product yourself. Be sure to find a diagram or photo of the assembly on the Internet or in books. Thanks to this, you will not waste extra time and materials for manufacturing. Now it seems to you that it is simple, but in reality everything is more complicated. The main thing is to believe in yourself and not give up. Once you have assembled a birdhouse, you can easily assemble another one. This rule applies to any wood products, the main thing is not to forget the assembly and creation technology.
- Don't be afraid to take on difficult ideas. You will gain a lot of experience, which is very useful.
- To make the task easier, you can buy electric tools. But this will not betray the ambience of physical work
- If you have made a birdhouse, bench, stool and other structures. Find a use for them. Take the birdhouse to the forest and attach it to a tree. Place the bench in the garage or country house.
- Constantly improve your technique in this difficult task. This is important especially for experienced craftsmen. Now it’s easy to learn, find various videos and practice.
- Don't be afraid to show your products to others. There are often people who are ready to order interesting wooden crafts. Put all your strength and love into such products and be sure that your customers' friends turn to you. And friends of friends will order a whole set of furniture for their home.
Log structures
The logs are very strong and massive. They are useful for assembling cars, motorcycles with sidecars, benches and other structures on which you can sit in the yard or garden.
Logs are often sawn into many round pieces to decorate walls and create decorative pendants. The latter become beautiful thanks to:
- Painting;
- Burning;
- Gluing rhinestones.
By stacking round timber with each other, you can get a romantic heart or a huge star. This decor is appropriate for walls.
Note!
- Crafts for February 23: master class on creating interesting DIY crafts for Defender of the Fatherland Day
- DIY crafts for February 14th step by step: a master class for beginners, with a description of how to make a craft for St. Valentine's Day. Valentina (140 photos)
- Crafts made from jute: 100 photos of beautiful options. Easy instructions with photos and descriptions on how to make a craft with your own hands
Photo ideas for homemade wood crafts
Sources
- https://gidrukodeliya.ru/podelki-iz-dereva
- https://svoimirykami.guru/podelki-iz-dereva/
- https://podelunchik.ru/podelki-iz-dereva
- https://podelki.expert/podelki-iz-dereva/
- https://kursi-floristiki.ru/recepty/kak-sdelat-iz-dereva.html
- https://tytpodelki.ru/podelki-iz-dereva/
- https://www.1000ideas.ru/article/biznes/khobbi-biznes-tvorchestvo-i-rukodelie/khobbi-biznes-15-neobychnykh-idey-derevyannykh-igrushek-i-izdeliy-dlya-detey/
- https://shkolarukodelia.ru/podelki-iz-dereva/
- https://svoimi.rukami.klubokidei.com/1598526846486711193/podelki-iz-dereva-svoimi-rukami-dlya-nachinayuschih/
- https://ars.ru/interesnye-podelki-dlya-dachi-iz-dereva-svoimi-rukami/
What do they look like in the interior?
By choosing the right design option, design style and installation method, you can provide an original and attractive look to the interior in any room. You just need to consider its size and purpose.
In the hall
A decorative panel made of slats can be combined with a hanger.
In the interior of the living room
In the living room, wooden slats are used to decorate the walls and zone the room.
- One of the common options is a slatted surface behind the sofa. You can place a picture, shelves, indoor plants on it, or simply leave a slatted element in the form of a panel.
- Another common option is the wall opposite the sofa. A TV just begs to be seen here. In this case, all supply wires will be disguised under the cladding.
Using a slatted partition, you can provide zoning for the living room. It is quite popular to move the kitchen here. You can select a dining area or a small office.
Reiki in the kitchen interior
A slatted wall looks good in a large kitchen, highlighting the dining area.
The naturalness of the interior increases appetite, and its appearance attracts the eye. It is advisable to reinforce the impression with a beautiful dining table. Sometimes in the kitchen the ceiling is finished with slats. This makes it possible to create a special lighting system.
In the bedroom interior
Wooden designs are quite popular for bedrooms. The classic option is to decorate the wall behind the head of the bed with a slatt.
This way you can decorate the entire wall or cover only the width of the bed, but up to the ceiling. There is a belief that wood improves sleep. In modern styles, preference is given to asymmetry.
In this case, you can cover the wall only on one side of the bed.
Wooden slats in a children's room
In a children's room, the possibilities of slatted decor expand. Here you can veneer a wall or ceiling, make a transition from floor to wall or from wall to ceiling.
Separate the recreation area (bedroom) from the play or study area with a partition.
It is better to make partitions airy, decorative, with large gaps between the slats. As in the bedroom, a wooden wall behind the head of the bed looks good in the nursery. You can hang shelves on a wooden surface near the table.