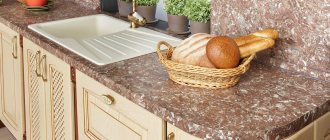
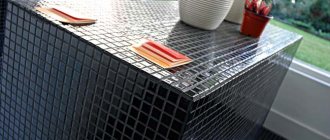
Often countertops need restoration. If a corner breaks off or is cracked, you can glue it back together. Special adhesives will help restore the attractive appearance of a granite product without disturbing the design, texture and processing.
What is the best way to glue wood to wood?
For carpentry needs, a fairly wide range of adhesive materials is used: various types of PVA adhesives, polyurethane compounds, epoxy resin, contact adhesive, etc. The choice of the most suitable adhesive option is made with a focus on the following features of the project:
- characteristics of the tree itself (oily content, level of adhesion, etc.);
- characteristics of the loads that will fall on the seam (including shocks and vibrations);
- conditions in which the product will be used (humidity, temperature changes, exposure to moisture).
You can read about the working properties and areas of application of the main types of wood glues here.
ADTEK 701
ADTEK 701 is a hot melt adhesive based on ethylene vinyl acetate (EVA). Available in the form of rods of translucent color with a slight shade of white. Thickness 11.3 mm, length 30 cm. Hot-melt adhesive, due to its combination of transparency, high viscosity and long open time, is widely used for manual joining of a large number of materials: wood, plywood, paper, cardboard, fabric, stone, plastic.
ADTEK 701 adhesive is waterproof and frost-resistant down to -20℃. Does not lose shape and does not soften at temperatures up to 80℃. Glue finds very wide application in many areas. First of all, this is printing, the production of ritual and souvenir products, floristry, electronics, furniture manufacturing, household repair of clothes and shoes, fastening design elements, handicrafts, and filter manufacturing.
How to glue wood correctly?
Carpentry adhesives are applied in a thin, even layer to both surfaces to be joined. The only exception is the technology of gluing wood with polyurethane glue: in this case, the material is applied to one of the surfaces, and the second is moistened (slightly moistened with water). Applying the compound in excess does not improve the quality of gluing in any way, but only leads to wasted material consumption and smearing of surfaces with squeezed out excess (by the way, this adds headaches at the finishing stage).
When gluing a tenon-groove joint, only the cheeks of the tenon and the walls of the groove are lubricated with glue. This gluing method provides the most reliable connection: the joint is glued “tightly”, not inferior in strength to the surrounding wood. Applying the compound to hangers does not improve the quality of gluing; all you get in this case is just excess bleed through and a waste of time, which is especially valuable in complex multi-component assembly.
Alternative options
Everyone knows that the price of good furniture made from natural solid wood is quite high. Therefore, a wood-look countertop is often installed as an alternative. We will not talk about pure plastic; we will focus only on materials close to wood in composition.
The most affordable option is laminated panels based on chipboard or MDF. The slabs are made from waste from the wood processing industry and are covered with a synthetic film on top, onto which a background is applied that copies a natural pattern. Thanks to modern technologies, the appearance of such a slab is not much different from natural solid wood.
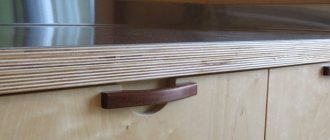
Lamination for chipboard and MDF.
Veneered coating is much closer to natural wood. Essentially, this is an average, cheaper option. The basis is MDF or a board of an inexpensive species, onto which a thin section of wood of more expensive varieties is glued and pressed.
If you make a round tabletop for a coffee table, then it will serve for decades. But such a product is not suitable for a kitchen or cottage; the veneer will quickly delaminate.
Advice: if you plan to install a stove yourself under a kitchen sink or cutting table, then a factory-made laminated wood-look countertop will be the best option, both in terms of cost and quality. Any decent hardware store has a large assortment of this product.
Veneer board installation.
What is the most effective way to apply glue?
It is important to distribute the glue over the surface of the wood in an even layer, so you should not limit yourself to simply squeezing strips out of a bottle or tube. For smearing, a small brush with stiff bristles is usually used. But the simplest toothbrush will be a more effective assistant: bristles of optimal stiffness will carefully and evenly distribute the composition over the surface, providing an optimal adhesive layer.
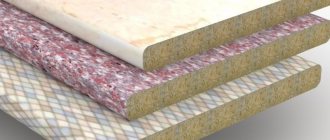
General instructions for gluing artificial stone
The adhesive composition must be at room temperature; cold glue cannot be used. Before you begin the gluing process, you must thoroughly wash the surface. Before applying the adhesive composition, you need to try on two parts, make sure that they fit perfectly and do not form gaps. It is also important to outline where the elements will be located in order to clearly glue the parts together.
Then the side surfaces of the stone countertop are processed and holes are cut out where the screed will be located. Please note that the holes should not be through.
Is it necessary to degrease surfaces and what is the best way to do this?
When gluing wood to wood, there is no need to degrease the surfaces. Although in some cases, for example, when working with oily rocks, this will not be superfluous. In this case, it is advisable to degrease the wood before gluing with white spirit.
When gluing dissimilar elements: wood with plastic, glass and other materials with low adhesive properties, the degreasing process is more important. Degrease only one of the surfaces, wiping it with white spirit.
When is stone gluing needed?
There are two main reasons for gluing:
- if the tabletop is cracked due to improper use;
- when installing a countertop with non-standard dimensions or shape of the product: it may turn out to be too large, making it impossible to bring it into the entire house or room; It may also contain too complex cuts for sinks and household appliances, pipes, so gluing will be required during installation.
Also, countertops of complex shapes are glued together in production. In most cases, the product is made as a whole, but angular, asymmetrical, U-shaped panels have to be assembled from parts.
Glue is also used when installing a wall edge or plinth, increasing the thickness of the end, joining the table top with vertical elements, an apron, or a window sill.
How tight should I tighten the clamps?
It is important to understand that the strength of the gluing does not depend on the amount of pressing force, but on the quality of surface treatment and their accuracy of fit. There is no need to tighten the clamps too much. A small amount of glue showing through is a sure sign that sufficient clamping pressure has been created.
The use of clamps is not always advisable. If we are talking about gluing small crafts, for example, wooden boxes and boxes for tightening, you can use adhesive tape or masking tape, but, again, provided that the joints are well fitted.
We repair furniture with PVA glue, epoxy plasticine and resin
Even the best quality furniture can break sooner or later. The reason is not always its natural wear and tear and the end of its service life. Sometimes chairs, tables, cabinets deteriorate from accidental mechanical impact, impact, or jerk.
In order not to spend money on buying furniture that is still usable, you should listen to the advice of experts and apply modern technologies.
Repairing chipboard furniture with PVA glue
First, the breakdown area is thoroughly cleaned of debris, dust, sawdust, using a brush, screwdriver or other convenient device. They try on the fragments in their original place, making sure that they fit tightly to the surface.
Swollen chipboard tabletop
Remove the pieces again and coat the base well with construction PVA. Glue in the fragments and carefully tap the entire damaged area with a hammer to compact it. Any PVA glue that comes out over the edges is immediately wiped off with a sponge before it hardens.
The area to be repaired is covered with cellophane film on top and clamped as tightly as possible with clamps. Leave the entire structure for a day to dry completely, then disassemble it.
Important! To seal visually noticeable cracks that inevitably remain after gluing the pieces, use office corrector (for white furniture), furniture wax of a suitable color or paint. The edge of the product is sanded until smooth.
Repairing chipboard furniture using epoxy plasticine
The repair material epoxy plasticine is sold in the form of a two-pack product (resin and hardener) or in the form of “sausages”, which must be thoroughly kneaded to mix the components.
Epoxy plasticine Second
To carry out repairs, do the following:
- Cut a piece of plasticine to the desired size.
- Wear gloves and thoroughly knead the epoxy until a homogeneous mass is obtained.
- “Brick up” the chip on the furniture with epoxy plasticine.
- If the chip is located at the location of the mounting hole, install a screw and fix it with epoxy.
- Form a neat patch, cut off its surface with a sharp knife, comparing it with the main plane.
- To obtain a more even patch, place a film on top and carefully press the damaged area with a block.
- Leave the repaired part until completely dry.
- The screw is removed from the epoxy mixture, obtaining a new hole with threads for fasteners.
- Sand the surface with fine-grain sandpaper and paint with oil paint of a suitable shade.
Restoring a broken hinge area
To work, you will need a lining and a bolt, which must be immediately screwed to the torn loop. The hole is clogged with oil to prevent epoxy resin from penetrating there in the future .
A small amount of epoxy resin and hardener are diluted on a film, a piece of masking tape, or in a disposable cup. Add a little filler (sawdust or construction putty) to make the mixture thick enough.
The resulting product is applied to the damaged area, then a loop is screwed on to hold it in place. Leave the part until completely dry. As the resin hardens, the lining will adhere exactly where needed.
Next, using clamps and a clerical blade, they make a kind of formwork for the edge: they fix the blade on top to limit the plane for pouring the mass. The inner surface of the chip from the outer edge is filled with a similar mixture (epoxy and putty) and allowed to dry.
At the next stage of work, you will need a small section of the sewer pipe, the diameter of which will exactly fit into the hole for the loop. Using masking tape, it is secured inside the round hole, and the remaining part of the damage is filled with epoxy mixture.
After drying, remove a piece of pipe and apply a finishing epoxy layer. As the initial setting progresses, carefully level it with the blade of a stationery knife.
New edges of a suitable color are glued to the ends of the furniture piece. To do this, use a hair dryer, an edge with an adhesive base and thick gloves for safety reasons.
The edge of the edge is heated with a hairdryer and pressed against the end of the part by hand. After cooling, the excess sections of the edge are cut to length and width using a special furniture veneer cutter or a regular stationery knife.
Next, the edge is sanded until the edge is perfectly even. At the end of the work, paint the repaired area with suitable paint and secure the loop.
Thanks to simple steps, you can give a second life to most products in the house and save on the purchase of new furniture.
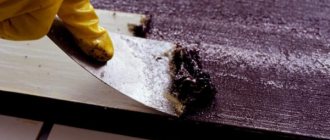
How to clean a surface from dried glue?
It makes sense to remove excess glue from the surface of the wood either while it is completely fresh or when it has completely hardened. If you rush to sand a damp area of wood, you will most likely end up with an even greater aesthetic defect when the fibers deformed by sanding dry. The hardened glue is cleaned by hand sanding (along the fibers) or cut with a chisel.
Before applying decorative finishing, check to see if there are any stained areas on the product. Otherwise, traces of dried glue will appear under the finishing compound. To more effectively detect defects, wipe the surface of the wood with a cloth soaked in white spirit.
How to make a tabletop from boards
An original tabletop made from boards with your own hands will decorate the interior of a kitchen, living room or terrace. How to make a tabletop from boards so that it lasts a long time? What type of wood should I choose and what size? Consultants will tell you about this.
ADVANTAGES OF WOODEN BOARD TABLETOPS
For a wooden tabletop you can use the following materials:
Surfaces made from MDF boards, chipboard and veneer have an aesthetic appearance, but are inferior to wooden boards in practicality and durability.
Wooden boards are the most popular material for countertops, as it has a number of undeniable advantages:
- environmental friendliness and safety;
- presentable appearance;
- resistance to mechanical damage;
- resistance to moisture, sunlight, temperature changes;
- ease of processing, creation of various shapes and designs;
- possibility of surgical restoration.
To make a tabletop, you should take boards from durable and flexible wood, such as larch, teak, oak, walnut or cherry. It is not easy to qualitatively process harder types of wood at home, which can lead to rapid deformation (drying out, swelling) under the influence of temperature and humidity changes.
TYPES OF TABLETOPS
The dimensions and design of countertops may vary depending on the installation location, operating conditions and functional purpose of the products. Among the main types of countertops are:
- prefabricated structures;
- glued products;
- made of solid wood;
- carved from furniture board.
Thick boards for countertops are more often used in luxury interior design, since the cost of the material is high. To create a tabletop yourself, the best option would be a prefabricated or glued structure made from boards (lamellas).
HOW TO ASSEMBLE A TABLETOP FROM BOARDS
Assembling a tabletop yourself will not be difficult if you are familiar with woodworking technology. Before making a tabletop from boards, prepare the necessary materials, equipment and read the step-by-step instructions for assembling the product.
You can make a tabletop from boards, which you can buy at:
- planken (20×90, 20×140) – a larch board that has a smooth surface and its edges are beveled or rounded;
- deck board (28×110, 28×140, 45×145) is a universal material of increased strength that can withstand aggressive environmental influences and mechanical damage.
Content
Pitfalls of self-installation
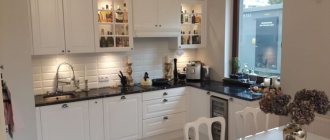
Installing countertops in the kitchen: important points
How to install a countertop in the kitchen with your own hands: step-by-step instructions
Step 1. Preparatory work
Step 2. Joining fragments
Step 3. Installation of the canvas
Self-assembly of kitchen furniture is becoming increasingly popular. This is beneficial and practical, since it becomes possible to adjust the parts as accurately as possible to the size of the room. You need to choose a ready-made project or create your own and order cutting of the necessary elements. The main difficulty lies in careful and correct assembly. Let's look at how to properly install a countertop in the kitchen with your own hands.