Vintage style is in demand not only among modern fashionistas in clothing and jewelry, but also in designer interiors. The antique furnishings create a special coziness and romance. Craquelure on furniture is a good solution for those craftsmen who themselves want to give a touch of time to a standard chest of drawers or an ordinary mirror, turning it into a wonderful vintage item.
Making a composition for craquelure from gelatin
You can make craquelure with your own hands by using regular gelatin to prepare the composition, of which you need to take one tablespoon. The substance is poured into a glass of water, and then it must be left until it swells. The gelatin should then be heated until completely dissolved, after which it should be left until it cools. Then you can begin to carry out work. You need to cover the surface with the composition and wait until everything hardens, and only after that should you apply a second layer of paint.
Next you have to do the same as with any other craquelure. You can apply gelatin, and then paint, the consistency of which should be as thick as possible. After this you need to dry the surface with a hairdryer. However, when performing work, you must follow the rules, which include the need to coat the craquelure with varnish. So, you must follow a technique that involves applying pigment, gelatin and base paint. Afterwards, you can use napkins on which the varnish is applied. This will allow you to get a surface treated not only with a craquelure composition, but also with decoupage. Since gelatin never hardens completely, it can always be washed off with water, but in order to fix the finish, varnish is applied.
Tools for work
Various techniques can be used to decorate walls; the set of necessary tools depends on this. In any case, you need to stock up on the following set:
- putty knife;
- roller;
- paint brushes;
- foam;
- sandpaper;
- fan;
- spray gun;
- clean cloth.
To obtain small depressions, foam rubber is used in the work. To get deeper cracks, you will need a soft brush.
These tools are used to apply craquelure varnish.
Description of dextrin
If you decide to use the technology described above, then you should know what dextrin is. This is heat-treated starch, based on corn or potato substrate. Dextrin today is quite common in many sectors of the national economy. It is often used in the manufacture of adhesives for bags and labels, adhesive paper tape, as well as in the production of food containers. Among other things, this material is used in the light and food industries.
Coating care
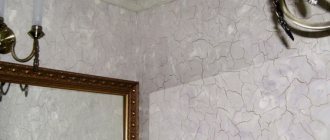
Craquelure is a “delicate” coating. It is easy to scratch and damage. Therefore, you need to care for it without hard brushes and the use of abrasives. Also, do not wash with large amounts of water or use chemicals. The walls are wiped with a damp sponge or a damp, clean cloth (no more than once a week).
Knowing the basics of the technique for creating craquelure plaster, having practiced the techniques, following the recommendations, you can master such a skillful imitation of the action of time and replace it in the created decor.
Making a liquid gel composition
You can make your own craquelure using a liquid gel-based composition intended for washing. The example considers a variant of washing powder, which is sold in gel form. First, apply a base color to the surface, which then needs to be allowed to dry. Next, you need to put gel on the brush; it is preferable to use the consistency that is as thick as possible. This indicates that for this work it is best to use a concentrated composition. You can use a sea sponge to apply the gel to the surface. It should be carefully dipped into the diluted paint. If this technique is implemented on fabric, the composition should be used on the surface of the material, while paint is applied on top.
Egg white using craquelure technique
In order to create craquelure on the walls, you can make your own composition using egg white. Latex acrylic paint must first be applied to the surface; this is done in one or two layers. After this, the composition should be allowed to dry thoroughly. Then egg white is applied to the surface in bold, large strokes. At the same time, you should not pay attention to the fact that one stroke will intersect another. Without using a hairdryer, the surface should be allowed to dry. Then paint is applied to the base, but of a different shade, so that one stroke does not overlap the other.
Vinegar in preparing the mixture
If you decide to use craquelure on furniture, you can make a composition for this technology with your own hands using another method. For this you should use vinegar. After paint has been applied to the base to be treated, you need to take a small sponge, which should first be soaked in vinegar. Afterwards you need to start hitting the surface with it. In this case, the cracks can become very wide. Well, if the bottom layer of paint is visible, for this you will have to use a composition that has a contrasting shade.
Using scrap materials
The mixture for implementing craquelure technology can be made using PVA glue. You can do craquelure and decoupage with your own hands if you use one of the methods below.
First you need to take undiluted glue, which should be thickly applied to the entire surface. The resulting layer needs to be dried well, but not completely. In this case, you will have to use your experience by checking the surface to ensure it is dry. Afterwards you can apply one layer of acrylic paint. Some masters use a technology that involves additional listening after the acrylic composition has hardened on its own.
You can also decorate a bottle with craquelure yourself quite easily. In this case, you can use the second method of producing the mixture. To implement the technology, you should combine the acrylic composition with PVA glue. This method is quite rare to find. It is considered to be some modification of the above method. You can use it to decorate bottles, and the composition will fit well on the work surface. PVA and acrylic should be combined in equal proportions, after which the mixture can be immediately applied to the bottle. You can also make door craquelure using this method. After applying the composition, you need to leave it for a while, and then dry it with a hairdryer so that cracks appear.
How to paint it antique? DIY craquelure
Rating 4.60 (5 Votes)
| The technique of artistic aging “craquelure” or in other words “crackle” (from the French “craquelure” - cracks) rightfully occupies a special place among decorative techniques (decoupage) and is loved by many who are engaged in creativity professionally or just for themselves. And, indeed, the antique-style finish looks great in the interior and is great for decorating a box, vase or panel, as well as for furniture decor. With the help of craquelure, you can completely turn an old chest of drawers into a work of furniture art or present interesting, hand-made gifts to your friends, adding a touch of antiquity to them. |
Two main types of craquelure are used:
- one-step; - two-step.
They can also be called single-phase and two-phase.
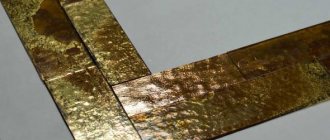
One-step craquelure is a network of decorative cracks in the paint, through which another color applied to the base, or the base of the product itself, can be seen. This type of craquelure is easier to perform, but at the same time very effective.
| Two-step craquelure results in a more delicate network of cracks covering the surface of the product. The composition for this type of craquelure differs from the one-step one, and the cracks are thin and almost airy. They can be made in any shade by rubbing them with coloring pigments, but a brighter mesh of cracks, contrasting with the main background, looks best. Both craquelure techniques are perfect for decorating items made of wood, glass, ceramics and even metal. For your convenience and to save time, manufacturing companies produce ready-made kits that contain everything you need for decorating in the craquelure style, equipped with detailed instructions. |
How to make one-step craquelure at home. Necessary materials. Sequence of work.
You will need:
1) The item being decorated itself. You can decorate a wooden panel, a box, an old chest of drawers, a metal product, ceramic plates or a glass bottle you like - whatever your imagination allows!
2) Sandpaper - if the base is wooden. Alcohol for degreasing - when working with glass and metal.
3) Primer. An acrylic primer is suitable for wood and ceramics, but for glass surfaces it is better to take a primer specifically for glass (when it dries, it becomes transparent), because other types of primer on glass surfaces may peel off as a film along with the craquelure. Metal also requires a primer, for example, a special one for metal or for smooth surfaces. Please note that for glass, ceramics and metal, a primer is required!
When decorating a wooden surface, depending on the desired result, you can do without a primer. For example, if you want to leave the natural wood texture more obvious, or according to the decorator’s idea, the base of the product should be visible through the cracks.
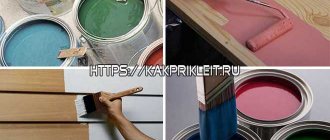
4) Paint in two colors: one color for the bottom layer, which will show through the cracks, the other will cover the top layer. It is better to use acrylic paints, and as for the color of cracks, contrasting colors and metallic shades look especially advantageous. If the base of the product remains as the bottom layer, only one color of paint will suffice.
5) Brushes for paint and varnish, synthetic is preferred. It is also convenient to apply the paint with a sponge.
6) A jar of water.
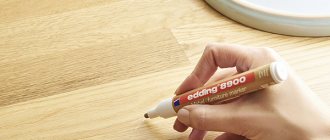
7) One-step craquelure varnish (this varnish forms the cracks).
 Varnish for fixing the decor. Acrylic, acrylic-pistachio or shellac varnish is perfect.
Work progress: How to make one-step craquelure?
| Step_1 First you need to prepare the surface. We remove old paint and varnish from wooden products using special removers or sandpaper. Wash the glass thoroughly and degrease it with alcohol. All work must be carried out in a well-ventilated area! Step_2 Prime the surface and let the primer dry completely. On porous, rough surfaces, such as ceramics, the primer is applied in 2-3 layers, and each layer must dry well. |
| Step_3 We cover the surface with the paint chosen for the bottom layer - this is the color of the craquelure cracks. If the natural surface should be visible through the cracks, then we skip this step. We wait until the paint is completely dry. Step_4 Apply craquelure varnish with a brush so that the layer is quite dense. For approximately 40 min. The varnish layer should dry to a “touch-free” state, when it already looks dry, but is still slightly damp when touched. If you lightly dry the varnish with a hairdryer, the drying will go faster. |
Step_5 Apply the next layer - paint of a different color. The color of the cracks applied first or the base of a natural shade will be visible through this layer. The paint should not be too thick; it can be diluted a little with water, and then large, bright cracks will appear on the paint of a thinner consistency. For small cracks, it is better to dilute the paint with acrylic varnish or a special thinner.
| Now use a wide synthetic brush to paint the surface, keeping in mind that cracks will appear in the same direction in which the brush moves. Try to brush over the same area once, otherwise the varnish will “roll off”. Leave the painted product for about a day until the varnish is completely dry. To speed up the process, you can also dry it with a hairdryer. Step_6 The completely dried painted layer now needs to be fixed. Acrylic varnish, acrylic-pistachio or shellac varnish are suitable for this. |
What do you need to make a two-step craquelure?
You will need:
1) The object being decorated is wooden, ceramic, glass or metal.
2) Sandpaper - if the base is wooden. Alcohol for degreasing - when working with metal or glass. The surface to be decorated must be smooth; if necessary, it can be covered with a layer of acrylic varnish.
3) Primer. For glass, metal and ceramics it is a must! An acrylic primer is suitable for wooden and ceramic surfaces, and for metal and glass - special primers for these materials or a primer for a smooth surface. As in one-step craquelure, you can do without a primer if, for example, you want to leave the wood texture more obvious or the base of the product should be visible through the cracks.
4) Paint for the base of the product, acrylic is best. Colored dye or pigment on a water, oil or wax basis - for rubbing into cracks. You can use crushed pastel, and to give the cracks an iridescent hue, use pearlescent paint.
5) Brushes for paints and varnish. Flat synthetic brushes are an excellent choice.
6) A piece of cotton cloth or sponge to rub the dye into the cracks.
7) Varnishes. In the two-step craquelure technique, two types of varnish are used: shellac and craquelure. They are also designated as step No. 1 and No. 2 (base coat and top coat).
Work progress: How to make two-step craquelure?
| Step_1 Prepare the surface. We remove old paint and varnish with special removers and treat it with sandpaper. Wash the glass thoroughly and degrease it with alcohol. Step_2 Cover with acrylic primer if the base is porous (wood, cardboard, ceramics). For a glass base we use a primer specifically for glass, and for a metal base, accordingly, a primer for metal. Let the soil dry. |
Step_3 Paint the surface and wait for the paint to dry completely. This is the base color, which will then be covered with cracks. If the cracks should be located against the background of the natural surface of the product, or the workpiece is made in advance using the decoupage technique, then we also skip this step.
Step_4 Apply shellac varnish with a wide synthetic brush (step No. 1, base coat) in 2 or 3 layers. Dry each layer thoroughly before further work. The longer the varnish dries, the smaller the cracks will be.
| Step_5 When the previous layer of varnish has dried to a touch-touch state, apply craquelure varnish with a flat brush (step No. 2, top coat), trying to avoid unpainted gaps. The size of the cracks in this case depends on the thickness of the varnish layer - the thicker the layer, the larger the cracks. It is better not to dry this varnish with a hairdryer, but to let it dry naturally in a dry, warm place. Step_6 We rub the resulting cracks with pigment using a piece of cloth or a sponge, immediately removing excess paint. |
Step_7 We fix the decor with shellac varnish (step No. 1, base coat) or protective finishing varnish. For a decorative item, 1 layer of varnish is enough, but for furniture or items that will be frequently used, 2-3 layers will be required.
| The “craquelure” technique is quite accessible even for a beginner, but at the same time it is capable of transforming the most unremarkable objects, making them interesting, special things with a history that will delight you and delight your friends. |
If you found this article useful, please rate it (at the top of the page). Thank you!
Visitors to this page most often choose from the online store:
Set “Two-step craquelure”
|
Recommendations for the craquelure technique
If you use this technique (craquelure), preparing the composition with your own hands is quite simple. But it is also important to properly prepare the surface. For example, if a mixture based on egg white is used, then the surface must first be coated with a primer. Only then is a layer of acrylic paint applied. Varnishing will be required to prevent the protein from being absorbed. Painting can be done in any order, and drying without using glue should last a sufficient amount of time.
The composition for craquelure can be made from different materials, and you do not have to spend money on purchasing factory-produced mixtures, which are quite expensive. This is especially true when decorating a surface of an impressive area.
Varieties
Modern manufacturers offer 2 types - one-step craquelure and two-step. The first of them is well suited for beginners due to its ease of application. The surface treated with this varnish resembles enamel cracked over time. A layer of acrylic paint peeks out from under the surface of the varnish - the base.
Two-step craquelure varnish is more difficult to use, but it gives a different effect - more beautiful, aesthetic, and natural. Due to the fact that in this case the varnish itself cracks, it does not overlap the previous layer (for example, some kind of picture, image), and it can be used to finish a wide variety of surfaces.
Both types are used in decoupage. It all depends on the degree of skill of the decorator, his ability to work with this material. Craquelure is not particularly difficult, but still requires certain skills.
In this case, the type of varnish does not play a particularly important role. Some people find two-step craquelure more difficult; for others, working with one-step craquelure is difficult.