Benefits of using an arch
A beautifully designed arch between the kitchen and the living room, hallway or insulated loggia can serve not only aesthetic functions. There are a number of other obvious advantages for owners:
- Good indoor air ventilation, especially for small apartments and private houses.
- Sufficient level of natural light. A decorative door arch to the kitchen significantly frees up the “corridor” to sunlight.
- The side surfaces of the arch between the kitchen and living room can be additionally equipped with shelves, racks, hooks, or decorated with original paintings.
- Many types of arches for the kitchen can be made with your own hands or purchased as ready-made installations.
- A wide variety of models in any hardware store at very affordable prices.
- The ability to model a project in advance, for example, a kitchen-living room with an arch, and choose a design for your home. Large furniture and construction stores are equipped with virtual interior modeling programs.
- For independent work, there is also an extensive collection of ready-made projects, step-by-step instructions on how to make an arch in the kitchen, and video tutorials describing each step.
A decorative arch can completely replace a standard doorway when zoning a studio apartment or, conversely, play a role when combining a kitchen with a living room.
Nuances you need to know about
Since after the arch is designed, the space between the kitchen and the adjacent room is united, following the laws of physics, cooking smells may well spread throughout the apartment. This is why it is very important to install a hood in the kitchen before installation: it must purify the air before it moves to other rooms.
There are also other nuances:
- the arch is not recommended to be installed in apartments equipped with gas stoves;
- due to the open space, there is a problem of constant noise, which is especially important if there are small children at home;
- the transition between rooms requires decent lighting so that all decorative details are emphasized and the overall impression is enhanced;
- if you have low ceilings (less than 2.5 meters), you should think about installing a regular door, since the arch in this case risks turning from a potentially beautiful interior decor into an overly intrusive accent;
- The smaller the apartment, the less noticeable the opening should be designed so as not to get the effect of narrowing the space, as often happens with Khrushchev-era buildings.
Disadvantages of using arches
Despite a number of obvious advantages, arched structures are not suitable for all rooms. In practice, owners and designers have to deal with some disadvantages:
- The lack of a high-quality exhaust system in the kitchen contributes to the spread of unpleasant odors throughout the apartment.
- The presence of gross construction defects on the walls can significantly complicate the installation work.
- All sounds from the street and kitchen will flow into the remaining rooms of the house (apartment), which is due to the absence of a direct barrier between adjacent rooms.
As a rule, there are much fewer disadvantages of using arched structures, and the advantageous design and visual increase in area determine the popularity of this decorative element.
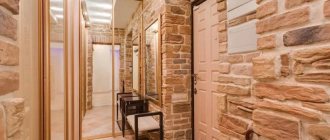
Stonework for the kitchen
Stone can also be used for finishing. Natural plaster stone is perfect for this purpose, as well as special compositions with decorative stone chips.
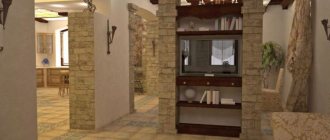
Using stone, you can very advantageously design the side pillars for a trapezoidal arch or perform finishing to form a rounded structure.
Classic Slavic style
The most common type of arch is a rectangular arch with rounded corners. Used when transitioning from the kitchen to the dining room or living room. It adds elegance to the design of the room. If necessary, it can be easily complemented with decorative details and shelves.
Note!
- Kitchen in minimalist style: new designs for minimalist kitchens. Choice of colors, furniture and additional decor + 120 photos
Kitchen in the Art Deco style - TOP-190 photos of kitchen interiors in the Art Deco style + DIY stylish furnishing ideas
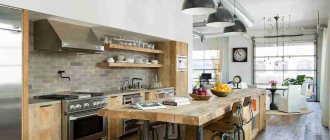
- Kitchen in the loft style: TOP-180 photos of kitchen design in the loft style, design features of the style with examples of interiors
Plaster structures in the kitchen
Drywall today is a universal material for forming an arched structure instead of a doorway. It is quite durable and resistant to most factors (moisture, temperature changes).
It is easy to cut out decorative grilles from plaster for romantic arches in a unique design. For installation, you must first level the surface of the opening, and then weld the metal profile.
Sheets of cardboard are attached with self-tapping screws to the profile at several points. The last, but no less important stage is to decorate the surface: opening with varnish, paint, original stencil painting.
How to make an arched opening with your own hands in 7 steps from plasterboard
To make a plasterboard arch with your own hands you will need 1-2 free days and the following materials.
Tools:
- Screwdriver or screwdriver;
- Hammer;
- Scissors/metal hacksaw or grinder – will be needed to give the profiles a rounded shape;
- Jigsaw or hacksaw – needed for cutting drywall;
- Needle roller;
- Nylon cord/wooden ruler and pencil or engineering compass - for drawing a vault template of the correct shape using the compass principle.
Materials:
- GKL 12.5 mm - for both sides of the arch frame;
- A strip of arched plasterboard (6.5 mm) or regular (12.5 mm or 9 mm) - for the end of the arch;
- Metal starting profiles UD27 and, if necessary, strengthen the arch body with profile CD 60;
- Self-tapping screws with dowels;
- Everything you need for puttying: serpyanka, finishing gypsum putty, primer, etc.
So that making an arch does not seem complicated to you, we have divided the entire process into 7 steps.
- Carefully dismantle the old door and its frame. If necessary, increase the height/width of the opening using a hand-held diamond saw or a wall saw if the partition thickness is thicker than 20 cm.
- We attach the profile frame to the doorway using self-tapping screws and anchor dowels (included in the kit). To do this, first cut the profile (UD 27) with a metal knife into three parts of the following dimensions: 1 part = opening width, 2 parts = arch height. We attach the long profile to the “ceiling” of the niche, and the short ones to the walls as shown in the photo. Then we repeat the same steps for the other side.
- Profiles must be mounted with a distance from the edge of the wall/ceiling equal to the thickness of the plasterboard;
- The fastening step is 10 cm.
- Let's start making the arch body from plasterboard. To do this, you need to draw a life-size template on whatman paper and then cut out the arch body using it. The second method is to first cut out a rectangle of the required width and height from the plasterboard, and then draw an arc directly along it using the principle of a compass - using a pencil and a cord/strap as shown in the photo below. We cut off the excess and trace the resulting part as a pattern on the second sheet of drywall. The two halves of the vault are ready.
Drawing an arc using the compass principle
- The easiest way to cut out the gypsum board is with a jigsaw, but if you don’t have one, a hacksaw or drywall saw will help.
Blank for an arch made of gypsum plasterboard
- Now it’s time to mount the two parts of the arch to the frame using self-tapping screws, recessing them flush (in level) with the drywall in 10 cm increments.
- After installation, make sure that both parts are installed level and level with each other. If necessary, their levels can be leveled using a drywall plane.
- Next we need to make and secure the end strip. We will cut out the end later, but for now we will make the basis for its installation from the same profiles. To do this, they need to be made flexible so that they can take the shape of an arc. We measure the required length of the guides, and then cut their sides in increments of 2-5 cm, depending on the steepness of the bend.
Preparing the profile for fastening to the arch
Now we screw the resulting arched profiles from the inside to the arch body.
- If the arch is deep (more than 60 cm), then at this stage you need to additionally install jumpers inside it to make the arch strong and rigid. Jumpers can be made from CD-60 rack profile and even foam “bars”;
- If the opening walls are too narrow, then the end strip is secured with glue.
- Finally, we cut out the end strip to the required length and width.
- If you bought flexible arched drywall, then you will just need to attach it to the profiles, carefully giving it the desired bend right during the installation process;
- Regular drywall needs to be processed: first, lightly run a needle roller on the marked side (!) along the entire length of the strip, wet it evenly with water using a brush or sponge, and then place the strip so that it can bend under its own weight and take on a rounded shape. This process can last 2-12 hours, you need to wait until the drywall becomes dry in appearance, but more flexible. Of course, you need to test the strip for flexibility carefully.
You need to attach the end strip to the arch in the same way as you attached the parts earlier, that is, recessing the screws into the level with the drywall and observing a step of 10 cm.
- Well, that's all, all that remains is to finish the arch - putty it, and then paint it, plaster it with decorative plaster, cover it with wallpaper, frame it with a finished arch made of MDF/wood, or cover it with natural/artificial stone, brick, mosaic.
More information on how to properly putty a plasterboard arch with your own hands can be seen in this video instruction:
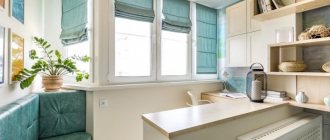
Decor options for arched structures
Modern arches not only allow you to significantly expand the kitchen space, but can also be used as storage areas. On the side racks you can always arrange small shelves, racks, hooks on which small items, keys, and souvenirs will be stored.
The second interesting option for decorating interior arches is the installation of additional lamps. Most often, spot modular lamps or LED strips play this role. This type of lighting is often used to advantageously accentuate the kitchen area, dining table, and small bar counter.
The arch itself can be used as an additional decor if you install an original metal wicker lattice inside. These can also be ready-made plastic inserts or ornaments carved from wood.
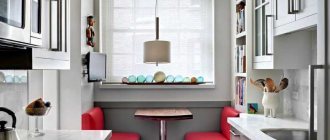
Doors, windows and more
In addition to the entrance to the kitchen, there are many structural elements and interior items that can be designed in the form of an arch. Arched windows look luxurious and give the interior a special charm. Doors with an arch in the upper part give the premises a touch of antiquity and the mystery of medieval dwellings. By decorating the space above the kitchen work area in the form of an arch, you bring a little variety, unexpected elegance, smooth lines and shapes to the decor of a traditional kitchen.
Built-in cabinet systems with arched solid wood doors are certainly the highlight of this original kitchen. The theme of arches was supported by the design of the space above the stove. Part of the hood is hidden behind the arch. Even the elements of pendant lamps in the form of street lamps use arched decor.
A window in the shape of an arch is interesting in itself and can diversify any, even the most trivial, interior, and if presented in the appropriate decoration, the room will be unique, interesting, and attractive.
Decorating the arched space above the stove with light stone and dark grout brings a country element to this eclectic kitchen-diner. Despite the many interesting decorative items, the arch in this room comes to the fore as a decoration for the hearth, which is represented by the kitchen stove.
Small arched elements in this kitchen are present in the doorways, above the work areas and windows. Despite the fact that the arches in this classic kitchen are not striking, they certainly transformed the interior and decorated it.
Arched doorways, window openings and niches made with white painted brickwork become the focal point in this country-style kitchen. Against the background of snow-white brick arches, wooden elements of decoration and furniture look great.
An arched window in such a fantasy image can in itself become a highlight of the kitchen interior. And if the campaign offers wooden furniture of an unusual design against the backdrop of a dark blue shade of surfaces that is unusual for a kitchen, such an interior is simply doomed to success