Secure the furniture! Together we create a safe home
The home should be a safe place, and if we work together we can reduce the risk of accidental injury.
Home is a place where it is not only cozy, but also safe. It happens that children's games end in injuries. Together we need to reduce the risk of children's injuries at home – to a minimum.
The best way to prevent furniture from tipping over is to secure all tall furniture to the wall. IKEA encourages all customers to secure cabinets and chests of drawers to the walls; the fastenings are included with the furniture.
At the IKEA store in Riga you can get furniture fastenings for free or order delivery by mail, +371 6330 1000.
Avoid furniture overturning, avoid injury
Secure the furniture! Mounting instructions
Parts such as screws, dowels, etc. must be selected based on the type of walls in your home. If the required wall type is not available, please consult your nearest hardware store.
WALL TYPE Plasterboard walls with wooden beams
FASTENING PARTS Screw the self-tapping screw into the beam. For example, a 5 mm self-tapping screw from a set of screws and dowels FIXA IKEA (Fig. 1)
WALL TYPE Plasterboard walls without wooden beams
FASTENING PARTS Insert a dowel into the wall and screw a screw into it. For example, an 8 mm dowel from a set of screws and dowels (Fig. 2)
WALL TYPE Brick or concrete wall
FASTENING PARTS Solid wall: dowel with screw. For example, an 8 mm dowel from a set of screws and dowels FIXA (Fig. 3A) Hollow wall: FIXA IKEA (Fig. 3B)
Source
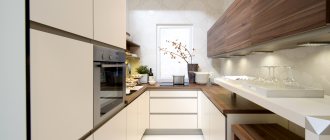
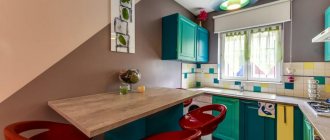
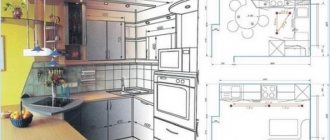
We spend a lot of time in the kitchen. Here we have dinner with the whole family after a long day, make culinary discoveries and have heart-to-heart conversations. That's why it should be comfortable and safe here. Wall cabinets are an integral element of almost any kitchen combination. And their installation is one of the most difficult stages in arranging a kitchen. To make the room safe, cabinets must be securely and levelly attached to the wall.
IKEA craftsmen know how to assemble furniture quickly and accurately. To have no doubt about the reliability of your kitchen, be sure to use the help of our specialists. With them you will receive an interior ready for use. Just order the assembly and installation service in the store or leave a request online.
Rules for installing and hanging cabinets
Before hanging the cabinet, you must:
- carefully level the walls;
- finish laying the electrical wiring, installing sockets and switches;
- complete the finishing of the walls - plastering, wallpapering, installing drywall;
- assemble the tool;
- determine the height of the headset;
- Mark with pencil or chalk.
To work you will need:
- electric or hand drill;
- hammer drill if the wall is concrete;
- level, preferably water;
- tape measure for measuring distance;
- screwdriver with a set of attachments;
- hammer and punch;
- clamps, if the boxes will be hung as a whole set;
- wrenches if anchors are used.
On a concrete wall
For hanging on a concrete base, anchor bolts are used, which guarantee reliable fixation. Mounting strips can be attached to screws that are screwed into plugs; holes for them are punched with a hammer drill. You can use a corner to attach the cabinet to the wall.
On a foam block wall
Furniture must be secured to cellular material with air bubbles using special fasteners. Dowels, anchors, and nails will not hold, but can destroy the wall when the load increases. Fasteners that can be held in hollow material are called chemical anchors. They are an adhesive mass. They also hold dowels made of plastic, nylon, and metal.
Installation of fasteners in foam blocks is carried out as follows:
- mark the wall;
- drill holes with a drill corresponding to the dimensions of the fasteners;
- inserts the dowel into the hole, previously cleared of crumbs;
- tighten the screw.
Features of fixing cabinets on a plasterboard wall
Mounting strips are attached to the surface of the plasterboard sheet with special self-tapping screws or anchor bolts, onto which furniture with adjustment fittings will subsequently be hung. This method is not suitable if the cabinets are designed for heavy kitchen utensils and appliances. Decorative cables or tubes are used to attach heavy kitchen cabinets to the wall.
Selecting the type of fastening
We recommend starting with choosing a mount. The sequence of actions when assembling an IKEA cabinet and installing it depends on this. There are two types of fastenings:
Installing furniture on corners and hangers requires the most accurate height measurement. The cabinet is attached using screws or dowel-nails, the location of which on the wall is not adjustable. Corners are convenient to use on uneven surfaces. Some cabinets are installed on corners by default.
An example of such furniture is the KNOXHULT wall cabinet.
The mounting rail is a metal strip that is attached to the wall with screws. The kitchen cabinet is mounted on a rail using hooks fixed on its back wall. The rail allows you to adjust the position of the cabinet horizontally and vertically (within 2 cm) without dismantling.
METHOD hanging frames can be secured using either corners or a mounting rail.
Blog "Caesarionia"
Method kitchens appeared in the mid-2010s.
As always, even to select components you have to independently collect and analyze a lot of fragmented information. And it’s generally unrealistic to drill mounting holes in advance, before visiting the store. I share my experience. So, fasteners. Not only wall cabinets, but also floor cabinets are attached to the walls. There are two options: two mounting points for a specific cabinet or a rail. The tire, of course, is more expensive (350 ₽/m), but it allows you to move cabinets along it. And it makes life much easier if the kitchen assembler does not have an assistant. In short, I only tried it with a tire.
What does studying the assembly instructions give?
- Set includes 10 washers. It turns out that the interval between the attachment points is approximately 2 m/(10 - 1) = 22 cm.
- It is necessary to fasten starting from the outer hole. The interval is no more than 30 cm (which means 8 washers are enough). Adjacent holes are spaced 5 cm apart. Total 2 m/5 cm = 40 holes.
- Minimum height from the floor to the bottom edge of the busbar (820 mm for cabinet heights of 800 mm and plinths of 80 mm).
- The minimum height from the ceiling to the top edge of the tire is 20 mm. Very smart. There is even a picture with different cabinet heights. But all this does not answer one question: at what height to drill. Why do I need to know the height to the bottom edge of the tire if I don’t know the height from that edge to the centers of the holes?! And what are the acceptable dimensions of the self-tapping screw?
By the way, in addition to the instructions from the tire, there is also such a document as the Kitchen Installation Guide. I found it completely by accident through Yandex while preparing this entry. But there is nothing new there either. “The overhead rail for base cabinets should be located at a height of 82 cm from the highest point of the floor (to the bottom edge of the rail),” and that’s it. No, of course, even such information is better than nothing: now you can first buy tires, attach them, and then buy cabinets, and they will fit exactly where it was planned. But you still have to buy tires!
There is also a “Purchasing Guide.” Kitchen system METHOD" (need I clarify when and where I came across this document?).
But I'm not as evil as Ikea, and I share secret information.
Source
Preparing the walls
Having chosen suitable fastenings, prepare the walls for work. The better you prepare them, the fewer problems you will have when installing the cabinet. Proceed in the following order.
Check flatness
Unevenly mounted wall cabinets are very noticeable. Even a slight slope of the walls, recesses or bumps immediately become noticeable when installing wall furniture. That is why it is so important to correct all defects in a timely manner if possible.
To do this you will need a building level. There are several types of such devices:
The most popular in construction is the bubble level. Electronic is almost no different from bubble, but the result is displayed on a digital display in the form of an angle of inclination.
The laser level is convenient because it only needs to be adjusted once. Place the device on a flat surface and level it using the bubble indicators. If your device has automatic leveling, it will beep until it is perfectly level. If you're going to be hanging a cabinet alone, your best bet is to use a laser level.
Having determined the evenness of one of the walls, make sure that adjacent walls are located at an angle of 90° to it and to each other. A construction square will help detect deviations.
Light irregularities are found quite often in apartments and houses. They can be corrected during installation - for example, using slats or pads. In case of severe unevenness or slope, the best solution is to contact a plasterer. When the walls are smooth, proceed to the next stage.
Make sure the walls are strong and thick enough
The thickness of the kitchen wall must be at least 10 cm so that it can support a cabinet with dishes. Not all walls are made of concrete. Sometimes behind a layer of plaster there is drywall, behind which there is 20 cm of air. It also happens that such voids are found in main walls. They are easy to detect manually: tap the wall along its entire length. Dense areas have a dull and quiet sound, empty areas have a more booming and loud sound. More professionally and accurately, voids and dense areas are found using an ultrasonic flaw meter. This device measures the thickness of the wall and displays a graph with the corresponding values.
Source
Attach furniture to the wall
In addition to the fact that all products are carefully tested before production begins, a fastening kit is placed in the box with the furniture.
According to European safety standards, all furniture over a meter high must be secured to the wall to prevent it from tipping over.
A few years ago, a tragedy occurred in America when children knocked over an unsecured chest of drawers. And although it was adults who violated safety regulations, IKEA has revised its standards and now includes mounting kits even for low furniture like bedside tables.
Of course, an Ikea rack or cabinet will stand like any other, but since this is a safety issue (primarily for children, who quite unexpectedly and even at a relatively adult age can decide to use shelves or drawers as a ladder), then, of course, it’s worth secure furniture (especially narrow and tall ones). As parents and simply responsible people, we attached all the tall furniture that we have in our house. Why? Because this is a very simple action, you only need to screw a couple of bolts into the wall. It takes a couple of minutes, but it increases your peace of mind by an order of magnitude.
Included with any cabinet furniture is a metal bracket, which is attached with one side to the wall and the other to the piece of furniture. The design allows you to step back from the wall (for example, if there is a pipe or a wide plinth running along the bottom
If the wall is painted, then usually no questions arise; in the case of wallpaper, it is recommended that before drilling, make a cross-shaped cut in the place where the hole will be and carefully bend the corners. If you decide to rearrange the furniture, these corners are glued and there is no trace of the hole left. Fastenings do not spoil the repair! Not so much as to neglect safety in order to preserve the walls. It is especially important to fasten large furniture like chests of drawers, cabinets or overshoes, but we don’t move them according to our mood! So only you will know about a couple of small holes.
As for the fasteners themselves, which are screwed into the wall, they are not included in the furniture set (the same for shelves, photo frames and other hanging elements), since different types of walls require different types of fastenings.
In addition, it is also worth remembering that the heaviest items should be stored on the lower shelves and in the back of the drawers.
A shelf or drawer cannot be used as a step.
This is a staged video, the furniture is not IKEA, no one was hurt, but we really hope that it will convince you not to neglect safety precautions.
We have been bringing IKEA products to Crimea and Simferopol for a long time and are completely confident that they should bring only joy!
Order any and see for yourself.
If you liked or found this article useful, share it on social networks:
Source
At what height should kitchen wall cabinets be mounted?
Almost every kitchen has a combination of floor and wall cabinets. Such furniture makes it easier to maintain order and helps free up space for household chores. However, to maximize the efficiency of your cabinets and countertops, it is important to install the furniture correctly.
From this article you will learn how and at what height to mount wall cabinets, and also become familiar with some other ergonomic rules for organizing kitchen space.
Basic criteria for determining height
Growth of the hostess and other family members
This criterion is perhaps the most important when determining the installation height of wall cabinets. It is best to hang them at eye level so you can clearly see the contents. It is important that all users can comfortably reach the highest shelf without a stool. The top panel of the cabinet should not be more than 20–25 cm higher than a person’s height.
Ceiling height
If the ceilings are not high enough, you should not choose high wall cabinets for the kitchen combination, since the height of the room simply may not be enough to accommodate the selected furniture.
Design and dimensions of a kitchen apron
The apron can be standard, such as LIESEKIL wall panels. It is also often made up of tiles, which allow you to lay out a certain ornament. Before calculating where to attach the wall cabinets, you need to decide on the type and dimensions of the apron. Then it will fit harmoniously into the interior.
Furniture dimensions
Tall cabinets are recommended for small rooms where every centimeter counts. To make it convenient to use such cabinets, it makes sense to purchase a ladder stool or mini-stepladder. This inexpensive item will allow you to easily and safely get the necessary things even from the very top shelves. Suitable options are TENGULT, GRUBBAN, BEKVEM.
Aligning the top panels of wall cabinets
When attaching drawers, it is important to focus on the distance between the bottom panel of the wall cabinets and the work surface, and then the height of the top panels will be determined by the height of the cabinets themselves. If your combination includes a high floor cabinet, then for the beauty of the interior you need to align the height of the top panels of the wall cabinets with its top panel.
Distance from wall cabinets to work surface
The optimal distance from the bottom panel of wall cabinets to the countertop is considered to be 50–60 cm. This height allows you to use the space as efficiently as possible. You will have enough space for wall accessories - rails, containers, hooks, etc. If the cabinets are mounted too low, they may get in the way when working in the kitchen. It is also important to provide sufficient distance to the cabinets from the hob - for example, if you are using a built-in hood built into a wall cabinet.
Exploitation
When placing furniture, you should immediately think about how you plan to use it. In different cabinets, things can be arranged most conveniently and beautifully.
Door opener
To make the furniture convenient to use, you should also pay attention to the door opening mechanism. For example, thanks to hinges with a built-in closer, the doors close smoothly and silently.
Functions of shelves in the interior
This small piece performs many functions and significantly complements the room. Therefore, in most of their projects, designers use such furniture.
Shelves are easy to make with your own hands. But if you do not have experience in such work, then it is better to buy such a product in a store. Inexpensive but stylish options can be found at Ikea.
Wall shelves are a great addition to your interior. After all, they perform many functions. We propose to consider which ones.
What functions do wall mounted shelves perform:
- These are complete storage spaces. They can fit a lot of necessary little things. For example, in the hallway it is convenient to place your keys and wallet on them.
- Can act as decorative stands. At the same time, everyone can see the decor on them.
- Beautiful shelves can be decor in themselves. At the moment there are many original ideas.
Hanging ones look very nice in the interior of an apartment. Therefore, if you really want to make your interior original, choose stylish and unusual shelves.
Mounting methods
Installation of the combination should begin from the wall or corner module. This way you will definitely not be mistaken with the height and will correctly calculate the location of all sections relative to the width of the walls and each other.
When installing cabinets, the main thing is to secure them securely. Otherwise, they may not withstand the load.
There are two main fastening technologies.
On hinges
This method is suitable for installing furniture of any configuration. Each module is mounted separately, so a level is required for alignment. Stages of work:
On mounting rail
A fastening method that allows you to evenly distribute the weight of the cabinet and adjust its height. The sequence of work will be as follows.
Source
Marking
Having decided on the height, mark the horizon using a tape measure, laser or hydraulic level. If the set is corner, start from the corner. If the block will be located in the center of the wall, then draw a line for the location of the side wall of the far right or left cabinet, and start marking from its top point.
The best option for marking markings is to use a hydraulic level. In this case, the line will not move, as often happens when using a tape measure.
A laser level guarantees convenience, speed and maximum accuracy, but not everyone is ready to purchase this device due to its high cost.
From grandfather's drawers to modern storage solutions
During her student years, Petra Kammari Enarsson, a product designer at IKEA, moved frequently and used old fishing boxes given to her by her grandfather, who lived on the east coast of Sweden, to store things. Many years later, while developing the new EKET series, she remembered these boxes to create a mobile storage solution.
New technologies, new hobbies and even a new family member... big and small changes affect our lives, our needs and our home, which must accommodate so many of the most necessary things. As an IKEA product designer, Petra often visited our customers' homes to explore their daily lives and understand how storage solutions could change them for the better. She remembered one family from Copenhagen, to whom the daughter of one of their spouses from a previous marriage came to stay once every two weeks. “There was no separate room for the girl in the house, but her parents put a loft bed in the living room for her, and the chest of drawers under the bed could be used for things.” This is an excellent example of how you can intelligently and comfortably organize life even in a small house. After all, most of the day's events and activities take place in the living room, which is why it is so important that the interior of this room is both stylish and practical at the same time.
Furniture adapts to you
Frequent moving is a new trend in the modern world; people easily change their place of residence, just like Petra in her student years. “The problem is that most furniture doesn’t suit a mobile lifestyle, which means you’ll have a hard time keeping things organized.” This finding inspired Petra and her colleagues to develop more flexible and customized storage solutions that can be easily adapted to suit changing needs without you having to buy new furniture. Petra thought about the boxes that in her youth replaced her closet and chest of drawers. They were easy to move and could be stacked one on top of the other. What if you make a piece of furniture consisting of different modules that can be added and removed.
Furniture designer
To get started, Petra's team ordered cardboard boxes of different sizes. They placed boxes in different rooms and combined them in different ways, like building blocks. They also looked at various storage statistics, such as how many magazines we keep at home or what height of module would be ideal for storing a cell phone. “Many people, when returning home, put their keys, phone or bag in a certain place. We often do this automatically, without thinking,” says Petra. The height that is suitable for most people is 80 cm, so a shelf at this height must definitely be among the cabinets, shelves and drawers that are included in the EKET series. “I’m glad that mobility and freedom of choice have become our priority, we have created EKET modules in different colors and sizes,” says Petra, looking forward to seeing the products she has designed in our customers’ homes. “I think the most unexpected decisions await us, which we did not even imagine.”
Source