by Alexey | Crafts For Friends Gifts For Loved Ones Decor For Men For Women Workshop Cheap Accessories | Sunday, January 07, 2018
| Follow Make-Self.net on Facebook and be the first to read our articles. |
Coasters for cups are not only decorative, but also protect the table surface from scratches and stains left by the mugs. These coasters are usually made of wood, cork, marble or fabric . Although stores offer a huge selection of coasters for cups, you can also create your own unique options that will fit specifically into your interior. Take a look at 15 examples to inspire you.
Coasters for a mug made of paper or cardboard
polaroid photos
Capture bright moments with one click and print. To give the product strength we need ceramic tiles. We glue rubber or felt legs for better stability. Family photos are also a great idea to please yourself. Don't forget to apply two layers of protective varnish. An aerosol can of hairspray is suitable for this.
The result will be truly unique little things that radiate homely warmth.
With stills from comics
It's better to start the morning with a smile. Make a base from thick cardboard or plywood. Stick on funny scenes and varnish in several layers. Have a hot drink and enjoy.
Try making a set with stills from comic books - maybe the sticky circles from soda glasses will finally disappear from the furniture in the nursery.
From magazine pages
They look stylish and are appropriate in any interior. Using glue, secure pages or sheets of newspaper to a solid base and protect with yacht varnish. Geographic maps or starry skies also look great.
Meditative, cheap and environmentally friendly!
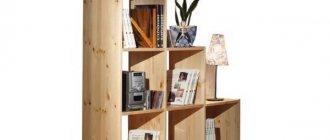
Idea 9. Jars for storing spices and bulk products
When you don't have enough storage space in the kitchen, the bottom of a wall cabinet and a few glass jars with tin lids will help you out. Depending on the volume of the jars, you can store spices, cereals, sugar, salt or any small items in them.
- Make three holes in the lids using a nail and hammer.
- Screw the lids to the bottom of the wall cabinet using self-tapping screws. It is best to choose a cabinet that is closest to the stove and work area.
- Fill the jars and screw them onto the lids. Voila, the organizer is ready!
How to make it yourself
Many housewives wonder how to make a hot stand with their own hands. There are a great many ideas that are easy to implement.
From felt
Felt is a malleable material; it can be used to make a stand of any configuration without any special skills. A fresh solution would be products in the form of lemon slices.
Materials and tools:
- felt (white, yellow);
- floss threads (same colors);
- scissors;
- needles (for sewing and fixing).
Step-by-step instruction:
- Cut 2 circles with a diameter of 8.5 cm from white felt, one circle with a diameter of 10 cm and another 2 circles with a diameter of 7 cm from yellow felt. The last two circles need to be cut into 8 slices each.
- Place the slices on the white blanks and secure. Sew each of them with colored threads using a “forward needle” seam.
- Connect the white circles with the colored one in between. Sew with the same seam, but with white threads.
There is nothing complicated in the manufacturing process, but the kitchen interior will immediately sparkle with summer colors.
From wood cuts
To make wooden coasters for hot dishes, you will need branches (logs) of trees. Beautiful pattern of saw cuts in apple, juniper, plum, oak, and ash trees.
Materials and tools:
- logs of branches 3-6 cm thick;
- base made of plywood or large-diameter sawn wood;
- miter saw or hacksaw;
- wood glue;
- sandpaper.
Step-by-step instruction:
- If the bark is easily removed from the branches, it is better to remove it.
- Saw round pieces 4-5 mm thick. The more parts of different diameters, the more impressive the stand looks.
- Lay out a dense pattern of blanks on the base.
- Sand with sandpaper and glue.
- Leave for a day to dry under pressure.
This hot stand will fit into almost any interior and will delight its owners with a long service life.
We take branches of approximately the same size. We file round pieces. You should get the following details. Apply a little PVA glue to each round piece on the side. Glue it together and wait for the stand to dry.
From wine corks
Before you make a stand for hot food from wine corks with your own hands, you need to select 4 identical products. In addition to them, you will need the following materials and tools:
- base made of plywood or linoleum;
- stationery knife;
- sandpaper;
- glue "Moment";
- twine or decorative rope.
Step-by-step instruction:
- Place the corks vertically and cut each into two halves.
- Straighten the cuts and polish them.
- Prepare a base measuring 9.5 x 9 cm and sand it. Place the plugs on it.
- Glue all 8 parts at once.
- Place under a press for a day.
- Decorate the side by gluing twine.
Such a product can serve as a decoration not only for a city kitchen, but also for a country house.
From discs and fabric
An elementary option that will not cause any difficulties in manufacturing.
Materials and tools:
- two old disks;
- fabric and padding polyester;
- lace;
- scissors;
- needle;
- threads to match the fabric or lace.
Step-by-step instructions on how to sew a hot stand with your own hands:
- From fabric and padding polyester, cut out 2 circles with a diameter 2 cm larger than the circumference of the disk.
- Baste the fabric circle to the padding circle along the edge of the product.
- Place the disk in the center and tighten the thread.
- Make another blank.
- Connect the disks, trim the edge with lace.
Making such a stand does not require large material and labor costs, and the result will pleasantly please any connoisseur of exclusive things.
Knitted
As an option, you can knit a stand in the shape of a green apple. To do this, you will need cotton or wool threads in green, olive and brown colors, as well as a No. 2 or larger hook.
Step-by-step instruction:
- Make a circle with a diameter of 10 cm from green threads (start from a chain of 5 air loops connected into a circle and then knit in a circle with single crochets).
- Knit the stalk from brown threads: cast on 10 air loops and knit 10 half-columns.
- For the leaves, use olive thread to knit 14 chain stitches and tie them on both sides with single crochets. To increase the width of the leaf in the middle, instead of single crochets, knit the same stitches, but with a double crochet.
- Sew all the details.
Unique comfort and a warm atmosphere in the kitchen are created by all sorts of little things, including coasters for hot dishes. You just have to choose an idea and bring it to life, especially since it doesn’t require any special skills.
Decoupage technique
We will need:
- napkin with a pattern,
- preparations for the site,
- white acrylic paint,
- acrylic glossy decoupage varnish,
- PVA glue,
- tassel,
- scissors,
- sponge.
Such original solutions inspire creativity.
Let's paint our base with white paint on both sides. For this we will use a sponge, with which we will apply layers until we completely cover the entire area. Let's wait until the workpiece is completely dry. Separate the top layer with the pattern from the napkin. Carefully glue it to the site, applying a layer of adhesive first to the base and then to the surface of the napkin. We also close and glue the edges of the workpiece. We wait until it dries completely. Cover with two layers of glossy varnish. To do this, it is better to use an aerosol can.
Botanical prints on a cut of wood.
A DIY cup stand is a great gift. This is a necessary little thing in everyday life that is pleasant to use.
Now you can take every sip of your favorite drink with pleasure.
Knitted
For those who know how to knit and crochet - freedom for creativity! The number of models is amazing with the variety of patterns, shapes and colors. Frankly, it was difficult to choose a few pieces; I wanted to show everything.
The variety of knitted patterns is impressive
And again I dare to give advice from a practical point of view: it is advisable to take yarn of medium thickness and tighten the loops as tightly as possible, otherwise the fabric will turn out loose and will not hold its shape well. If you choose between knitting needles and crochet, I would give preference to the latter.
Crochet coasters
Even if you only know how to knit flat “pancakes”, you can already swing at the stand! A few stitches of simple embroidery will turn a faceless circle into a mischievous smiley face in the blink of an eye.
Models with flowers and ears-tails may seem complicated at first glance, but they are not! There are many simple and understandable patterns on the Internet that make it easy to knit such coasters.
Simple models
The imagination of craftswomen is limitless: here are a small fraction of the ideas that seemed worthy of attention to me, but there are many times more of them!
How do you like these ideas?
And again, ideas for coasters to match the dishes. Very beautiful! It’s a pity, but this option is not for me... Girls like a variety of cups, so over time an impressive varied collection with flowers, birds, Harry Potter, resort towns, etc. has accumulated. Plus those that were given to my husband, and there are also a lot of them... In general, there can be no talk of a single color scheme.
Idea for a service
However, knitted patchwork can solve the problem, you just need to adjust the number and color of the “flaps” to suit your needs.
As an option
The following coasters captivate with their elegant appearance, behind which you can not see the flaw: they will not hold their shape, no matter how tightly you pull the loops when knitting! Here I see two options for solving the problem: either starch it after each wash, or put it on a solid base (matching or contrasting), for example, felt.
They were probably starched for the photo shoot.
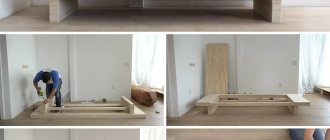
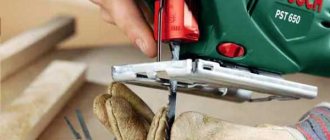
Preparation
Mark the square pieces on the boards and cut the wood with a circular or hand saw.
Tour operators spoke about the most budget destinations in Russia in April
Cartoon about Hansel and Gretel from Wizart Animation studio is released
AliExpress calculated the cost of Russians' online shopping cart
I wanted a base made from planks with rounded edges, so all sides of the squares were sanded.
Additionally, process all workpieces with sandpaper, achieving complete smoothness of the surfaces. In the future, it will be easier to work with sanded parts, and finishing will take much less time.
Stands made from molds and lids
Cake pans
From a cork sheet we cut out the parts to fit the bottom. Use the stamps you like and apply the design. Glue it inside and fill it with transparent resin. After a few days it will harden and become as hard as glass.
Coasters made from cupcake tins.
Caps and photos
Let's print out photos of our favorite people. Cut it into a circle and stick it on the lid. As in the previous example, let's prepare the epoxy resin and pour our blanks. A little patience, wait a couple of days until it hardens completely. Now you don't have to be afraid of drops.
Stands made from family photographs.
Tips for choosing
Before you go to the checkout and pay for the hot tray, you need to look at and evaluate the following criteria:
- Resistance to elevated temperatures.
- Workmanship. At this point it is important to pay special attention; try to find all the elements that stick out, are poorly glued or are not fully stitched. It is better to immediately pass by such stands, as they can be thrown away after a month of use. Shake the stand in your hand a little; if you feel that some of its elements are loose, then it is better to refuse the purchase. Since most likely after the first or second use the stand will fall apart.
- It would also be nice if the material of the stand was anti-slip, both on the top and bottom. For this purpose, a fine abrasive coating is applied to the upper part, which does an excellent job of fixing dishes.
- Simplicity and ease of movement on a table or other surface.
- The coating of the stand plays an equally important role. Lightly scrape the surface with your fingernail; the protective coating should not come off.
- Smooth surface of the stand without slope. The relief of the stand is not at all necessary, since this reduces the contact area, and accordingly, the stability of the dishes decreases.
By thinking about the parameters of the product in advance, you will be able to protect yourself from severe disappointment with the purchase, as well as avoid unnecessary expenses. A properly selected hot pad will last you more than 1 year.
We are sure that you enjoyed reading the article, and we also want to believe that you will definitely try to make a hot stand yourself. Moreover, we have provided many interesting methods, and you can choose the one you like best. Good luck!
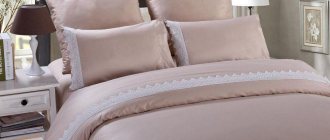
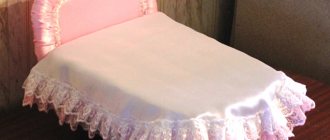
Coasters for a mug made of fabric and threads
Embroidery and applique
For more experienced craftswomen with sewing skills.
If you love to sew and have the right fabric on hand, you can make a wonderful set of very cozy accessories like in the photo.
Tools:
- main fabric,
- foam padding,
- threads,
- braid,
- needle,
- scissors.
Let's decide on the shape and make a template for the pattern.
Let's cut out all the details. A dense material, such as denim or felt, would be appropriate here. Cardboard can be inserted inside to make it firmer. If you are planning a round product, then an old CD will hold its shape perfectly. We will do embroidery or applique on the front side. Let's put all the parts and sew them together.
Finish the edge of the product with braid or bias tape.
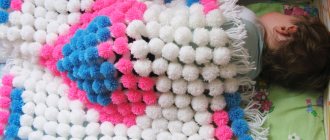
Miniature colored wool balls
Let's purchase ready-made felt balls. You can simply stick them on a solid base. Or string it on a thread and sew it together, in which case we can do without a backing.
These bright bonfires may well become your favorites, they are so cozy.
Jute rope coasters
A glue gun will make the job much easier. Let's prepare a base in the form of a circle made of cardboard or cork. We fix the rope in the center and begin laying it in a spiral, carefully applying glue and tightly fitting the turns to each other. You can take multi-colored skeins and alternate colors.
In the summer they will add a little sea mood to your home.
Knitted products
Colored ball, hook or knitting needles, scissors. With a little patience and skill, your homemade mug stand is ready. It can be in the form of a circle or square, colored or plain.
Make them plain and add embroidery with a contrasting thread.
Mug coasters made of clay and stone
Sea pebbles
This item will be a wonderful reminder of a beach holiday. Select flat pebbles that are approximately the same size. Prepare a solid base. Pre-arrange the elements so that they fit snugly against each other. Then glue them firmly into place.
Using sea stones for a stand.
From white clay
We will need clay of two contrasting colors. For example, black and white. Let's knead the dark base and attach light pieces in random order. Let's make a “sausage”, then press it into a ball again. Let's divide it into parts. Let's prepare a template in the shape of a polygon. Roll out each piece separately and trim off the excess.
Dry in the oven at 120 C for about 25 minutes.
From agates
The easiest way is to order blanks of the desired size and shape in the online store. Take a small brush and apply golden paint to the edge in a circle. Let's glue the legs to our stand for stability.
Bright stand made of agate cut.