by Alexey | Crafts Decor Workshop Furniture Cheap | Saturday, November 20, 2021
| Follow Make-Self.net on Facebook and be the first to read our articles. |
Stylish furniture that matches your interior is not only difficult to find, but also the high prices will greatly surprise you. Every middle-income person finds himself feeling his heartbeat with one hand and clutching his pocket with the other after hearing about the exorbitant prices of furniture in the market. If you can't find a way to avoid these harsh truths about inflation, then the only thing that can save you is your passion for making furniture yourself.
Here are collected the coolest ideas and projects for both creating furniture from scratch and restoring and remodeling old interior items. You will be inspired by extremely clever restorations, simple yet stylish designs to create unusual and charming furniture.
In this article we tried to include the most interesting furniture projects that you can make yourself. Over time, the number of projects will only increase. Take a look at 480 furniture examples to inspire you!
If your cat has been thinking about getting a personal cat house for a long time, then we recommend taking a look at 33 incredible cat houses.
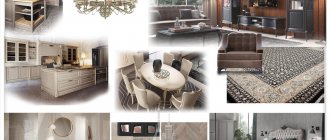
Dinner table
When choosing a simple table, it will not be so easy to choose exactly the option and specific style that you would like to recreate. You can make your dreams come true even on a limited budget! We've rounded up 20 of the best dining table designs you can make yourself.
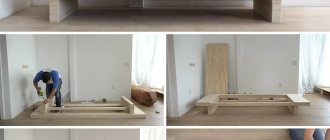
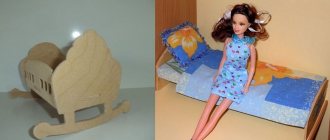
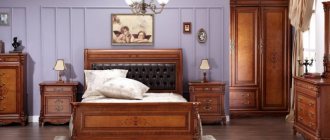
Bed
A DIY bed is a master class that is popular. For manufacturing, it is better to select wood with a high moisture content.
The bed can be made by both a novice craftsman and an experienced furniture maker who has special woodworking equipment.
The process looks like this:
- a diagram is drawn, materials and accessories are purchased, the necessary tools are selected;
- the frame is assembled: the bars are fastened together with self-tapping screws;
- the edges are filed down and smoothed with a sanding machine;
- the frame is painted with a composition for wood;
- supports for the slatted bottom are made;
- holes are drilled in the frame, bars are mounted;
- wooden slats are attached to the supports, the distance between them should be the same;
- The legs are made from wooden blocks, their cross-section and length should be within 10 cm.
Having decided on the dimensions, you should think about the design of the bed and its design style, and draw up a drawing or sketch.
- the legs are mounted to the frame;
- The furniture is sanded and top coated with varnish.
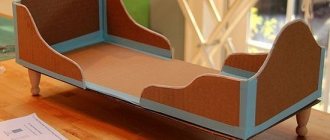
The bed can be decorated with various types of decor, which will greatly decorate the bedroom where it will be installed.
Decoration can be different: painting, carving, original painting. To ensure that the furniture is level and not skewed, a building level is used at all stages.
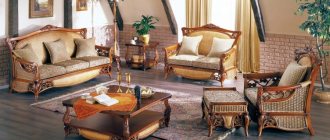
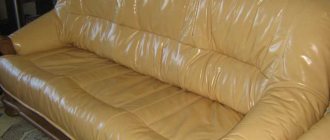
Simple sofa
Do you want to relax on the sofa after a hard day at work? But you are not satisfied with the size, color of the wood, quality of materials or price offered in stores. Take a look at 40 simple sofa designs to inspire you and save your family budget. If you want to make a sofa for relaxing in the garden, I suggest you take a look at 10 garden sofa designs.
Assembly
When transitioning from constructing furniture with your own hands to assembly, the entire process can be described in the following steps:
- All present fittings (hinges, locks, ties, runners) are attached to the main parts;
- Assemble the frame and back wall, mount the mirrors;
- They check the fittings, attach handles, plugs, and install retractable elements in their places.
Depending on what piece of furniture you plan to assemble, the process may differ slightly, but the basic procedure remains the same. So that every person planning to create furniture with his own hands understands how he needs to act, we can analyze the whole process using the example of creating an ordinary cabinet.
We fasten the fittings
Assembling the frame
We mount the handles We attach the plugs
Stage 1. Frame
The cut parts are connected according to the plan. To perform the screed, it is first recommended to prepare a screwdriver with special bits. Twisting will happen much faster than with a screwdriver. In addition, much less effort will be spent on such work. It is important to ensure maximum structural strength, so it is not recommended to use nails to strengthen the bottom of the cabinet. The best choice would be 4 by 16 self-tapping screws. The side surfaces, as well as the top and bottom, are connected at right angles using furniture corners. You can nail the back wall of the cabinet to the finished frame.
Assembling the base Making holes
Installing the lower part of the frame Attaching the shelves
Stage 2. Sliding system
To ensure the correct movement of sliding doors, the guides are first attached. They are mounted parallel to the top and bottom planes of the cabinet. One of the best options would be to use a specially developed system called “Commander”. Without much effort, you can not only move the doors to the desired position, but also easily make adjustments. As a rule, adjustment is needed if gaps are observed during the assembly process, which not only spoils the appearance, but also complicates operation. In most cases, during the first time after assembly, cabinet furniture shrinks, which can also result in cracks appearing. This is considered normal due to the specific characteristics of the material.
Special rollers are screwed to the doors. The finished structure is installed in the guides and the progress is checked.
Installing the stopper Installing the rubber pad Installing the guides Adjusting the system
Stage 3. Installation of fittings
At this stage, all shelves, drawers are inserted into place, coat hooks and other small elements are attached. The cabinet is ready. Even a person who does not have experience in creating cabinet furniture with his own hands will not spend a lot of time creating something of excellent quality. The average assembly time is no more than three hours, excluding preparatory work. In addition, the cost of a handmade product is much lower than the price of ready-made furniture in a store.
Assembling cabinet furniture with your own hands is a combination of the optimal design solution, the choice of quality materials, as well as the acquisition of new skills, with the help of which you can create entire furniture sets in the future.
Bamboo furniture
Bamboo has great endurance in any conditions and retains its appearance for many years. Additionally, it is naturally stronger than other traditional hardwoods available and is very environmentally friendly. Check out 14 cool bamboo furniture ideas and ways to join trunks to get inspired to create a unique piece.
Step-by-step instruction
First you need to determine what cabinet furniture is made of. The most common and affordable materials are chipboard, fiberboard or chipboard. Solid wood is more reliable and stronger, but it costs more and is more difficult to work with.
Design
All instructions for creating cabinet furniture can be divided into two stages. The first is the design of cabinet furniture. This stage involves an artistic or graphic representation of all elements (drawings of cabinet furniture). This is a complex undertaking, since a project diagram must be correctly developed to help visualize the necessary functionality of the furniture.
Just a few years ago, such a project could only be developed by a qualified designer, but with the help of modern applications and programs, you can work on the task yourself. To draw up a clear plan for designing cabinet furniture with your own hands, it is worth determining what information should be contained in it:
- On a separate plan, you need to draw the general design of the room in order to visualize the position and appearance of cabinet furniture;
- All dimensions are included in the project - section dimensions, height, depth;
- All the details that will serve as the basis of cabinet furniture are worked out, drawings of facades with the required dimensions are included;
- The texture and color scheme are selected.
On the Internet you can find special 3D programs with which you can recreate absolutely any furniture project. In the functions you can set special parameters and even select the material from which you plan to create the desired interior items. The main advantage of such services is that there is no need to study information on how to calculate dimensions or draw “the old fashioned way,” especially since not every person has such skills. The finished version is printed on a printer as a photo project, and then it’s a matter of technique and practical skills.
The graphical drawing of the overall project determines the success of the planned business, but the creation of details is an equally important undertaking. First of all, everyone should think about what functions the furniture should perform and only after that start drawing. Correct sizing is a determining factor in the success of all further assembly. Otherwise, the part may not fit into place, which means that its shape will need to be adjusted, which means additional financial expenses. Even if the plans include making an ordinary storage cabinet, each detail should appear from a separate perspective in the drawing:
- Back wall;
- Front Panel;
- Side walls;
- Each shelf;
- Door.
As for the parts that will be retractable, they are also drawn separately from the rest.
We create a general design and take measurements
We create color design
Creating parts
The production of parts is carried out according to the general instructions:
- Selecting the material from which the parts will be formed;
- Creating a project on a computer using a 3D program or drawing by hand on whatman paper;
- Making patterns by printing on a printer or making patterns by hand;
- Transferring blanks to the material by tracing patterns with a pencil or bright marker;
- Sawing using a high-performance machine;
- Edge processing, grinding if necessary;
- Drilling holes for fasteners.
Choosing manufacturing materials Making a project
Creating patterns and cutting out materials We cut chipboard
Sanding the coating Making holes
Shelves and racks
The day has come when your books will no longer be on a chaotic journey around the apartment. It's time to make shelving, and our selection of 40 unique shelving and bookshelves that will awaken the urge to make your own will help you with this.
Here are hanging shelves that are perfect for small spaces.
Facades
Kitchen fronts and furniture doors are usually made of more elegant material. But if you are making a drawer door inside a sliding wardrobe that no one will see, you can use regular 16 mm laminated chipboard with a 2 mm PVC edge for it. But the cabinets in the kitchen should look more presentable.
The facade is a separate furniture element. It is usually made to order. If the dimensions of the facades are non-standard, their production may take several months.
You can easily navigate the standard dimensions: usually the facades are made 2 mm smaller than the cabinet itself on each side. Therefore, for a standard 600 mm cabinet, a 596 mm façade is used.
The height of the kitchen cabinet also depends on the facade and ranges from 715 to 725 mm for floor cabinets (without legs) and low wall cabinets, and 915-925 mm for high wall cabinets.
Standard front sizes for kitchen cabinets
Types of facades
Since facades serve mainly a decorative function, the choice is huge; they differ in appearance and material.
- Facades made of laminated MDF. This is a pressed material, more moisture-resistant and dense compared to chipboard. Most often, the surface is laminated to look like wood. But no matter how strong the film is, over time it can come off at the edges and crack. The main advantage of this material is its low price and fast production.
MDF facades
- In addition to standard blank facades, there are also options with figured cutouts for stained glass. The glass is attached to the cover on the reverse side.
- Softforming - such facades are similar to ordinary MDF, but have a characteristic two-color layout with relief on both sides. They can only be used in dry rooms, bedrooms or living rooms.
Softforming
- Postforming – even higher quality and durable products. Thin plastic at the edges is wrapped 90° or 180°, thereby eliminating unnecessary seams at the corners. Chipboard or MDF boards are used as the base. Typically, postforming is done in a strict form, without unnecessary pretentious decorative elements.
Postforming
- Plastic facades are of high quality, but expensive. They consist of a base (chipboard/MDF) lined on both sides with thick plastic. They always have a strict design and a flat surface, glossy or matte. The edges of the slab are sometimes protected with ABS edges or aluminum profiles. Super-glossy acrylic plastic has been especially popular lately.
Plastic facades in aluminum profile
- Facades made of wood and veneer are suitable for lovers of natural materials, but they are expensive. In addition, there is a long debate about environmental friendliness: there is an opinion that there is so much varnish and impregnation that there is only one name left for the tree.
Wooden facades
- Painted facades to resemble enamel. They have a significant drawback - the surface is vulnerable to scratches and deformations, and has low chemical resistance. They used to be popular due to their rich color, but with the advent of glossy acrylic plastic, everything changed.
- Aluminum facades with glass are suitable for a high-tech kitchen. They look modern, but are difficult to manufacture and install. Non-standard fittings are used for their fastening.
Plywood furniture
In the era of minimalism, natural motifs and naturalness, plywood could not have come at a better time. More recently, this material was considered faceless, unsightly and too cheap in appearance. Today, along with exposed brick walls and bare concrete floors, plywood furniture is in fashion. It's worth taking a look at 50 examples of plywood furniture. You might also be interested in this article about a list of projects that can be made from just one sheet of plywood.
Tabletops
A tabletop is a horizontal work surface on which you can cook, eat, read, write, etc.
Most office and desk tables, as well as cheap dining tables, have a tabletop made of the same chipboard as the main parts. The thickness is 16 or 22 mm, it is necessary to frame it with a 2 mm PVC edge.
Special countertops are used for the kitchen. They are a sheet of chipboard 28-38 mm thick, which is covered on top with durable plastic using postforming technology. Moisture-resistant countertops are green when cut, while regular chipboard is gray. A proper kitchen countertop should have a drip tray that will prevent dripping liquid from getting onto the fronts and drawers.
Cutting a regular and moisture-resistant countertop
The weak point of such countertops is the cut edge. They are usually covered with a simple melamine edge, so they become unusable within the first year of use. To avoid this, it is recommended to protect the edges with special aluminum profiles (end strip), and to protect against moisture, pre-coat the cut with silicone sealant.
There are also other types of profiles: corner and connecting strips, which are needed for joining several cabinets with different countertops.
Corner, connecting and end strip for table top
Another element is a decorative corner that closes the gap between the wall and the tabletop.
Skirting board for table top
A wall panel is sometimes used to finish the apron. Unlike tiles or mosaics, it is more practical due to the absence of seams and is inexpensive compared to glass splashbacks.
The tabletop is attached to the cabinets from below using short self-tapping screws to horizontal spacers so as not to spoil the smooth front surface.
Scheme of fastening the tabletop to the cabinet
Countertops made from natural or artificial stone are higher quality and more durable than others. Natural stone is heavy and requires special care due to its high porosity. But artificial stone does not have such disadvantages; it can be given any size and shape. The main disadvantage of stone countertops is the high price; for a small kitchen they cost from 40 thousand rubles. and more.
An alternative option is a countertop made of tiles or porcelain stoneware. You can make it yourself, but the tiles cannot be mounted on regular plywood or chipboard. The base must first be covered with cement-fiber sheets.
Original furniture designs
Below are interesting furniture designs, some of which cannot be brought to life without drawings and specialized tools. But friends, try, create and you will succeed! Don't spend a lot of money on designer tables. They were also made by people. Why can't you?
Preparatory process
The creation of any furniture always begins with the design of the future item. This can be done in the traditional way, drawing a drawing on paper, or using special programs. You should also make accurate calculations and select the necessary parts for the product.
Steps for making a simple do-it-yourself plasterboard cabinet
Design
Today there are many 3D programs for creating furniture designs. Their main advantage is that there is no need for design skills. There is no need to study information on sizing calculations and draw on paper - not every person has such skills. Of all the programs, there are 5 most popular:
- Volume;
- T-FLEX Furniture;
- SketchUp;
- Adobe Photoshop;
- DYNALOG.
Before printing a drawing for the manufacture of cabinet furniture, you should double-check everything carefully. Otherwise, one mistake in calculations can reduce the efforts to nothing - nothing will be remade.
What is modern furniture made of, an overview of the main materials
Volume
T-FLEX Furniture SketchUp Adobe Photoshop DYNALOG
Assembly drawings
It is advisable to create an assembly drawing that will simplify the manufacture of furniture. It includes:
- images of all parts, providing information about their connection and location relative to other parts of the product;
- exact dimensions;
- designations of permanent connections and conventional numbers of components;
- specifications.
An assembly drawing is a type of engineering document that shows the location of all parts of a product and their relationship to each other.
Calculation and detailing
The technology for manufacturing cabinet furniture requires careful adherence to preliminary calculations. The design of the product must maintain rigidity. This can be achieved using a back wall or drawer, which is fixed at an angle of 90 degrees between the panels. Without these parts, the furniture will constantly wobble or fail.
It is important to remember about gravity - all unsupported elements with a length of more than 90 cm will sag. The thickness and width of the part will not affect this in any way. It is also necessary to calculate partitions that will not prevent the product from serving its intended purpose and will serve as a rigid frame.
How to use wood putty
It happens that chips, dents or deep scratches appear in the wood due to mechanical stress. In this case, you will need wood putty to disguise these imperfections. If you've never worked with this material before, be warned, it may soon become your favorite item in the toolbox. Find out in more detail how to use putty on wood, it will definitely come in handy.
Follow us on Pinterest for more interesting articles.
Useful short videos from Make-Self.net
Manufacturing technologies
Answering the question of how to make cabinet furniture at home, we divide the whole process into several stages.
Cutting out the parts that make up the overall structure
When you plan to work with chipboard, it is impossible to do without cutting. Using a machine, we cut chipboard, on which we distribute all the workpieces in advance. This will help reduce material consumption. It is recommended to use a high-performance machine, due to which the optimal sawing frequency is achieved, since a scoring saw is installed here.
It is easier to work with ready-made laminated chipboards. In stores you can buy options covered with a decorative layer to suit every taste. All that remains is to cut out the necessary parts from them. If the furniture is made from unprocessed raw materials, then you need to paste over the already cut parts. The cladding can be done with self-adhesive film or special plastic.
We take measurements
We make cuts with a machine
Processing slices
Before assembling the cut parts, you need to process the cuts. For this purpose, adhesive-based edge tape is used. Before work, it is important to pay attention to the conditions in the room:
- The humidity percentage should be as low as possible;
- It must be warm to avoid deformation of the material.
To paste parts with edge tape, prepare a breadboard or construction knife and an ordinary iron. Most often, the edge is sold with an already sticky layer, and no additional surface treatment is required.
You can use a professional iron. During operation, it is important to keep it at a certain distance from the surface in order to avoid displacement and secure all parts tightly in place.
It is important to remember that the iron must be held on the edge for a short amount of time, otherwise it will overheat and bubble. As soon as the edge is fixed and takes a certain position, take a knife, trim the edge and smooth out all the irregularities with sandpaper.
Trim off unnecessary parts
Glue the edge
Marking points for fittings
The finished parts must be laid out on a flat surface. Next, mark the places where the fittings are attached, in accordance with the plan of the finished product. Check all dimensions; an error of just 1 mm can cause the entire structure to become distorted. The cabinets will stop opening, the doors will not fit together correctly. Next, you need to drill all the holes of the required diameter to secure the fittings.
Lay out the parts on the floor Create markings Drill holes Fasten the fittings
Installation
After the work with the fittings is completed, we proceed to assembling all the elements. Many newcomers to this business first turn to video instructions, which not only show the order of assembling a certain model, but also give practical advice on how not to confuse the entire process. We collect the nodes. This is the final stage when it is necessary to assemble all the prepared parts into a single structure. It is important to perform all operations sequentially.
Workshop - simple ideas for a loggia
For a creative person who prefers to spend his free time creating interesting things with his own hands, the most acceptable solution would be to set up a separate workshop on the loggia area.
Important! In order not to create a feeling of chaos, it is advisable to initially think through all the places where everything you need will be stored
- You can install a comfortable and lightweight work table, a small cabinet for storing tools and workpieces.
- You should hang light shelves on the walls or install racks for finished products, which will further decorate the interior of the balcony workshop.
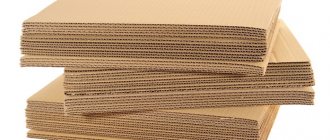
Main material: chipboard
Chipboard panels have a wide range of colors
Laminate (chipboard) is considered the most accessible and inexpensive. It is widely used in the manufacture of furniture, and due to its low cost, it has almost completely replaced wood. It is also used to decorate structures.
The production of laminated chipboard is based on the use of wood waste, which is converted into boards by hot pressing. Product components are bonded with urea-formaldehyde resins.
Set of children's furniture made of laminated chipboard
The material is used for the manufacture of various types of furniture and individual parts, in particular countertops, taking into account the properties it has:
- it can withstand high temperatures;
- some of its types are moisture resistant;
- Available in a wide range of colors and shades;
- easy to process;
- withstands heavy loads;
- sold at an affordable price.
However, laminated chipboard is not an ideal material and has disadvantages. It is not suitable for creating shaped parts and has a negative attitude towards high moisture: when water gets in, the non-moisture-resistant type swells and becomes deformed.
In addition, it requires careful handling when sawing, otherwise the varnish coating will be damaged. A certain skill is also required when drilling a laminated surface.
Features of wicker options
Furniture can be made not only from wood or wood-based materials. Durable and beautiful products made by weaving have long been known, for which the following are used:
- twigs of willow, willow, willow and other plants;
- roots of coniferous trees;
- birch bark (birch bark), used for weaving decorative elements;
- rattan – shoots of the rattan palm;
- bamboo;
- bast - linden bark
- and any climbing plants with a sufficiently dense and flexible base.
Beautiful wicker furniture for home and outdoor
Wickerwork can be used for furniture:
- made entirely from plant materials using various types of weaving;
- wooden, for decorative braiding;
- combined, where various materials and furniture elements made from them are used.
Weaving is used to make various items: from chairs and stools to cabinets and chests of drawers.
Bathroom storage
In a small apartment, bathrooms most often also have a small area, and if the order in a small bathroom gets out of control, then you can resort to various options for storing items such as razors and combs, detergents and toilet paper.
Here are some of the suggestions:
- install shelves above the sink, providing easy access to the things stored on them;
- The space above the toilet should not be neglected, as this is an excellent place to install special baskets or drawers for storing toiletries;
- Towel holders can be installed on the door leaf;
- It is advisable to store many small items and personal hygiene items in cabinet drawers installed in the bathroom;
- Quite a lot of things fit in a narrow closet with drawers;
- A stylish way to keep dirty laundry out of your bathroom is to use space-saving fabric baskets that can be folded and hidden when empty;
- a shower cabin, rather than a bathtub, is the best proposal for increasing the space in the room for taking water procedures.
Frequently asked questions from beginning furniture makers
Before you start making this or that design, you should familiarize yourself with the list of questions that beginners in this business often have.
How to cut parts?
When cutting longitudinal parts, it is better to use a circular saw, and for transverse parts, an electric jigsaw.
Jigsaw
Prices for popular models of jigsaws
Jigsaw
How to connect parts of the structure?
For connections that carry the main load, you will need to use euroscrews or self-tapping screws. In other cases, the parts are assembled using wooden choppers and glue.
Chopiki
Paint or varnish?
The choice of materials for processing depends on the quality of the wood itself. If the material does not have any defects, it can be treated with stain and then a layer of varnish can be applied. If stains appear on the surface, the wood must first be puttied, coated with a primer, and only then painted.
Wood varnishes come in different shades
How to reduce the consumption of paints and varnishes?
Quite often, during final finishing, the paint is quickly absorbed into the surface, which is why bald spots remain on it. This happens because natural wood has a porous structure. That is why professionals recommend pre-treating it with drying oil.
Drying oil for wood processing