Often, in do-it-yourself furniture, narrow strips with a width of about 50-80mm are used as connecting elements, drawers, sides, and stands. It is somewhat impractical to fasten them with two euroscrews on each side - holes located so close to each other do not add either aesthetics or strength to the finished furniture.
- If a narrow strip is “caught” on the long side (for example, if it is the base of a cabinet or the side of a drawer under the oven), the assembly with confirmations remains unchanged - this nuance can be ignored.
- If the connection is such that during the operation of the furniture the part will rotate relative to its axis, then it is better to foresee this moment in advance: drill for confirmations with a shift of a couple of centimeters relative to the opposite sides.
Expert opinion
Viktor Fedorovich Strebizh, leading construction foreman
An electric drill, with a Forstner drill with a diameter of 35 mm clamped in a chuck, drills blind holes to a predetermined depth. If you want to clarify something, please contact me!
How to glue plywood using PVA?
PVA based glue
has high adhesive strength and a colorless adhesive seam. The glue is applied to both plywood surfaces to be glued with a brush or roller, then the structure is left under pressure while the glue hardens. The excess is removed before the glue hardens.
Interesting materials:
What to wear in the Carpathians in autumn? What does a woman wear 2 times a year ending with CO? What is a musical genre? What is the music of the third direction? What are the main genres of vocal music? What are professional achievements? What does the ping command display? What good books should I read? What should a modern woman read? What to give to your grandfather for his 60th birthday from his granddaughter with your own hands?
Varieties
The design and type of fastener will depend on the purpose of the furniture on which it is fixed. The elements can hold the product together inside, creating its frame, and also secure the base of the furniture to the wall or floor. Today the following types of fasteners are used:
- Furniture corner;
- Confirmation;
- Dowel;
- Screeds;
- Shelf supports;
- Bolt nut.
Each of these types has its own characteristics and features that distinguish them from each other. To find out which element is needed to assemble furniture, it is recommended to consider in detail the advantages and disadvantages of each category.
Furniture corner
This element belongs to a simple and outdated type of furniture fastener. It would seem that if a detail is outdated, then why talk about it? It's simple - such a corner will be useful for beginning assemblers. He will also become an assistant in the independent design of furniture products and subsequent assembly. In addition, its installation does not require any special equipment or skills. According to the production material, there are 2 types of furniture corners:
- Plastic - fastened with self-tapping screws, has a more miniature appearance and is relatively light weight. This corner is convenient to use for fastening light furniture panels or for supporting furniture parts;
- Metal - has stiffening ribs and is produced at an angle of 90 degrees. To fix the part, plastic or metal screws and couplings are used. There are holes on one side of the corner and grooves on the opposite side.
Such fasteners are used to connect the roof or bottom of a sliding wardrobe with its walls or when assembling cabinet kitchen furniture. Plastic options are equipped with a special plug, which gives the product a finished look. Metal ones are considered affordable and very durable. The disadvantages of fastening include the gradual loosening of surfaces secured with corners, as well as an unattractive appearance.
Confirmat
This name is usually used to refer to ordinary furniture screws. In another way they are called euroscrews, as well as euroscrews. The fastener is easy to install and does not require precision; a screwdriver or drill is required to fix it. In the screw head there is a hole for a hex key, which is also necessary for work.
To install this part, you need to drill two holes: one in the end of the part, and the other in the element that will be attached. The ease of assembling furniture using a confirmat allows the furniture maker to drill holes on site. It takes a minimum of time to complete the job. You can simplify the process as much as possible if you use a special drill for confirmation for installation. However, many furniture makers claim that over time this device becomes loose and the cutters become clogged with wood shavings. Therefore, for frequent use, standard drills are used.
The most popular and used confirmat size is 7x50 mm. Below are the pros and cons of using this fastener.
Read also: How to measure resistance with a multimeter video
| Advantages | Flaws |
| Easy installation, no special equipment required. | The confirmation hat will be visible if it is not covered with a cap that matches the color of the furniture. |
| The fasteners provide excellent connection between the parts. | The fastener cuts threads in the chipboard material and can deform it. |
| Able to withstand increased loads. | Furniture fastened with a confirmat cannot be assembled and disassembled more than 3 times. |
| If desired, the part can be corrected using a mallet. |
Based on the information provided, it is worth noting that these furniture fastenings are convenient and reliable. But if you can use them, then it is better to give preference to an eccentric coupler.
Dowel
Hidden types of fastening are a feature of furniture assembled using dowels. This is a small wooden cylinder, its dimensions are often 35x8 mm. The first number shows the height of the element, and the second indicates the diameter of the fastener. The essence of fastening with dowels is as follows:
- Holes are drilled in each of the two parts;
- The holes must be coaxial - that is, coincide in the location of the axis;
- A dowel is inserted into one hole, which only goes halfway deep;
- A second piece of furniture is placed on the cant protruding from the furniture piece - this is how they are tied together.
In order for the connection to have increased strength, the hole is treated with PVA glue, which additionally fixes the dowels and makes them motionless. The big advantage of this type of furniture fastener is that it remains invisible: it cannot be seen from the outside or the inside. The dowel connection has some disadvantages: it is done once, so it is extremely difficult to disassemble such furniture without damage. The second disadvantage is that precise drilling of holes is required for a perfect fit of the two components. This nuance creates the need to use special devices.
Devices for installing dowels are called conductors. They can be factory-made or home-made. The former are considered the best in quality, but the latter can be made independently.
Ties
Today, there are two main types of furniture screeds - eccentric and intersectional. It is necessary to consider in more detail each of these types separately:
- Eccentric tie – this element is used only in conditions of factory assembly of furniture. To place it on a furniture panel, you need to use a device to drill an exact hole. The main advantage of such fasteners is the ability to remain invisible, then the furniture acquires a neat and attractive appearance. Another advantage, compared to confirmed ones, is that such furniture fasteners allow you to assemble and disassemble furniture several times without losing rigidity. In addition, using an eccentric coupler it is possible to fasten parts at an angle;
- Intersectional tie - represented by a screw and a nut, with the help of which two perpendicular furniture elements are tightened. An intersectional screed is convenient for fixing the headboard and bottom of the bed, as well as tabletops. It is necessary to select fasteners based on the thickness of the particle board.
The most popular tie size is 32 mm, but this figure can reach 50 mm.
Shelf supports
A large number of shelf holders allows us to divide them into 2 subgroups: for parts made of chipboard and glass. In furniture showrooms you can find many models where glass is harmoniously combined with a wooden base. To efficiently hold two materials of different composition together, shelf holders are used.
Each type can be separately divided into two more categories: with and without fixation. Let's take a closer look at how to fix glass in furniture, as well as how to use a shelf holder for chipboard.
| Shelf holder for glass | Shelf holder for chipboard | |
| Design | Rod and screw. | Holder and screw. |
| Installation | They are screwed to the cabinet wall, and a shelf is inserted into the base. | The self-tapping screw is attached to the cabinet stack, and the shelf holder itself secures the plane of the shelf. |
| pros | Looks attractive and holds the shelf steady. | Reliable fixation of the shelf, thanks to the thread in the material. |
| Minuses | An elastic spacer is required to prevent the shelf from loosening. | The hole in the shelf and the wall must match perfectly. |
When installing shelves in a cabinet or cabinet, you cannot do without shelf supports. They should ideally match the style of the furniture and be combined with the general principles of the interior.
Bolt nut
Previously, the bolt-nut system was widely used to fix furniture parts. With this connection, a hole was drilled in both surfaces through which the bolt was threaded. On the other side of the cabinet wall, this bolt was secured with a nut. Today, a screw with a nut is also used - it is the simplest type of connection of furniture parts. The screw is equipped with a semicircular head, which, after connecting to the nut, does not rotate, but remains motionless. This fastener is easy to use, but with the advent of new materials, it has faded into the background. Bolts with nuts are suitable for use by craftsmen at the initial level of assembly.
The advantages of such fasteners are:
- Possibility of self-assembly;
- Availability of parts;
- Possibility of reusable assembly and disassembly of furniture.
Among the disadvantages is the visibility of the fasteners, which is why they have ceased to be relevant. Another significant drawback is the ability to connect only parallel surfaces.
What it is?
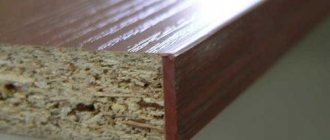
To understand the features of using laminated particle boards, you need to clearly understand how laminated chipboard differs from other structural and finishing materials. Its base is a regular chipboard, which we talked about in this article.
Most often, boards of classes P3 and P6 are laminated, because they are intended for use in dry rooms . However, chipboard of other classes is also found.
Laminated chipboard is produced in the form of slabs (sheets)
of rectangular shape and different sizes .
In addition, the edges of the sheets can be either smooth or equipped with a tongue-and-groove type lock; such a lock is called a tongue and groove.
Sheets with smooth edges are available clean and covered with laminating film.
During the production of laminated chipboard , the edges are clean , because even large slabs are cut from huge sheets, the length of which often exceeds 5 m. Companies that produce laminated chipboard also supply with it an edge tape , which is glued to the clean cut, making the entire surface of the sheet one color.
IKEA mount
Almost all models of IKEA wall cabinets have this type of fastening.
The fastening is a corner that is screwed to the side wall inside the cabinet; the second side with a large round hole for hanging is located in the slot in the back wall.
To hang furniture, a hole is drilled in the wall, a dowel is driven into it and a self-tapping screw is screwed in, its head is threaded through a round hole in the corner. Fastening to the wall is carried out through a self-tapping screw from the inside, onto which a washer in the form of a metal plate with pointed ribs is placed; it is pressed against the notches of the mounting angle near the hole when screwing.
Peculiarities:
- The fastening system allows you to adjust within small limits the position of the cabinet vertically and horizontally within the round hole in the corner.
- The fastening is quite reliable; during installation, the cabinet fits tightly to the wall.
- The design takes up little space; the metal corner is covered with an aesthetic plastic cover.
Scheme for calculating the number of furniture hinges for installation
There is no clear answer to the question of how many hinges need to be installed on one swing façade. Each manufacturer of fittings and components gives its own recommendations. Typically, the scheme for calculating the number of furniture hinges is based on two values, the size and weight of the door:
- The height of the door determines the number of connection points to the frame. If the number of hinges is insufficient, the door may bend over time. Its width is no less important. It is recommended not to design facades whose width is too large relative to their height.
- The weight of the door also plays a role. It is logical to assume that a facade made of laminated chipboard, on top of which a mirror sheet will also be glued, will require additional fasteners. Installing a standard number of furniture hinges may not be able to withstand the increased weight - this will require reinforcement.
The standard installation scheme for furniture hinges is as follows.
It can be followed if there are no other recommendations from the manufacturer.
Types, depending on the material to which it is attached
Modern manufacturers today use not only chipboard to make furniture. Glass, metal parts, and plastic elements are widely used. Fastenings for furniture made of chipboard were discussed throughout the material, and options for fastening objects made from other raw materials are discussed below:
- Glass - screw-type holders are used that are screwed into a wall made of concrete or plasterboard. They are used to fix shelves and mirror surfaces without damaging the coating of the part. For glass doors on the cabinet, the use of furniture hinges is suitable;
- Metal – screw fastenings are used to connect the shelves of metal racks. They are screwed into the racks using a drill or screwdriver. An attractive cap is installed on the front side;
- Plastic – plastic parts can be secured using any chipboard fasteners.
Separately, it is worth highlighting the dovetail fastening - it is used to connect drawers. The essence of the connection is to cut out a comb surface on each part, which is inserted into another part, resulting in end-to-end fixation. Choose only the type of fastening that suits you best. Before purchasing, be sure to calculate the thickness of the material so that during the assembly process screws and screws do not protrude on the surface.
Read also: How to determine cross-sectional area
Modern furniture fittings offer a wide range of furniture fasteners, each of which has its own area of application depending on the type of connection and the materials used. In this article we will examine in detail the main furniture fasteners that are used to make furniture in professional workshops and by home craftsmen.
This type of fastening is rarely used on its own in the modern furniture industry. It is mainly used only to impart rigidity in conjunction with eccentric couplers.
Its main function in most cases of furniture construction is to prevent the panels from moving relative to each other and giving additional rigidity to the fastening.
Usually used in conjunction with an eccentric coupler. It is made from hard natural wood and has a cylindrical shape. This is a very simple and cheap part that has been used in wooden joints since time immemorial.
Craftsmen and carpenters who work with wood use furniture dowels as the main fastening element. In this case, the furniture parts are connected to dowels, which are glued to the parts using PVA glue. In this case, using any other screeds together with PVA no longer makes sense.
Screw tie
The screw coupler consists of a screw and a barrel. This kit is used to attach the end of one panel to the face of another. For example, for attaching a shelf to a side panel or a headboard to the drawers.
This is a very strong fastening due to the large tightening stroke. The only drawback of this fastener is that the screw head is visible from the front of the panel.
You can, of course, close them with special plugs, but this is also not a panacea. The plugs on the outer panel of the cabinet do not look aesthetically pleasing.
Installation of this type of fastener requires skills. Beginners may encounter such a problem as inaccurate alignment of the barrel holes with the hole in the end of the shelf, and it is not so easy to remove the unwanted barrel from its nest.
But the inconvenience during assembly and aesthetic errors are more than compensated for by the reliability and durability of the connection.
Conical coupler
The conical tie is often used for fastening thick chipboard panels (25 mm, 38 mm) and assembling frame facades on tie bars.
One of its advantages is the absence of visible caps on the front side of the panels. Unlike the screw in a screw tie, the rod used in a tapered tie is screwed into the panel. The screed itself has 2 holes. One is for the rod, which is screwed into the panel layer. The second is for the conical tie screw. The disadvantage of this type of fastener is the small tightening stroke. Under heavy loads, the holes for the rod screw may become loose over time. Then the screed will simply stop working!
Furniture corner
Quite a simple type of fastener. Easy to install. Does not require any additional holes in the panels for its installation. There are both metal and plastic options.
Euroscrew
This fastener is often used for assembling kitchen furniture modules and in economy class furniture. Just like with a screw tie, Euroscrew heads or plugs are visible on the front side of the side panel of the cabinet.
It screws into the end of the shelf with a pre-drilled hole. This screed also belongs to the economy class. To install it, 2 holes are drilled - into the end of the shelf and into the face of the part. They are attached perpendicular to each other. The most commonly used euroscrews are 7 mm in diameter and 50 or 70 mm in length.
This screed has 2 significant drawbacks:
Firstly
, the outer side of the cabinet, if there are many shelves behind it, as a rule, is all “disfigured” with caps or Euroscrew plugs. Therefore, these fasteners are used in economy furniture. In kitchens, this drawback is hidden thanks to the cabinets standing in a row.
Secondly
, furniture assembled with euroscrews cannot be disassembled and reassembled more than 3 times, since screwing the tie into the end of the shelf destroys its internal structure.
Eccentric coupler
One of the most popular types of fasteners today. All high-quality furniture is assembled on an eccentric screed (minifix). Its operating principle is as follows: an eccentric rod is screwed into the face of the part to which another panel will be attached at the end, into which the eccentric itself is screwed through the end of the other shelf, and then the eccentric turns the rod into itself.
An eccentric tie is always used in conjunction with a wooden dowel, which was described earlier. The dowel provides additional rigidity to the assembly and prevents the fixed panels from moving relative to each other.
Furniture assembled on this screed can be disassembled and assembled an unlimited number of times! There are different diameters of the eccentric itself: 25, 15, 12 mm. More common is an eccentric with a diameter of 15 mm.
Since the eccentric itself is visible on the side panel, plugs are provided for it to match the color of the panel. One of the disadvantages is the weakening of the tie in the event of spontaneous rotation of the eccentric.
To avoid this, some hardware manufacturers have provided notches directed in the opposite direction from its rotation during installation, which enhances adhesion.
Types of eccentric couplers
As practice shows, furniture is assembled and disassembled with great difficulty if all the fasteners in it are metal ties, described above. Let’s say that in order to remove one shelf, you practically need to disassemble half the cabinet. For horizontal parts (shelves), it is more convenient to use eccentrics, which allow you to place horizontal parts in an already assembled furniture box. Their operating principle is the same as that of the previously described eccentric coupler. The only difference is that the eccentric, located in the shelf, fits onto the rod screwed into the face of the sidewall from above and there is no need to disassemble half the cabinet for this. In some factories, this type of fastener is called a shelf holder, since it is intended only for horizontal parts. Horizontal shelves assembled using these ties further tighten the joint, which increases the rigidity of the entire furniture frame.
Repeated dismantling and installation of furniture on such fasteners does not lead to wear of the connections.
All about joining countertops
The two parts are adjusted to each other, coated with sealant and installed in place. The resulting joint is almost invisible. This technique has several advantages.
pros
Minuses
- Short-lived results. The sealant protecting the joint deteriorates over time, the slab absorbs moisture, swells and deteriorates.
- The docking station cannot support the weight of objects placed on it. You cannot place household appliances, heavy dishes, etc. on it.
- Splicing is possible only for perfectly even fragments. Even a slight deformation will ruin the result.
Professionals do not recommend using such a connection for kitchen countertops. It quickly collapses under the influence of temperature changes, moisture, and mechanical stress.
Expert opinion
Strebizh Viktor Fedorovich, leading construction foreman
The technology of connecting tabletops using connecting strips allows for high-quality, durable joining quickly and without specialized equipment. If you want to clarify something, please contact me!
Fastening chipboard: types of fasteners, methods of installation to the wall, connecting chipboard to each other
- Installing the bar. You should attach it to the cut, then screw it with self-tapping screws;
- The cracks of the tabletop and the ends must be coated with silicone sealant;
- Then you can connect the elements together;
- The clamp is placed directly into the grooves. On the opposite side of the nut, there will be a tightening head, under which washers are placed;
- Next, tighten the nuts with a wrench, pulling the tabletops tightly;
- The clamps must be tightened crosswise.
Butt connections
To make a box or body, start by marking and sawing the material into blanks for parts. To get clean, straight edges, use an electric circular saw or hacksaw.
When cutting, mark each piece with a pencil and mark both floorboards of each joint with the same letters so as not to mix them up during assembly.
To make a butt joint using glue at a right angle, apply wood glue to the edge of one of the parts. Connect the joint and clamp it so that the right angle is not broken.
Reinforce the adhesive joint with nails driven so that they go into the middle of the thickness of the bottom panel. Remove excess glue with a damp rag.
Connections made with screws are stronger than connections made with nails. Place the part connected by the end to the part connected by the face, and mark the position of the first part on the second.
Mark the positions of the screws carefully, especially if the joint is not angular, but T-shaped. Duplicate all measurements from adjacent edges.
Drill through holes in the front part, then guides in the end part. Countersink the passage holes and tighten the chipboard screws.
Expert opinion
Strebizh Viktor Fedorovich, leading construction foreman
Below we will consider the option of using 100 mm ties, which are the most common and convenient to use. If you want to clarify something, please contact me!
Furniture hinge
Another name for this fastening system is an “ear” type suspension, which is a metal plate with slots for hanging and fastening. Screwed with screws to the rear side or top and side walls of the cabinet in the corner, hung on the head of a screw screwed into the wall.
Peculiarities
- Hanging cabinets with hinges is more suitable for hanging individual modular cabinets and ensures they fit tightly to the wall.
- The mounting method requires precise markings during installation and does not allow changing the position of the hanging cabinet.
Some modifications of hinged lugs have rectangular horizontal slots of about 20 mm. in places of suspension - this allows you to move furniture in a horizontal plane over a short distance. In case of inaccurate installation of the mounting dowel with self-tapping screw in height, the required height of the suspension can be set by re-hanging the ears.
Making furniture yourself
Stores offer a wide selection of furniture laminate of any color, as well as various accessories, so finding material for making furniture is not difficult. The main problem is the equipment for processing laminated chipboards.
A good cutting machine cannot be installed in a garage due to its large size, so to make furniture, you will have to cut sheets into cabinet shelves and wall panels in a furniture or carpentry shop equipped with a circular saw with a movable table.
A jigsaw and a hand router with a set of cutters are not very expensive , so people with average incomes or those who do carpentry and finishing work can afford to buy them.
The main problem faced by everyone who does not have experience in carpentry and plumbing, but is trying to make furniture on their own, is the inability
to drill holes at the desired angle in relation to the face and edge of the slab.
They solve this problem with the help of a conductor , and everyone comes up with their own form of this device.
If all the holes are marked and drilled correctly, then furniture assembly will be accessible even to an inexperienced person; the main thing is not to rush and constantly check the drawing.
Therefore, having experience and the necessary equipment, you can make furniture from laminated chipboard in your own garage, cutting sheets into parts in the nearest furniture or carpentry shop.
Eurozapil
- Fragility
. The sealant loses its protective properties over time. Moisture begins to be absorbed, the tabletop swells and also becomes unusable; - Does not withstand heavy loads
. You cannot place anything heavy at the joint. May not stand it; - Levelness requirements
. The parts to be joined must be perfectly straight. Any deviation will affect the result.
How to treat the surface → Room decoration → How to choose the right paint → Surface treatment technologies → Leveling and finishing the walls → Selecting and applying a primer → Removal from the surface → Stretch ceilings and technologies → Reviews and testimonials
Installation of overhead furniture hinges with markings
Before installation, it would be a good idea to make markings so as not to make mistakes when drilling and fastening the mounting strip and bowl. You can use a ready-made template (conductor) or measure it manually. We take into account the following nuances:
- The overlay facade does not completely cover the frame. Taking into account the gap, for example, for a kitchen cabinet with a height of 720 mm and a width of 400 mm, it will have dimensions of 716x396 mm. This means that if along the box for installing the fastening strip there is a 100 mm indentation from the edge, then along the façade the indentation will be less, equal to 98 mm.
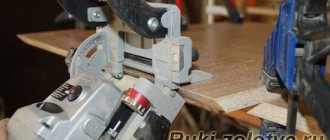
- A hole 11 mm deep is selected for the four-hinged hinge on the door. This can be done using a Forster drill with a scoring edge and a spout designed specifically for installing furniture hinges (diameter 26 or 35 mm). Special drills have a limiter that will prevent you from piercing the front part through when milling. Provided, of course, that the thickness of the facade is at least 16 mm.
- The depth of attachment of the mounting strip from the edge of the cabinet side when installing an overhead furniture hinge is 37 mm. The distance between the holes at the bar is 32 mm.