What is padding polyester
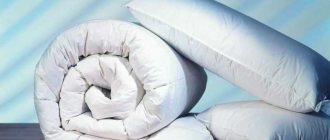
This is a non-woven material made from synthetic raw materials. It is produced in the form of a voluminous fluffy white fabric, the fibers of which are connected using adhesives.
For your information! Consumers ask which is correct: padding polyester or padding polyester. The verification word is synthetic. It is from these raw materials that it is made.
Sintepon
Varieties of padding polyester
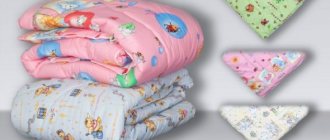
Sintepon comes in different thicknesses and widths. The cheapest type of this non-woven material is a 1.5 m wide strip rolled into a roll. The filler is sold by the meter. To sew a standard size blanket, you will need about 5 m.
The second common type is double-sided padding polyester. Fabric stitching with padding polyester is done in a factory way. Layers of filler are laid out on the lining fabric and sewn with intersecting stitches, which create a specific pattern. These can be rhombuses, squares, waves. Used for sewing lightweight bedspreads. Quilt blankets are not made from cheap synthetic lining, as it is unpleasant to sleep under. The synthetic lining does not absorb moisture. Jackets are made from these materials.
Double-sided stitch
Blanket padding polyester, according to OKPD, belongs to the highest class of fillers. The material is made from high quality raw materials that do not cause allergic reactions. The thickness of the canvas can be from 10 cm. The width for this type of filler is 2.2 m. This size allows you to collect material of the same length and not grind the canvases together. The easiest way to make a DIY blanket from padding polyester is using this type of filling.
You may be interested in: Is it possible to make liquid skin yourself and how to use it?
Pattern
Having decided on the size of your quilt, you need to make a pattern from the purchased material. The first thing to consider is that there will be some shrinkage in the finished hand quilted product, as after the process the length will be reduced to 4 centimeters on each side. If you use binding for edging, there is no need to leave extra centimeters, but if such a technique is not in the plans, then about 5 centimeters on each side will be rolled up.
The insulation should be uniform, without lumps or tears.
So, if the standard size of a quilt is 220x200 centimeters, then for your pattern you will need to cut out 2 pieces 229x209. This is the case when using thin padding polyester, but if you put thick padding polyester or fluff inside, then the parts should be longer on each side by another 5 centimeters. The pattern of a quilt for a child will look different, since in this case you should start from the dimensions of the crib.
When the parts for the base are cut out, the filler is cut out. Let's consider the simplest option - padding polyester. Measure out the required length and width and cut with ordinary scissors. The insulation should be uniform, without lumps or tears.
Types of DIY blankets
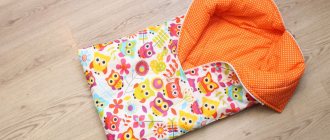
Blanket with cover
There are several common types of bedding that you can create yourself:
- the most practical ones are quilts. The frequent curly stitching catches and fixes the filler, preventing it from bunching up.
- In addition to them, there are products sewn like old feather beds. The filling is punched into the bag cover and a duvet cover is put on top. Sewing a padding polyester blanket with your own hands using this principle is simple and quick. The only drawback is that the liner inside it often gets knocked down; you have to remove the cover from the duvet cover and straighten the filling;
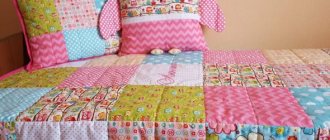
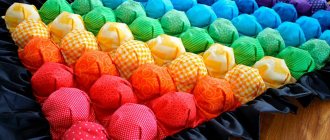
- A separate group includes blankets sewn from scraps of fabric and padding polyester into separate small pillows, which are then connected to each other.
Step-by-step instruction
To make the quilt smooth and beautiful, each of the prepared parts must be ironed well. This way you can avoid unnecessary folds or lumps during production. After ironing, you need to cut off the protruding threads and then overlay all the parts except the filler. This can be done on an overlocking machine, but if you don’t have one, make a snake seam with a simple sewing machine.
When doing the work by hand, the edges are processed with a buttonhole stitch, placing the stitches at equal intervals. For this purpose, threads are selected according to the color of their base, as well as its type. If you do not treat it, the blanket will begin to creep around the edges when used, and filler will crawl through small holes.
The following steps follow:
Assembly
- the first piece of material is laid out on the floor so that its front side is at the bottom;
- a layer of filler is placed on top;
- on top is the second fabric piece, right side up.
The assembled workpiece is carefully straightened out and secured with sewing pins so that its parts do not move to the sides. Pins are inserted not only on the sides, but also in the center of the blanket in order to evenly quilt the fabric. Next they start drawing.
What material is best to choose for a blanket?
For sewing a blanket cover, only natural or mixed fabrics with a small amount of synthetic impurities are suitable.
Note! If the blanket is to be used without a duvet cover, it is made from beautiful bright printed fabrics. This only applies to bedding that is made like a cover with a liner.
Quilted bedding
A quilt cannot be washed without filling. For this reason, it is not suitable for use without a duvet cover. Sintepon does not tolerate frequent washing, its adhesive base is destroyed, and the fibers lose volume.
Sleeping accessories are made from:
- cotton (calico, satin);
- thick silk;
- bamboo
The main qualities that the material must meet:
- hygroscopicity;
- density;
- wear resistance.
Patchwork techniques
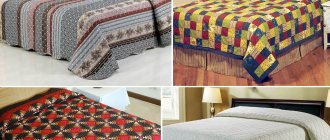
Despite the obvious desire to create a complex masterpiece the first time, it is better for beginners to give preference to traditional basic techniques - such as quick squares , watercolors , magic triangles and stripe to stripe . They use the simplest geometric shapes and will not cause problems during operation.
Quick squares - the name speaks for itself, the work is assembled from square scraps of different colors. If the workpiece is rotated 45 degrees relative to the stitching, a diamond-shaped pattern will be obtained. There is a method in which squares are cut out from several pre-sewn ribbons - then triangles appear in the design.
Chess is a subtype of square technique in which elements of two colors are arranged in a checkerboard pattern.
Read also: Poses where a man is behind
Watercolor - the canvas is also composed of square pieces, the colors of which gradually change from dark to light, creating the effect of a watercolor blur. It is better to use fabrics with a small pattern. Watercolor looks good on large-sized products, in the manufacture of which the number of details makes it possible to create smooth transitions.
Magic triangles - the basis of simple elegant compositions are patches in the shape of an isosceles or equilateral triangle. You can also cut out elements with sides of arbitrary size, but in this case it will be a little more difficult to combine them.
Strip to strip - the fabric is cut into ordinary ribbons, but the simple shape of the parts does not in any way affect the design possibilities. The arrangement of stripes can be very different: horizontal or vertical alternation, zigzags, corners, diamonds, ladders.
The log cabin or well is a variation of the strip technique. In the center of the product there is a square, around which ribbons are laid out sequentially - like the walls of a wooden house.
Boro is a patching technique. Any item from your wardrobe can be used as a basis for it. Flaps are most often sewn on by hand using coarse stitches, or machine stitching is combined with hand stitching.
Lyapochika - sewing small strips of fabric onto a durable base, the surface of which is ultimately completely covered. The product comes out textured, voluminous, and in a complex version it is used to create real paintings, a little reminiscent of palette knife painting.
Required Tools
Sewing a blanket begins with measuring the bed. The product should completely cover its entire area and hang slightly on three sides. To sew a blanket you will need:
- roulette;
- centimeter;
- awl;
- pins;
- spool of thread with needle for basting;
- chalk or a sharpened piece of dry soap;
- sewing machine.
Sewing tools
Name of decorative varieties and their description
On mechanical and semi-automatic modern sewing machines, the number of additional stitches is extremely limited.
On the contrary, smart devices with good memory can reproduce even the most complex patterns.
They combine a cross with a hemstitch or an openwork stitch.
Smetochny
Mainly used for basting buttons and making copy seams.
Imitating hand work
Ideal for holding together small pieces of fabric, like a patchwork quilt.
stalked
Often used for joining stretch material or embroidery. There are wide and narrow. The first is used mainly as a decorative element. Narrow is more functional. Most often it is chosen for working with knitted materials.
The three types of decorative stitches listed above are the most used by seamstresses. But this list is far from complete.
You can supplement the list with less popular, but interesting lines in terms of functional characteristics.
Stitch for appliques (perfectly copes with such tasks), “double cross” (sewing sportswear), half-true stitch (indispensable when sewing knitted items).
This is a non-exhaustive list of decorative stitches. Their presence and quantity in the sewing machine menu is determined by the model.
Advice! Before starting to work on the device, you should carefully read the instructions for use and the contents of the menu.
Material cutting
The main lining fabric and synthetic padding layer are cut to the same dimensions. Making some details more or less is labor-intensive and unnecessary work.
Note! The main fabric is cut strictly along the thread. The required size is measured along the edge of the fabric, an incision is made, and then the thread must be carefully pulled out. The canvas is cut strictly according to the resulting puff.
You might be interested in what microsuede fabric is: use for furniture
Cut the fabric thread by thread
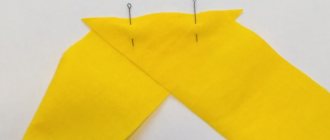
If the upper part of the blanket is sewn from several parts, then all its parts are cut out, assembled into a single whole according to the pattern, and then the lining and interlayer are cut strictly according to the dimensions of the front side. The synthetic padding filler, consisting of two strips, is swept away manually with thread before cutting.
General rules for needlework
In order for a thing to create a pleasant impression, it must be made accurately in geometric terms and be neat. To do this, you need to follow some rules:
- To prevent an item processed using patchwork technology from shrinking after washing, the purchased fabric must be washed and ironed.
- If a previously used fabric is used for work, it must be treated with a solution of water and starch and ironed.
- To mark the fabric, use only soft crayons or, in extreme cases, a bar of soap. Ink pens and pencils will not work in this case.
- The fabric should be cut in the direction of the grain thread. This will help avoid unwanted deformations when stitching.
- To avoid deformation, strips and flaps of fabric must be smoothed across.
- All patches with images must be ironed in the same direction.
If you plan to manufacture a large item, you should first create a smaller sample of it in order to correct all the shortcomings in advance and finalize the design.
How to sew a quilt with piping around the edges
The easiest way to make a edging for a blanket is from bias tape. It must be purchased at the rate of: 2 perimeters of the product + 30% of this amount. This means that for a blanket 2.2 m by 2.2 m you will need (8.8 X 2) + 30% = approximately 23 m.
Bias tape
Step-by-step instruction:
Bar tack stitch
- The bias tape is divided into two equal strips and sewn along its entire length.
- The front part, lining, and back are folded on top of each other the way the blanket should look in the finished product.
- Several fastening basting lines are applied through all three layers. Then, using a tape measure and chalk, the stitch pattern is applied to the front side.
- Then you need to quilt the fabric with padding polyester.
- The product is aligned along the cuts so that all layers have an even, uniform edge.
- Along the entire perimeter at a distance of 0.5-0.7 cm you need to sew a tack stitch.
- The cut is covered with finishing tape made from bias tape.
First, attach the binding to the wrong side
. Important! Craftswomen with extensive experience can do this in one line. For those who still find it difficult to lay a single line, it is better to secure the edging with two lines, that is, sew one side of the bias tape to the wrong side, then the second to the front of the blanket.
The second line is used to sew the binding to the front of the product.
How to quilt a patchwork quilt?
The finished quilt is a sandwich consisting of three layers. The first layer consists of flaps, the second is insulation (batting, padding polyester, slimtex, etc.) and the third layer is fabric for the reverse side. Each subsequent layer should be 3-5 cm larger than the patchwork top. Usually the sandwich is assembled on the floor - this is the most common assembly method. But if the room is small and there is no floor space, then everything becomes much more difficult. A large table will help you get out of this situation; you can assemble our sandwich on it. I saw a video on the Internet where a sandwich is assembled on the wall, but it is much more complicated and less convenient.
The process of preparing for quilting:
1. So, let's start assembling all our quilt parts. To do this, first lay out the fabric for the back side of our bedspread on the floor. It should be well ironed and lie flat without folds or creases. Now let's fix it with masking tape. We tear off small pieces of tape and glue our first layer to the floor in the corners and in the middle of each side. This is done so that the fabric does not slip when we apply the next layer to it.
2. Now let's take the filler. Our task is to carefully lay it on top of the fabric for the wrong side. I do it this way: I lay out the filler separately, take a stick, a piece of wood, a cardboard tube that is suitable in size (the width of the filler) and screw the insulation onto it. Now all this can easily be transferred to the fabric that we have fixed to the floor. Having retreated 3-5 cm from above, we put our stick with the filler and begin to unfold it, while smoothing it with our hands so that there are no wrinkles. The second layer was placed.
3. We do the same with the patchwork top. We wind it onto the roll and transfer it to the floor, retreating 3-5 cm from the top of the filler. Then we begin to unwind the roll, while smoothing it. When our sandwich is assembled, we can remove the tape. Now, we just have to fasten all three parts of our product. This can be done by basting them with large stitches. For convenience, I advise you to use safety pins, it is faster and more convenient and the more there are, the better. Now our sandwich is ready, all that remains is to stitch the patchwork blanket.
All these stages are shown in detail in the video:
Quilt stitch:
The product can be quilted by hand. There are craftswomen who really like to quilt by hand. On long winter evenings they slowly but surely walk towards their goal. This is very labor-intensive, labor-intensive and will take a huge amount of time. It is much easier and simpler to quilt on a sewing machine. For this we need special paws:
— The first is called walking foot or upper conveyor . With its help, all three layers of our blanket will move evenly under the needle. Using this foot, you can quilt a blanket into the split seam using straight lines.
— The second foot is called for stitching or darning . You can use it to quilt various patterns. This is called free motion machine quilting (SSMS). I warn you, nothing will work the first time. To master such a stitch you need time, a desire to learn and quite a lot of practice.
An excellent assistant in stitching a specific pattern at the moment are templates . These are very convenient plastic blanks with which you can apply any design to the fabric. To transfer it, you can use special water-soluble or time-disappearing fabric markers or chalk. And, when the pattern is already on the fabric, sew along the marked lines.
After the patchwork bedspread is quilted, you need to trim off the excess on all sides. You remember that the back side and the filling are slightly larger than the patchwork top. And now all that remains is to edge our product.
Stitch pattern
The stitch can be any. The degree of its complexity depends on the experience of the craftswoman. The simplest and most common pattern is diamonds or squares. On the sides, each segment can have a width and height from 3 to 20 cm. It is better for a novice master not to embroider waves and zigzags on a blanket; straight lines are easier to sew. The biggest difficulty is dragging a large volume of material with padding polyester under the machine.
Note! Even experienced craftsmen do not always know how to quilt a blanket using padding polyester on a machine. To prevent the product from deforming during sewing, quilting the blanket begins from the center to the side sections.
You might be interested in Description of sisal: production and use of material
Beginning of work
Before you sew a quilt for a child or for yourself, you also need to decide on a pattern. The simplest to perform will be loops and waves. Do not immediately take on straight lines. Until your hand is “stuffed”, it will be difficult to adhere to a clear and even contour. Be sure to do a small sketch on paper of your finished piece before moving on to the fabric itself.
To make a quilt using a sewing machine, clean and oil all necessary parts. Insert needle, thread, spool, darning foot. Check everything carefully again. If you don't have special gloves for quilling, regular gardening gloves will do. Their main task is to sit tightly in the palm of your hand and not interfere with working with the fabric. Free up your workspace. A sewing machine, for example, can be moved to the kitchen or dining table. You need a lot of space to work, nothing should embarrass you, distract you or slow down the process.
First of all, practice on a rough draft. Test the thread tension, stitch length, and whether the selected needle and thread are suitable for the thickness of the fabric.
Lining is the fabric that covers the back of the front surface of the quilt.
The padding is located between the lining and the top. Its thickness depends on the purpose of the quilt and the fabric used.
To make a quilted baby blanket, pillowcase, or even a regular potholder, thin fabrics are suitable: non-woven fabric, wool. For the bedspread, more voluminous materials are chosen - holofiber, padding polyester. It is not recommended to use cotton wool, as the product will deteriorate when washed. Quilt stitching is used to prevent the layers of filling from clumping together. You can try making the first seams in the shape of squares.
By machine or by hand
How to make quilted fabric if the volume of the product does not allow it to be pulled under the sewing machine? In this case, you can fix all three layers manually. It's much easier than creating a stitch pattern on a machine. The blanket in this case is sewn like this:
- All three components of the blanket (front part, filler, lining) are laid out on the table on top of each other.
- The attachment points are marked with chalk.
- A hole is pierced with an awl.
- A needle and thread are used to make several stitches through it; you can sew small buttons on the front side at the attachment point.
Overlock
The difference in stitches made with a sewing machine and an overlocker appears due to the fundamentally different lockstitch design.
An overlock stitch made on a regular machine breaks when pulled.
Types of overlock seams:
- Open imitation (the edges of the product are processed, elastic, stretch fabrics are sewn down).
- Closed imitation (good for processing materials such as jersey).
- Half-sure stitch is an elastic and overlock stitch used for working with knitted items.
Caring for synthetic winterizer
Blankets (covers) are washed separately from the padding polyester insert. The mode is chosen depending on the material from which they are sewn.
In other cases, bedding is washed on a gentle cycle with a water temperature of 30 to 40 °C. Use gentle gels. Aggressive powders for synthetic winterizer are harmful.
You can sew bedding yourself. A beautiful thing requires time and hard work. It is difficult to perform the stitch the first time due to the labor-intensive process. If the technology is followed, the result will please not only the creator, but also the whole family.
Quilted bedspread: stages of work
When sewing a bedspread using this technique with your own hands, you need to take into account many nuances. First of all, you need to decide on the type of fabric, prepare all the necessary materials and make a pattern for the future product. Only after this can you begin cutting the fabric and sewing directly. Before starting work, it is recommended to draw up a detailed action plan. This measure will protect you from possible mistakes and will greatly simplify the production of the bedspread.
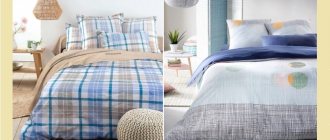
Model selection: simple and beautiful
The simplest and most popular bedspread model is a rectangle. This option is recommended for beginner seamstresses. For experienced craftswomen, the choice is not limited to any boundaries. In this case, you should take into account not only your sewing experience and personal taste, but also the style of the interior of the room. So, a bedspread with frills will look like an alien object in a minimalist room, but it will fit perfectly into a bedroom in a romantic style.