Creation technology
The process of sewing a product from small pieces of fabric is actually a very exciting activity. In addition, it does not require huge financial investments. After all, the necessary materials in the form of various pieces of fabric can be purchased as a set or you can use old things that may be lying in your closet.
Many ideas and secrets from experienced designers can be found at dizajny.guru
As a result, things that have gone out of fashion will be able to continue to exist in a new way and will remind of the wonderful past. But you should not use very old things, so that your diligence will not be in vain.
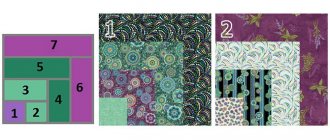
To create a patchwork quilt, you need to prepare 6 or more different colors of fabric. To realize a unique design with the help of your irrepressible imagination, you should use different colors, fabric structures and patterns on them. Slightly gathered details will add volume to the texture and an impressive appearance.
How to sew a patchwork quilt with your own hands? To do this, just watch master classes from the Internet that will help you learn the patchwork technique yourself.
Edging a patchwork product in 3 stages
Stage 1: making the binding
To demonstrate, I found some kind of cutter in the bins and quickly made a sandwich out of it. The artistic qualities of the blank leave much to be desired, don’t blame me, but it will do as a training springboard. And at the same time the cat will get a new rug.
Grow, grow, little tail...
A full-size adult blanket requires 7 to 10 meters of binding. It is quite obvious that we will not get a continuous strip. Therefore, we will gain the required length by grinding shorter strips.
It would seem that nothing could be simpler - fold the ends and sew the strips together. But no!
The edging strips are always sewn diagonally at an angle of 45°. Why?
Just imagine a straight seam with pressed seam allowances. This is already 2 layers of fabric (face and seam allowance).
The formed binding, going around the edge of the product, will already give 8 layers of fabric. And that's not even counting the sandwich! Moreover, they will overlap each other.
Even if your sewing machine can handle this thickness, there will be unsightly raised bumps at the joints. We don't need it! Therefore, only obliquely.
Some needlewomen immediately cut the ends of the strips at 45° and grind them down. But, as for me, this technique is not perfect. It is easy to stretch the edges, it is not easy to align the oblique cuts.
The correct way to proceed is to fold the strips face to face, at an angle of 90°, so that the strips slightly overlap each other.
Pin, draw a diagonal as in the photo (not in the other direction!), lay a seam from “tick” to “tick”.
And only then cut off the excess, leaving the required allowance. Naturally, we iron the allowance.
There is also a way to cut an “endless” trim directly from a single piece of fabric, sewn diagonally with an offset. The principle is easy to understand from the picture.
I don’t really like this method, because you need to cut with scissors, not a roller knife. But you can try.
Important detail
How many such strips need to be cut out and stitched? Well, let's say that we need to edge a blanket with a perimeter of 7.8 m. Let's say you cut strips from a meter cut. You will need 9 of these meter strips.
Why not 8? Firstly, do not forget about the 20 cm increase. And secondly, when sewing diagonally, a lot of fabric is lost in the allowances. I'm decoding.
Nine stripes in one are 8 joints, at each we subtract 1 strip width. If the tape is 6 cm wide, then you lose 8 × 6 = 48 cm. Nine meter strips will give you a total length of 852 cm. This is enough for the perimeter of the blanket, but you must admit, the losses are large. Take this fact into account.
All that remains is to fold the ribbon in half and iron it. We cut off the “ears” from the allowances.
Stage 2: first seam around the perimeter
Let's spread straws
Don't start from a corner. Start anywhere on the side of the blanket, leaving a free “tail” of the ribbon of 10-15 cm. And first apply the tape to all sides of the quilt to check that the joining seams do not fall into the corners of the quilt. If yes, then move the trim to avoid this problem.
Traditionally, we attach the binding to the front of the blanket, matching the open edges.
Red hut with corners...
We come to the corner. We're almost there. We stop before reaching the edge of the blanket by the width of the allowance. Turn the quilt and sew a corner at 45°.
Unfold the blanket to the next side. Holding the binding to the left, bend it upward (away from you) so that it forms a straight line with the edge of the blanket.
Then we lower it down towards us, aligning it with the edge.
A comb fold forms in the corner.
That's it, you can start a new line without forgetting about the bartack.
We repeat this gimmick at all corners.
The ring has no end
And the last operation of this stage is to connect the ends of the edging.
Remember when we left a free piece at the beginning? We'll leave the same one at the end. Stop the stitching, 20 centimeters short of the beginning (or more, see what is more convenient for you), make a tack.
Level the edge of the blanket and place the free ends of the binding over it. They will overlap each other. They also need to be connected at an angle.
Method 1 – mathematically accurate.
Mark the joint on one edge of the tape. Cut it to the mark.
The second edge should overlap the first by an amount equal to the width of your border.
Measure out the required amount on it and also cut it.
Then we open the ribbons, turn them towards each other at right angles, and sew them diagonally.
Method 2 – applied. We place the open bindings on top of each other, marking the junction point.
We align the marks face to face, stick a pin there, almost to the edge.
And on a pin, like on a pin, we unfold the stripes at right angles. We fix it and sew it diagonally.
Do not cut off the allowances immediately. First, check if the binding is in place. Doesn’t wrinkle or tighten anything? Great, cut it.
We iron out the joint with our fingernails, give the binding its original appearance by folding it in half again and attaching it to the blanket, not forgetting about the fastenings.
Stage 3: second seam around the perimeter
Fold the binding onto the wrong side of the blanket. Using the tip of the iron, you can carefully go over the seam from the face.
We form the corners, lay them at 45°, and secure them with pins. It's difficult to describe, it's better to look at the photo and try it in practice.
If you want, baste the rest of the binding; if you want, press it with special clips or paper clips. Sew with a blind stitch by hand.
7–10 meters manually? Come on, it's good to pour! Seriously?
Imagine, yes. This is a classic conservative approach. It is claimed that only a hand-stitched edge looks neat and conveys the true charm of handmade work. So I condescended and hemmed my rug by hand.
Yes, it seems neat. But for me there is no logic in hand hemming.
That is, throughout the entire quilt project, you use a fancy cutter that takes several layers of fabric, use accelerated cutting techniques, in-line sewing, use military stratagems when assembling a sandwich, machine quilt... in general, you do everything to make the sewing process easier and faster . And then suddenly - bam! oh, my work is handmade! – and you figure out 10 meters manually.
And this is in an age when our spaceships roam the expanses of the Universe...
Alternative edging methods
I prefer to avoid hand sewing and complete the edging by machine. The opinion that machine edging looks sloppy and soulless seems to me to be very subjective and biased. However, to each his own. I just want to show all the alternative options that exist.
- The trim is sewn from the face to the wrong side. Secure with a zigzag or decorative stitching. Well, the zigzag is completely homey, it looks so-so, of course. The decorative one is better, although it also looks artisanal on the reverse side.
- The trim is sewn from the face to the wrong side. On the front side we sew directly into the stitching seam; on the reverse side, the binding should overlap the seam by 2-3 mm. The result is that the line is not visible at the top, but at the bottom it goes along the edge of the tape. To be accurate, this method requires basting, which, in general, also increases time costs.
- The trim is sewn, on the contrary, from the inside out onto the face. We sew the binding on top to the edge, the bottom thread on the wrong side goes along the blanket, parallel to the binding. If you take the threads to match the backing, it looks very decent. Convenient and fast, and no preliminary outlines.
- Sometimes edging is not even necessary; you can do without it, especially if you cannot match it by color or just want to save effort or fabric. You need to cut the border wider and turn it inside out, and process the corners in the same way as when sewing napkins and tablecloths. Or do the opposite, cut out more of the back fabric and wrap it on the right side. Watch this method in the video by Varvara Tasits.
I think this concludes my treatise on quilt edging. If you didn’t take something into account or forgot, write in the comments.
Patchwork magic to you!
Choosing the right fabric
To sew a blanket from scraps with your own hands, you need pieces of fabric of the same thickness and texture. The color palette of fabrics is selected in accordance with the interior style, wall colors and furniture.
Contrasting combinations of fabrics look most advantageous against the discreet background of the main fabric. You should not allow excess variegation; it is better to give preference to moderation.
Before starting the sewing process, you need to make a preliminary layout of the blanks on the leading base of the fabric, move a little away from it and evaluate the resulting masterpiece. So to speak, a look from the outside will help you understand the success of the combination of design and color scheme.
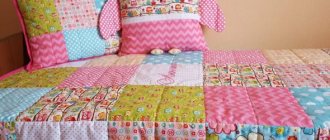
“Lyapochikha” technique
This is a fairly simple technique in which scraps of the same length are sewn in rows. Each of the elements is stitched in the middle, bending the edges to create the required volume. In order for the product to keep its shape, the flaps are sewn very tightly. The splendor of the product depends on the length of the elements. The most popular item used using this technique is a rug.
Blanket filling material
A patchwork blanket has three main layers: a beautiful top, insulation and a lining bottom. If you take the insulation out of the blanket, you get a regular bedspread.
For insulation of the product, padding polyester is most often used, which does not shrink after washing. Therefore, it does not need to be soaked before sewing, as it will not change its original appearance and size.
Its only drawback is that it is synthetic. The use of synthetics is undesirable for children; it is better to use the most natural materials possible.
As alternatives, you can use natural fillers:
- made of cotton, similar to lightweight batting without threads. It is milky in color, 2 or 3 mm thick, and does not crumble. But after contact with water it may shrink by approximately 5%. In this regard, it should be pre-soaked, carefully squeezed in a towel and dried.
- made from 100% natural wool. Its main property is considered to be excellent thermal insulation, which is great for handicrafts.
Edging = binding
And now the word “taping” appears in our vocabulary.
Strictly speaking, bias tape is applied tape cut at a 45° angle with pre-folded allowances. Factory ready-made binding is sold in handicraft stores and is used in sewing for processing rounded cuts - armholes, necklines, etc. For those who are not satisfied with the industrial quality, I give a link on how to make bias tape yourself.
But:
Patchworkers don't need bias tape more often than they do.
After all, cut at an angle, it stretches, and this is what quilters really don’t like. After all, we constantly warn ourselves when sewing diamonds and triangles: “Careful, don’t pull diagonally, there will be deformation.”
Bias tape can only be useful to us on rounded areas - for example, on the flaps of bags or on the border of scallops.
If we cover the straight sections of a blanket, pillowcase, or napkin, then this “ductility” and plasticity are useless.
Therefore, we cut the strips for edging straight, along the grain (along the fabric) or along the weft thread (across the fabric). I don’t know if the concept of “straight binding” exists, but that’s exactly what it is.
I prefer, and I advise you, to cut according to the share. This way the tape turns out to be as rigid as possible, but still stretches a little along the weft.
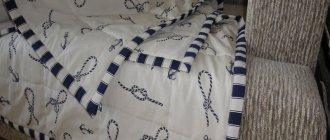
Next: the edging (trimming) can be single or double, with a fold - it is sometimes called French.
Single is used on small flat products. In blankets we use double. After all, a blanket is a hard-to-use object: we wash it often, shake it, and mercilessly grab the edge with our hands. Therefore, a double layer of fabric on the fold will not hurt at all.
Sewing patterns used
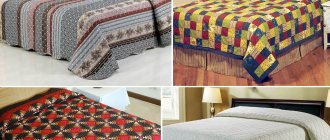
Do-it-yourself compositions using the patchwork technique can contain patches of various configurations: quadrangles, triangles or stripes. First, they are cut out of cardboard or thick paper. The easiest way to create a patchwork masterpiece is from large squares, which will undoubtedly appeal to novice needlewomen.
Patterns of increased complexity for a patchwork quilt can be viewed on special websites so that you don’t have to worry yourself, or you can buy them in a needlework kit.
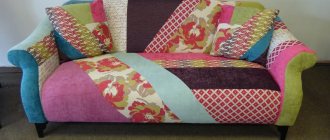
Variety of styles
Chaotic patchwork also has its own directions. Not all of them are ideal for creating blankets using this technique. Styles are:
- classical. The most suitable for sewing a blanket, as it easily fits into the selected dimensions and monotonous decor of the room. This style includes patches of equal size, often in two color schemes, which are placed in clear symmetry or in a checkerboard pattern;
- Oriental. More suitable for decorative small blanket. The style is maintained in the use of flaps of different shapes and sizes, adding to them a variety of embroidery with threads, beads, beads, as well as zippers, buttons, chains and any other type of decorative design. However, unlike the next type, the eastern one adheres to a certain system and symmetry in stitching the flaps;
- crazy patchwork is a “crazy” patchwork technique. The style, which is not limited in the shapes and placement of flaps, combines the chaotic clumsiness of the placement of parts and a mixture of color schemes. More suitable for blankets and bedspreads of outdoor garden decor.
Article on the topic: Crochet hat with lush columns: diagrams with step-by-step description
Quilt patches come in many forms:
- squares - simple stitching of square flaps of the same size;
- stripes - flaps of stripes can be sewn either alternating or in a circle, into a spiral, decreasing their length as you work, using a template in the form of a lined square;
- triangles - in order to achieve a smooth square canvas at the end, such flaps are cut in the form of isosceles triangles;
- honeycombs - symmetrical hexagons, which are combined with triangular flaps along the edge;
- lapachikha is a type of patchwork made from patches of different shapes, assembled into a specific pattern according to a pre-prepared template.
Materials and tools required
To organize and create a patchwork quilt you will need: a table, threads, a template, prepared fabrics, insulation material, lining fabric, binding, needles, pins, chalk or soap, scissors, a measuring tape, a sewing machine and an iron.
Using different fabrics, you can get various masterpiece blankets using the patchwork technique, which will become a real interior decoration, and also warm and cozy. To create children's patchwork quilts, use only natural materials. Go for it and you will succeed!
Varieties of patchwork
Over hundreds of years of existence, many varieties of patchwork have emerged. We invite you to get acquainted with the most popular ones.
Traditional (classic) patchwork
A distinctive feature is restraint in colors and shapes. The front side of the product is made of individual flaps that create simple geometric patterns - squares, rhombuses, triangles or trapezoids. The lining is most often cut out from a single piece of fabric. Product options: capes, blankets, pillowcases, potholders and kitchen towels.
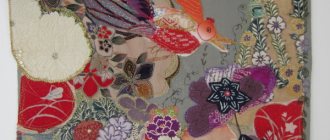
Сrazy patchwork
When looking at the work done using this technique, one can recall the lines of an old song: “I molded you from what was, and then I fell in love with what was.” And, indeed, despite the apparent randomness of forms, materials and decorations in the form of ribbons, bows, beads, pendants and embroidery, Crazy’s works are original and have an attractive charm. This technique is most often used for small items - bags, clothes and decorative panels.
Japanese patchwork
Characteristic features will be contrasting colors, the use of silk, fringe, tassels and hand sewing with contrasting thread in the typically Japanese technique of sashiko stitch - a uniform hand stitch with a needle pointing forward. Ornaments can be either geometric shapes or oriental natural themes - flowers, plants and animals.
Quilting
American multi-layer sewing technique with a mandatory additional step of quilting the product. She enriches the classic patchwork with the use of appliqués, embroideries, decorative stitches and non-woven materials - leather and padding to add volume. Finished products are usually small - bags, cosmetic bags, decorative pillows, panels and clothing.
Knitted patchwork
Knitted patchwork comes in two versions. A combination of flaps, tied along the contour and fastened together using a hook or knitting needles, and exclusively using the knitting technique. In the latter case, the flaps can be conditional - the canvas is made continuously with periodic replacement of yarn to create a geometric pattern. This allows you to avoid skewing of the canvas due to the heterogeneity of the product.