You just want to wrap yourself up in a large, warm, cozy quilted blanket on a cool autumn or winter evening. Thanks to the stitch mode in modern sewing machines, anyone can now sew such a blanket with their own hands, without spending a lot of time on it, as before, when each stitch was done by hand. A master class on how to make a quilted bedspread quickly and easily with your own hands using the quilting technique with step-by-step photo accompaniment will tell you how to do this.
Let's think about the composition
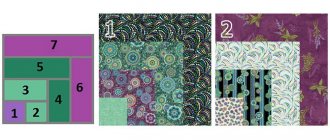
Most often, a traditional quilt consists of a number of blocks. In a child's room there will be fewer of them than in a blanket for a double bed.
Between the blocks, if appropriate and adding elegance to the project, dividing strips can be located.
Without dividing stripes
With dividing stripes
And to give the blanket completeness, a border frame is sewn along the edges of the patchwork part. Sometimes there is no need for a border and then it is enough to simply cover the sections with a narrow border.
A patchwork block is a set of geometric shapes organized into a pattern. Most often the blocks are square. This form is the most convenient to work with. But there are also hexagonal, rectangular, octagonal blocks. We will also consider a sector in a radial pattern to be a block.
A separate point is the blocks, which are not a mosaic pattern, but a simple geometric figure. They are called single-segment. Here we include blankets made of squares, hexagons, stripes, rhombuses, triangles, trapezoids.
Triangles only
Just diamonds
All hexagons
How to add variety to a sketch? You can line up the blocks not only horizontally, but also place them “at an angle” or position them offset. This technique greatly enlivens the composition.
Diagonal arrangement
Diagonal arrangement + dividing stripes
To prevent the blocks from merging into a monotonous fabric, they are separated by strips of fabric of a matching color. But you always need to weigh whether these separators are needed. There are some patterns that, “clinging” to each other, create interesting optical effects. In such cases, separating strips will be redundant.
You can make a layout out of blocks with a repeating pattern, but you can use several patterns, or you can repeat none. Quilts from completely different blocks are often sewn by beginning quilters to practice their skills, and such products are called samplers. By the way, the most famous historical quilt “Dear Jane” is also a sampler.
This is interesting: Pattern Patchwork quilt with interesting pinwheels
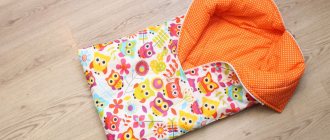
Quilted bedspread with frill
You can decorate a quilted bedspread with a frill along the edge - in this case, the dimensions of the pattern of layers for quilting should be equal to the dimensions of your bed with a blanket.
To decorate, you will need a strip of facial fabric at least one and a half to two times longer than the perimeter of the product. And the width of the strip should be equal to the height of the bed. Make a hem on one edge. On the other edge of the strip, the prepared fabric can be gathered. Or you can simply stitch it with a double seam, laying the folds at a distance of about ten cm from each other.
A quilted bedspread looks beautiful and stylish in any bedroom. And sewn with your own hands, it multiplies all these positive qualities several times - after all, you put your soul into it! However, if this seems difficult to you, you can simply order a ready-made bedspread with a beautiful stitch in the store. In our catalog there is a huge selection of them for you!
Not every studio can sew to order
a quilted bedspread, and if you can persuade him, the price for the work, not counting consumables, can be staggering.
Any person who can deftly handle scissors and a needle can sew a quilted bedspread with their own hands;-)
The simplest bedspread is a rectangle of fabric
, preferably tapestry. It can be cut out and sewn without lining.
If you want to have a silk or satin bedspread, more elegant, and also with a frill along the edge, you need to additionally stock up on padding polyester and fabric for the lining.
For the bottom layer, a simpler fabric is usually selected.
Step by step instructions below
is intended for those craftswomen who are starting to create
a quilted bedspread
on their own for the first time, bringing their own ideas into the work.
Fabric for making a patchwork blanket
Patchwork is patchwork sewing from fabric of various household and decorative items - beds, blankets, bags, clothes, tablecloths, kitchen utensils, etc. The technique, known for thousands of years, is popular all over the world. Skilled craftswomen create all sorts of outlandish works of art using the patchwork method. And novice needlewomen are advised to start with wide blankets made from “quick squares”. Such products are practical and aesthetic, and are also optimally suited for mastering such a delicate science.
Today, patchwork is considered one of the most popular patchwork techniques. It consists of stitching together various pieces of fabric according to the mosaic principle. In the hands of experienced needlewomen, bright pieces of material are transformed into luxurious products that surprise and delight. But not all fabrics are equally good for patchwork patchwork.
To choose the right material for creating a patchwork quilt, you can follow the traditions of our grandmothers: simply save all the scraps and leftovers from sewing clothes or bed linen. From such different-sized shreds you will certainly get a motley blanket. Or you can do it much simpler - purchase a set of fabrics for patchwork at any specialized store. Since the most difficult process in the patchwork technique is working with the material, the fabric must certainly not only be beautiful in appearance, but also of sufficient quality.
Cotton fabrics are considered the ideal material for patchwork because they meet all the important requirements:
- Do not wrinkle;
- Don't rush;
- Do not shrink;
- They do not shed;
- Easy to cut.
Linen, silk, viscose and wool are used a little less often in patchwork, since such materials are more capricious and always require special care in work. Craftswomen with experience begin to use complex fabrics; for beginners, there is nothing better than cotton!
Sewing material stores offer customers a huge selection of cotton fabrics of different colors and densities. But, unfortunately, they are not always suitable for patchwork. Some options fray too much when cut, others are hard to iron or sag after washing. It is, however, recommended to buy special fabrics for patchwork that have undergone special pre-treatment. This material is very easy for beginners to work with.
How to sew a quilted bedspread?
A quilted bedspread is a beautiful bedroom accessory.
It can give a room a special coziness and will delight its owner with its beauty in the bedroom for many years. Today it is easy to buy a quilted bedspread in a store, but it is much more fun to sew it yourself, putting all your efforts and self-expression into the work. The simplest thing is to buy quilted fabric for the bedspread and simply hem it or trim it with piping. And the beautiful quilted bedspread is ready! But today we will tell you how to quilt a bedspread with your own hands. After all, this exciting activity is a good opportunity to get a bedspread with a pattern that perfectly matches your taste and interior.
Popular types and patterns of patchwork
The patchwork style is a wide field for ideas and experiments, which has no boundaries in combinations of shapes, colors, and types of material. Here, any creative idea of the author can be brought to life. Fancy patterns, applications with animals and flowers, geometric mosaics and other equally interesting options can easily be folded into a warm bedspread or comfortable blanket.
Of course, you can create a diagram for a product with your own hands, armed with imagination and a sharp pencil. Or you can use ready-made ones, of which there are hundreds of thousands, depending on the types of patchwork.
Let's look at the most popular types of patchwork:
- Classic English
. In this version of patchwork, all parts of the same shape and size are used, usually in two primary colors. Patterns for English patchwork are very primitive. For example, squares of two shades arranged in a checkerboard pattern, or symmetrically stitched triangles. - Eastern patchwork
. The manufacturing principle is similar to the classic one, but differs in the use of various decorative elements - ribbons, beads, zippers, etc. Most patterns for oriental patchwork products allow greater freedom in the shapes and sizes of parts. For example, these can be arched and wavy patches, connected and decorated with satin ribbons. - Crazy patchwork
. The most “free” look. Characterized by its aesthetics and attractiveness. As a rule, the shape, color and size of parts are not limited by anything other than the pattern used. And the designs can be incredibly diverse: images of nature or flowers, floral or geometric patterns, complete abstraction.
How to make a frill for a bedspread or bed
If you have finally finished quilting the bedspread, the shapes of the patterns and long lines are perfectly even, there are no sags at the joints and the dimensions of the bedspread are almost the same as they were at the beginning, then consider yourself a pro and sewing a frill along the edges of the bedspread is no longer a problem for you.
The frill for the bedspread can also be sewn separately, in the form of a bed skirt. But more often the frill is sewn to the bedspread and is its permanent part, which is largely justified. The non-removable frill makes it easier to process the edges of the bedspread. In addition, even, neat folds of the frill can hide stitch imperfections if your diamonds are far from geometric symmetry.
There is hardly any point in buying an additional piece of fabric 5 meters long for a frill. It can be assembled by building up the pieces left over from cutting the bedspread. The main task is to ensure that the strips being sewn are cut in one direction. Otherwise, each section of the frill of the bedspread will have its own shade and such a trifle can ruin the entire appearance of the bedspread. And yet, the connecting seams of the frill stripes should be “hidden” inside the fold, then they will not be visible.
The fold for the frill of the bedspread must be made wide; you should not skimp on this. A width of 10 cm is quite suitable, but you can experiment by making the folds narrower or wider, changing the pitch between the folds, the direction of the folds (counter), etc. How to sew a frill? There are a lot of ways, including sewing a frill with a double stitch, as shown in this photo.
Blanket Making Tips for Beginners
Nowadays, patchwork creations have become more popular than ever. In between the noisy bustle and tiring workdays, you really want to touch something warm and cozy. Even those women who have never thought about needlework before begin to confidently master patchwork. Decorative sofa pillows, aprons, coasters, colorful panels, curtains for a country house, ultra-modern bags and many other things can be created by experienced craftswomen.
Beginning needlewomen should pay attention to a few useful tips:
- Before using new fabric, it must be washed, ironed and only then cut. This will prevent accidental shrinkage, loss of color, or other problems.
- The color of the thread used should match the color of the shred or differ by a couple of tones.
- For drawing, use a pencil or soap. It is prohibited to use a pen.
- Cutting is done along the shared thread. In this case, the part will not warp.
- When cutting, leave a 1 cm indent on all sides. If the fabric is loose - 1.5 cm.
- Ideal templates are made of plastic.
- Without a ruler, patchwork is impossible.
- The resulting fragment must be ironed after each line.
This is interesting: Pattern Patchwork quilts
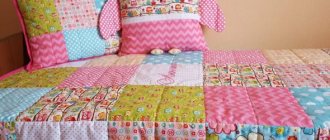
Sew a bonbon blanket
The “Bonbon” blanket is originally a decorative element of the style, the origin of which is based on the patchwork technique.
The bonbon blanket is a version of patchwork. Sewing it seems incredibly difficult at first glance. It is warm, unusually beautiful, bright. For it, one-color and multi-colored scraps are taken, forming a mosaic. The base fabric is drawn into squares with a side of 11 cm. Cut square pieces with a side of 17 cm are sewn into horizontal stripes, like in a patchwork blanket. The strip is sewn to the base as follows: using pins, the squares of the scraps are secured to the vertical lines of the base fabric, and a fold of excess fabric is placed in the middle of the square for lifting. The resulting voids are filled with holofiber, the squares are attached on three sides to the main fabric using a machine. The following rows are sewn to the bottom edge, continuing until the entire length is filled. The edges of the product are finished with bias tape.
Blankets of this type are sewn from separate ottoman pockets filled with holofiber
Patterns for making a blanket using the patchwork technique
Depending on the chosen patchwork technique, the needlewoman may need one or another pattern pattern:
- Square technique
. It involves creating a product from square patches or square blocks of different colors. In this case, a pattern in the form of a regular square or a pattern of strips from which a square block will be made will be useful. - Strip technique
. This is parallel or circular stitching of strips of different colors and lengths. To create a product using this technique, you will need to cut out different strips. - Triangle technique
. In many ways similar to squares. Most often, patterns of isosceles triangles, identical in size, but different in color, are used for it. Parts can be sewn along a short edge to form a strip, 4 pieces to form a square or in the shape of a star. - Honeycomb technique
. It got its name thanks to the end result. Upon completion of the work, the design of the product will resemble the pattern of a honeycomb. For production, patterns of symmetrical hexagons are used. - Lapachikha technique
. It is considered the most interesting and at the same time difficult. Pieces of fabric with raw edges are attached to the canvas, thereby forming a three-dimensional drawing of a certain pattern or a chaotic image of a three-dimensional abstraction. If a specific pattern is chosen for the product (bird, animal, flower, etc.), patterns for each part will be needed. If you plan to randomly sew on different patches, you can do without patterns altogether.
How to make a patchwork blanket - watch the video:
Products made using the patchwork technique are not only beautiful and cozy home decorations, but also positive emotions from the process of making them. Agree, a few pieces of fabric, a sewing machine and imagination in combination can work wonders.
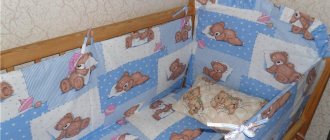
Pillows on the sofa, baby blanket
From the leftover fabric from cutting the bedspread, you can simultaneously sew decorative pillows for a sofa or bed, or a children's blanket. Those who sew a lot probably accumulate a lot of leftover pieces of fabric of different colors. sew a blanket from a variety of colored pieces
or a blanket. The shape of the flaps can be very diverse; it is not necessary to cut out exact geometric shapes. If you don't have enough leftover fabric, you can make a patchwork quilt.
It is not necessary to quilt a children's blanket; it is much more important to make it cheerful and colorful. The fabric can be “diluted” with another fabric, with a pattern of your favorite cartoon characters or animals, in bright and warm colors. Such a blanket will add warmth and energy to the children's room, bringing a certain mood and positive emotions into the nursery.
No matter how much you like the practicality of dark shades, do not buy black, purple or gray bedding for children and do not use these colors when decorating a child’s bedroom, including bedspreads. Such colors have a depressing effect on the children's nervous system.
Volumetric, soft pillow letters are a stylish and original decoration for your bedroom, especially if the textile letters completely repeat your name. Such original decorative decorations are easy to make with your own hands. In addition, sewing just one three-dimensional initial letter of your name does not require a lot of fabric and other materials. For more details, see the article on the website “Sewing Master”
We come up with a project. Mine was born suddenly before bed and I immediately quickly drew him, taking into account the size (10 cm real = 2 notebook cells). Then we calculate how much fabric we need to buy and write everything down.
Having decided on the color scheme, we go to a real or online store or use what is in stock.
We cut the fabric into pieces with allowances for 4 central blocks; you can initially draw and cut out patterns with allowances from graph paper in order not to make a mistake.
We lay out the flaps of one block and see how we like it. We select fabrics for the very center of the quilt, i.e. on each block in one of the four corners the fabric will be different than on the others (you can see this in the picture).
Then we stitch each block one by one and then all together. After each stage of stitching, we iron it with an iron. We cut each sewn and ironed part to the required size and monitor its accuracy.
We measure our sewn 4 blocks, each side should be the same - a square. Using these dimensions plus allowances on all sides, we cut 2 strips of white fabric and sew them, first to two parallel sides, only after that we measure the other two parallel sides and sew the strips to them. Then we sew on a thin strip = 2 cm (with allowance = 3.2 cm, my allowance = 6 mm, since I have a foot limited to this size). We sew the strips first to two parallel sides, then to the other two.
We sew the border, first red rectangles of the required sizes to all four sides, then cut out 4 white squares.
We cut a square with one side of the border, sew it on, stop in front of the pink corner, raise the foot and needle and carefully align the other side of the square with the adjacent border (turning the fabric to the desired position) and continue sewing.
This is what happens.
We select a decorative stitch from those available on the sewing machine and perform it, having previously practiced it on a piece of unnecessary fabric.
Be sure to use a stabilizer on the inside, mine is tear-off, otherwise the stitching will pull the fabric. You need to cut 4 strips of the exact size or slightly narrower so that they fit into the strip between the allowances.
We glue the stabilizer with an iron, or pin it, constantly making sure that it does not run away. We tear off the remaining stabilizer along the edges.
We lay the back of our quilt face down. We glue it with household tape, without pulling it, just straighten it evenly.
We put padding polyester on top and cut the inside to fit.
This is the thickness.
We place our wonderful sandwich top and pin it with curved quilting pins starting from the middle to the edges.
We begin to quilt (with white threads) along the inner contour of our strip; if possible, it is better to use the foot of the upper conveyor so that the layers do not move relative to each other.
At the corners we raise the foot, the needle is lowered, we turn the fabric and continue, of course lowering the foot first.
I quilt in old gloves, I made holes on my index fingers so that it would be convenient to do something without taking off the gloves.
Then we quilt (with red threads) the outer contour of our stripe.
Using a free-running technique, we quilt along the outline of the stars (with white threads), inside the stars with monofilament.
We quilt between the stars with some kind of pattern. I came up with a circle with a larger circle around it.
We come up with a pattern somewhere in a notebook in a small format. We cut out the required size of the part from graph paper and draw it there with a regular pencil.
We transfer this onto the stabilizer with a pencil, without pressing too hard.
We pin and quilt (with monofilament), having thought in advance where we will start, so that we go through the same place as few times as possible. We carefully tear off the stabilizer; after washing, everything remaining from the pencil imprinted under the threads will disappear.
We fill the space around our pattern with microstitch.
We quilt the border with a large pattern (white threads).
We cut out the drawstring and hem its two short edges. I have its width at the cutting stage = 20 cm, and the length will depend on the size of your quilt, it should be slightly shorter on (2-3 cm on each side) the side of the quilt to which it is sewn.
We cut out the strips for the edging, sew them diagonally to reduce the thickness and sew them to the border.
At the end of each stitched side we stitch into the corner.
Then we chop off the fabric so that we can start sewing the adjacent side.
And we start right from the edge, just take into account our allowance.
We iron the edging, tuck it in and pin it with regular pins so that it can be easily hemmed later.
And we sew it by hand.
Now let's rejoice and relax)
A quilted bedspread always looks interesting in a bedroom interior. Stitching makes any fabric more effective. And at the same time, a stylish quilted bedspread is not at all difficult to sew yourself. To do this, we give simple and understandable recommendations - a master class on stitching a bedspread.
Cutting fabric according to a template: some nuances
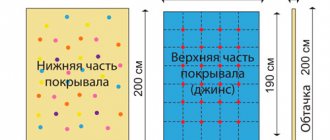
In the case of this example, the required canvas dimensions are 150x190 cm. The squares of the ornament themselves should be 15x15 cm. It turns out that, together with the necessary material for the seam, their sides will be 17x17 cm. It is this size that needs to be made of a template from thick cardboard. In addition to helping with cutting, it will also serve as a standard against which you can check the correct dimensions.
PHOTO: YouTube.com The template is made from thick cardboard
We cut and sew
Layer cutting
STEP 3 The complexity of the work depends on what fabric you plan to use to create the masterpiece.
Pattern for cutting the bedspread If satin or silk is chosen, the materials are quite slippery, and the cutting process must be approached carefully.
It is most convenient to fold the fabric in half lengthwise so that the length of the upper part from the fold line is equal to half the required length.
You can do the same with width. Then, closer to the cutting line, connect the layers in several places with pins or needles.
Cut only on a smooth surface; under no circumstances should you do this by weight!
In the same way, the padding polyester lining and the bottom layer are cut to size, but there is no need to allow for shrinkage.
Stitching the layers
STEP 4 Armed with a needle or a sewing machine (whichever is more familiar), we combine all three layers into one, making a seam along the edge.
This is necessary in order to fix the shape.
Marking the drawing
STEP 5 Now you can start marking the design on the fabric.
Only a top-class seamstress can afford to quilt a bedspread directly on a machine. The rest will have to be patient and have a template cut out of thick paper based on preliminary calculations.
Drawing stitches
The template (square or diamond) must be life-size.
Starting from one of the corners along the front side of the product, we apply our workpiece and, trying to capture all three layers, “draw” lines with a basting stitch.
Once we have outlined it, we move the square (rhombus) close to the line on one side, and the adjacent side to the edge, and sew again.
And so on until we reach the opposite corner.
- The future blanket should be on a smooth surface while working.
Stitch
STEP 6 It's time to sew the resulting long lines across the entire blanket on a machine. Stitch
- If possible, try to stitch as close to the basting as possible, but without stepping on it, then the auxiliary thread will be easily removed.
Sew on the frill
STEP 7 All that remains is to sew on the frill.
The required length does not have to be measured on a single piece of fabric; large scraps can also be used. Frill Main requirement:
All typesetting strips must be cut in the same direction. Longitudinal or transverse - not so important.
Decorating the bedspread with a pleated or finely gathered frill is a matter of taste and habits of the craftswoman.
Sometimes the frill is not sewn to the bedspread at all, but is attached directly to the bottom of the bed.
Sewing flaps: where to start, what to pay attention to
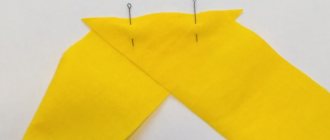
First you need to sew the vertical, shortest strips of the future fabric. The flaps are selected according to the diagram and laid with their front sides facing each other. Once the sides are aligned, they need to be pinned together to prevent them from moving apart during the stitching process.
The seam is made carefully so that the edge of the foot goes clearly along the cut of the fabric. This way the seam will be even, located at a distance of 1 cm from the edge.
PHOTO: YouTube.com The edge of the foot should be flush with the cut of the fabric
Preparing strips for stitching into fabric
When all the strips are ready, you need to properly press the seams between the flaps. This is done as follows. In one strip, the seams should be steamed in different directions. To make it clearer for readers how to do this, you can refer to the photo example below.
PHOTO: YouTube.com Seams should be steamed and smoothed in opposite directions
However, there is one caveat here too. After the seams of the first strip are steamed, the second, not yet ironed, is laid below. Its seams should go opposite to the first one. The fact is that if they match, after finishing work on the patchwork quilt, the internal seams will be clearly visible, and this is completely useless.
PHOTO: YouTube.com The seams of one strip should be smoothed in the opposite direction from the other
Which quilted pattern to choose and how to make it
It is very important to make an accurate calculation of the location of the pattern figures on the bedspread. They should be evenly located over the entire surface of the bedspread, without moving to any side. You may have to reduce or increase their sizes, but the shapes should start and end strictly from the edge.
It is better to first perform such a calculation on a sheet of paper in a reduced form, for example, on an unfolded piece of paper from a notebook in a box, and then make a life-size model of a rhombus or square and check how it will lay out on the back side of the fabric, having previously outlined the dimensions of the future bedspread with chalk .
However, this is not the most difficult thing. The most difficult part to mark is the stitch on the right side of the fabric. You can’t mark with chalk or a pencil either, there is only one way left - manually using contrasting threads to stitch the lines along which the stitching will be done on a machine.
The most “advanced” way of applying markings to a bedspread is to buy special paper that sticks to the fabric and, when wet, can be easily removed without leaving any traces of glue. You can use various types of washable markers, but sweeping is still much “cleaner” and more reliable. Moreover, with the help of a basting you will prevent the top fabric of the bedspread from shrinking as much as possible, and at the same time fix the padding polyester and lining with the top.
It is best to stitch the quilted pattern along the wrong side of the bedspread, that is, along the lining. Then the entire fit will go to the lining, and the front side will be smooth without sags of fabric at the intersection of the stitching. But to make a bedspread stitch in this way you need a good eye and experience, so I don’t recommend this method. By the way, when making stitches, you need to try to tighten, or even more precisely, stretch all the layers of the bedspread, but not so much that the needles on the machine break. Don't make the checkered pattern or diamonds too small. The larger they are, the easier it will be to sew the bedspread neatly and evenly, and most importantly, it will be easier to cope with the fit of the fabric at the joints.
If the bedspread does not have a gather or frill, then the easiest way to process the cut edge is shown in this photo.
What else will you need for work?
You can’t do without traditional sewing attributes, so you need to prepare or purchase threads, of two types. The usual ones will be needed for basting, others - No. 45, 50. Their color depends only on the desires of the author, it can be combined with the future product, or be contrasting. You will also need:
- pins, needles;
- chalk;
- scissors;
- centimeter;
- scotch;
- iron;
- colored pencils (felt-tip pens);
- segment templates (two) - plastic or cut out of cardboard (thick paper);
- sewing machine.
Video: How to quilt a patchwork quilt? Secrets
- Now let's move on to the methods of stitching blankets. Square stitch for blankets, when the lines intersect at an angle of 90 degrees.
Square stitch blankets
- Diamond stitch for blankets, when the stitches create elongated diamonds. This is the classic and most common way to stitch blankets.
Diamond quilt stitch
- Also interesting and unfairly forgotten recently is the “wave” stitch method.
Wave quilt stitch
- And numerous methods of fancy stitching, the beauty of which directly depends on the experience of the craftswomen.
All kinds of stitches for children's and adult blankets
All types of stitches are performed according to the same pattern:
- Marking with chalk, washable felt-tip pen or pencil;
- Note;
- Stitching with dense stitching.
And finally, we attach a video of machine stitching a blanket.
Sewing smoothed and prepared strips
In order for all the seams on the front side to look perfect, the stripes must be sewn correctly. Before starting this work, the strips are laid face to face one another and secured with pins. But special attention is needed here. A pin should go through each seam - exactly along the thread. This will ensure a perfect match. Of course, some may not think that a millimeter mismatch is too important, but aesthetics are also very important here.
Once all the pins are in place and the edges have been checked, you can begin stitching. Here, too, the foot should be flush with the edge of the fabric at a distance of 1 cm from the cut.
PHOTO: YouTube.com The pin should go straight along the seam line of both stripes
What should the quilt look like?
After the strips are sewn, the seams between them are also steamed and ironed. Here the direction of their placement does not play a role. It is interesting that when the fabric is assembled correctly after ironing, if you look at the reverse side, you get the impression that the seams do not match at all. However, this is just an optical illusion.
PHOTO: YouTube.com This is what a properly sewn and smoothed wrong side of the fabric looks like
Comparison of front and back sides
After all the seams are stitched and smoothed, you can turn the fabric over and admire the front side. If all the nuances described above are observed, then it should turn out perfect, the seam of each patch should be a continuation of the previous one. If such work is being performed for the first time, then minimal deviations are quite acceptable, but every effort must be made to avoid them.
PHOTO: YouTube.com The front side of the future quilt looks perfect
High-quality edge sealing
Machine finishing the edge of a quilt
There are many ways to create a beautiful edging, the most common is “cheesecake”.
First of all, leave a few centimeters free at the back of the bedspread; if you skipped this step, use a separate wide fabric tape. The backdrop (or tape) needs to be folded over to the front side and a seam made around the perimeter of the product, trying to get closer to the edge of the folded area.
Finishing a blanket with bias tape
We pin the corner of the edging with pins
We attach the binding, checking how the needle catches the lower half of the binding on the wrong side
Fabric selection
When choosing fabric for patchwork-style products, compatibility of textures and a thoughtful color scheme are important. There are no other restrictions for creating patchwork canvases. Many people prefer to make bedspreads from fragments of natural fabrics that are environmentally friendly and pleasant to the touch.
But for comfortable use of the blanket, the bottom lining layer is important; it is the one that comes into contact with the body; in most cases it is made of cotton.
The following types of fabrics can be used for the patchwork layer.
- Cotton. Safe natural and durable material. A large number of fabrics have been created based on cotton threads.
- Flannel. Often used to create baby blankets and envelopes for newborns. Flannel is soft and pleasant to the touch; it contains cotton fiber.
- Linen. Dense, rough fabric allows air to pass through well. It is highly hygroscopic, that is, it collects moisture but does not release it.
- Kulirka. The thinnest cotton jersey, with a beautiful smoothness, pleasant to the touch. Often used to create baby blankets.
- Fleece. The fabric is easy to care for. It is a synthetic product, but very light and soft, tactilely pleasant.
- Silk. Natural silk is expensive even as fragments. Pieces are more difficult to sew than cotton, and the sliding surface is not to everyone's taste. But some styles (oriental, historical) need just such material. All of the above can be attributed to the atlas.
- Chintz. Natural beautiful material with rich colors and various patterns. Calico blankets are inexpensive, cheerful and elegant. In the patchwork style, you can use not only fabrics, but also threads to create a blanket; they make magnificent knitted fabrics.
For the filling of a quilt, it is better to choose a light and thin material. It can be natural or synthetic, it is important that it can easily pass air.
- Cotton. Natural “breathable” filler. It resembles batting, only thinner and softer, and therefore more expensive. It is recommended to wash before use to avoid shrinkage of the finished product.
- Cotton with polyester. The addition of chemical material to cotton only benefits the filler. It does not shrink, is breathable, quilts well and is cheaper.
- Wool. Natural soft and warm material, easy to work with. But the blanket can shrink during washing, is not suitable for allergy sufferers and is expensive.
What do you need to stitch a bedspread?
Any quilted bedspread has three layers:
- front side - a beautiful fabric is taken for it, preferably plain, smooth or jacquard, and on satin materials the stitching is especially impressive;
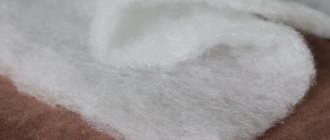
- filler - usually synthetic padding is used for this, and the larger it is, the more prominent the stitch pattern will be;
- lining, or base - this part should be non-slip so that you don’t have to constantly adjust the blanket that slides off the bed or sofa.
To sew a quilted bedspread, you will also need a sewing machine, threads of the required color, scissors, pins, and if you are making a bedspread with edging, tape for finishing the edges. This can be a strip of the same fabric or a contrasting one with a width of 5-6 cm or more (if you want a wide edge, double the width plus a hem), or you can buy a ready-made ribbon or bias tape 3-4 cm wide.
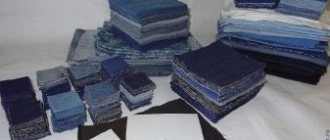
Blanket made from denim scraps
If the owners have accumulated a fairly large number of trousers that are still strong, and cannot throw them away, then this option can be considered a win-win. The product can be not only a summer blanket, but also an unusual bedspread.
Since even worn denim remains quite strong, most often a blanket is sewn from large squares or rectangles. However, areas that are even slightly worn or yellowed are not suitable for sewing.
Materials, tools
In addition to the usual sewing kit, you need to prepare:
- several (preferably many) jeans;
- lining fabric;
- filler (wool, padding polyester);
- wire cutters;
- constant iron.
Jeans can be of different textures, colors and shades: the more differences, the more original the patchwork quilt will be. The lining fabric must be soft, pleasant and warm. Wool is an ideal material for filler/insulation, but its price is the reason for the low popularity of this natural material in this “role”.
Stages of working with jeans
The process is already more or less familiar, but there are some differences from making a classic model, so you should go through all the stages of “jeans” work. The main feature of such a blanket is the fringe on the front (denim) part. It is obtained thanks to a seam that “looks” outward.
- Old jeans are washed, ironed, ripped, then all accessories are removed from the clothing and again armed with an iron - all suitable parts of the trousers are steamed again. 352 squares with a side of 12 cm are cut out of denim material. Exactly the same number of elements are made from the lining fabric, then from the filling.
- Each finished piece of denim is applied inside out to squares of lining and synthetic padding material. The two resulting blanks are connected so that the denim side is on the outside, then a machine seam is laid. Its width is 1.5 cm.
- To the first pair of denim-lining-painting polyester squares, the remaining parts are attached in the same way (with the right side of the jeans facing outward), obtaining the first strip. Then they move on to making the remaining blanks. Then the long elements are connected into a canvas.
- The final operation is making fringe - creating multiple notches along all seams. This important work is performed with wire cutters, but carefully, since the seams between the patches cannot be damaged.
The almost finished product is edged with the selected colored fabric, or the same denim fringe is made around the edges. A simpler option is to make a classic patchwork quilt, but this model looks much more interesting.
Do-it-yourself patchwork quilt is a topic that simply requires that the novice craftswoman at least once see the whole process for herself. And with this, all kinds of lessons - video tutorials - provide invaluable assistance. For example, here you can watch one of our popular videos dedicated to a cute product made from scraps:
Quantity of material
To determine the dimensions of a hand-quilted product, you need to know the dimensions of your bed that will need to be covered, its length, width and height. Height is necessary if the finished product should fall to the sides. To calculate the parameters, there is a universal formula, which provides that the length of the blanket will be the length and height of the bed, and its width will be the width of the bed plus two of its heights.
Having decided on the required dimensions of the material, you need to add two centimeters. This applies only to the base; such a margin is not added to the size of the insulation. You can follow the standard dimensions of the products, this is 220x200 centimeters. This option is suitable for a double bed. Since the sides will be trimmed with binding, you need to calculate the perimeter of the quilt. This number will indicate the required amount of finishing tape.
Step-by-step instruction
It is easy to sew a blanket from scraps with your own hands. We offer a master class for beginners, with a detailed description of the cutting, assembly and edging of the product.
Before starting work, you should wash or simply soak the selected pieces of fabric in hot water.
They must allow natural shrinkage to prevent deformation of the blanket during its use. Then the flaps are ironed well. Cotton fabrics can be sprayed with a starch solution to improve their appearance.
When choosing fragments, check them for compatibility. To do this, flaps of different textures should be slightly pulled, the amount of stretching should be the same. For example, dense material does not fit well with knitwear. If you don't pay attention to compatibility, the blanket will lose its shape over time. For the same reason, when stitching fragments together, the direction of the threads is taken into account.
For work, you should prepare not only the flaps, but also the backing material, as well as the filler. You will also need threads, a sewing tool and a sketch of the future work. One of the techniques available in patchwork is selected and a drawing of the details is sketched onto paper. For beginners, it is easier to work with squares or rectangles.
When choosing a color scheme, one should not forget about harmony.
Monochrome products look good. The basic tone of the blanket can match the color of the curtains or wallpaper. Children's bedspreads are made bright or tied to the gender of the child (for boys - for girls).
Creating a Sketch
Even professionals do not neglect the sketch, and for beginning needlewomen, calculations and diagrams of both the basic part and the entire project are a prerequisite. It is better for beginners to work with large parts. You can cut identical squares and simply sew them together, but it’s much more interesting to think through and put together a pattern and work with color. For this purpose, sketches are created on which the elements are drawn. According to the scheme, they are assembled into blocks, and fabric is sewn from the blocks.
To simplify the work process, the parts on the diagram are numbered, and the same numbers are transferred to the fabric fragments.
Making your work even easier by creating templates from cardboard or plastic. With their help, it is easy to cut and cut flaps in the required quantity.
Material cutting
A patchwork ruler can make the cutting job much easier. With a simple design (squares, stripes) you can do without it. During cutting, many factors are taken into account.
- The main thing is to remember that the cut must take into account the grain of the thread, otherwise distortions will occur.
- To cut squares, just draw a grid on the fabric and use scissors. For the remaining figures you will need a template and a roller knife. Parts of particular complexity are developed using a special ruler.
- When cutting out, you need to be as careful as possible, otherwise the stitching lines will not coincide with each other.
- When cutting out elements, you must leave 1.5 cm of fabric on all sides for allowances.
- The cut parts should be numbered according to the diagram.
After cutting the fragments, they move on to working with the substrate and fillers. They are cut out according to the selected sizes. When working with backing, be mindful of seam allowances. As for the details, it is easier for novice craftswomen to work with square elements. The substrate and all fragments are well smoothed before assembly. Then you can try it on: lay out the backing and place the squares on it, taking into account the tone of the future product.
Assembly of parts
It's easier to work with squares. The maximum size of the blanks is no more than 25x25 cm, the minimum is 6x6 cm. The most popular part parameter is 12x12 cm. The squares are assembled together into strips, the length of which should match the width of the future blanket. The finished strips are stitched together to form a large fabric.
You need to make sure that the seams go along the wrong side of the product.
For a more complex pattern, blocks are assembled first. The numbered parts according to the diagram are sewn together. Assembling the block should begin with large elements, and then small parts are added. During the working process, you can use safety pins, which will help the fragments not to spread out.
All parts are sewn together using edge seams. Finished blocks should be smoothed before forming them into a canvas. But you can leave ironing for the final stage. When the patchwork layer is fully formed, it should be laid on the wrong side and the joining seams should be carefully smoothed, opening the edges. Then you need to iron the seams from the front of the product.
When the patchwork fabric is ready, begin sewing the blanket itself. The lining fabric is placed face down on the floor, padding polyester or other filler is laid out on it and covered with a patchwork layer. This entire “sandwich” is stitched around the perimeter.
Some needlewomen assemble the three layers in a different way.
Before placing the filling, they sew the lining to the bedspread on one side, then lay out the filling and cover it with the already fixed patchwork layer. It remains to sew three more sides of the product. This method is more reliable and requires fewer pins to secure the edges. At the last stage, the entire blanket is quilted with threads. If this is difficult to do on a sewing machine, you will have to work manually.
Edging and decoration
The edging is needed to hide the seams running along the perimeter of the blanket and to give it an aesthetic appearance. To do this, prepare an edging, the color of which may coincide with one of the shades involved in the patchwork fabric.
To perform edging, you should perform the following steps.
- Measure the perimeter of the blanket and add another 20 cm, this will be the length of the edging.
- The width of the tape is selected to taste. A popular size is 6-8 cm excluding allowances.
- The cut strips of fabric are sewn together at an angle of 45 degrees into one large strip.
- The edge is steamed and ironed.
- One side of the full length of the tape is sewn to the lining of the blanket.
- The second edge of the edging lies on the front side of the product.
The finished blanket can be decorated with appliqués, lace, braid, beads, and any decor that the needlewoman likes.
Sewing a bedspread: How to make a quilted pattern
It is very important to make an accurate calculation of the location of the pattern figures on the bedspread. They should be evenly located over the entire surface of the bedspread, without moving to any side. You may have to reduce or increase their sizes, but the shapes should start and end strictly from the edge. It is better to first carry out such a calculation on a sheet of paper in a reduced form, for example, on an unfolded piece of paper from a notebook in a box, and then make a life-size model of a rhombus or square and check how it fits on the back side of the fabric, having previously outlined the dimensions of the future bedspread with chalk .
However, this is not the most difficult thing. The most difficult part to mark is the stitch on the right side of the fabric. You can’t mark with chalk and you can’t use a pencil either, there is only one way left - manually quilting contrasting lines along which the stitching will be done on a machine. The most “advanced” way of applying markings to a bedspread is to buy special paper that sticks to the fabric and, when wet, is easily removed without leaving traces of glue, but it is still much “cleaner” and more reliable. Moreover, with the help of a basting you will prevent the top fabric of the bedspread from shrinking as much as possible, and at the same time fix the padding polyester and lining with the top.
It is ideal to make the finishing stitch along the wrong side of the bedspread, that is, along the lining. Then the entire fit will go to the lining, and the front side will be smooth without sags of fabric at the intersection of the stitching. But to make a bedspread stitch in this way you need a good eye and experience, so I don’t recommend this method. By the way, when making stitches, you need to try to tighten, or even more precisely, stretch all the layers of the bedspread, but not so much that the needles on the machine break. Don't make the checkered pattern or diamonds too small. The larger they are, the easier it will be to sew the bedspread neatly and evenly, and most importantly, it will be easier to cope with the fit of the fabric at the joints.
If you have finally finished quilting the bedspread, the shapes of the patterns and long lines are perfectly even, there are no sags at the joints and the dimensions of the bedspread are almost the same as they were at the beginning, then consider yourself a pro and sewing a frill along the edges of the bedspread is no longer a problem for you. The frill for the bedspread can be sewn separately, in the form of a bed skirt, but basically the frill is sewn to the bedspread and is a permanent part of it, which is largely justified. The non-removable frill makes it easier to process the edges of the bedspread. In addition, even, neat folds of the frill can hide stitch imperfections if your diamonds are far from geometric symmetry.
For the frill, you will again have to do a little calculation, namely how to position it and how much fabric will be needed for sewing, taking into account the number and size of the folds. There is hardly any point in buying an additional piece of fabric 5 meters long for a frill. Its length can be collected by extending the pieces left over from cutting the bedspread. The main task is to ensure that the strips being sewn are cut in one direction. Otherwise, each section of the frill of the bedspread will have its own shade and such a trifle can ruin the entire appearance of the bedspread. And yet, the connecting seams of the frill stripes should be “hidden” inside the fold, then they will not be visible.
The fold for the frill of the bedspread needs to be made wide; you should not skimp on this. A width of 10 cm is quite suitable, but you can experiment by making the folds narrower or wider, changing the pitch between the folds, the direction of the folds (counter), etc. How to sew a frill? There are a lot of ways, including sewing a frill with a double stitch, as shown in this photo.
Looking at the beautiful works of skilled craftswomen, sometimes you really want to update your bedroom at home so that your eyes light up! After all, every update of furniture or home decor brings freshness and bright joy into our lives.
Let’s take, for example, the same quilted bedspreads for a bedroom set. In the bedroom, this is the most important accented place where we take a break from the worries of the day.
Japanese psychologists have long noticed that the color of walls in offices, the appearance of interior design, bedroom decor and others are the strongest irritating factors. Therefore, they advise choosing individually suitable colors of fabrics and patterns for our psyche. It’s not enough to sew something, but to pay close attention to fabrics, their quality. If you wish, you can buy bed linen from our domestic manufacturers, without being afraid of counterfeiting and non-environmental friendliness. When you know where you can get such high-quality fabrics for sewing bed linen, the problem is almost solved. You can start sewing, dreaming of a future beautiful bedspread.
Inspiration and success to you, needlewomen!
It is not difficult to sew a bedspread with your own hands if it is in the form of a cover for a sofa or bed made of tapestry fabric. It is much more difficult to sew a quilted bedspread with padding made of padding polyester, and even with frills at the bottom of the bed.
In order for the bedspread to become the main decoration of the bedroom, we advise you to take your time and first understand the technology of sewing quilted products. This especially applies to those starting to learn to sew, since tailoring requires not only certain knowledge, but also experience. It is quite difficult to make a quilted pattern so that it is perfectly even without tightening, gathering or seating the fabric at the intersection of the seams.
If you have never sewn a bedspread, try sewing a small patchwork baby blanket and quilting it first. The main thing is to learn how to quilt diamonds or stripes evenly, without seating the top fabric. After this, you will cope with a more difficult task and will certainly be able to sew a beautiful bedspread for a bed or sofa with your own hands.
Results of the work performed: is there anything to be proud of?
If all the recommendations outlined today are implemented, then there will definitely be something to be proud of. The resulting blanket will not only be warm, but also beautiful. Well, with the right choice of filler, it will also become light. Here are examples of how this work should end.
PHOTO: YouTube.com Only one straight seam is visible on both sides of the edge
PHOTO: YouTube.com The patchwork quilt even looks warm, airy and light
Pattern
Having decided on the size of your quilt, you need to make a pattern from the purchased material. The first thing to consider is that there will be some shrinkage in the finished hand quilted product, as after the process the length will be reduced to 4 centimeters on each side. If you use binding for edging, there is no need to leave extra centimeters, but if such a technique is not in the plans, then about 5 centimeters on each side will be rolled up.
The insulation should be uniform, without lumps or tears.
So, if the standard size of a quilt is 220x200 centimeters, then for your pattern you will need to cut out 2 pieces 229x209. This is the case when using thin padding polyester, but if you put thick padding polyester or fluff inside, then the parts should be longer on each side by another 5 centimeters. The pattern of a quilt for a child will look different, since in this case you should start from the dimensions of the crib.
When the parts for the base are cut out, the filler is cut out. Let's consider the simplest option - padding polyester. Measure out the required length and width and cut with ordinary scissors. The insulation should be uniform, without lumps or tears.
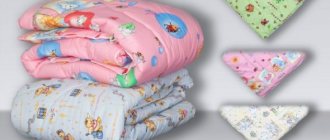
What should a baby blanket be like?
Before choosing materials and sewing, let's figure out what a baby blanket should be like.
Necessary requirements:
- compliance of the product with the season and temperature in the room where the child sleeps: if you choose the wrong blanket, the child may overheat, which can lead to heat rash and poor health, or freeze,
- a suitable size for the child: a product that is too small will not be able to warm the child, it will be uncomfortable for him, since with almost any movement the blanket will slide off, and too large will interfere with the baby’s free movements,
- light weight: a product that is too heavy can make it difficult for the child to breathe and disturb his sleep,
- lack of decorative elements: the child may get entangled in them or damage the skin.
Based on the standard ratio of height and weight of children from birth to 17 years old, you can determine whether increases or decreases are needed when sewing.
I bought my son a couple of blankets measuring 80x80 centimeters for his birth, he slept under them until he was almost two years old, despite the fact that he is very tall for children of his age. Later we bought a blanket 110x150, I think it will last him until he is about four years old. Therefore, in my opinion, all these standard sizes are quite subjective.
Before using the blanket, make sure that there are no threads sticking out anywhere! The baby may cut himself on them.
If the blanket meets all the listed requirements, you can rest assured that your baby will be safe and sleep well.
Table: standard sizes of children's blankets
| Infants (0–1 year) | 80x80 100x135 150x110 |
| Children from 1 year to 12 years | 100x140 120x150 |
| Teenagers 13–17 years old (one and a half years old) | 145x210 160x220 |
What fabrics are best to make a bedspread from and can they be combined?
The choice of material, as well as the model of the blanket, is a matter of taste. Some housewives give preference exclusively to natural fabrics, others gravitate towards synthetic materials for the ease of caring for products made from them, others love solemnity in everything and prefer silk or satin. Fans of original solutions will certainly be interested in the possibility of sewing a faux fur blanket.
When choosing a material, you need to take into account the stylistic decision that was used in the bedroom interior. In a room designed in a minimalist style, a satin bedspread or tapestry will seem like a foreign object, but such products, on the contrary, will fit perfectly into a room in the rococo style.
When choosing fabric for sewing a quilt, you need to take into account the financial component of the problem. To save on fabric purchases, it is recommended to pay attention to leftover curtain fabrics, which are often sold at low prices.
When choosing a material, you need to consider a number of recommendations:
- give preference to easy-to-care and non-staining types of fabric;
- inexperienced needlewomen should not use capricious velvet, velor, chiffon and linen, dense furniture materials (jacquard, upholstery, mats);
- To make a bedspread for a children's bed, it is better to use flannel, calico or baize.
Sewing a combined blanket is a convenient and original solution for a room. When two or more types of fabric are combined, the product turns out to be unusual and elegant. However, if you have insufficient experience with a sewing machine, it is not recommended to combine fabrics of different textures and densities, since sewing them requires certain skills.
Sewing technique
The step-by-step sewing process consists of the following steps:
- Wet, dry and iron the fabric to avoid shrinkage.
- Lay the prepared textile on a flat surface, smooth it out and pin the pattern. Before starting to cut, take into account seam allowances.
- Fold both parts of the product (top and bottom) right sides inward.
- Sew the top and bottom fabric from the inside out, leaving one side unstitched. Turn inside out and press seams.
- Prepare padding polyester and cut it according to the pattern. There can be several layers, it all depends on how warm the resulting product should be.
- Place padding polyester filling into the resulting opening (like a duvet cover) and carefully straighten it so that there are no folds or creases.
- Secure the filler by sweeping it away by hand or secure it with safety pins, counting their number so that when you subsequently remove none of them remain.
- Sew three sides of the future blanket, indenting from the edge, for example, 10 cm.
- Fold the edges of the unstitched side inward, iron it, manually stitch it with a blind seam, and then sew a line on a sewing machine, retreating 10 cm from the edge.
- To make the product quilted and the filling to remain uniform during washing, lay the lines, choosing patterns at your discretion (squares, other geometric shapes, flowers, waves, etc.).
The blanket turns out to be light and warm, it can be used to cover a child in a crib or take it in a stroller outside.
Choosing a color
The color of the material should match the style of the bedroom, its lighting, dimensions, as well as the seasonality of the product itself.
In small rooms, the bed should not be too bright, so it is better to choose fabric in the same color scheme as the rest of the textiles. Brightness and play are appropriate in spacious apartments designed in a classic style. Bedspreads in warm and light colors are ideal for dark bedrooms, and any color for light ones.
It must be remembered that a warm palette fills the space with coolness, creates the illusion of its enlargement and makes it more comfortable. Bright, dark and rich shades allow you to make an accent. This means that a bed with such a bedspread will stand out against the background of other furniture and decor.