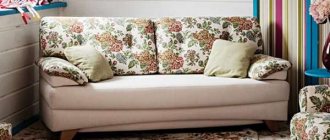
Embroidery in the carpet technique is fluffy; the embroidered motif resembles a soft carpet.
Handicrafts do not require complex tools or expensive materials, the process goes quickly, and the end result is always a unique and unusual piece of work. Creating your own little masterpiece is not at all difficult. You don't need to have unique talents to turn ordinary yarn into a fluffy picture. Even children can handle simple drawings, not to mention skilled craftswomen. Learn the theory and try it in practice!
- Types of carpet embroidery
- The essence of knot embroidery
- Embroidery using loop technique
- Useful tips
- Materials and tools for needlework
- Needles and hooks
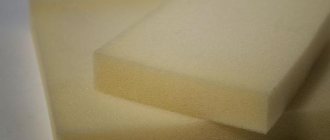
- Base material
- Suitable embroidery threads
- Application of carpet embroidery
Features of the technology
For beginners, carpet embroidery with a needle may seem complicated, but if you purchase a special set with a needle and even patterns for carpet embroidery, then you will have all the items, instructions, tools, and threads at hand.
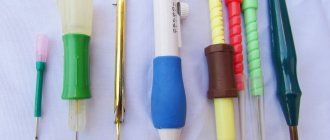
Needles for carpet embroidery.
There are several ways to embroider using carpet techniques.
- Coloring - take a mesh and attach short threads (about 5 cm) to it.
- Carpet embroidery with a needle or crochet - both tools are suitable for creating beautiful things. The threads are secured to the front surface, resulting in a fuzzy, voluminous appearance. Burlap or mesh is used as a base. The first is suitable for sewing small items - carpets, paintings.
- Creating tapestries is a simple process, comparable to cross stitch or satin stitch.
Note! Do not confuse weaving tapestries with creating using carpet techniques.
For weaving, a loom is used, and for embroidery in carpet technology, a hook or needle is used.
A beautiful shape and design can be made using a crochet hook.
Products, for example, handmade carpets, are sewn with a special needle. It looks like a regular one, only the ear is slightly beveled and a handle is attached for ease of use. The needle for sewing in carpet technology has a lock that allows you to make loops of ideally equal length - the pattern comes out even. The technique is simple, but time-consuming.
A needle for carpet embroidery has the shape of a tube with a cut eye, into which the thread is threaded.
Important! Use a hoop or a special frame - the needle must pass through the base.
It’s quite easy to find a pattern for crocheting carpet embroidery; you don’t even need to buy it – you’ll find everything on the Internet.
Embroidery patterns can be purchased at a special store.
Where to get the diagrams
Any designs can be used for carpet embroidery. You can draw a diagram yourself or use children's coloring books. Cross stitch patterns, where each cell corresponds to a loop or knot, are very suitable for this purpose. It is best to select pictures without small details.
Abstract geometric shapes or simple patterns look good. Even the stripes look beautiful, because they gain volume and softness.
Carpet embroidery for beginners is an opportunity to spend time profitably, use thread trimmings and create a unique thing that will decorate your interior.
Kinds
There are 2 main methods.
- Creating a pattern of loops using long threads. The technique is called looped or non-woven tapestry.
- Tying knots using short threads (5cm) - Called knotting.
Note! Experienced craftswomen advise purchasing an embroidery kit using the chosen technique. It contains everything you need to create a product. For beginning craftswomen, carpet weaving using a printed pattern is much more convenient and easier to understand.
The set includes not only tools and threads, but also a base with a printed pattern.
Let's look in more detail at what is needed to create voluminous embroidery using carpet technique, what is the process for knotting and looping techniques, and other nuances.
Looped
You will need a compacted fabric or mesh. Use natural or synthetic embroidery threads. If you want a more voluminous weave, take a thicker thread.
Use a special needle for carpet embroidery.
Work begins by transferring the drawing with a marker onto the base. Transferred with tracing paper. Fabric tension is required - use a hoop or a special frame. They embroider from the inside out, and the pattern is applied there. The frequency of the stitches creates the pattern - the denser they are, the more voluminous the picture.
The base itself needs to be pulled well onto the frame, because the needle can pierce the fabric during operation.
On the Internet you can find drawings and instructions for embroidering a rug on a mesh. This technique is believed to help create tapestries. On the Internet you will find diagrams of carpet techniques for embroidered tapestries.
The surface of the embroidery in this case turns out to be soft and fluffy, one might say “carpet-like”, since the design itself is obtained due to the loose threads released. .
Nodular
The ideal material is sets of acrylic threads of medium thickness.
The peculiarity of carpet embroidery using the knotting technique lies in the yarn. Use cut pieces of thread, five centimeters long.
It is noteworthy that the pattern in the carpet technique can be used for cross stitching.
The base is rigid, Stramin is ideal.
Instead of a needle, a special hook is used for embroidering carpets. You are allowed to take a crochet hook, but it is not very convenient and only experienced craftsmen know how to use it. It is advisable to buy a special hook.
Professional needlewomen use a hook with a moving lock.
Elements are created from the outline to the middle. First, the contour is filled in, the center is painted over using a circular or linear technique. You need to fold a piece of thread in half and put it on a hook. The hook pierces the base, the ends of the thread are held, then grabbed with the hook. The hook snaps into place and pulls the thread onto the front surface, while simultaneously being pulled into a knot.
Using a hook, a strong knot is created on the wrong side and random threads on the front.
Patterns for creating a crocheted carpet can be found online. A simple cross stitch pattern will do.
Embroidering correctly
For embroidery, it is possible to use leftover yarn or thread that the needlewoman has left over from other projects.
The work is done on the wrong side of the base, and on the front you will get loops with pile. Therefore, to facilitate the process, it is recommended to make color markings before starting work.
The base must be very well secured and tensioned, since when piercing with a needle, the tightness of the tension is important.
The embroidery process must begin by “drawing” the outline of the image. Then you can fill in the space in the outline, do small details and you can start filling in the background. When working, hold the needle with the beveled edge up.
The seams in this technique are quite simple, their execution is accessible even to novice craftsmen. Each detail of the drawing is performed separately; it must be filled in moving from the edge to the middle.
To simplify the embroidery process, you need to move from right to left when working, and keep the needle in a vertical position. This will help prevent the needle from damaging the loops and pulling them out. If done correctly and carefully, the pile will not need to be leveled.
Carpet embroidery needle
You can find a DIY embroidery needle at a craft store.
Carpet, a special needle allows you to quickly apply stitches. It has a comfortable handle, the tip is cut off, and there is an eyelet inside. Needles come in different thicknesses for thick and thin threads. Using a carpet needle is very simple.
Thread the yarn through the hole and pierce the canvas with a needle. Using a carpet needle comes down to these two steps.
Main seams
The basic rule for carpet stitching is that the threads must be stretched tightly and evenly. The most common and simplest seam is a cross stitch. It serves as the basis for the carpet seam. You need to start from the first half of the cross, moving from left to right, evenly stitching. The second half of the cross is also done with crosses, only the direction changes: from right to left. They should cover the stitches of the first half.
The second type of seam is elongated. The working thread should pass through two horizontal and one vertical threads of the canvas. All rows must follow this order: the working thread is laid in the direction of the seam from right to left. Covered with the first row from left to right, and back in the same order.
Ready product
A half-cross stitch is made with a thin thread. The canvas should be thicker than thread. The working thread is carried in a straight direction from right to left, without stitches. A semi-cross is made on top of it in the direction from left to right.
When embroidering with a straight tapestry stitch, you must not forget about the oblique tapestry stitch. There are two methods of embroidering with a straight tapestry stitch.
Carpet embroidery is not limited to just these stitches, there are many different stitches, but basically all masters use only these.
Hook for carpet weaving
It resembles a crochet hook, but differs in a special movable lock slightly closer to the tip. If an ordinary hook has a straight metal rod, then for carpet weaving it is characterized by a curved shape. There is a comfortable handle.
Specialized hook for making carpet embroidery.
Carpet technique: looped
You will need a needle for embroidery using the carpet technique described above, canvas, scissors, and a hoop (frame). Choose a beautiful pattern online or buy it in a specialty store.
Each loop is made with a simple precise movement of the needle: from the inside to the front side.
Selecting and drawing a picture
Select a carpet needle embroidery pattern and print it out. Using carbon paper, apply a pattern to the canvas - attach the carbon paper to the canvas, place the picture on top. Use a pencil to follow the contours and it will be imprinted on the base.
The frequency of stitches depends on how dense and voluminous you want to make your embroidery.
Where to start
Immediately after applying the pattern, the craftsman threads the thread through the eye of the needle and places the fabric in the hoop. In the future, you need to pierce the canvas at the same distance with the selected shades of thread.
First the outline is filled, then the middle.
When the thread runs out or you need to change the color, bring the thread to the wrong side, cut it, and secure it with a knot. Next, thread the new material into the eyelet and sew.
Hold the needle perpendicular to the fabric, make a puncture, then remove the needle a little. Make an indent of a few millimeters, stick the tool in again, and work according to the same carpet technique for rugs.
After filling the weave, you need to bring the product into decent condition. Remove the canvas from the hoop, fill a basin with warm water, and add mild (preferably sulfate-free) shampoo. Rinse the product carefully.
Place on a towel and wait to dry. Smooth out the creases a little with an iron.
The carpet technique does not require clear and huge outlines of the pattern, but unlike the technique using a needle, it allows you to work better with color combinations of threads.
Operating procedure
When getting started, the first thing you need to do is pull the selected fabric onto the hoop. In the process you need to follow some recommendations:
- the position of the needle should be perpendicular to the fabric;
- To avoid tangling of knots, it is necessary that the thread that comes out of the holder is located behind the hand.
- you need to lift and thread the needle very carefully until the tip of the needle is visible;
- the distance between the previous and the present stitch must be at least 1 mm;
- after 7-8 stitches, if the thread gets in the way, it needs to be cut off;
You might be interested in what a tapestry stitch is: how to embroider for beginners
Important! From the drawing you can understand whether everything is being done correctly. If the stitches are visible on the wrong side, and a pattern is obtained on the front side, then the work is being done correctly.
When choosing a complex textured pattern, you must first frame it. Then, taking the desired yarn, fill in the satin stitch of the pattern. It can be filled using a linear or circular method. Or you can combine these two methods.
Needle embroidery for beginners is not difficult to perform, but in order to avoid mistakes, you must follow the following rules:
- The stitches should be placed at the same distance from each other, not too close and not too far;
- In order for the boundaries to be clearly traced, you need to apply stitches on the inside of the pattern;
- To change the direction of movement of the needle, it does not need to be removed from the fabric. It is the canvas itself that turns, not the needle;
- make sure that no knots appear on the thread, so that you don’t have to unravel the work done;
- Constantly pay attention to the front side of the design to see whether the design is applied evenly. For beginning craftsmen, the first rows may turn out uneven, but there is nothing to worry about.
Drawing on the track
Having finished embroidering the canvas, you need to carry out the finishing work. The fabric needs to be washed by diluting the shampoo in warm water, then allowed to dry, having first laid it out on a flat surface. If, as a result of drying, the product becomes wrinkled, you can iron it a little.
Knot embroidery
The design must be applied on a special fabric - Stramin. Stramin is a dense tissue with large cells.
The first step is to draw squares consisting of 10 cells on the fabric. Prepare the yarn by first cutting it into pieces of a certain length. To make the pile longer, you need to take a long thread.
It is necessary to apply the design and embroider on the wrong side. The work is carried out in several stages:
- Fold a piece of yarn in half. Pull the resulting loop through the mesh using a hook;
- The ends of the thread are held with a finger, and then hooked and pulled through the net;
- The knots should be tightened tightly so that they are securely held on the mesh;
- Fill out the entire drawing using the same method;
- When the drawing is completed, turn the fabric over to the right side and trim off any irregularities.
Beginners may think that carpet embroidery is very difficult, but this is not so. There are basic seams that are very easy to make: half-cross, cross, long oblique tapestry, oblique tapestry and elongated cross.
To make it easier for a beginner, you can start with a simple drawing. You can buy it in a store or download it from the Internet. There are forums for craftswomen who often post their work there.
For beginning craftsmen, there are special ready-made kits. The main task for a beginner will be to choose a good canvas.
You might be interested in this Step-by-step tutorial for creating Brazilian embroidery for beginners
But it is worth remembering that the first works may not always turn out perfect, but over time, experience will come and the work will become much better.
Knot embroidery: master class
The kit can be found in the store; it will contain all the necessary tools, even instructions.
You will need a rigid base (stramin), a hook, chopped yarn, and a carpet needle embroidery pattern for beginners.
Operating procedure
Using the hook is quite easy, you just need to get used to it. Place the hook under the mesh, thread a doubled thread through the hook, pull the hook slightly towards you - the lock will snap into place.
Move the hook forward a little - the lock will open, insert the thread and pull it back. The loop will be tied, and the ends will be pulled towards you to secure the loop. The two ends of the thread will stick out from the front side, creating a fluffy weave.
Fill in the outline first, then the middle of the drawing. At the end of the work, if you find any unevenness, level them.
We recommend starting the embroidery process from the bottom left row, leaving no free space.
Main seams
For beginners, embroidery using carpet technique will seem too complicated, however, this is a misconception. There are five stitches that can be used.
- Cross.
- Half cross.
- Elongated cross.
- Oblique tapestry.
- Long oblique tapestry.
Using the tapestry technique, the painting is warm and soft to the touch. This product will become a real decoration for your home.
Where to get the diagrams
To create a rug using a special needle, you need to find a beautiful, simple weave, where the details are visible and understandable, and there are no small elements. You can buy it in a store, but it’s quite possible to find it on the Internet and just print it out.
There are forums for craftswomen who know how to embroider using this technique; they can post easy patterns using carpet needle embroidery techniques for beginners.
This hobby will allow you not only to while away your free time, but also to create exclusive things that will fit perfectly into your interior.
Little tricks
First, the small details of the drawing are completed, then the larger ones. The last step is to fill in the background.
The length of the loop can be changed during operation. This will create relief and volume. But the entire fragment must have the same loop height. For example, the grass at the foot of the mountains in the picture, or the ears of a puppy.
If there are missing loops in some areas, you can insert a thread into the needle and always come back and refine the gaps.
It is advisable to make a contour or straight lines in two parallel rows. This way they will look clearer and won’t get lost in the general background.